Microsoft released several Security Updates (SUs) for Microsoft Exchange Server to address vulnerabilities. Due to…
Configure autodiscover URL in Exchange with PowerShell
So you like to configure the autodiscover URL in Exchange Server with PowerShell. The best practice is to have it point to autodiscover.company.com. In one of the previous articles, we discussed how to Find autodiscover URL in Exchange with PowerShell. If you like to get the current server URLs, read the article Find Exchange Server URLs with PowerShell.
Note: The internal autodiscover can only be set with Exchange Management Shell. There is no option to configure internal autodiscover in Exchange Admin Center.
Table of contents
Check third-party certificate
Ensure that you have a third-party certificate installed in Exchange Server before you proceed further:
- How to create certificate in Exchange Server
- Install FREE Let’s Encrypt certificate in Exchange Server
Note: If no third-party certificate is configured in Exchange Server that covers the autodiscover URL, and you change the autodiscover URL, users will get a certificate warning in Outlook.
Get autodiscover URL
Let’s get the autodiscover URL on the Exchange Servers that we want to change. Run Exchange Management Shell as administrator and run the Get-ClientAccessServer cmdlet.
[PS] C:\>Get-ClientAccessServer | Select Identity, AutoDiscoverServiceInternalUri, AutoDiscoverSiteScope | Format-List


Identity                       : EX01-2016
AutoDiscoverServiceInternalUri : https://ex01-2016.exoip.local/Autodiscover/Autodiscover.xml
AutoDiscoverSiteScope          : {HeadOffice}

Identity                       : EX02-2016
AutoDiscoverServiceInternalUri : https://ex02-2016.exoip.local/Autodiscover/Autodiscover.xml
AutoDiscoverSiteScope          : {BranchOffice}
Now that we have the output, we can proceed further. We like to change the autodiscover URL on both the Exchange Servers EX01 and EX02.
Configure autodiscover URL
Configure autodiscover on both the Exchange Servers with Set-ClientAccessServer cmdlet. After that, restart IIS with the command iisreset.
[PS] C:\>Set-ClientAccessServer -Identity "EX01-2016" -AutodiscoverServiceInternalUri https://autodiscover.exoip.com/Autodiscover/Autodiscover.xml

[PS] C:\>Set-ClientAccessServer -Identity "EX02-2016" -AutodiscoverServiceInternalUri https://autodiscover.exoip.com/Autodiscover/Autodiscover.xml

[PS] C:\>iisreset

Attempting stop...
Internet services successfully stopped
Attempting start...
Internet services successfully restarted
The difference between iisreset and issreset /noforce command.
The /noforce parameter is recommended as a safeguard against data loss in case the IIS services cannot all be stopped within the one minute timeout period. If you are certain that it is safe to force IIS to restart, you can omit the /noforce parameter. In addition, if you are logged on locally, the computername parameter is not required. If you are administering an IIS server remotely, the computername parameter is the NetBIOS name of the computer on which you wish to restart IIS.
Verify autodiscover URL
Verify the result after the autodiscover change and that everything looks good.
[PS] C:\>Get-ClientAccessServer | Select Identity, AutoDiscoverServiceInternalUri, AutoDiscoverSiteScope | Format-List


Identity                       : EX01-2016
AutoDiscoverServiceInternalUri : https://autodiscover.exoip.com/Autodiscover/Autodiscover.xml
AutoDiscoverSiteScope          : {HeadOffice}

Identity                       : EX02-2016
AutoDiscoverServiceInternalUri : https:/autodiscover.exoip.com/Autodiscover/Autodiscover.xml
AutoDiscoverSiteScope          : {BranchOffice}
Add CNAME record
There are different scenarios on how to add and point the autodiscover CNAME record:
- Round-robin DNS: Add two CNAME records in the internal DNS server for autodiscover.exoip.com. Pointing to both the Exchange Servers EX01-2016 and EX02-2016. Assuming that both the Exchange Servers are the Client Access Servers (CAS).
- Load Balancer: Create a VIP on the load balancer. Pointing to both the Exchange Servers EX01-2016 and EX02-2016. Assuming that both the Exchange Servers are the Client Access Servers (CAS). Add a CNAME record in the internal DNS server for autodiscover.exoip.com. Pointing to the load balancer.
Verify autodiscover in Outlook
To verify autodiscover service works with Outlook, follow these steps:
- Start Outlook
- Hold down the CTRL key and right-click on the Outlook icon in the system tray
- Select Test Email AutoConfiguration
- Fill in the email address
- Check the checkbox Use AutoDiscover
- Uncheck the checkboxes Use Guessmart and Secure Guessmart Authentication
- Click on Test
- Select the tab Log
- Verify the result Succeeded (0x00000000)
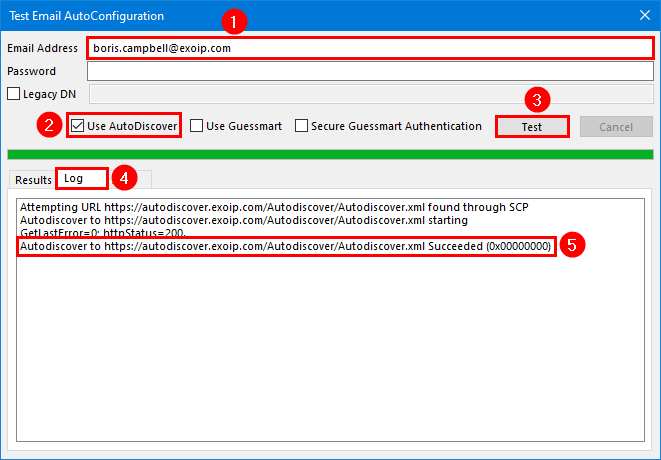
Everything looks great!
Read more: Configure Internal and External URL in Exchange »
Conclusion
You learned how to configure autodiscover URL in Exchange. It’s only possible to configure the internal autodiscover with Exchange Management Shell/PowerShell. First, check how the autodiscover URL is configured on the Exchange Server. The second step is to change the autodiscover and reset IIS after the change. Finally, remember to add a CNAME record.
Did you enjoy this article? You may also like Configure pagefile in Exchange Server. Don’t forget to follow us and share this article.
What Others Are Reading

I am a bit stuck i have migrated exchange 2010 to exchange 2016
I have installed the cert wild card
but when users first connect to outlook they still get the old exchange server cert warning.
when i run Get-ClientAccessServer | fl Name,AutoDiscoverServiceInternalUri
I get 2 servers the old and the new how do i stop this from happening,
and is this the reason why after migration when I stopped the transport service Distribution group stopped receiving emails
Great post ….small doubt from my side, what about certificate, dont we need certificate?
It’s certainly important to have a third-party certificate. I have updated the article.
This is the best tutorial I saw on the internet about the Exchange. No words bro. everything is 100% accurate. Keep it up and thanks.
Glad to hear, Shashika.