I am upgrading Exchange 2016 CU3 to Exchange 2016 CU9. Updates for Exchange Servers are…
Configure external DNS for Exchange
After installing Exchange Server, the next step is to configure external DNS for Exchange. It’s important to keep the same namespace internal and external. We will sign in to the public DNS and create the records for Exchange Server. In this article, you will learn how to configure external DNS for Exchange Server.
Table of contents
Information Public DNS Exchange
Important: Read the article Exchange namespace design and planning before going further.
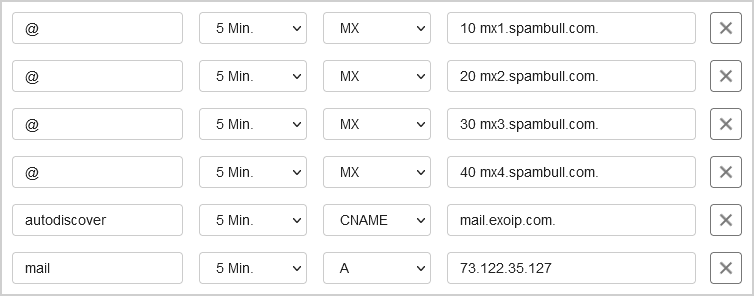
There are three records types that we will add to the public DNS. About the values, you should only enter an IP address for the A record. The MX record is the spam filter, and the CNAME (alias) should point to the DNS name of the A record for the Exchange server. If your IP address changed due to changing Internet Service Providers, you would only need to update the A record.
Note: Always use a spam filter to protect your Exchange Server organization from incoming and outgoing spam. The one we recommend is the SpamBull cloud spam filter.
| Record Type | TTL | DNS Name | Priority | Value |
|---|---|---|---|---|
| A | 300 | mail.exoip.com | 73.122.35.127 | |
| CNAME | 300 | autodiscover.exoip.com | mail.exoip.com. | |
| MX | 300 | @ | 10 | mx1.spambull.com. |
| MX | 300 | @ | 20 | mx2.spambull.com. |
| MX | 300 | @ | 30 | mx3.spambull.com. |
| MX | 300 | @ | 40 | mx4.spambull.com. |
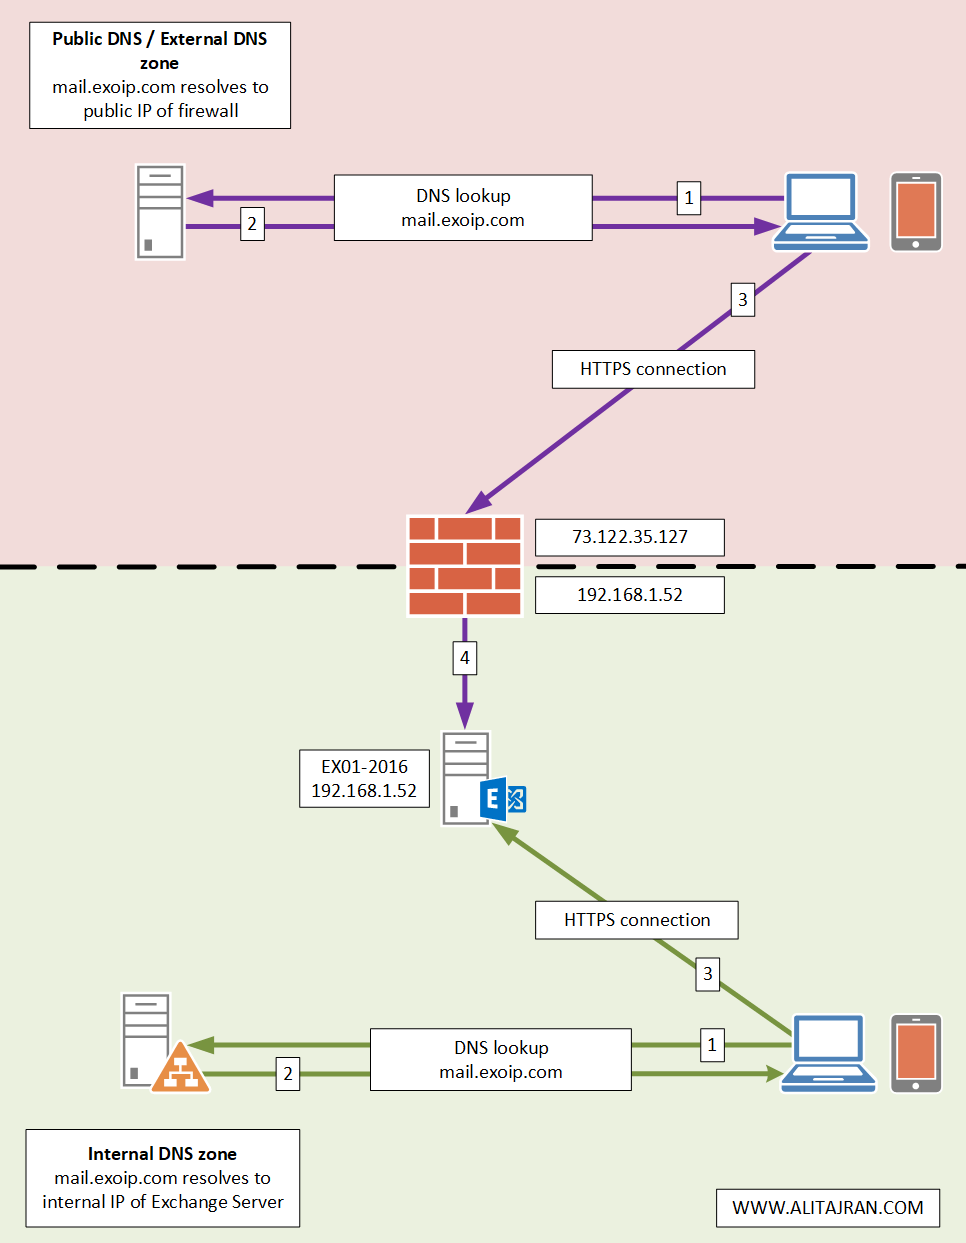
An architecture view of the Exchange namespace is shown below in the diagram.
Create Public DNS records
Sign in to your external DNS registrar. Configure the records.
Check the Public DNS records
Let’s run the Resolve-DnsName cmdlet to verify the:
- MX record
- A record
- Autodiscover record
Run PowerShell as administrator. Run the Resolve-DnsName cmdlet and the -Server parameter. The -Server parameter will resolve the name against the Google DNS servers. We can check the Public DNS records on the LAN or any external network.
Note: Don’t immediately resolve the external DNS records, as that will not work. The servers around the world have not reflected the changes. Give it a maximum of an hour as the DNS propagation will need time.
Check MX record
Verify the MX record.
PS C:\> Resolve-DnsName -Type MX exoip.com -Server 8.8.8.8 | Format-Table -AutoSize

Name      Type TTL Section NameExchange     Preference
----      ---- --- ------- ------------     ----------
exoip.com MX   300 Answer  mx1.spambull.com 10
exoip.com MX   300 Answer  mx2.spambull.com 20
exoip.com MX   300 Answer  mx3.spambull.com 30
exoip.com MX   300 Answer  mx4.spambull.com 40
Check A record
Let’s have a look at the public A record.
PS C:\> Resolve-DnsName -Type A mail.exoip.com -Server 8.8.8.8 | Format-Table -AutoSize

Name           Type TTL Section IPAddress
----           ---- --- ------- ---------
mail.exoip.com A    300 Answer  73.122.35.127
Check autodiscover record
As of last, let’s check the public autodiscover record.
PS C:\> Resolve-DnsName -Type TXT autodiscover.exoip.com -Server 8.8.8.8 | Format-Table -AutoSize

Name                   Type  TTL Section NameHost
----                   ----  --- ------- --------
autodiscover.exoip.com CNAME 300 Answer  mail.exoip.com
Conclusion
You learned how to configure External DNS for Exchange Server. Add the three records to your public DNS and verify that you can resolve the external DNS records. Don’t forget that it can take a little time before you can resolve the DNS.
Did you enjoy this article? You may also like Configure internal DNS for Exchange. Don’t forget to follow us and share this article.
Hi Ali, for dual isp (failover and ha), how would you setup the records?
Could you also show the DNS settings for HA with multiple sites? Thank you for a great and informative site!