How to download OneDrive template files (ADMX/ADML)? You want to ensure that all the OneDrive…
Create Active Directory Users from CSV with PowerShell
We want to create new Active Directory users in the organization. We can use the user creation wizard in Active Directory Users and Computers to create the users. What if you need to create 1000+ users? Doing it by the wizard will take a lot of time. In this article, you will learn how to create Active Directory Users from CSV with PowerShell.
Table of contents
Before you start to create Active Directory Users from CSV file
Let’s say you need one minute to create a new user with the wizard. It will take one minute for every user. What if you have to add a thousand new users? Do the math, 1000 users * 1 minute = 1000 minutes. That is approximately 16 hours. A bit too much time to spend on creating new users, right? What if you can simplify the process and do it much faster in time.
In the article, we are going to use the following files:
| File | Info |
|---|---|
| NewUsersSent.csv | The spreadsheet template that we sent to HR |
| NewUsersReceived.csv | The spreadsheet that we received from HR |
| NewUsersFinal.csv | The updated final version to import |
| Add-NewUsers.ps1 | The PowerShell script that will create the user accounts |
Create the CSV template
First, we need to make sure that we have a list of all the thousand users we need to create. The most important information we need is the first name and last name. We suggest to create a CSV file and send it to a user in the company.
We are going to send the CSV file to Jane. Jane works in the HR department at the company called EXOIP. She has information regarding the thousand users who need a new AD user account. The CSV file that we sent to Jane is NewUsersSent.csv. Jane will fill in the data, just like discussed, and send the CSV file back to us.
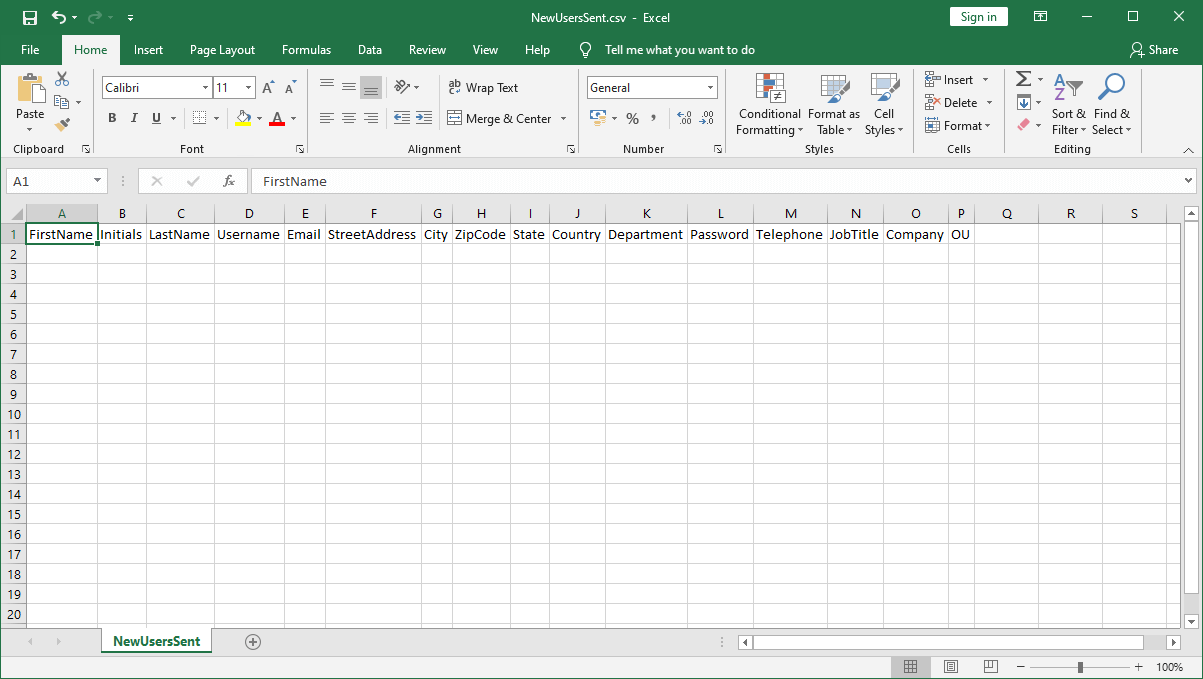
We told Jane to put as much information as possible in the fields. If she can’t fill all the fields, there is nothing to worry about. The most important is the First name and Last name. We also told her to leave the Password and OU field empty. Why did we tell her that?
- Password field, leaving it empty because the IT department will create the passwords. Even if it’s a temporary password. When the user logs in, a prompt will show up to change the password.
- OU field, leaving it empty because the IT department will fill in the Organizational Unit (OU). That’s where the new Active Directory (AD) Users are going to be created.
Edit the CSV file
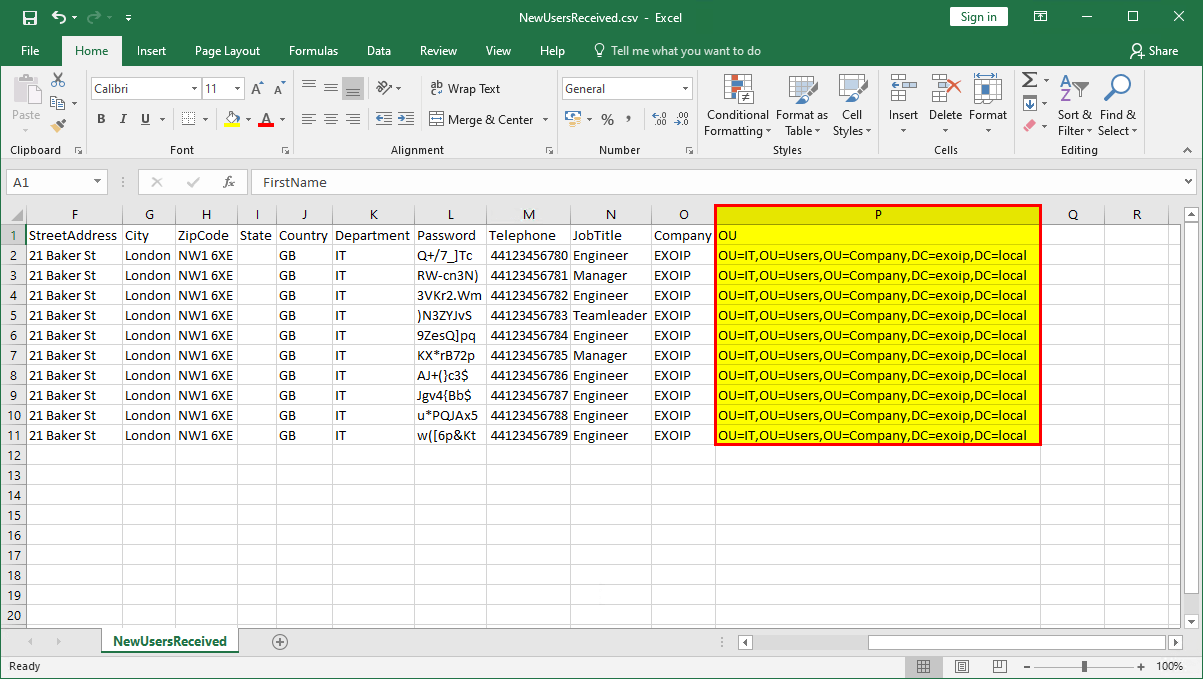
Jane sent the CSV file back with all the information. Let’s open the NewUsersReceived.csv file and have a look.
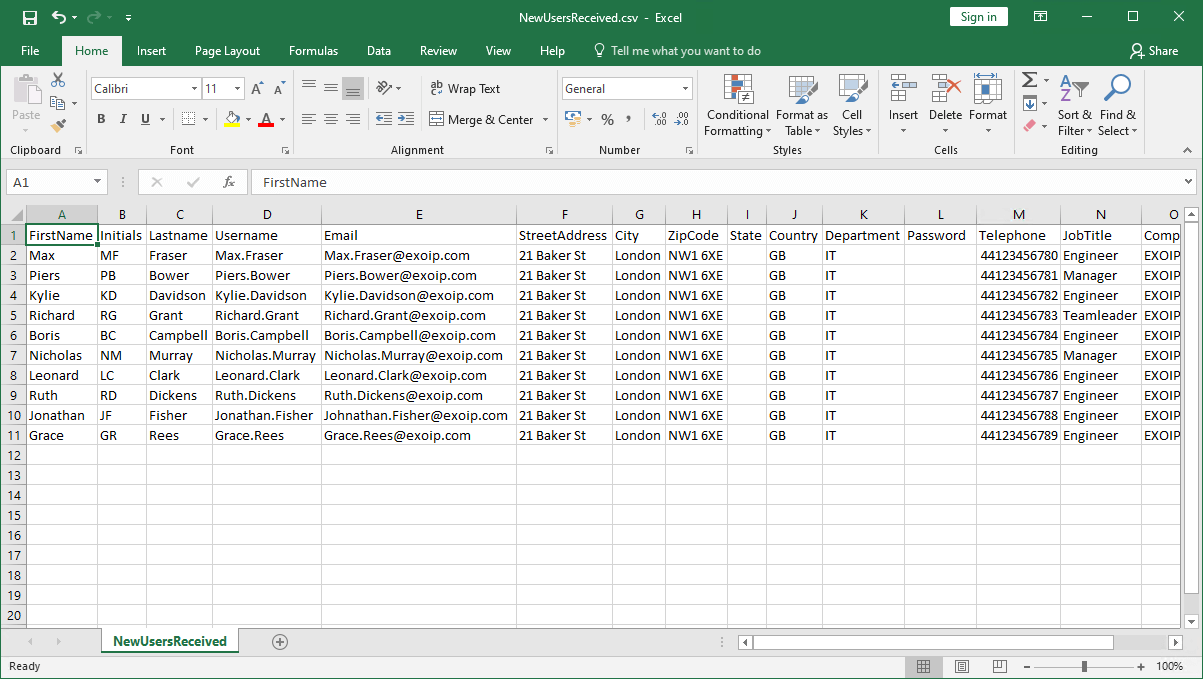
All is looking great. Jane did fill all the information that we need.
Note: Find your country code in the Active Directory country code list.
Generate passwords
Generate passwords for the users and fill in the password fields for every user. I recommend generating passwords with Manytools password generator. You can create a maximum of 9999 passwords at one time. After that, copy and paste the passwords in the column Password.

Fill in the Organization Unit (OU)
Start Active Directory Users and Computers (ADUC) and make sure to enable Advanced Features. Click the menu View and click Advanced Features. Now that Advanced Features is enabled, we can proceed further and create the OU in AD.
We can see in the CSV file that the users will work in the IT department. So, we will create an OU in Active Directory with the name IT.
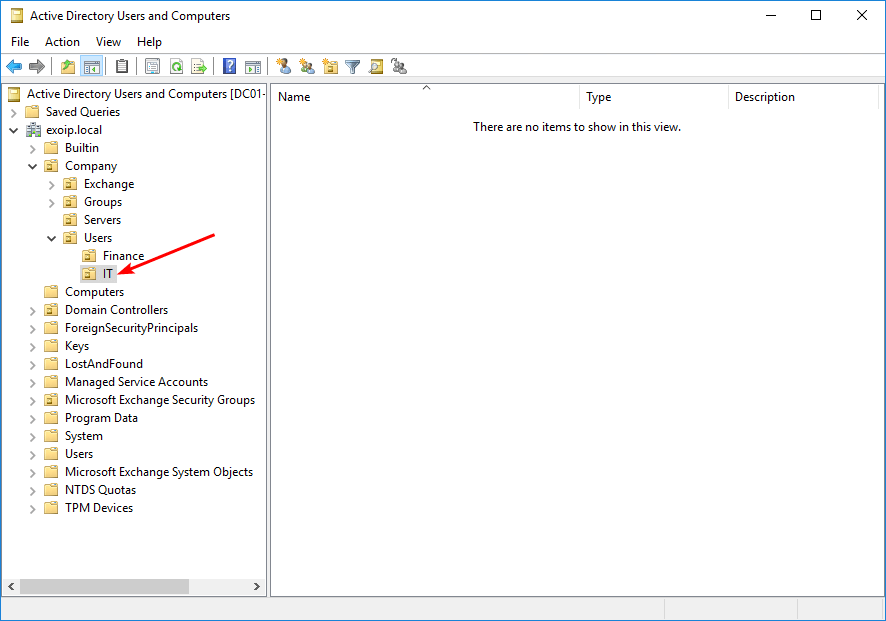
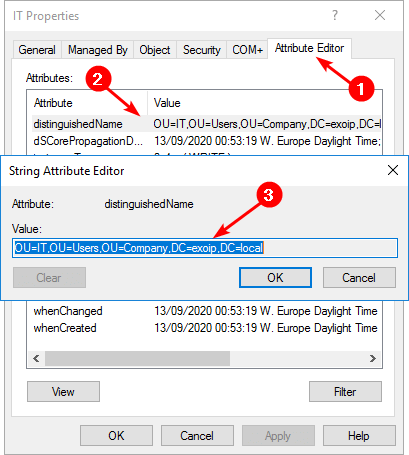
Right-click the OU with the name IT and click Properties. Click the tab Attribute Editor. Find the attribute distinguishedName. Double-click on it and copy the value.
The value in my example is OU=IT,OU=Users,OU=Company,DC=exoip,DC=local.
Place the value in the fields under the column OU.
When done, save it as a new CSV file. Go to File and click Save As. Give it the file name NewUsersFinal.csv. Save it as type CSV UTF-8 (Comma delimited) (*.csv). Click the button Save.
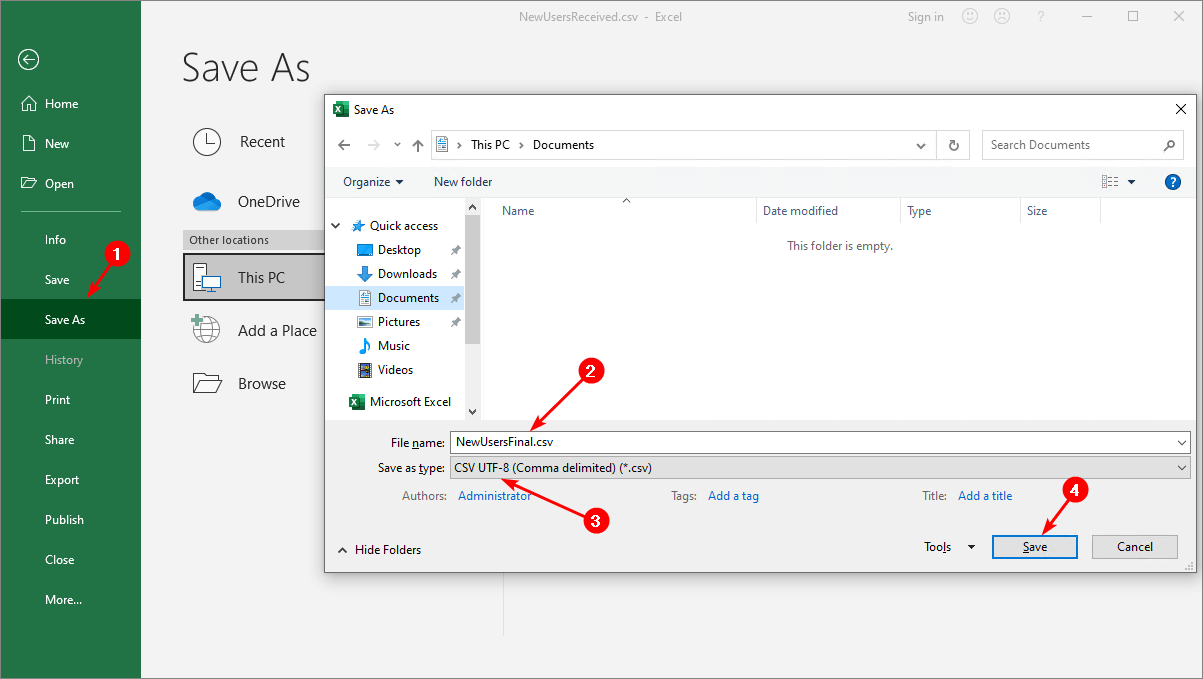
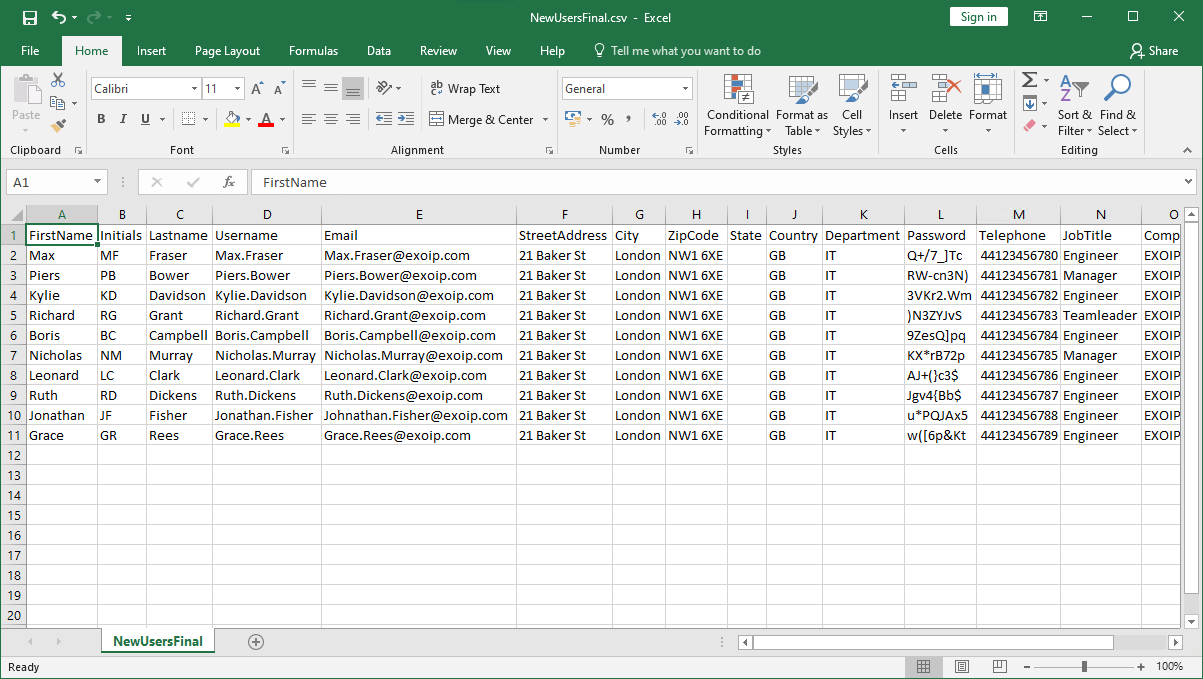
The NewUsersFinal.csv is created.
Place the NewUsersFinal.csv in the C:\Temp folder on the Domain Controller or the Management Server.
Check the CSV file
Before using the script, import the CSV file in PowerShell. It’s an excellent way to check if it’s readable and if you’re all set.
Good to know about delimiter
Is the delimiter showing as a comma or semicolon in the CSV file? You need to know that before you are going to use the PowerShell script in the next step. If you use the semicolon as a separating character in your CSV file, add the delimiter parameter -Delimiter “;” to your Import-Csv cmdlet.
Run PowerShell as administrator. Use the Import-Csv cmdlet to read the CSV file. If it can’t read the CSV file, remove the -Delimiter parameter. It will be Import-Csv “C:\Temp\NewUsersFinal.csv” | Format-Table.
Import-Csv "C:\Temp\NewUsersFinal.csv" -Delimiter ";" | Format-TableThis is how the output needs to look like.
FirstName Initials Lastname Username        Email                      StreetAddress City   ZipCode State Country
--------- -------- -------- --------        -----                      ------------- ----   ------- ----- -------
Max       MF       Fraser   Max.Fraser      Max.Fraser@exoip.com       21 Baker St   London NW1 6XE       GB
Piers     PB       Bower    Piers.Bower     Piers.Bower@exoip.com      21 Baker St   London NW1 6XE       GB
Kylie     KD       Davidson Kylie.Davidson  Kylie.Davidson@exoip.com   21 Baker St   London NW1 6XE       GB
Richard   RG       Grant    Richard.Grant   Richard.Grant@exoip.com    21 Baker St   London NW1 6XE       GB
Boris     BC       Campbell Boris.Campbell  Boris.Campbell@exoip.com   21 Baker St   London NW1 6XE       GB
Nicholas  NM       Murray   Nicholas.Murray Nicholas.Murray@exoip.com  21 Baker St   London NW1 6XE       GB
Leonard   LC       Clark    Leonard.Clark   Leonard.Clark@exoip.com    21 Baker St   London NW1 6XE       GB
Ruth      RD       Dickens  Ruth.Dickens    Ruth.Dickens@exoip.com     21 Baker St   London NW1 6XE       GB
Jonathan  JF       Fisher   Jonathan.Fisher Johnathan.Fisher@exoip.com 21 Baker St   London NW1 6XE       GB
Grace     GR       Rees     Grace.Rees      Grace.Rees@exoip.com       21 Baker St   London NW1 6XE       GB
For more information, read Import CSV delimiter PowerShell.
Prepare the Add-NewUsers PowerShell script
Download the Add-NewUsers.ps1 script and save it in path C:\Scripts on the Management Server or Domain Controller.
Another option is to copy and paste the below code into Notepad. Give it the name Add-NewUsers.ps1 and place it in the C:\scripts folder.
<#
    .SYNOPSIS
    Add-NewUsers.ps1

    .DESCRIPTION
    Create Active Directory users from CSV file.

    .LINK
    alitajran.com/create-active-directory-users-from-csv-with-powershell

    .NOTES
    Written by: ALI TAJRAN
    Website:    alitajran.com
    LinkedIn:   linkedin.com/in/alitajran

    .CHANGELOG
    V1.00, 03/12/2020 - Initial version
    V2.00, 02/07/2024 - Added try/catch and changed to splatting
#>

# Import active directory module for running AD cmdlets
Import-Module ActiveDirectory

# Store the data from NewUsersFinal.csv in the $ADUsers variable
$ADUsers = Import-Csv "C:\temp\NewUsersFinal.csv" -Delimiter ";"

# Define UPN
$UPN = "exoip.com"

# Loop through each row containing user details in the CSV file
foreach ($User in $ADUsers) {
    try {
        # Define the parameters using a hashtable
        $UserParams = @{
            SamAccountName        = $User.username
            UserPrincipalName     = "$($User.username)@$UPN"
            Name                  = "$($User.firstname) $($User.lastname)"
            GivenName             = $User.firstname
            Surname               = $User.lastname
            Initial               = $User.initials
            Enabled               = $True
            DisplayName           = "$($User.firstname) $($User.lastname)"
            Path                  = $User.ou #This field refers to the OU the user account is to be created in
            City                  = $User.city
            PostalCode            = $User.zipcode
            Country               = $User.country
            Company               = $User.company
            State                 = $User.state
            StreetAddress         = $User.streetaddress
            OfficePhone           = $User.telephone
            EmailAddress          = $User.email
            Title                 = $User.jobtitle
            Department            = $User.department
            AccountPassword       = (ConvertTo-secureString $User.password -AsPlainText -Force)
            ChangePasswordAtLogon = $True
        }

        # Check to see if the user already exists in AD
        if (Get-ADUser -Filter "SamAccountName -eq '$($User.username)'") {

            # Give a warning if user exists
            Write-Host "A user with username $($User.username) already exists in Active Directory." -ForegroundColor Yellow
        }
        else {
            # User does not exist then proceed to create the new user account
            # Account will be created in the OU provided by the $User.ou variable read from the CSV file
            New-ADUser @UserParams

            # If user is created, show message.
            Write-Host "The user $($User.username) is created." -ForegroundColor Green
        }
    }
    catch {
        # Handle any errors that occur during account creation
        Write-Host "Failed to create user $($User.username) - $_" -ForegroundColor Red
    }
}- Line 25: Change the path if you place the CSV file in another path. In our example, it’s C:\Temp\NewUsersFinal.csv.
- Line 25: Remove the -Delimiter parameter if you have a comma separating character instead of a semicolon in your CSV file. In our example, it’s the semicolon character.
- Line 28: Change the UserPrincipalName (UPN) to yours. In our example, it’s exoip.com.
Run the Add-NewUsers PowerShell script
Run the below command to run the script Add-NewUsers.ps1.
C:\Scripts\.\Add-NewUsers.ps1The script will run and create Active Directory users in bulk.
The user Max.Fraser is created.
The user Piers.Bower is created.
The user Kylie.Davidson is created.
The user Richard.Grant is created.
The user Boris.Campbell is created.
The user Nicholas.Murray is created.
The user Leonard.Clark is created.
The user Ruth.Dickens is created.
The user Jonathan.Fisher is created.
The user Grace.Rees is created.
If the user already exists in AD, you will see the following.
A user with username Max.Fraser already exists in Active Directory.
A user with username Piers.Bower already exists in Active Directory.
A user with username Kylie.Davidson already exists in Active Directory.
A user with username Richard.Grant already exists in Active Directory.
A user with username Boris.Campbell already exists in Active Directory.
A user with username Nicholas.Murray already exists in Active Directory.
A user with username Leonard.Clark already exists in Active Directory.
A user with username Ruth.Dickens already exists in Active Directory.
A user with username Jonathan.Fisher already exists in Active Directory.
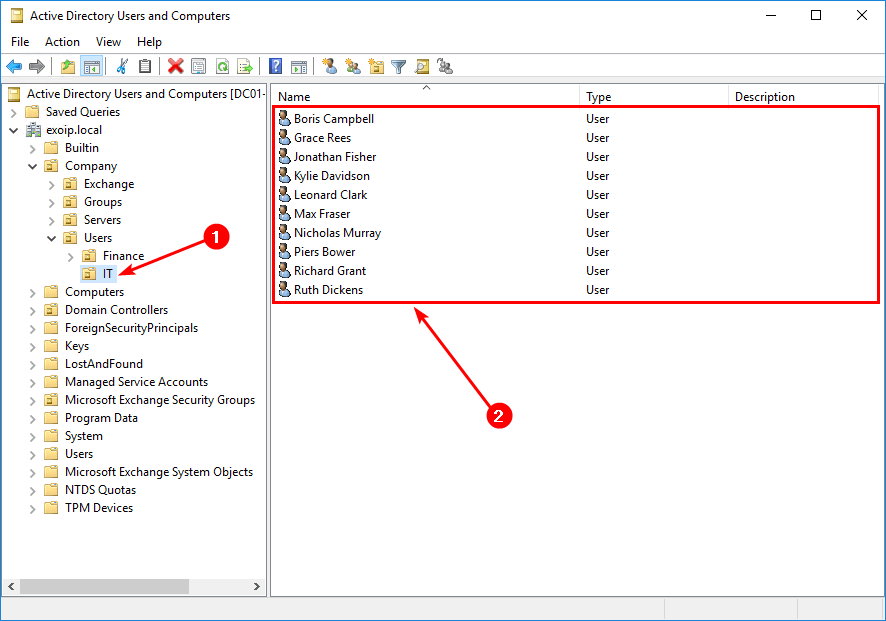
A user with username Grace.Rees already exists in Active Directory.Have a look at ADUC. The users are created successfully in the OU.
Did this help you to create Active Directory Users from CSV with PowerShell?
Keep reading: Bulk move AD users to another OU with PowerShell »
Conclusion
You learned how to create Active Directory Users from CSV with PowerShell. First, prepare the CSV file and make sure all the information is filled in. When you have the final CSV file, import the CSV file in PowerShell to check if it’s readable. Adjust the two lines in the Add-NewUsers.ps1 script, as shown in the article. Run the script to create the users in AD. The last part is to check if the users are created successfully in ADUC.
Did you enjoy this article? If so, you may like Install Exchange Server prerequisites. Don’t forget to follow us and share this article.
Great work, you lowered my burden, I have to create Hundreds of users ( some 320). It helped a lot.
This was perfect – Thank you
Some advice to save time -When you do the export to Csv Use the -Delimiter “;”
Get-ADUser -Filter * -SearchBase “OU=Research,OU=Users,DC=ad,DC=contoso,DC=com” -Properties * | Select-Object name | export-csv -path c:\temp\userexport.csv -Delimiter “;”
Hi Ali,
How can I add details of Manager while importing csv?
many many thanks
Ali that is great content.
Do you have the script for user-offboarding in AD using a CSV file?
That script searches all users accounts in an OU and for any that have a leave date that is that day or later then do the following:
Disable the account
Move to the Disabled Accounts OU
Remove all group memberships
Thanks it worked…!
Excellent. Thank you
Hello, what do I need to add to the CSV file and the PowerShell script to get in the same import the cellphone number?
Works perfect! Thanks a lot!
How can one go about also adding the ability to map server $Homedirectory to this script for each user found on the CSV?
Can I change Zip code as Pin code? Is there any problem in format
Thank you very much works wonders for me! I do have a question.
Let’s say the street address has 2 lines. If the address is the following:
Random St.
Suite 101
How would you go about doing that? I tried to make another line on the csv, but it still shows up as 1 line on the address in AD.
Thanks in advance!
Hello,
Thank a lot for the script.
Hi Ali,
Could you advice more on how to add group memberships into the same script?
hi I want to add/import bulk users with multiple fields in local AD.
First Name
Last Name
Display Name
Mobile Number
E-mail
Job Title
Department
Company
OU
, can you suggest a PowerShell command for the same. ?
Hi Ali
Thank you for the absolut genius powershell, it work very well.. One question, is it possible to add AD Groups in the same script? So i can make several different powershell scripts for different OUs whit differt accsess?
br
Ivo
Thanks for the info. Great Script. I want to add multiple proxy addresses for each user. I not very good at ps (just learning). I am unable to figure out how to do this. Any help would be appreciated. I have been researching for hours and testing with no luck.
hello,
i am testing the script and am getting the following erors:
Get-ADUser : Variable: ‘username’ found in expression: $username is not defined.
At C:\scripts\script2.ps1:31 char:9
+ if (Get-ADUser -F { SamAccountName -eq $username }) {
+ ~~~~~~~~~~~~~~~~~~~~~~~~~~~~~~~~~~~~~~~~~~~~~~
+ CategoryInfo : InvalidArgument: (:) [Get-ADUser], ArgumentException
+ FullyQualifiedErrorId : ActiveDirectoryCmdlet:System.ArgumentException,Microsoft.ActiveDirectory.Management.Commands.GetADUser
any idea what is going wrong?
thank you
Line 25, remove the -Delimiter parameter
Ensure on line 25: Import-Csv “C:\Temp\NewUsersFinal.csv” -Delimiter “;” you change the “;” to “,” and your problem will be resolved.
Hi! Nice job, your script really helped me. Is there a way to define flags like “Password never expires” with a similar script?
Thanks in advance.
Hi Albert,
Glad to hear.
You can edit the script and use the -PasswordNeverExpires parameter.
Great, it works without problems, thank you very much for your work.
Danke für die schone ding
Is there a way to add these new users to groups in the same script? Or does there need to be a secondary script just for that?
You can add a new column in the CSV file, which you call “Group”. After that, edit the PowerShell script to add the new users to the specified groups.
how can i add in script member of and other pager?
thank you,
I added this to line 56-57:
otherAttributes = @{pager = $User.pager
}
It works perfectly! Thank you!
thank you Ali for the amazing tutorial.
Gracias ALi,, espero nos sigas compartiendo material
Thank you very much for this material! It helped a lot!
Thank you so much for this Ali Tajran! I’ve been trying to make a script working the whole day and yours worked perfectly! Thanks man! Really appreciate it!
-Stian
Muchas gracias por la información Ali, super bueno el aporte.
Hi, i get following error messages after the Accounts have been successfully created:
Get-ADUser : The search filter cannot be recognized
At C:\Users\x.ctue\Desktop\Create_ADUser_Bulk.ps1:29 char:9
+ if (Get-ADUser -F { SamAccountName -eq $username }) {
+ ~~~~~~~~~~~~~~~~~~~~~~~~~~~~~~~~~~~~~~~~~~~~~~
+ CategoryInfo : NotSpecified: (:) [Get-ADUser], ADException
+ FullyQualifiedErrorId : ActiveDirectoryServer:8254,Microsoft.ActiveDirectory.Management.Commands.GetADUser
so you have any sugestions?
Thanks in advance.
Sincerely
Chris Turk
I had the same issue.
If you have a second DC make sure this one is reachable.
Ensure on line 25: Import-Csv “C:\Temp\NewUsersFinal.csv” -Delimiter “;” you change the “;” to “,” and your problem will be resolved.
thank you Ali for the amazing material.
it works great however the Country will not be inserted in the AD User Properties.
I’m using AD 2012 R2
I have tried to add countrycode (380 in my case) for Italy in your script but I get errors
You’re welcome, and I am glad you followed the steps to create AD users with PowerShell. That will save you some time.
After having a look, I adjusted the CSV file and the PS script.
One more thing, use “IT” as the country code for Italy.
Thanks for the in-depth material.
Thank you. Thank you. Thank you. It worked!!!!!