Around 43% of all websites use WordPress as their Content Management System. Most of the…
Create Office 365 mailbox in Exchange Hybrid
It’s good to go through the Exchange Hybrid test plan checklist and test all the scenarios before migrating any mailboxes to Office 365. The first task is to create an Office 365 user mailbox in Exchange Hybrid configuration. There are different ways to create an Office 365 mailbox in Exchange Hybrid. In this article, we will look at how to create Office 365 mailbox in Exchange Hybrid for both methods.
Table of contents
Information
You can create an Office 365 mailbox for a new AD user or create an Office 365 mailbox for an existing AD user.
In this article, we will:
- Create two Office 365 mailboxes
- Test hybrid mail flow in both organizations
- Test GAL visibility in both organizations
Important: You need to create the mailbox from the on-premises Exchange environment. If you create the mailbox directly in Exchange Online, you will get mail flow issues.
Create Office 365 mailbox
There are two ways to create a user mailbox in Exchange Hybrid:
- Exchange Admin Center
- Exchange Management Shell
Create Office 365 mailbox in Exchange Admin Center
Sign in to the Exchange Admin Center (EAC) with admin privileges. That’s on the Exchange on-premises server and NOT Office 365.
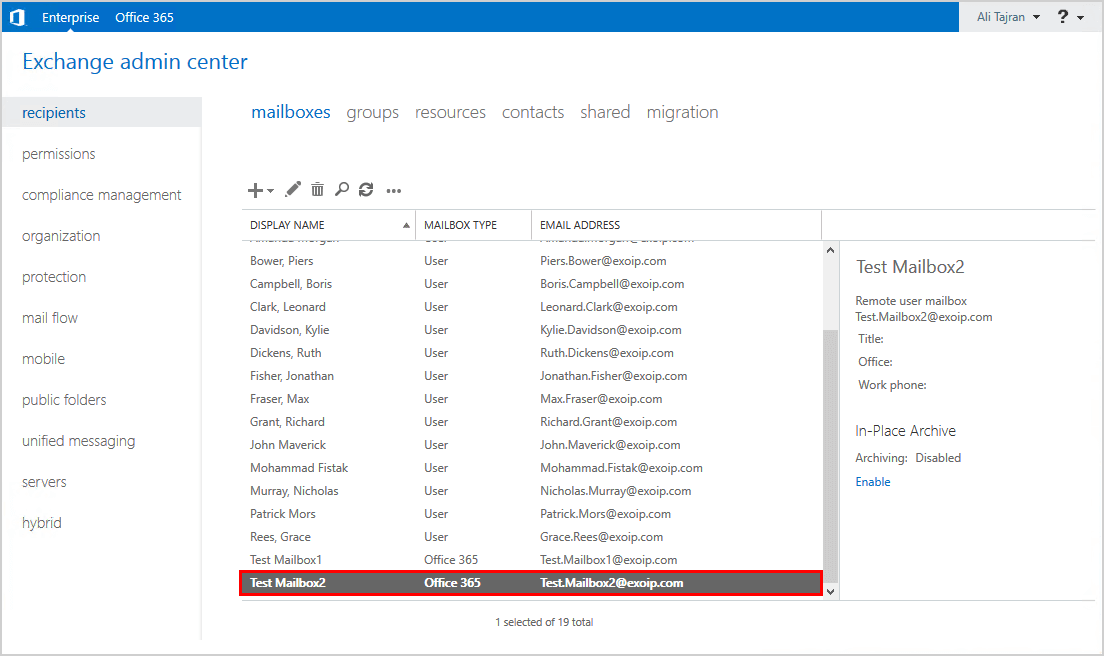
Click recipients in the feature pane and click mailboxes in the tabs. Click the + icon. Select Office 365 mailbox to create a new mailbox in Office 365.
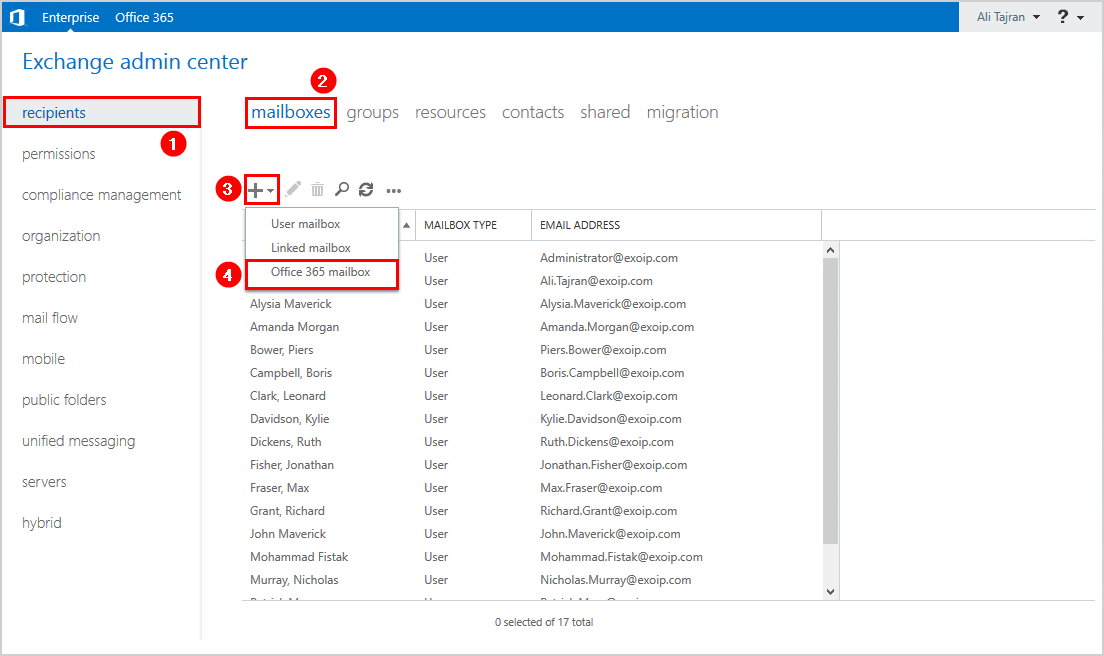
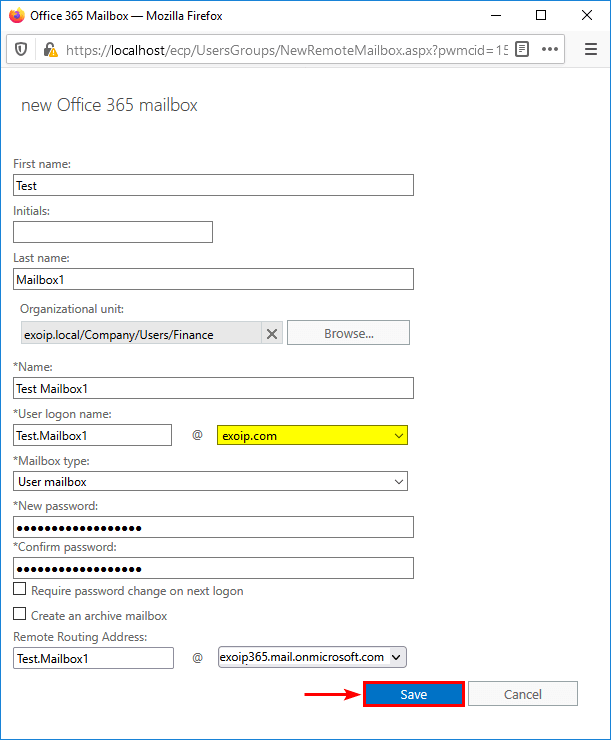
Fill in the information. Make sure that you select a proper domain suffix. Click Save.
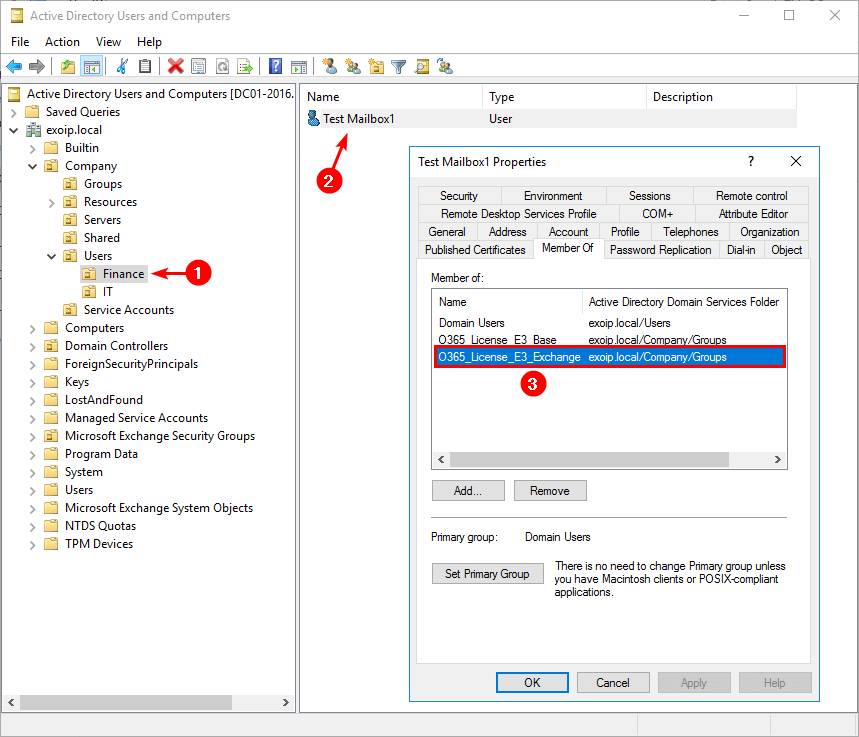
Add the Exchange Online license to the user. In our example, we will make the user member of the security group that contains the Exchange Online license. That’s because we have set up group-based licensing in Microsoft Entra ID. You don’t have to assign an EXO (Exchange Online) license right now, and it’s fine to do that later.
Note: Remember that you can’t send and receive an email if you don’t have an EXO license assigned to the user.
Don’t forget to sign in to Azure AD Connect server and force sync Azure AD Connect.
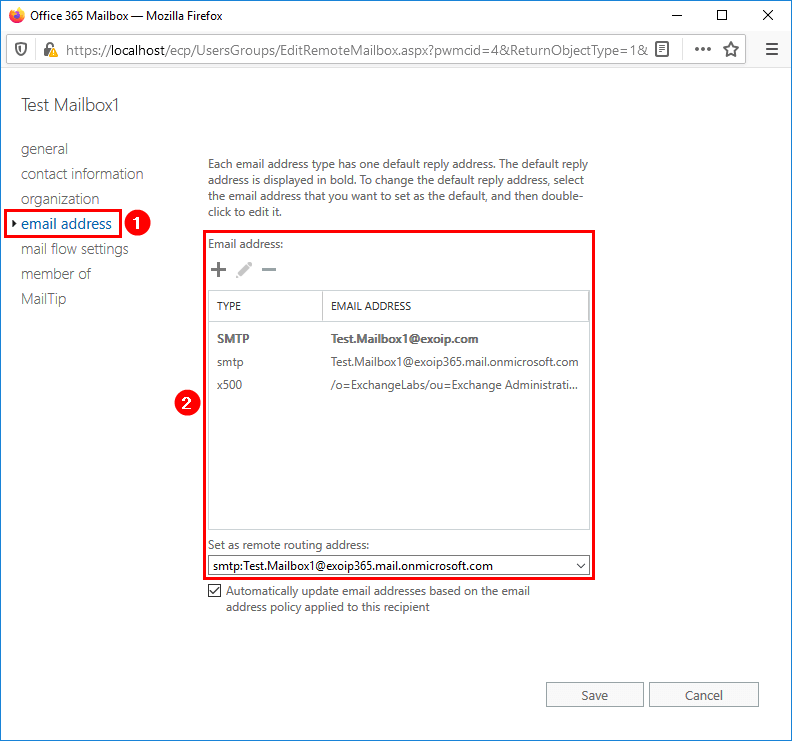
Start-ADSyncSyncCycle -PolicyType DeltaClick on the new mailbox and click the edit icon in the toolbar.
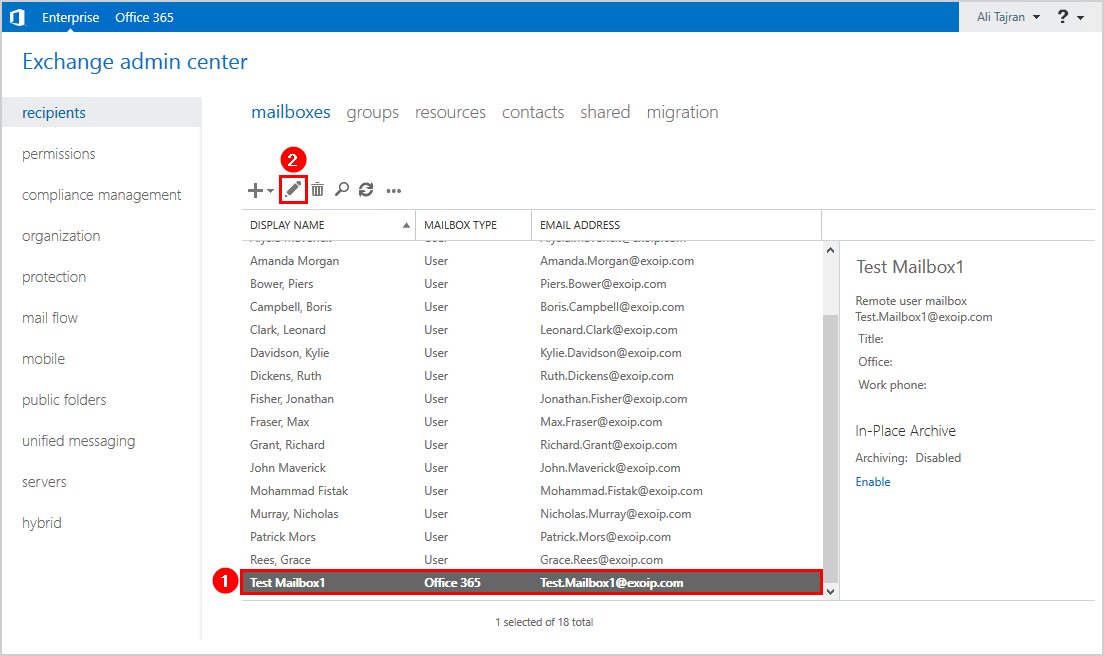
Click email address in the menu. Verify that you see the following:
- smtp:<user>@tenant.mail.onmicrosoft.com
- Remote routing address
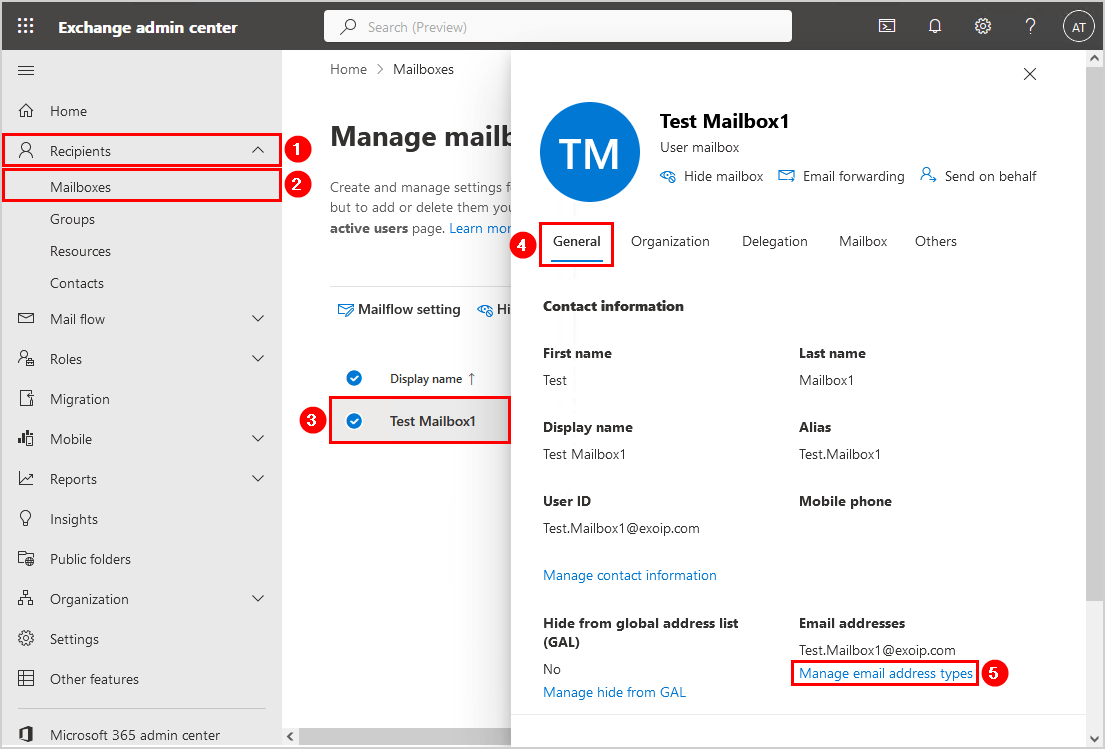
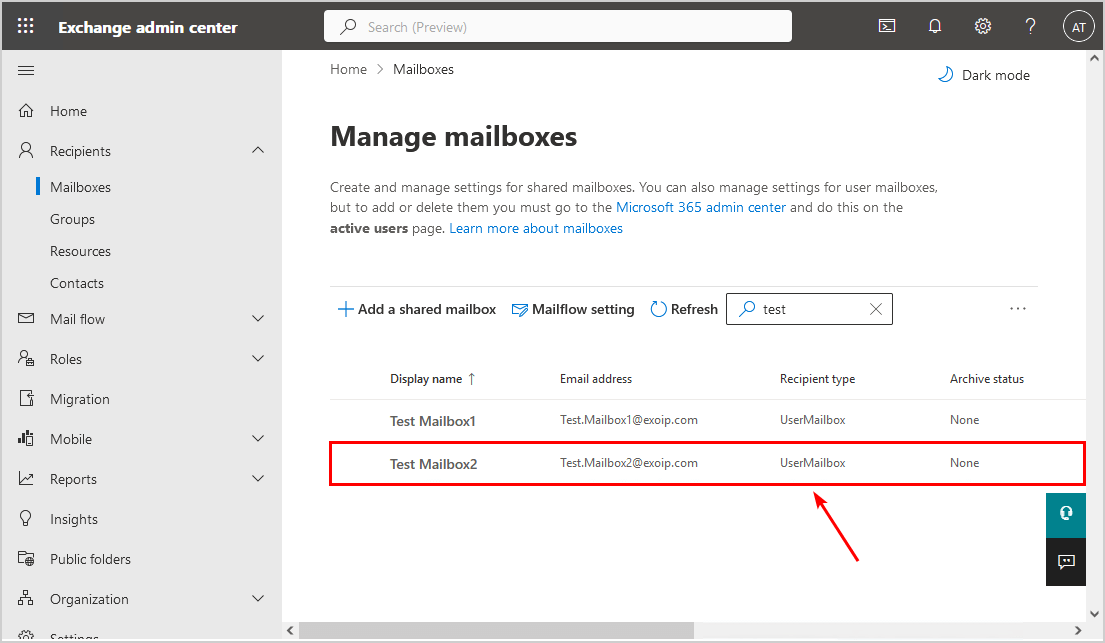
Sign in to the Exchange admin center with your Microsoft 365 admin credentials.
Go to Recipients > Mailboxes and click on the Office 365 mailbox. Select General and click on Manage email address types.
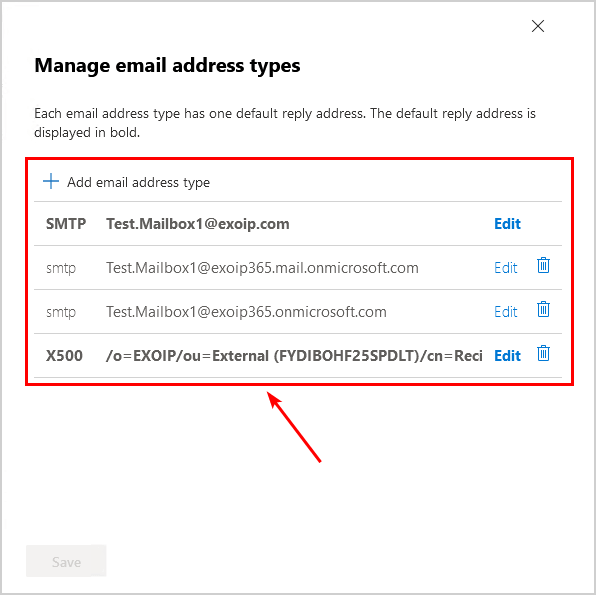
Note: You will only see Office 365 mailboxes in Microsoft 365 Exchange admin center. The on-premises mailboxes are not shown on Microsoft’s cloud servers.
There is no remote routing address option in the cloud, and you will see two smtp onmicrosoft.com email addresses:
- smtp:<user>@tenant.mail.onmicrosoft.com
- smtp:<user>@tenant.onmicrosoft.com
We did create an Office 365 mailbox directly from on-premises Exchange admin center in an Exchange Hybrid configuration.
Create Office 365 mailbox for new AD user
The New-RemoteMailbox cmdlet is excellent when you don’t have an AD object in Active Directory. It will create the AD object in Active Directory on-premises and the Office 365 mailbox.
Run Exchange Management Shell as administrator and run the below command to enter a password and save it as a variable. That password will be used for the new AD user creation.
$Password = Read-Host "Enter password" -AsSecureStringMake use of the New-RemoteMailbox cmdlet and fill in the details. Change the tenant information to yours. In this example, it’s exoip365.mail.onmicrosoft.com.
Note: The proxy address will always be @tenant.mail.onmicrosoft.com.
New-RemoteMailbox -Name "Test Mailbox1" -FirstName "Test" -LastName "Mailbox1" -UserPrincipalName "Test.Mailbox1@exoip.com" -RemoteRoutingAddress "Test.Mailbox1@exoip365.mail.onmicrosoft.com" -Password $PasswordThe PowerShell output shows the mailbox creation.
Name          RecipientTypeDetails RemoteRecipientType
----          -------------------- -------------------
Test.Mailbox2 RemoteUserMailbox    ProvisionMailbox
Create Office 365 mailbox for existing AD user
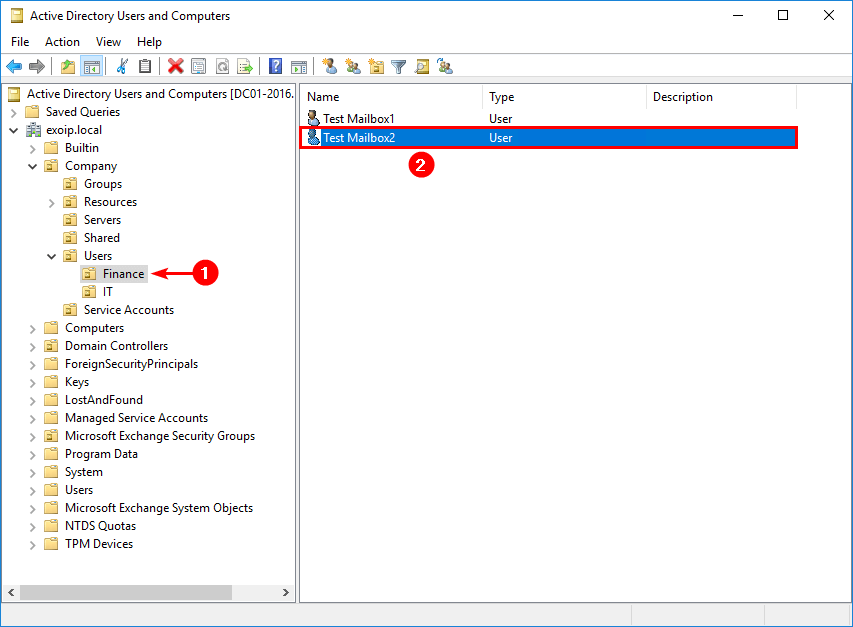
Create a user account in Active Directory. In this example, Test Mailbox2. Add the Exchange Online license to the user. We already did assign the security group that contains the Exchange Online license because we use group-based licensing in Microsoft Entra ID.
Run Exchange Management Shell as administrator. Run the Enable-RemoteMailbox cmdlet to create a remote mailbox in Office 365 for existing AD user. Change the tenant information to yours. In this example, it’s exoip365.mail.onmicrosoft.com.
Note: The proxy address will always be @tenant.mail.onmicrosoft.com.
Enable-RemoteMailbox "Test.Mailbox2" -RemoteRoutingAddress "Test.Mailbox2@exoip365.mail.onmicrosoft.com"The PowerShell output shows the mailbox creation.
Name          RecipientTypeDetails RemoteRecipientType
----          -------------------- -------------------
Test Mailbox2 RemoteUserMailbox    ProvisionMailbox
Do you get an ExchangeGuid is mandatory on UserMailbox error after running the above command? Read the article Enable-RemoteMailbox ExchangeGuid is mandatory on UserMailbox.
Wait for the Azure Active Directory synchronization or sign in to Azure AD Connect server and force sync Azure AD connect with PowerShell.
Start-ADSyncSyncCycle -PolicyType DeltaVerify in the on-premises Exchange admin center that the mailbox type will show as Office 365. If you have a mailbox on-premises, it’s the mailbox type User.
Sign in to the Exchange admin center with your Microsoft 365 admin credentials. You will only see Office 365 mailboxes in Microsoft 365 Exchange admin center. Here, the mailbox recipient type is UserMailbox. The on-premises mailboxes are not shown on Microsoft’s cloud servers.
Test hybrid mail flow in both organizations
We did create both Office 365 test mailboxes. Let’s test the mail between both organizations and send an email in both directions.
Send email from Office 365 mailbox to on-premises
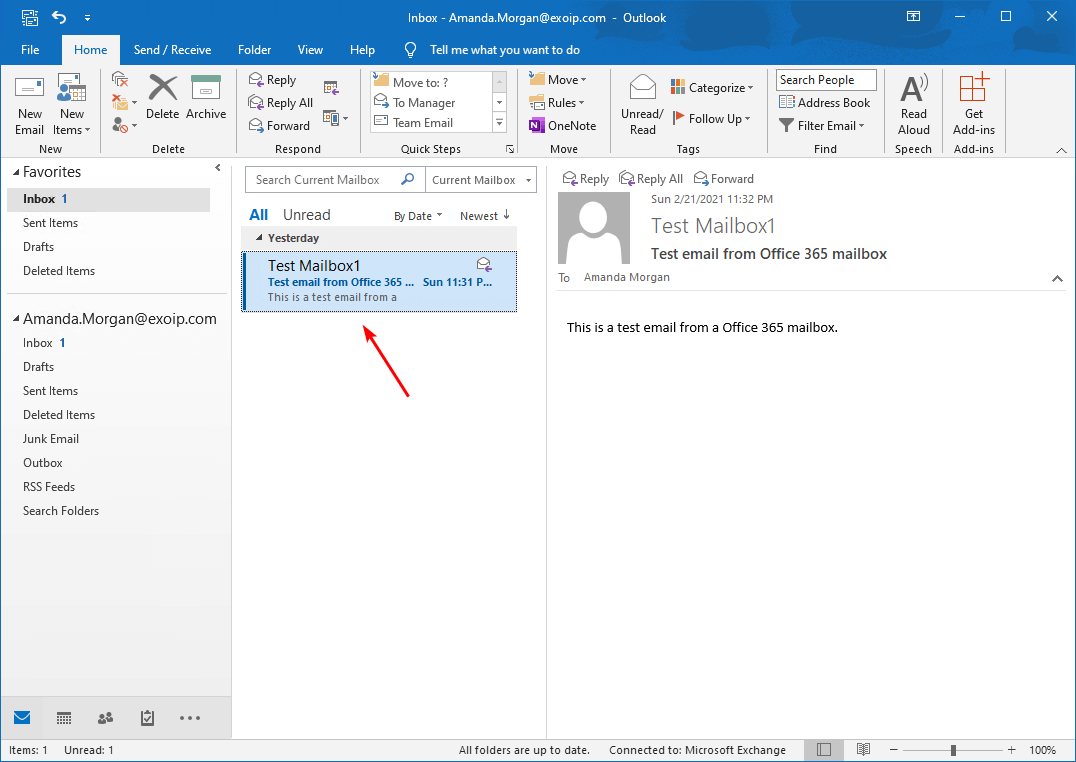
Start Outlook and sign in with the Office 365 mailbox. Create a new message and select an on-premises mailbox. In this example, Amanda Morgan. Click OK.
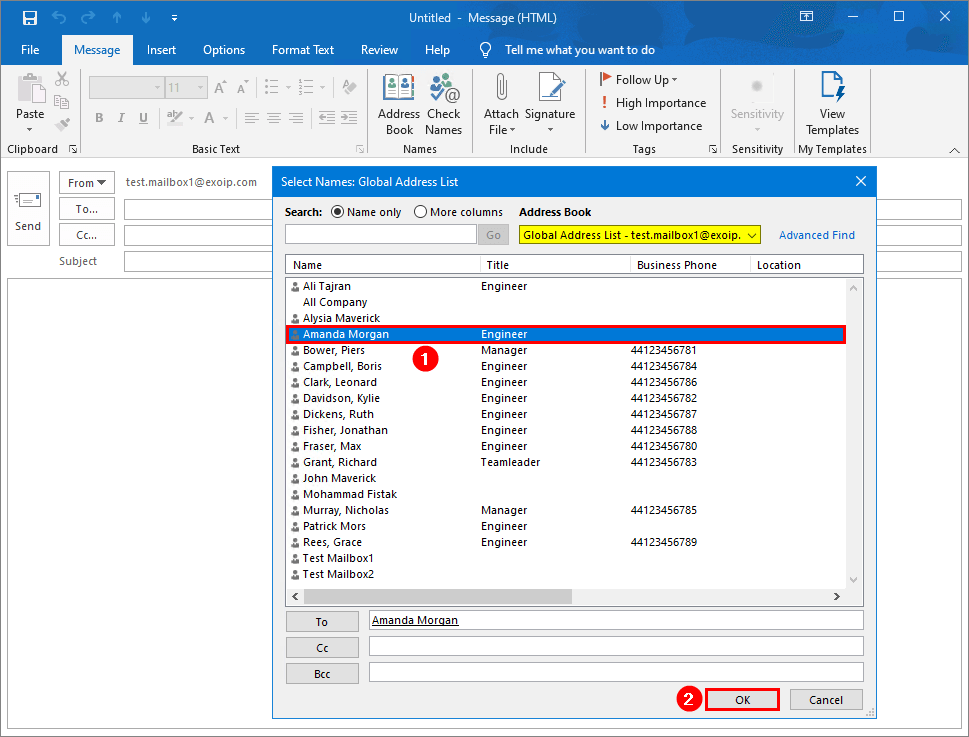
Send a test email from the Office 365 mailbox to the Exchange on-premises mailbox.
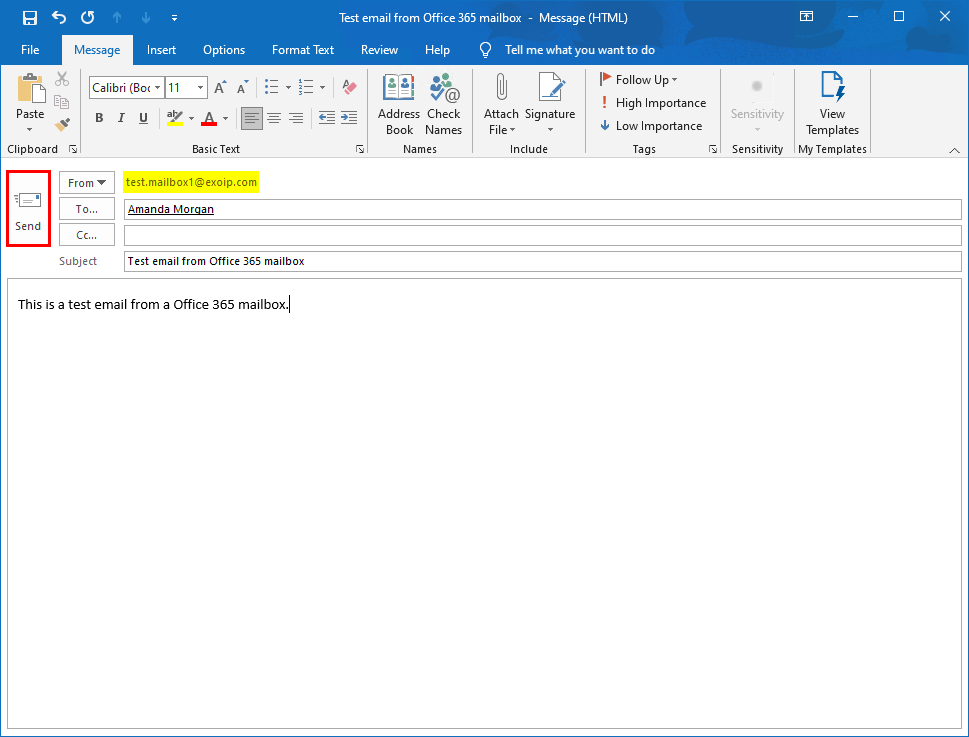
Sign in to Outlook with the Office 365 mailbox. The email shows up from Test Mailbox1. The mail flow from Office 365 to on-premises works.
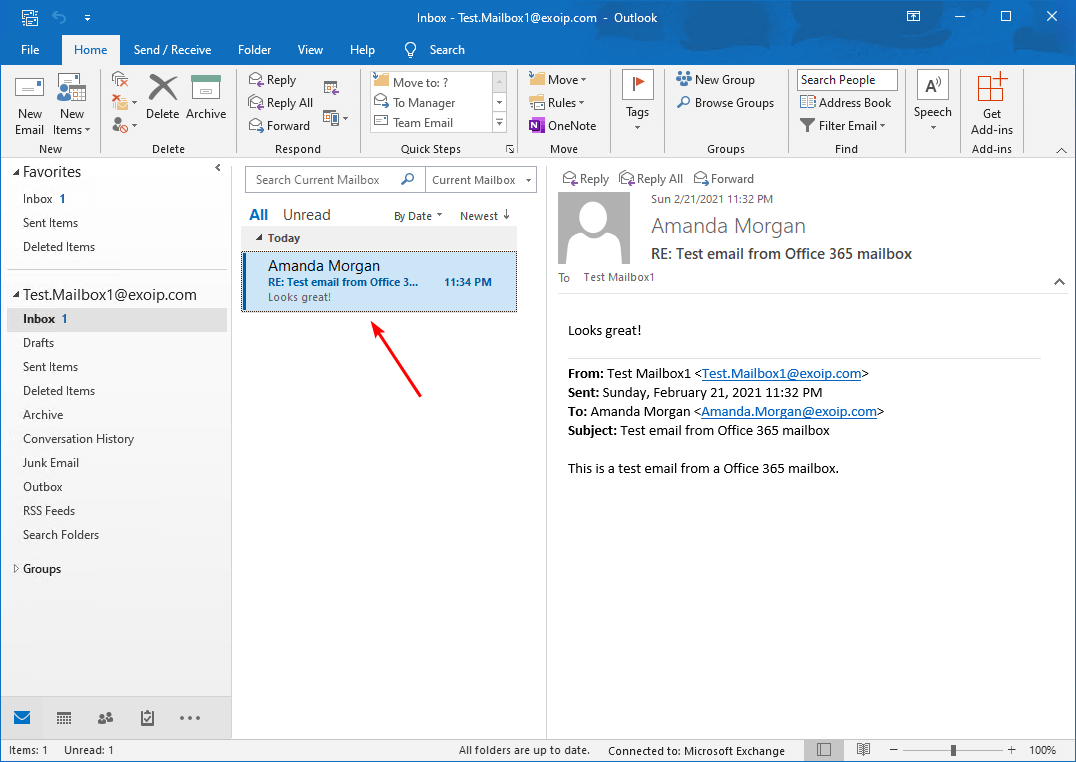
Send email from on-premises mailbox to Office 365
Sign in to Amanda’s on-premises mailbox. Send an email in the other direction. Reply to the email and click Send.
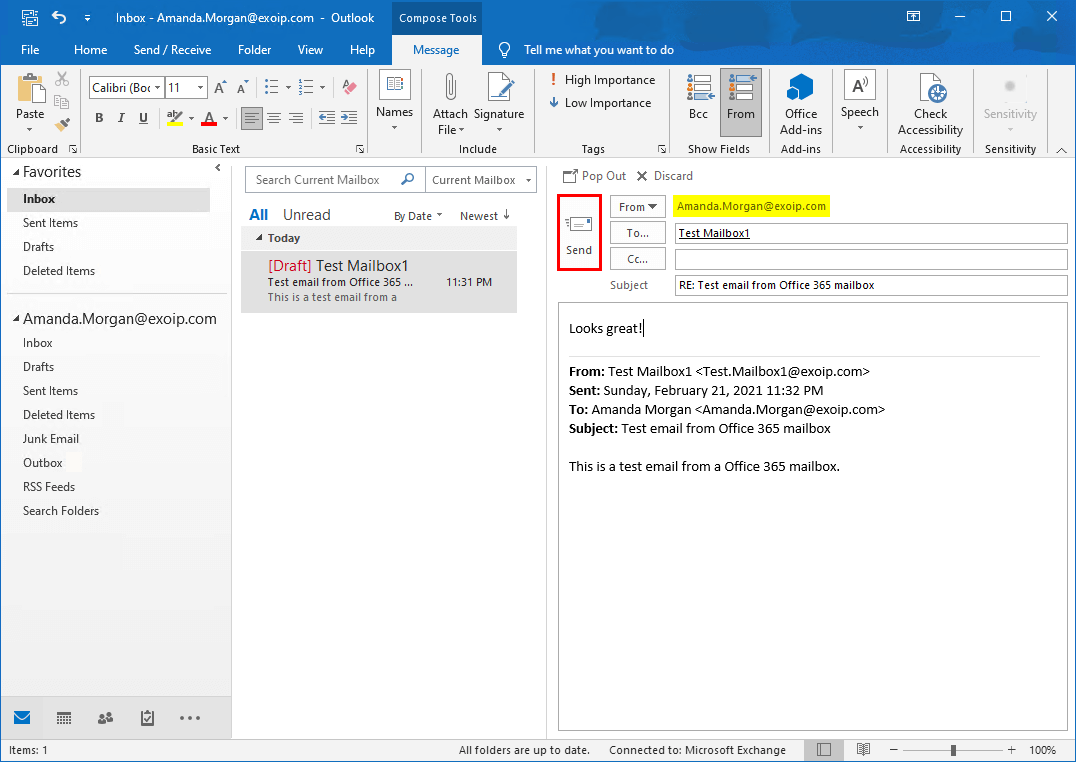
The reply shows up in the Test Mailbox1 Outlook client. The mail flow from on-premises mailbox to Office 365 mailbox works.
Test GAL visibility in both organizations
It’s good to test the Global Address List (GAL) visibility in Exchange Online (Office 365) and Exchange on-premises.
Office 365 Global Address List visibility
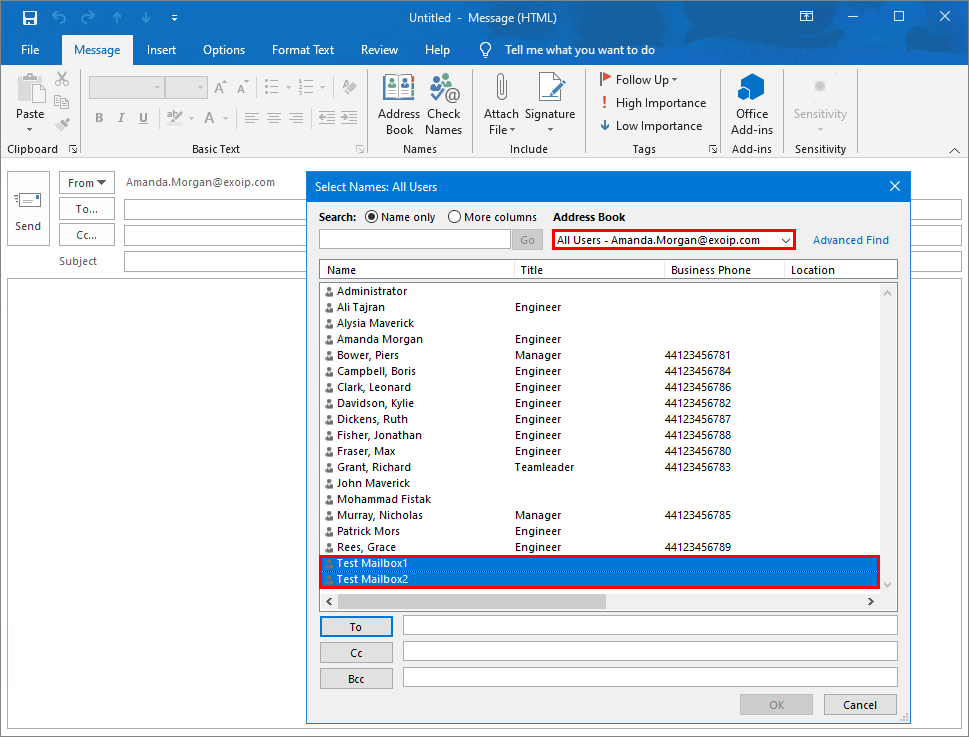
From Test Mailbox1 Outlook client, create a new email and click on Address book. Select the address book All Users. Verify that you see both on-premises and Office 365 mailboxes.

Exchange on-premises Global Address List visibility
From Amanda’s Outlook client, create a new email and click on Address Book. Select the address book All Users. Verify that the on-premises and Office 365 mailboxes show up.
That’s it!
The next time, we will look at how to create Office 365 shared mailbox in Exchange Hybrid configuration.
Conclusion
You learned how to create an Office 365 mailbox in Exchange Hybrid configuration. There are a couple of methods to create an Exchange Online mailbox in Office 365. Which one you choose, both will work. It depends on the company and which workflow is best for them. It’s your job to consult them.
Did you enjoy this article? You may also like the course Exchange Hybrid. Don’t forget to follow us and share this article.
What Others Are Reading


Hi Ali,
Thanks for all of your excellent guides, I’ve found them quite useful during out M365 migration.
When we create a new AD user with a M365 Mailbox enabled as per your recommendations here, we end up with a working mailbox which appears in the On-Prem EAC. The mailbox is able to send/receive email internally and externally. Great!
The problem we have is related to migrating the mailbox back to on-prem from M365. We get the following: “Error: RecipientNotFoundPermanentException:” and no other information. The migration fails.
If we create the account using the On-Prem EAC we don’t get this problem.
Any ideas as to where we can check?
Thanks
Simon
You can read more about this in the article Cannot find a recipient that has mailbox GUID.