A hybrid deployment provides the seamless look and feel of a single Exchange organization between…
Determine if a mailbox is on-premises or in Office 365
How to determine if a mailbox is on-premises or in Office 365 located? That information is excellent if you have a migration finished and want to know which mailboxes are still on-premises. In this article, you will learn to check if the mailbox is on-premises or in Office 365.
Table of contents
How to check if a mailbox is on-premises or in Office 365?
If you have Exchange Server 2010 running, you can’t see the mailboxes located in Office 365 when looking in the Exchange Management Console (EMC). That’s because when you finish a mailbox migration to Office 365, the mailbox will be removed from EMC. Use PowerShell to get the location of the mailbox.
If you have Exchange 2013 and higher running, you can see the mailbox’s location in the Exchange Admin Center (EAC). Another way to determine the location of the mailbox is with PowerShell.
Determine if a mailbox is on-premises or in Office 365 with Exchange Admin Center
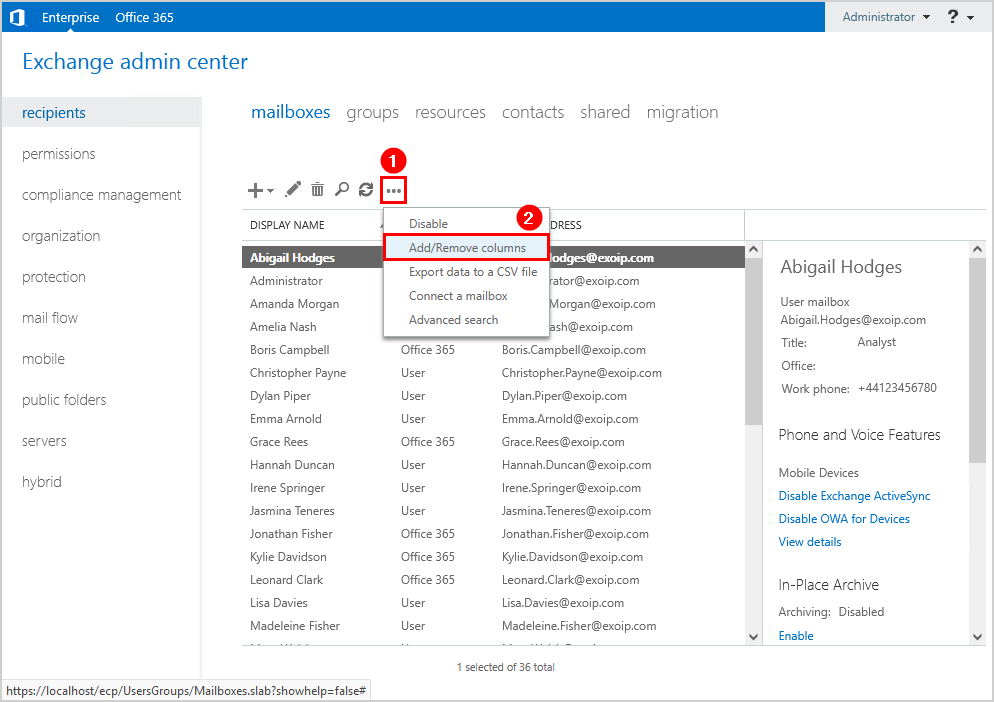
In Exchange 2013/2016/2019, you can check if the mailbox is on-premises or in Office 365. Sign in to the Exchange Admin Center and look at the Mailbox Type column. You can see if the mailbox is located on-premises or in Office 365.

Another way to determine if a mailbox is on-premises or in Office 365 is by checking the mailbox database. Let’s have a look at that.
Click the more button in the toolbar and click Add/Remove columns.
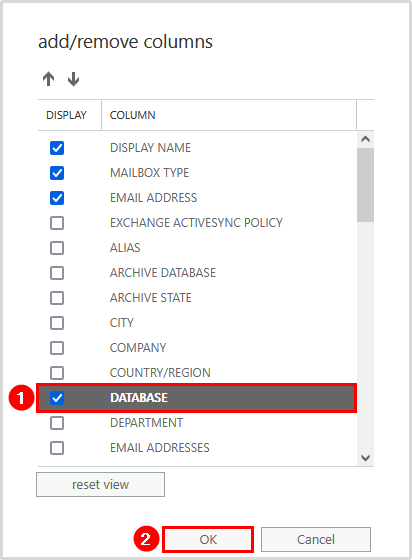
Check the checkbox DATABASE and follow with OK.
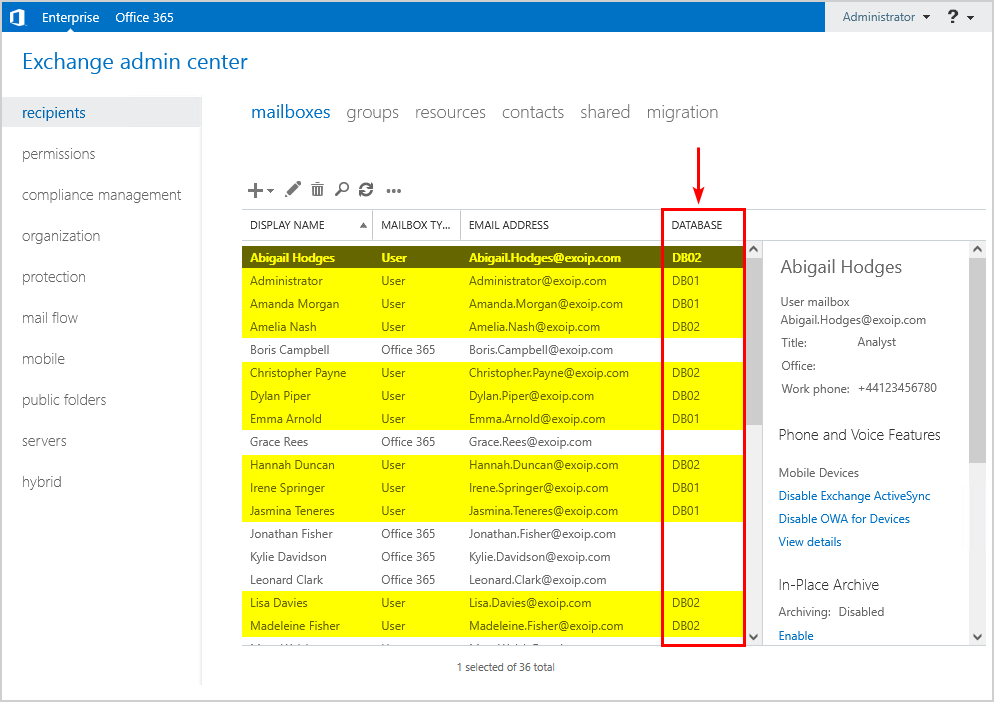
The DATABASE column is visible in the list view. In our example, the location of the highlighted user mailboxes is in the mailbox database DB02. It means that the location of the mailboxes is on-premises.
Note: When a mailbox location is in Office 365, the database field is empty. If the mailbox location is on-premises, the mailbox database name appears.
Export to CSV from Exchange Admin Center
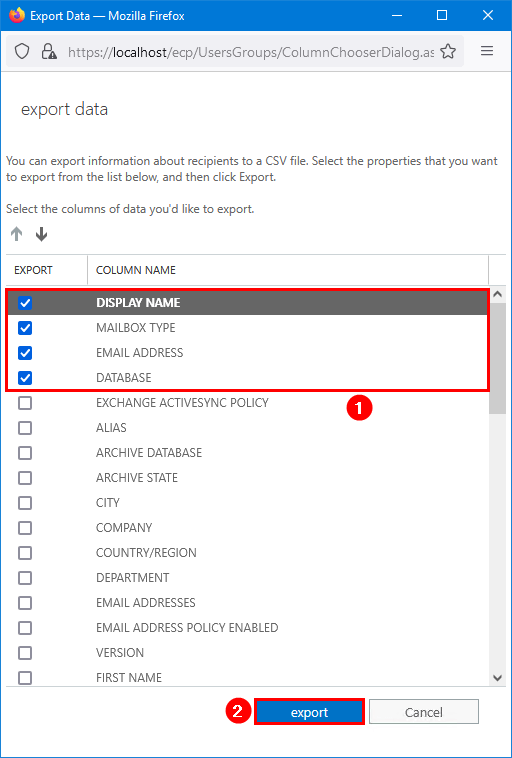
Click the more button in the toolbar and select Export data to a CSV file.
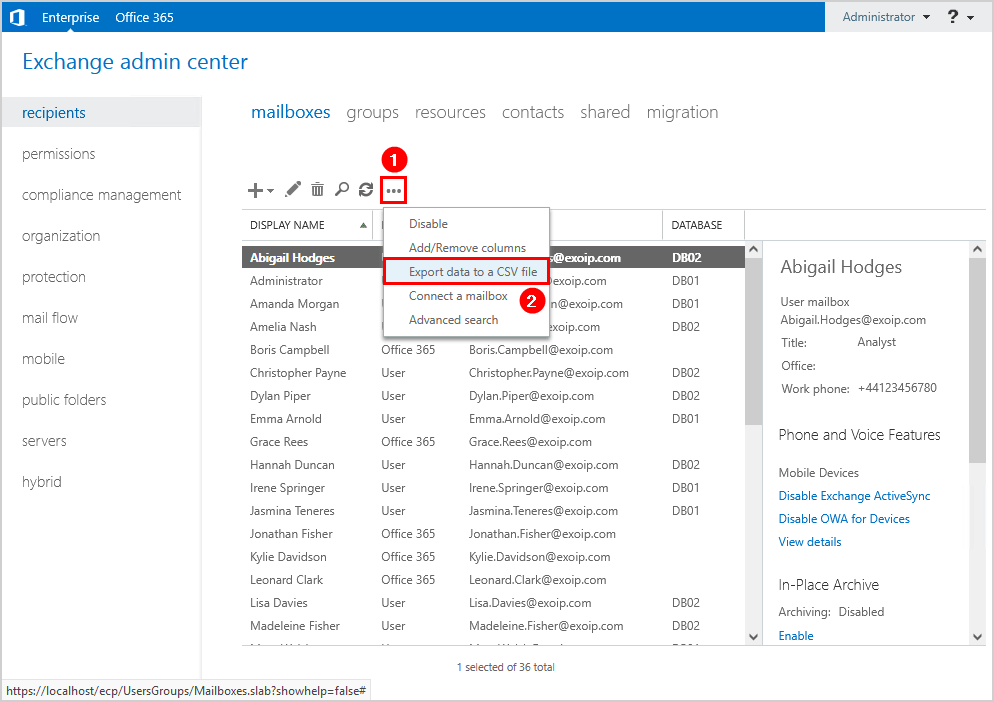
Make sure that you check the MAILBOX TYPE and DATABASE columns. Click export. Select a destination to save the CSV file.
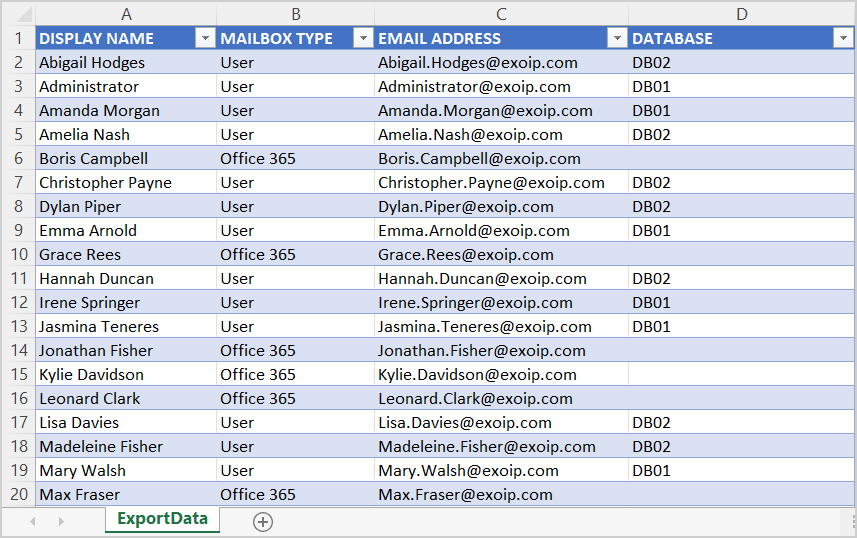
Open the CSV file to verify the list with your favorite CSV viewer.
You can see the location of the mailboxes in the Mailbox Type column. If the mailbox database is empty in the Database column, it means that the mailbox location is in Office 365.
In the next step, we will look at how to determine if a mailbox is on-premises or in Office 365 with PowerShell.
Determine if a mailbox is on-premises or in Office 365 with PowerShell
To determine if a mailbox is on-premises or in Office 365, we will use a couple of PowerShell parameters.
- If the mailbox location is on-premises, the RecipientType value is UserMailbox
- If the mailbox location is in Office 365, the RecipientType is MailUser
Note: We will run the commands in Exchange Management Shell (on-premises), and it will show the below outputs. If you run the same commands in Exchange Online PowerShell, the values will be switched. That’s because you are connected to the cloud.
Check one mailbox
Run Exchange Management Shell as administrator. Use the Get-Recipient cmdlet and the RecipientType parameter to filter the results. The mailbox location of Max Gibson is on-premises.
[PS] C:\>Get-Recipient -Identity "Max Gibson" | Select Name, RecipientType

Name       RecipientType
----       -------------
Max Gibson   UserMailbox
Check all mailboxes and export to CSV file
List all the mailboxes. These are the user mailboxes, resource mailboxes, and shared mailboxes. After that, export the results to a CSV file. Create a temp folder if you don’t have one in the (C:) drive, or change the path in the second cmdlet.
We have four mailboxes located on-premises and three mailboxes in Office 365.
[PS] C:\>Get-Recipient -Resultsize Unlimited -RecipientType UserMailbox, MailUser | Select Name, RecipientType | Sort RecipientType

Name            RecipientType
----            -------------
Max Gibson        UserMailbox
Owen Simpson      UserMailbox
Zoë Roberts       UserMailbox
Jasmina Teneres   UserMailbox
Richard Grant        MailUser
Boris Campbell       MailUser
Nicholas Murray      MailUser


[PS] C:\>Get-Recipient -Resultsize Unlimited -RecipientType UserMailbox, MailUser | Select Name, RecipientType | Sort RecipientType | Export-CSV "C:\temp\All_Mailboxes.csv" -Encoding UTF8 -NTI
Open the CSV file in your favorite CSV viewer. In our example, it’s the application Microsoft Excel.

Add the -Descending switch if you want it to sort the other way around. There is no -Ascending switch for the Sort-Object cmdlet because that is the default behavior.
[PS] C:\>Get-Recipient -Resultsize Unlimited -RecipientType UserMailbox, MailUser | Select Name, RecipientType | Sort RecipientType -Descending

Name            RecipientType
----            -------------
Richard Grant        MailUser
Boris Campbell       MailUser
Nicholas Murray      MailUser
Max Gibson        UserMailbox
Owen Simpson      UserMailbox
Zoë Roberts       UserMailbox
Jasmina Teneres   UserMailbox


[PS] C:\>Get-Recipient -Resultsize Unlimited -RecipientType UserMailbox, MailUser | Select Name, RecipientType | Sort RecipientType -Descending | Export-CSV "C:\temp\All_Mailboxes_Descending.csv" -Encoding UTF8 -NTI
Only list RecipientType UserMailbox. The second cmdlet will export the results to C:\temp\Only_Usermailboxes.csv.
[PS] C:\>Get-Recipient -Resultsize Unlimited -RecipientType UserMailbox | Select Name, RecipientType

Name            RecipientType
----            -------------
Max Gibson        UserMailbox
Owen Simpson      UserMailbox
Zoë Roberts       UserMailbox
Jasmina Teneres   UserMailbox


[PS] C:\>Get-Recipient -Resultsize Unlimited -RecipientType UserMailbox | Select Name, RecipientType | Export-CSV "C:\temp\Only_UserMailboxes.csv" -Encoding UTF8 -NTI
Let’s use a filter this time and only list RecipientType equals to MailUser. The second cmdlet will export the results to a CSV file.
[PS] C:\>Get-Recipient -Resultsize Unlimited -Filter {RecipientType -Eq "MailUser"} | Select-Object Name, RecipientType

Name            RecipientType
----            -------------
Richard Grant        MailUser
Boris Campbell       MailUser
Nicholas Murray      MailUser


[PS] C:\>Get-Recipient -Resultsize Unlimited -Filter {RecipientType -Eq "MailUser"} | Select-Object Name, RecipientType | Export-CSV "C:\temp\Only_MailUsers.csv" -Encoding UTF8 -NTI
I hope that this article helped you to determine if a mailbox is on-premises or in Office 365.
Keep reading: Move mailbox to Exchange Online with PowerShell »
Conclusion
You learned how to check if a mailbox is on-premises or in Office 365. If you have Exchange 2013 or higher, you can sign in to Exchange Admin Center (EAC). Check the location of the mailbox in the list view. Export the list from EAC to a CSV file. After that, open the CSV file with Microsoft Excel or another CSV viewer. The mailboxes without a database are mailboxes located in Office 365. Unfortunately, this is not possible in Exchange 2010.
Another way to find and determine if the mailboxes are on-premises or in Office 365 is with PowerShell. In the article, we showed the cmdlet to get the mailboxes and to export the results to CSV file. After exporting, open the CSV file with Microsoft Excel. The mailbox with the RecipientType MailUser value is a mailbox located in Office 365. If you do see the RecipientType UserMailbox value, that means that the mailbox location is on-premises.
Did you enjoy this article? You may also like Export a list of mailboxes to CSV in Exchange. Don’t forget to follow us and share this article.
I apologize but I believe you have this backwards?
RecipientType: Mailuser is onprem
RecipientType: UserMailbox is in the cloud.
In a hybrid environment you will see both, facilitating both on-prem and cloud path. If mailbox is oncloud is found as a UserMailbox, but will have remotemailbox attribute for on-prem needs – and vice versa if mailbox is on-prem there will be a smt pointing to cloud.
The output depends on which environment you are connected to and run the commands. In the article, I used Exchange Management Shell (on-premises). In contrast, you are using Exchange Online PowerShell (cloud).
Thanks for the post.
If I check from Office365 Admin portal then I can see
Mailboxes -> Recipient Type = UserMailBox
If I run this on Exchange Management shell
Than I get
RecipientType MailUser
So does this means my mailbox lives on O365?
That’s correct.
Funny, but my O365 Mailboxes are called UserMailbox and those on Exchange On-Prem MailUser. The Opposite of what you write… Is there something wrong in my whole configuration?
I am connected to Exchange Management Shell, which showed these values.
You are connected to Exchange Online PowerShell, and it shows you the values you mention.
Nothing is wrong with your configuration.
Hey, do you know how to determine where mailbox created initially? (on-prem or cloud )?
That was a nice post mate, thanks