Users get a Microsoft credential prompt in the Outlook client. This does not matter when…
Disable external access to ECP in Exchange Server
You should always disable external access to Exchange Control Panel (ECP). You don’t want a brute force attack on ECP in Exchange Server. It’s a big security risk. The best approach and my advice are to block it on the firewall. The firewall is the first point that will block external access. If it’s not possible to do it on the firewall, do it on the Exchange Server. It’s better than not disabling ECP. Let’s look at how to disable external access to ECP in Exchange Server.
Do you have more than one Exchange Server? Do the below steps on all the Exchange Servers accessible from external.
Table of contents
Install IP and Domain Restrictions role
To install the IP and Domain Restrictions role, follow the steps below:
- Sign in to Exchange Server
- Start Server Manager
- Click on Manage > Add Roles and Features
- Follow the wizard and select the Exchange Server
- Go to the Server Roles tab
- Expand Web Server (IIS) > Web Server > Security
- Check the IP and Domain Restrictions role
- Click Next
- Finish the installation
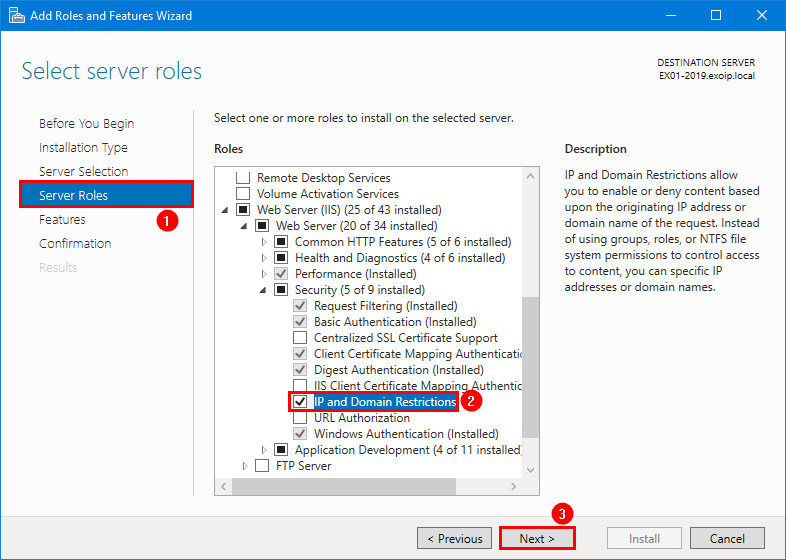
You did successfully install the IP and Domain Restrictions role. Proceed further with the steps below.
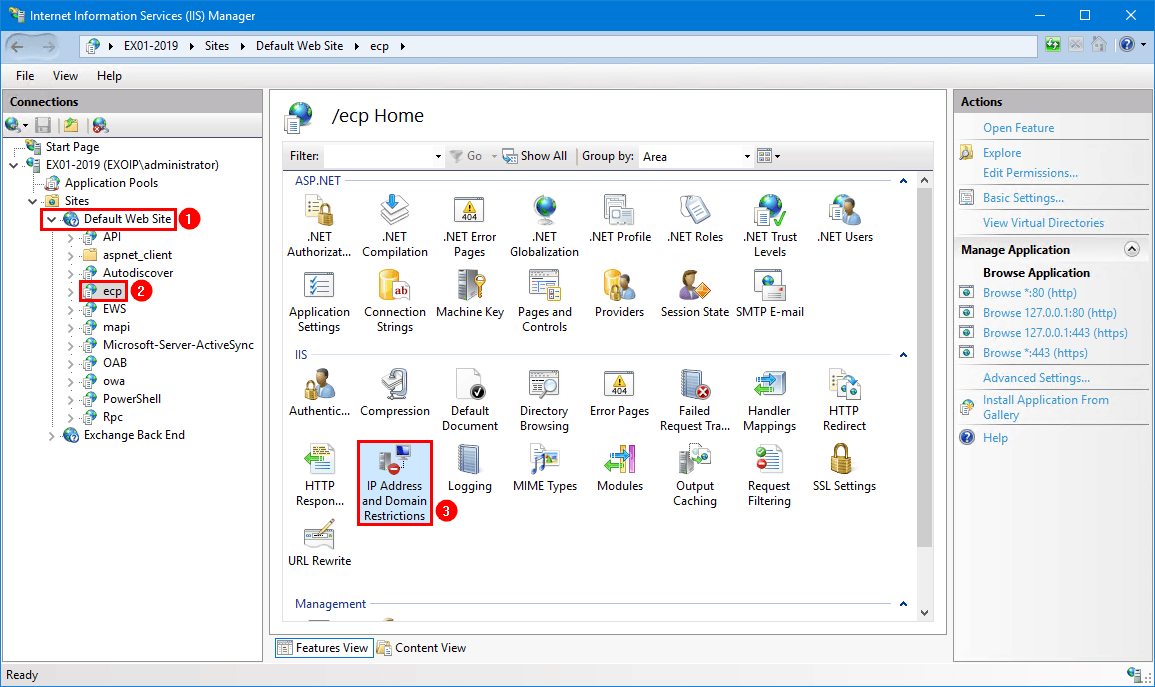
Start IP Address and Domain Restrictions in IIS
Follow the below steps to start IP Address and Domain Restrictions:
- Open IIS Manager on the Exchange Server
- Expand Site > Default Web Site
- Click on ecp
- Double-click on IP Address and Domain Restrictions
Note: You must first click on ecp and then double-click IP Address and Domain Restrictions.
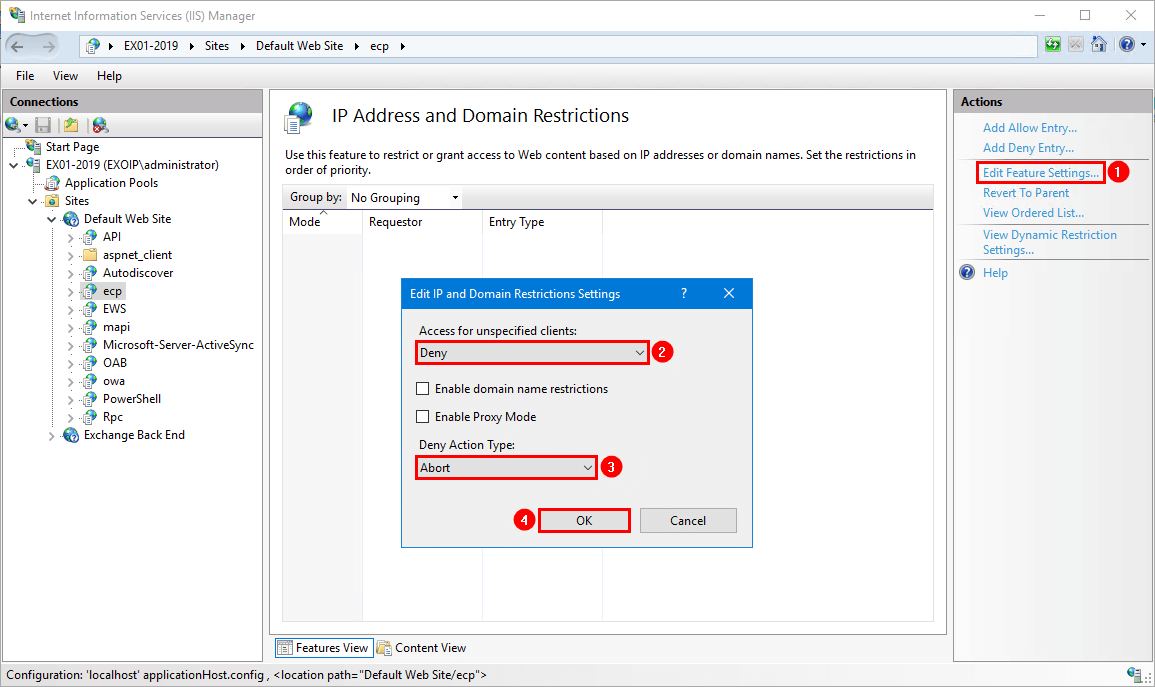
Edit feature settings
Disable external access to ECP on Exchange Server by following the steps below:
- Click on Edit Feature Settings
- Set the Access for unspecified clients to Deny
- Set Deny Action Type to Abort
- Click OK
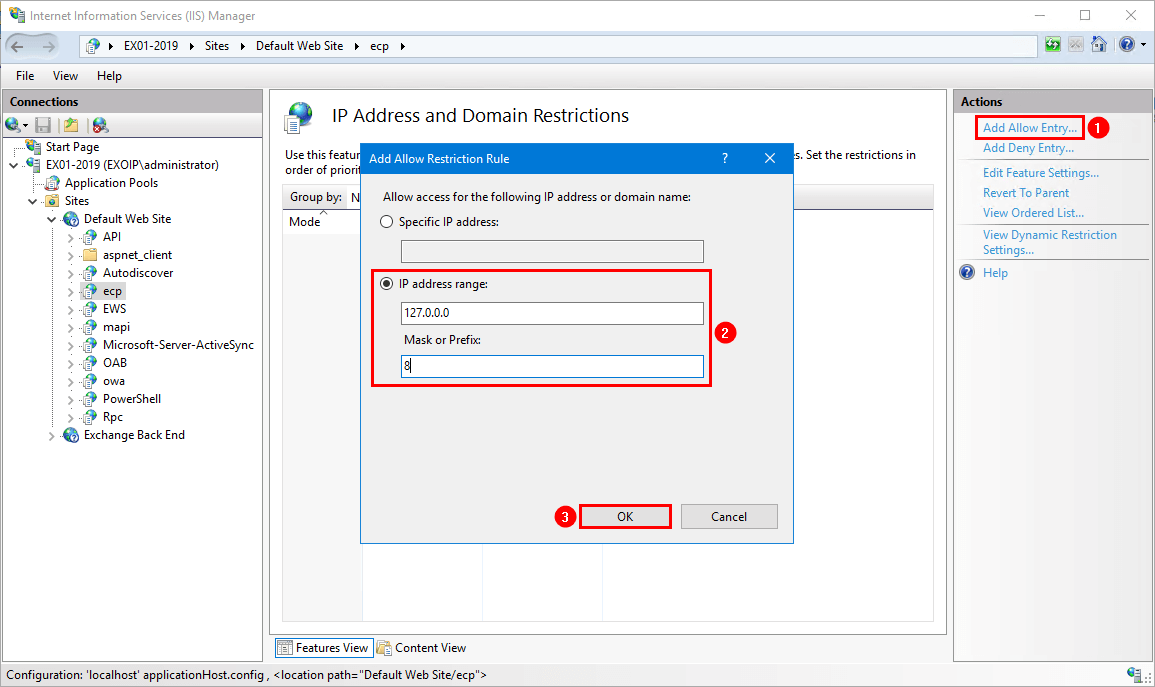
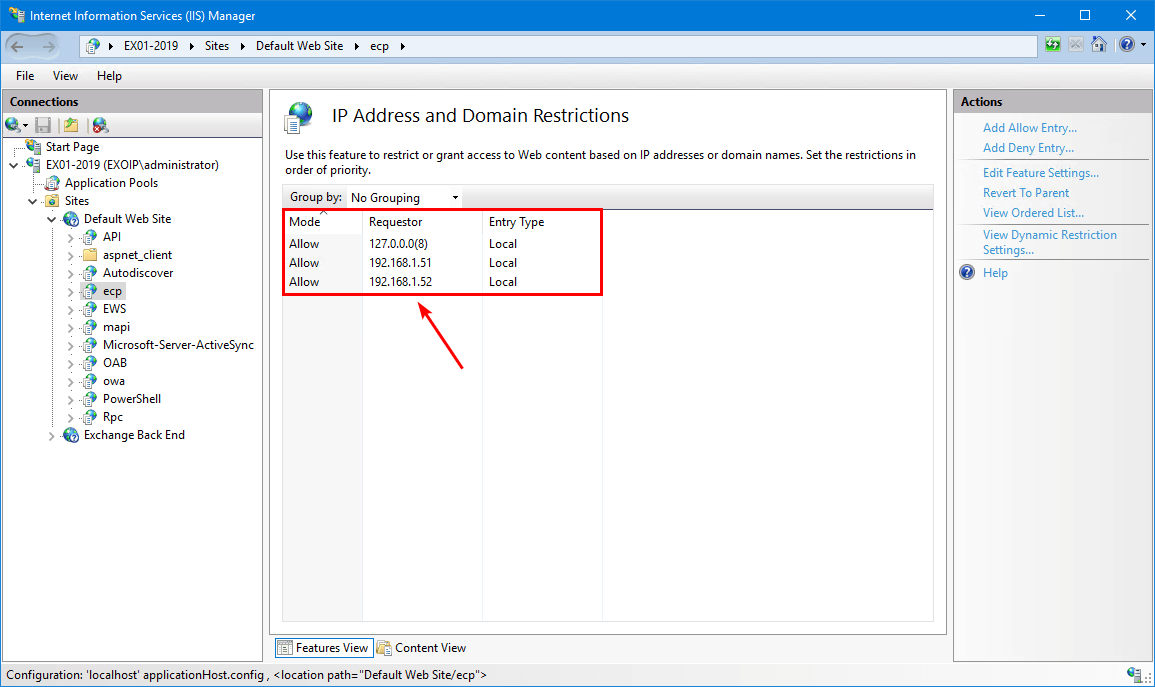
Add allow entry
Allow localhost to access the Exchange Server:
- Click on Add Allow Entry
- Add the IP address range 127.0.0.0 with prefix 8
- Click OK
Suppose you want to add the subnet mask instead of the prefix. That will be 255.0.0.0.
Add other IP addresses to the allow list.
Note: It’s not recommended to allow ECP access on the whole internal LAN. If you have management servers, add the IP addresses to the allow list.
In our example, we have the following systems in the allow list:
- 127.0.0.0(8) (localhost)
- 192.168.1.51 (Management Server)
- 192.168.1.52 (Exchange Server)
Verify access to ECP
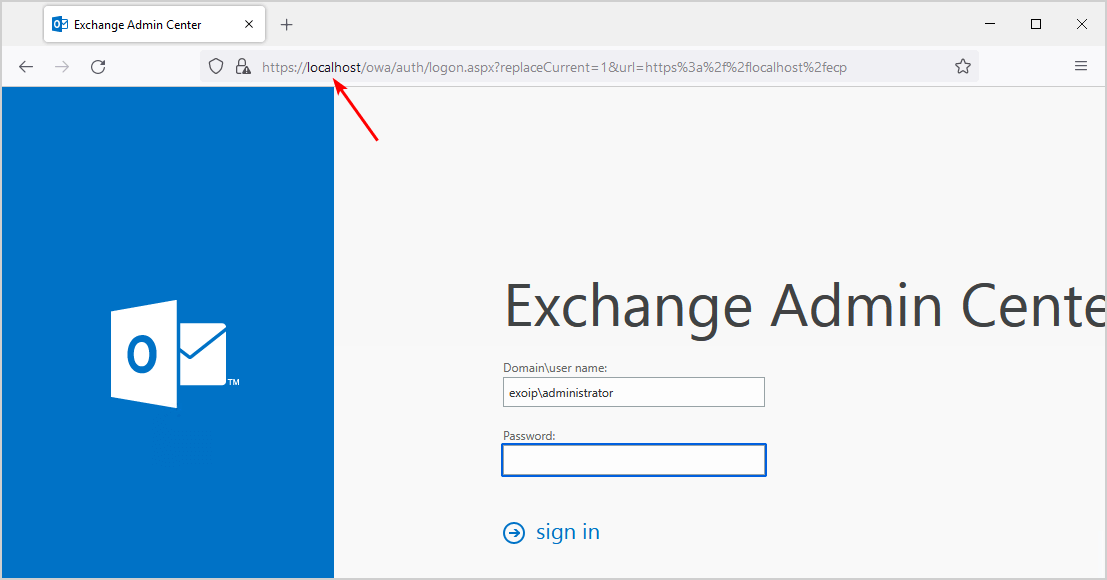
Start ECP from the Exchange Server. Make sure you insert the local hostname https://localhost/ecp. You do see the sign-in screen, and you can successfully sign in.
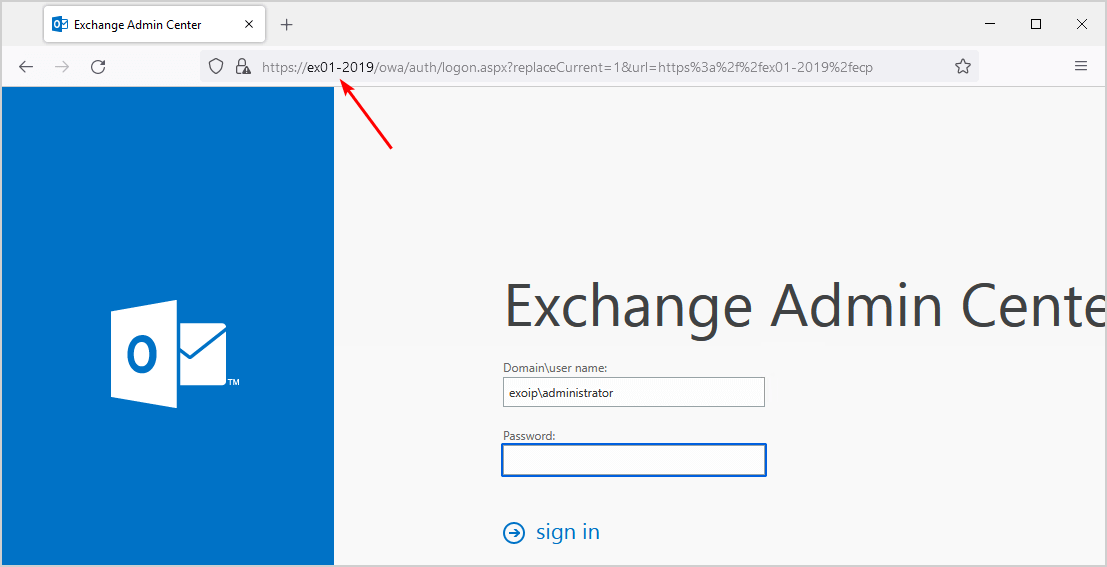
Start ECP from the IP addresses on the allow list. Make sure you insert the Exchange Server hostname. For example, https://EX01-2019/ecp. You do see the sign-in screen, and you can successfully sign in.
Note: Navigating to the Exchange Server hostname ECP (https://EX01-2019/ecp) from the Exchange Server will not work. However, it will work on other allow-listed systems. Instead, use localhost or the internal DNS name.
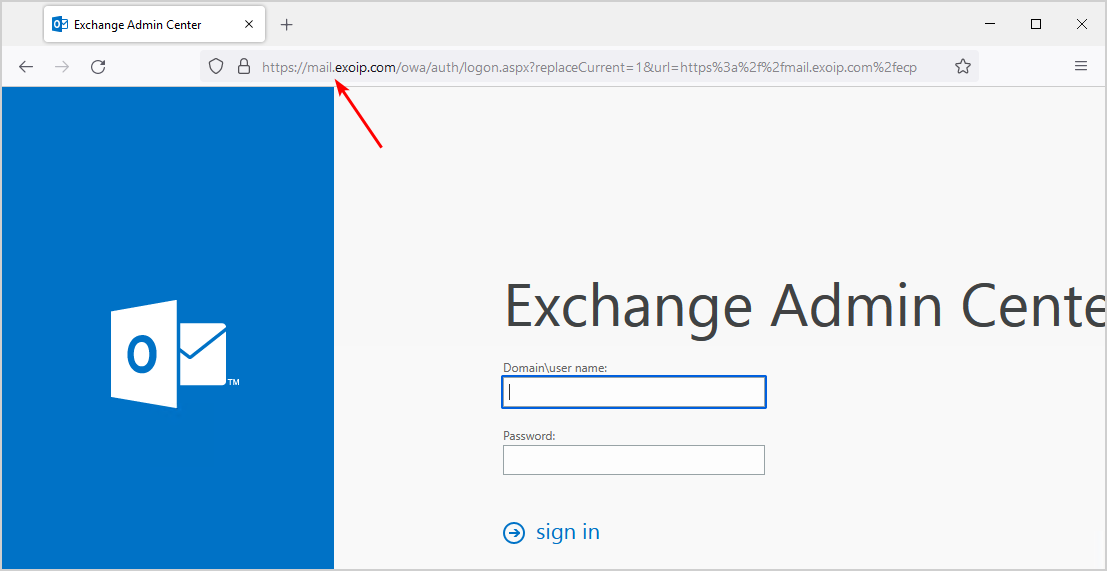
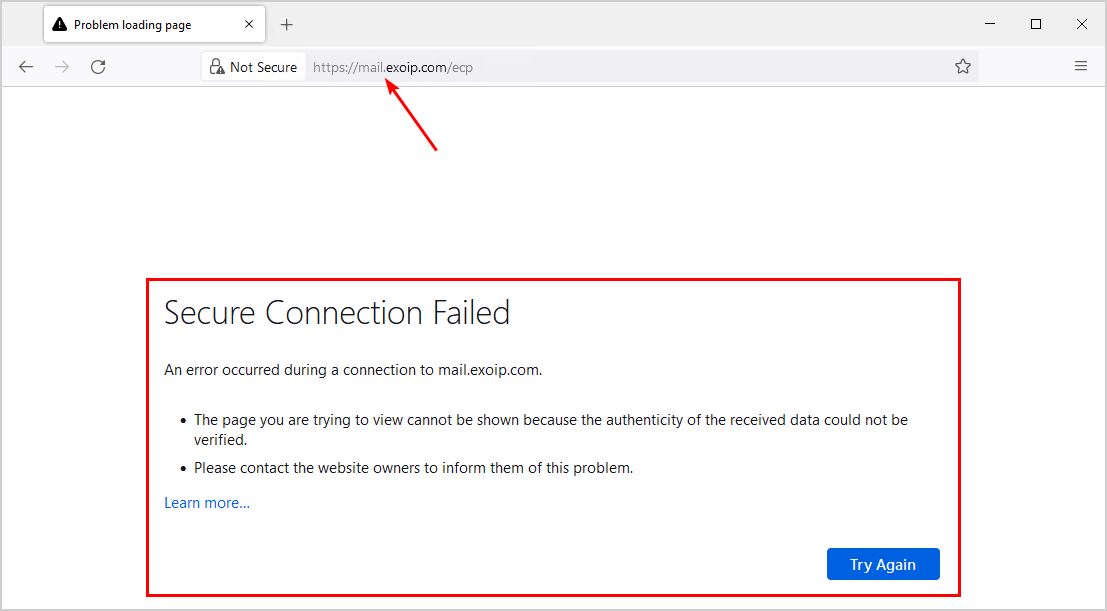
Start ECP from the IP addresses on the allow list. Make sure you insert the Exchange Server internal DNS. For example, https://mail.exoip.com/ecp. You do see the sign-in screen, and you can successfully sign in.
Start ECP from an external or non-added IP system. It will not show the Exchange Admin Center (ECP) and abort the connection.
That’s it!
Read more: Exchange HTTPS high availability with Kemp load balancer »
Conclusion
You learned how to disable external access to ECP in Exchange Server. The IP Address and Domain Restrictions is one of the great built-in features which allows to selectively permit or deny access to ECP in Exchange Server. Remember to test after you apply the configurations. Think smart before allowing access to ECP.
Did you enjoy this article? You may also like Configure Internal and External URL in Exchange. Don’t forget to follow us and share this article.
What Others Are Reading

As of today, with this method, it works for me entering like this:
https://exch1/ecp/?ExchClientVer=15
https://exch2/ecp/?ExchClientVer=15
Or from the Exchange Server like this:
https://localhost/ecp/?ExchClientVer=15
Always from the supported IPs.
But it does not work for me by entering https://mail.exoip.com/ecp/?ExchClientVer=15
I clarify that mail.exoip.com is an A record pointing to my load balancer in my DMZ. And that I use an Alternative Service Account.
It works on 2013 exchange, Great post!
With this solution, Options is not available in OWA.
In Exchange 2019 the best alternative is blocking with client access rule. While coexistence, ecp will redirect to older version, which does not support it, so do not panic, if it does not work.
As of 2023, this method does not work, please help and revise.
I tested it right now on a new Exchange Server 2019, and everything works as described.
When i choose deny and abort option it denies access for external and internal both even I have specified allowed list.
Three items:
1. I have also been adding FE80:: (10) to the allow list. Exchange seems to randomly make references using IPV6 as well. This cleaned up some occasional issues we were having.
2. I agree with the idea of restricting internal access to IT subnets/management workstations. That said, is it only necessary to do these steps on internet facing exchange servers? Since OWA proxy’s requests to other servers, does that mean that even internal exchange mailbox servers also require these blocks?
3. What about other virtual directories? I got a cyber-insurance form the other day that asked if we were blocking EWS and POWERSHELL??
This does not work for me. As a result ECP is blocked from in and outside. Any thoughts?
Same here in one environment.
Last month, I did all of this in four-five Exchange environments and everything works perfect but today, in new environment, the ECP is blocked from in and from VPN although I put their IP ranges on the IIS allow list. Why!?
Nice job! It turned out most of the settings where already there on my Exchange 2016 server. Only difference was for ‘Edit IP and Domain Restrictions Settings’ – the Deny Action Type was ‘Forbidden’. Changing it to Abort shows in the browser ‘Not found’.
thanks for your article.
Ali,
I’ve used a few of your articles, including this one. many thanks for your help! it goes mostly unrewarded as we try to resolve the issue and forget to pay credit where it is due.
appreciate you.
hi
how can i automate this with powershell? someone has idea?
(in case i must deploy new exchange server)
thanks a lot
p-h schneider
Well, Deny Action Type set to “Abort”. It works. Thank you so much, very good article.
Best to restrict “IP Address and Domain Restrictions” with Deny Action Type to “Abort”. In my environment i wanted to restrict all access for external and internal users except some individual IP’s. It worked great in our scenario.
I was able to block ECP with the instructions. However, it appears that there is a redirect within OWA that bypasses this block. For example https://mail.domain.com/ecp is blocked but https://mail.domain.com/owa/auth/logon.aspx?url=https%3a%2f%2fmail.domain.com%2fecp%2f&reason=0
is not blocked and asks for authentication to ECP. How can the second url be blocked in IIS?
You will see the Exchange Admin Center (ECP) page. But, when you try to sign in, it will abort the session and not work.
Unfortunately, I am having the same issue with https://webmail.domain.com/owa/auth/logon.aspx?replaceCurrent=1&url=https%3a%2f%2fwebmail.domain.com%2fecp. If I type in known good credentials, it will either bounce back to the login page or will produce an error, depending on what “Deny Action Type” is set to. However, if I type in wrong credentials, it tells me “The user name or password you entered isn’t correct. Try entering it again.” So it will at least give an intruder an idea of whether they have good credentials or not. That’s not good enough for our cybersecurity insurance company. They want this panel turned *OFF*. Is there any update on a way to do this?
We are having the same issue. Anyone have a solution for this?
At first this too didn’t work for me and could not deny external access to ECP/EAC when following that article. Looks like others were too. My setup consists of two 2016 Exch servers behind a Load Balancer / VIP.
For me, my Load Balancer’s eth0 and eth1 IP addresses were being sent to the Exch servers as the source IPs. So the “Order List” within IP Address and Domain Restrictions, needed to be the following:
Allow | 127.0.0.0(8) | which is localhost
Deny | 10.10.10.250 | IP of LB eth0
Deny | 10.10.10.251 | IP of LB eth1
Allow | 10.10.0.0(16) | which is my internal network
So with this modification, to support my Exch servers via EAC internally, I connect to them directly and not through the VIP i.e.:
https://exch1/ecp/?ExchClientVer=15
https://exch2/ecp/?ExchClientVer=15
Merci infiniment pour ce bel et intéressant article
Just tried these instructions on an Exchange 2019 server. They don’t seem to work very well.
The ECP page comes up and users can try to log in. If they use the wrong credentials they get a message about wrong credentials. However, if they use a set of good credentials, the get taken back to the login page.
Anyone else experience this?
I updated the article and tested it myself. Everything should work. Try it again.
It works great. Thanks!
I tried this and now it blocks both internal/external access to the ECP. I tried removing the IP and Domain restrictions role but I still cannot access the ECP internally. Its only through the local host
Thanks for your great work. I have the same questions as Zakaria. I would like to restrict access to all virtual directories (EWS, OWA, powershell, Mapi, etc.) to only the IP ranges internal LAN and VPN range. Anything major issues you see here?
It works great. Thanks!
I have found trying to do this works… it blocks external access to ECP. It ALSO blocks internal access from the server in question. Basically… it blocks ALL access to ECP. It doesn’t seem to follow the allow list at all.
I’m followed up this guide, and did every step on my exchange server 2016,
but isn’t worked for me 🙁
One possible word of warning though.
From my experience, if you make these changes then any users that uses OWA to check their mail can no longer change their options as options require them access ECP.
If there is a way around this, I would love to know!
Internally you can add all subnets to the allow list. Use the IP Range and enter the lowest possible address on your network with a mask that will include them all. For example 192.168.0.1/255.255.0.0. That would cover any subnet starting with 192.168. Externally, you’re out of luck. I haven’t found a way around that one.
if allow 192.168.x.x => edit 192.168.0.0/16
Can i use the same method to block EWS and OWA for external access?