Microsoft released Cumulative Update 23 for Exchange Server 2016 (KB5011155) on April 20, 2022. Also…
Disable remote PowerShell for non-admins
Every user in Active Directory will have remote PowerShell enabled by default. For security reasons, it’s strongly recommended to disable remote PowerShell access for non-admins and service accounts in the organization. In this article, you will learn how to disable remote PowerShell for non-admins.
Table of contents
Before you start
It’s good to understand that there are several options on how to disable remote PowerShell access for non-admins. Choose one of the methods below that works best for your organization.
Disable remote PowerShell for non-admins
The first method is to get all the users and disable remote PowerShell. After that, enable it for the admins and service accounts that need remote PowerShell access.
Step 1. Run Exchange Management Shell as administrator.
Step 2. Disable Remote PowerShell for all users.
Get-User -ResultSize Unlimited -Filter 'RemotePowerShellEnabled -eq $true' | Set-User -RemotePowerShellEnabled $falseStep 3. Verify that Remote PowerShell is disabled for all users.
Get-User -ResultSize Unlimited -Filter 'RemotePowerShellEnabled -eq $true' | ft Name,UserPrincipalNameStep 4. Enable Remote PowerShell for the user(s) that needs it. This is most likely the administrator accounts and service accounts.
Set-User -Identity "userprincipalname" -RemotePowerShellEnabled $trueDisable remote PowerShell for non-admins (script)
The second method is to run the below PowerShell script as a scheduled task every night or every couple of hours. It will ensure that the user accounts in the defined security group have Remote PowerShell enabled and that all other user accounts are disabled for Remote PowerShell.
Note: We recommend this method because new users you create will have Remote PowerShell enabled. Scheduling the script below will automatically disable RemotePowerShell for the users not in the defined security group.
Step 1. Start Active Directory Users and Computers.
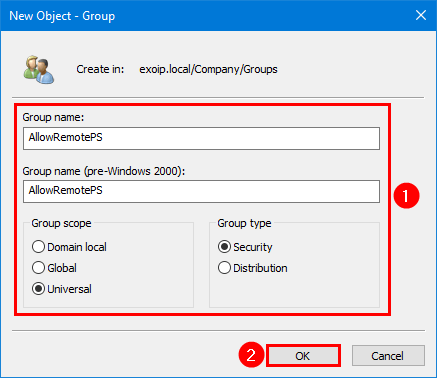
Step 2. Create a security group with the name AllowRemotePS.
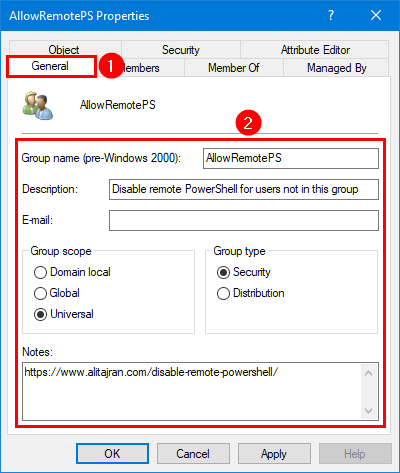
Step 3. Open the AllowRemotePS group, click on the General tab and fill in the description Disable remote PowerShell for users not in this group.
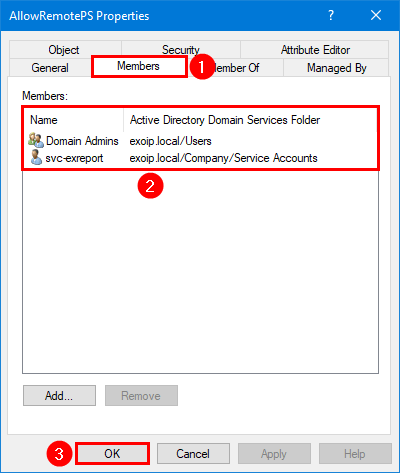
Step 4. Click on the Members tab and add the administrators/service accounts that need remote PowerShell access. Click OK.
Step 5. Download and place DisableRemotePS.ps1 PowerShell script in C:\scripts\ folder.
Ensure the file is unblocked to prevent errors when running the script. Read more in the article Not digitally signed error when running PowerShell script.
Another option is to copy and paste the below code into Notepad. Give it the name DisableRemotePS.ps1 and place it in the C:\scripts\ folder.
# Load Exchange Management Shell PowerShell Snap-In
Add-PSSnapin Microsoft.Exchange.Management.PowerShell.SnapIn

# Allow Remote PowerShell Group
$AllowRPSGroup = "AllowRemotePS"

# Get all users with enabled Remote PowerShell
$AllUsers = Get-User -ResultSize Unlimited -Filter 'RemotePowerShellEnabled -eq $true' | select SamAccountName, RemotePowerShellEnabled

# Get all users from AllowRPSGroup
$AllowUsers = Get-ADGroupMember $AllowRPSGroup -Recursive | ForEach-Object { Get-User -Identity $_.SamAccountName | select SamAccountName, RemotePowerShellEnabled }

# Enable Remote PowerShell for allowed users
foreach ($AllowUser in $AllowUsers) {
    if ($AllowUser.RemotePowerShellEnabled -eq $false) {
        Set-User $AllowUser.SamAccountName -RemotePowerShellEnabled $true
    }
}

# Disable Remote PowerShell for all users
foreach ($User in $AllUsers) {
    if ($AllowUsers.SamAccountName -notcontains $User.SamAccountName) {
        Set-User $User.SamAccountName -RemotePowerShellEnabled $false
    }
}
Step 6. Run Exchange Management Shell as administrator and run the script.
C:\scripts\DisableRemotePS.ps1Step 7. Verify that Remote PowerShell is enabled for the AllowRemotePS security group users.
Get-User -ResultSize Unlimited -Filter 'RemotePowerShellEnabled -eq $true' | ft Name,UserPrincipalNameStep 8. Create a scheduled task so the script will run every night or every couple of hours.
Admin account locked out from remote PowerShell
What if the admin account gets locked out, and you can’t connect with Exchange Management Shell?
Suppose you forget to enable Remote PowerShell for the admin account and Exchange Management Shell does not connect to the Exchange Server anymore, follow the below steps:
Step 1. Close Exchange Management Shell
Step 2. Run PowerShell as administrator (note that this is PowerShell and not Exchange Management Shell):
Step 3. Add the Exchange Management PowerShell Snap-In:
Add-PSSnapIn Microsoft.Exchange.Management.PowerShell.SnapinStep 4. Enable Remote PowerShell for the admin account:
Set-User -Identity "userprincipalname" -RemotePowerShellEnabled $trueStep 5. Start Exchange Management Shell, and everything works as you expect.
Conclusion
You learned how to disable remote PowerShell for non-admins and non-service accounts. The best method is to create a security group and add the admin accounts/service accounts that need remote PowerShell enabled. As last, schedule the PowerShell script and focus on other tasks.
Did you enjoy this article? You may also like Secure Active Directory passwords from breaches. Don’t forget to follow us and share this article.
What Others Are Reading


The script runs, but has an unexpected result.
1.) It claims one of our conf rooms (i.e. a ressource) beeing a member of the admins group.
2,) we have 2 users fas and fas2 which can not be handled by the script, it throws an exception. But fas appears now in the list of allowed admin users. But fas has no admin rights in AD
How can this happen?
keep up your good work
Roman
Hi,
Thank you for your work, it is outstanding with every article you post!
One question – can this be applied in Azure AD and automated in a similar way you show for on-prem AD?
Be,
Stan
Thank you for this information, question this script need to be schedule to run on Exchange or AD or can by on any server?
I recommend scheduling it on the Exchange Server.
It’s possible to schedule the script on a different server. You only need to install the Exchange Management tools on that server.
That’s because the script (see lines 1-2) needs to load Exchange Management Shell PowerShell Snap-In.