After installing and configuring Exchange Server, the next step is to test the mail flow.…
Exchange namespace design and planning
Exchange Server namespace design and planning are some of the most critical tasks. If you configure it right, you will spare yourself a lot of headaches. Therefore, it’s essential to understand the Exchange namespace design and plan it accordingly. In this article, you will learn Exchange namespace best practices configuration.
Table of contents
Information Exchange namespace design
When installing Exchange Server, the internal URLs match the fully qualified domain name (FQDN) of the Exchange Server. This design is by default.
Let’s have examples of how internal hostnames look like:
- .local
- .priv
- .internal
- .lan
You are asking for trouble if you proceed like this, for example:
- You can’t buy a third-party certificate based on the internal FQDN URLs
- Autodiscover certificate warnings and issues when connecting with clients
- You can’t load balance between multiple Exchange Servers with an internal FDQN
- Adding another Exchange Server in the environment will cause problems
- Configuring Exchange Hybrid deployment will cause problems
Note: We recommend making use of a generic namespace. For example, mail.yourdomain.com.
In our example, we have an internal domain with the name exoip.local and external domain exoip.com. Therefore, we will configure the namespace as mail.exoip.com.
Exchange namespace planning
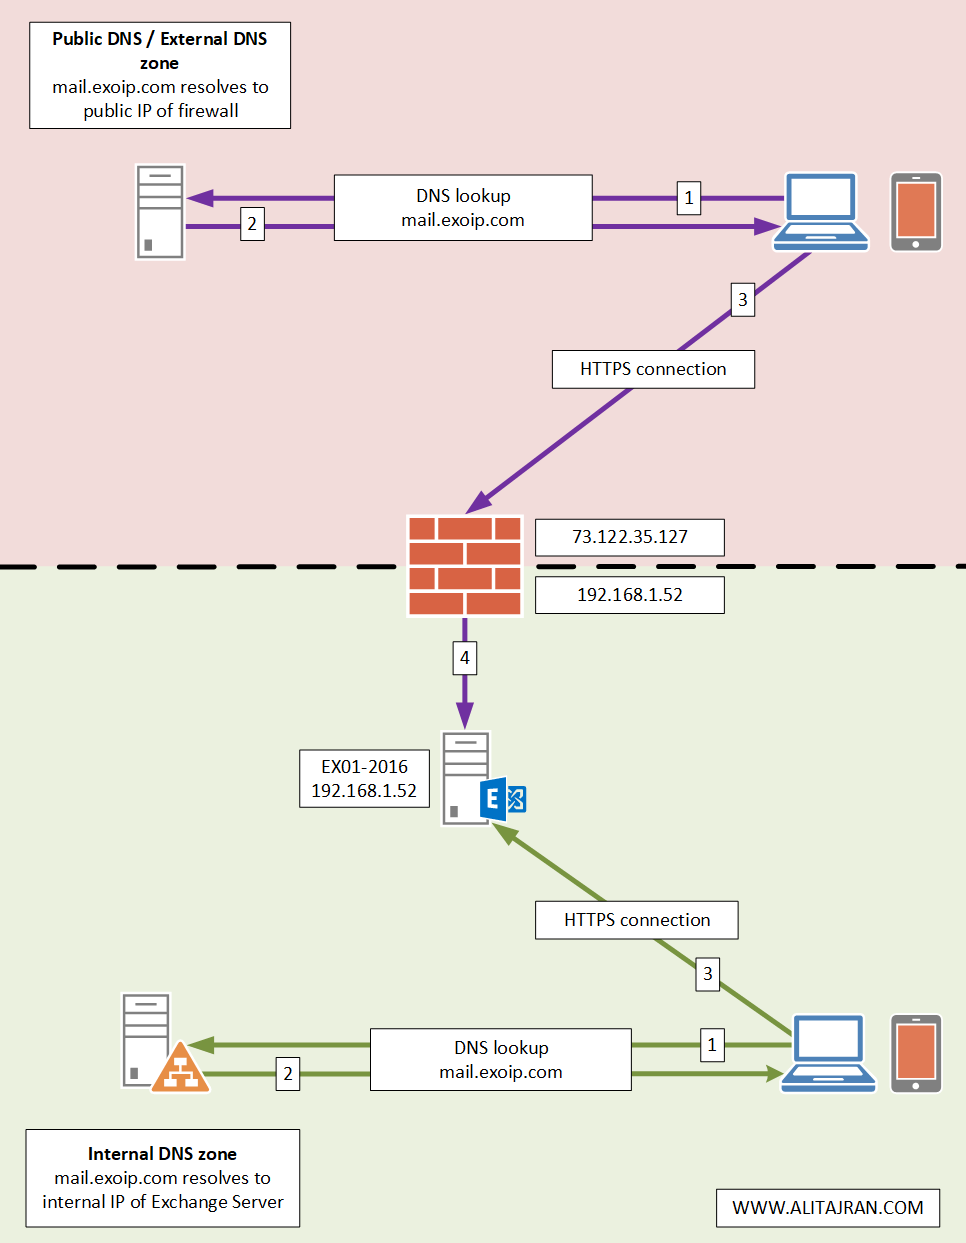
An architecture view of the Exchange namespace is shown below in the diagram.
- The public DNS/External DNS zone will have a mail.exoip.com record that resolves to the public IP address of the firewall or router. It will then NAT any external connections to the Exchange Server internal IP.
- The internal DNS zone will have a mail.exoip.com record that resolves to the internal IP address of the Exchange Server.
Configure internal DNS for Exchange
Configure the DNS zones internally with Pinpoint DNS. Both these records are A records.
| Record Type | DNS Name | Internal IP Address |
|---|---|---|
| A | mail.exoip.com | 192.168.1.52 |
| A | autodiscover.exoip.com | 192.168.1.52 |
Read the article Configure internal DNS for Exchange.
Configure internal and external URL in Exchange
Configure the internal and external URLs with the same name. Almost all the URLs will have mail.exoip.com in the configuration. That’s because the AutoDiscover URL will be different.
| Service | Internal and External URL |
|---|---|
| AutoDiscover | https://autodiscover.exoip.com/Autodiscover/Autodiscover.xml |
| Exchange Control Panel | https://mail.exoip.com/ecp |
| Exchange Web Services | https://mail.exoip.com/EWS/Exchange.asmx |
| Exchange ActiveSync | https://mail.exoip.com/Microsoft-Server-ActiveSync |
| Offline Address Book | https://mail.exoip.com/OAB |
| Outlook Web App | https://mail.exoip.com/owa |
| MAPI over HTTP | https://mail.exoip.com/mapi |
| Outlook Anywhere | mail.exoip.com |
Read the article Configure Internal and External URL in Exchange.
Configure external DNS for Exchange
There are three record types that we will add to the public DNS. These are the A record, CNAME record, and MX record.
Note: Always use a spam filter to protect your Exchange Server organization from incoming and outgoing spam. The one we recommend is the SpamBull cloud spam filter.
| Record Type | TTL | DNS Name | Priority | Value |
|---|---|---|---|---|
| A | 300 | mail.exoip.com | 73.122.35.127 | |
| CNAME | 300 | autodiscover.exoip.com | mail.exoip.com. | |
| MX | 300 | @ | 10 | mx1.spambull.com. |
| MX | 300 | @ | 20 | mx2.spambull.com. |
| MX | 300 | @ | 30 | mx3.spambull.com. |
| MX | 300 | @ | 40 | mx4.spambull.com. |
Read the article Configure external DNS for Exchange.
Conclusion
You learned the Exchange namespace best practices. It’s essential to have an architecture view of the namespace design before you start to configure. Save yourself trouble in the future, and don’t use internal hostnames for the internal URLs.
Did you enjoy this article? You may also like Exchange high availability namespace design and planning. Don’t forget to follow us and share this article.
Hi,
Thanks for the content, it’s been very helpful. Just a question on the virtual directories, I’ve got a DAG setup in my 2019 environment. Should all of the servers be using the same internal/external URL for their virtual directories?
Thanks in advance
Yes.
Hi Ali.
Thank you for your very well axplained information on your pages about Exchange configuration.
I used your scripts for doublechecking my namspace, DNS and internal/external URLs.
Even all looks very correct, my sendet email headers still show up the internal URL from my mail server mx.domain.de, which is mx.domain.local. The FQDN of the Exchange sending connector is correct, SMTP-namespace also.
Meanwhile I believe in an bug. Do you have any ideas?
Thanks for your attention
Eugen
You can follow the article Remove message header in Exchange Server.