We don't recommend to enable circular logging in Exchange Server. That's because an excellent backup…
Export Exchange mailbox to PST with PowerShell
It’s useful to export Exchange mailbox to PST. For example, an employee is leaving the organization, and you want to archive the mailbox to a PST file. By default, no user can import and export to PST file in Exchange Server. You need the role permissions before you can do that. In this article, you will learn how to export Exchange mailbox to PST with PowerShell.
Table of contents
Information exporting Exchange mailbox to PST file
Exporting an Exchange on-premises mailbox is different than exporting an Office 365 mailbox. Are you looking at how to export an Office 365 mailbox to PST file? Read the article: Export Office 365 mailbox to PST.
In the article, we will export an Exchange on-premises mailbox. The steps that we will take are:
- Check if the account has role permission
- Create a network folder for the PST export
- Export the mailbox to a PST file
- Remove role permissions
Check Mailbox Import Export role permission
The Mailbox Import Export management role enables administrators to import and export mailbox content and purge unwanted content from a mailbox. Therefore, we need to have access to the Mailbox Import Export role. If we don’t have access, we can’t export PST files from Exchange Server.
I wrote an article about it. Read more about New-MailboxExportRequest is not recognized.
After you have the role assigned, you will have permission to export PST in Exchange. See the next step of creating a network share folder.
Create a network folder for the PST export
If we export the mailbox data to PST file, it needs to be saved to a folder. We will create a folder with the correct permissions.
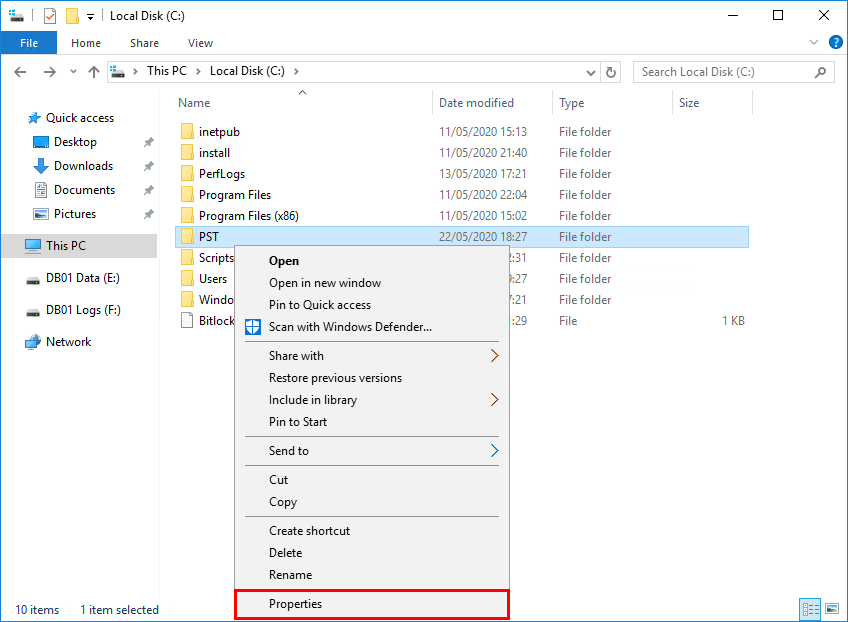
Create a folder named PST in your C: drive. Right-click the PST folder and click properties.
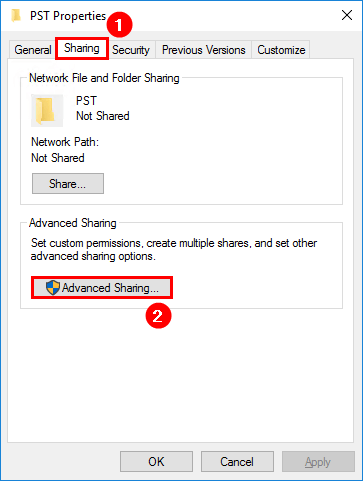
Select the tab Sharing and click Advanced Sharing…
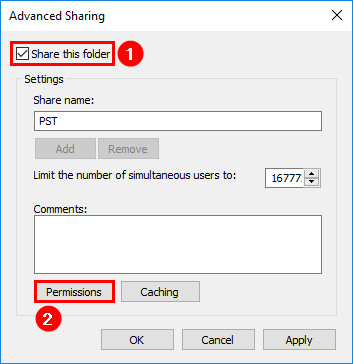
Enable Share this folder. Click Permissions.
Add the Exchange Trusted Subsystem group with Change/Read permissions.
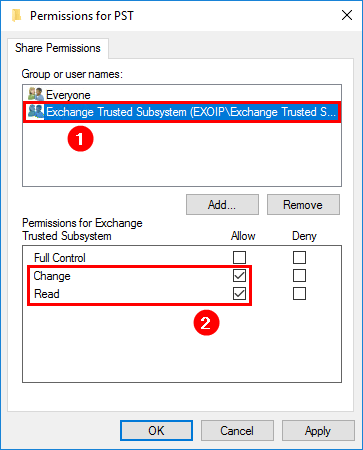
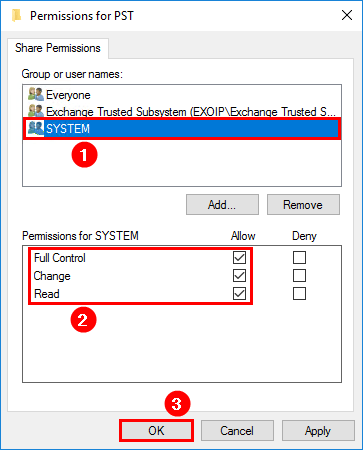
Add the SYSTEM account with Full Control permissions. Click OK.
Now that you have created a network share for the PST files, you can export the mailbox to PST in Exchange.
Export Exchange mailbox to PST with PowerShell
List the mailboxes if you don’t have the name of the mailbox name. It will list all the mailboxes in the organization.
[PS] C:\>Get-Mailbox -ResultSize Unlimited

Name                      Alias                ServerName       ProhibitSendQuota
----                      -----                ----------       -----------------
Administrator             Administrator        ex01-2016        Unlimited
Amanda Morgan             amanda.morgan        ex01-2016        Unlimited
Anna Welch                anna.welch           ex01-2016        Unlimited
Benetiz Anees             benetiz.anees        ex01-2016        Unlimited
Boris Campbell            boris.campbell       ex01-2016        Unlimited
Important: Did you assign permissions in the last part? Close Exchange Management Shell and rerun it for changes to take effect.
Ensure that you use the Alias when running the next command behind the -Mailbox parameter to export PST.
[PS] C:\>New-MailboxExportRequest -Mailbox "amanda.morgan" -FilePath "\\ex01-2016\pst\amanda.morgan.pst"

Name          Mailbox                                    Status
----          -------                                    ------
MailboxExport exoip.local/Company/Users/HR/Amanda Morgan Queued
Bulk export Exchange mailbox to PST with PowerShell
Run the command to bulk export Exchange mailboxes to PST.
[PS] C:\>foreach ($Mailbox in (Get-Mailbox -ResultSize Unlimited)) {New-MailboxExportRequest -Mailbox $Mailbox.DisplayName -FilePath "\\ex01-2016\PST\$($Mailbox.Alias).pst"}Check mailbox export to PST status
Check the status of the export.
[PS] C:\>Get-MailboxExportRequest | Get-MailboxExportRequestStatistics

Name          StatusDetail SourceAlias   PercentComplete
----          ------------ -----------   ---------------
MailboxExport Completed    amanda.morgan 100
If you only want to filter on completed status.
[PS] C:\>Get-MailboxExportRequest -Status Completed

Name          Mailbox                                    Status
----          -------                                    ------
MailboxExport exoip.local/Company/Users/HR/Amanda Morgan Completed
The export of the mailbox to PST is 100% complete. Let’s verify by going to the network share path.

Now that you verified the export to a PST file in the folder, you can clear the completed export request statistics. Confirm with Y and press Enter.
[PS] C:\>Get-MailboxExportRequest -Status Completed | Remove-MailboxExportRequest

Confirm
Are you sure you want to perform this action?
Removing completed request 'exoip.local/Company/Users/HR/Amanda Morgan\MailboxExport'.
[Y] Yes  [A] Yes to All  [N] No  [L] No to All  [?] Help (default is "Y"): Y
The completed export statistics are successfully cleared.
Remove role permissions
Now that you finished the PST export, it’s good to remove the assigned permissions to the role. Read the article New-MailboxExportRequest is not recognized.
Conclusion
In this article, you learned how to export Exchange mailbox to PST with PowerShell. The next time will be much faster now that you followed the article and did a mailbox export to PST in Exchange. That’s because we walked you through the export Exchange mailbox to PST step by step. Don’t forget to remove the assigned role permissions when the PST export finishes.
The documentation by Microsoft gives you extra information regarding mailbox exports to PST files in Exchange Server. Did you enjoy this article? You may also like Repair corrupted mailbox Exchange. Don’t forget to follow us and share this article.
i have mailbox primary smpt 50GB and run “New-MailboxExportRequest” reach to 100 % and restart in A loop ? any one help me
Pls share step import pst all file to mailbox exchnage
Hello Ali Tajran,
We have requirement to export data from shared mailboxes on specific folders into PST file . Could you please help us to do through powershell.
Many Thanks in Advance
Hello, Ali,
I want to export the inbox and sent items but I want to specify a date range, How can I ?
I refer back to this every now and then when it’s been a long time between exports. Good stuff!
Is there a way to get the email confirmation when using the EAC command line? When you do this through the GUI you get forced to send email confirmation i think.
When you export a mailbox to PST in Exchange Admin Center, you can send an email when:
-Import PST request is received
-Import PST has finished
You can get these emails when you export a mailbox to PST with Exchange Management Shell. See below for the commands:
Hi Ali,
Many thanks for yet another great article. The only thing I missed was an entry that this does not work for Office 365. That said, after assigning yourself with Full Control permission to the mailbox in question, you can open mailbox in your Outlook and use the built-in export to PST feature. Not the best, but so far the only solution I’ve found.
Many thanks,
Chato
Hi Chato,
You’re welcome.
I added a paragraph at the top that these steps are for Exchange on-premises. Thanks!
Outlook is okay to use, but not convenient. I recommend exporting the Office 365 mailbox to PST from the Microsoft 365 compliance center.
What do you recommend as an alternative to using the ‘.pst’ format for back up?
Thank you for this!
This helped me tremendously!
You’re welcome, Tim.