The mailbox in Exchange can get corrupted or damaged. It can happen due to various…
Export remote IP addresses from Exchange receive connector
Do you like to know how to export remote IP addresses from Exchange receive connector? Sometimes you get asked which IP addresses are added in a particular receive connector. Most likely, it’s the SMTP relay receive connector that you have set up. Another case is that a second Exchange Server is installed, and you want to export and import the IP addresses to the receive connector. In this article, you will learn how to use PowerShell to export remote IP addresses from Exchange receive connector.
Table of contents
Check remote IP addresses in Exchange Admin Center
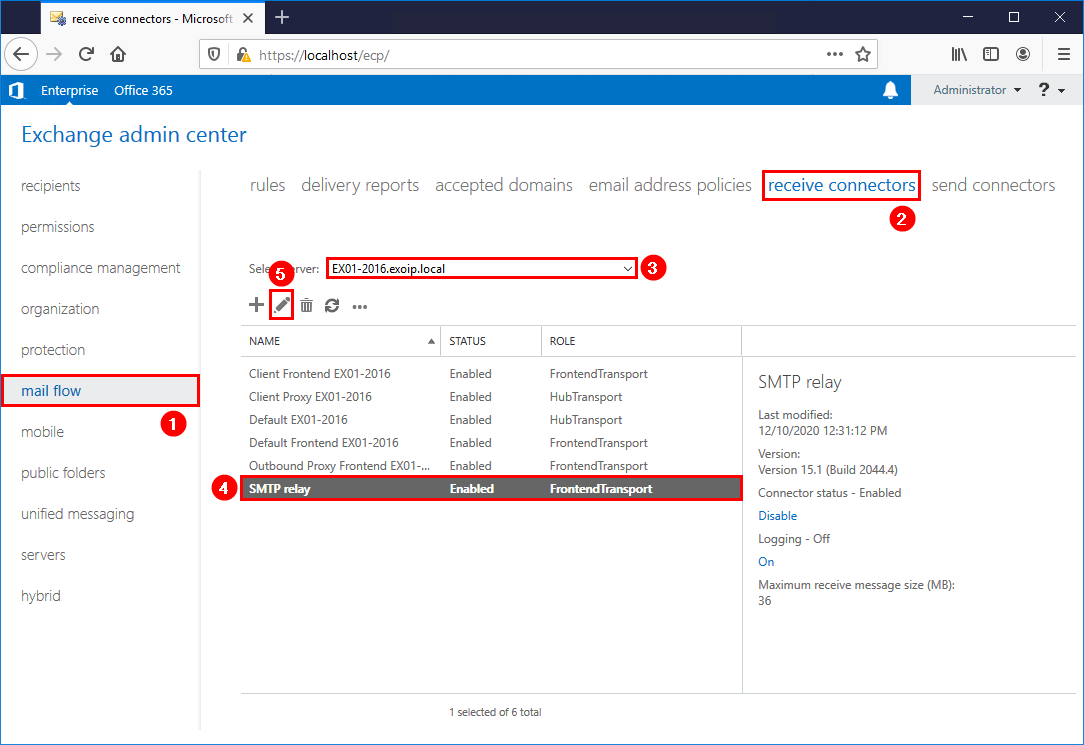
Sign in to Exchange Admin Center. Click in the feature pane on mail flow and follow with receive connectors in the tabs. Select the Exchange Server, which has the receive connector with the remote IP addresses set up. Click the receive connector in the list view and click the edit icon in the toolbar.
In our example, it’s Exchange Server EX01-2016.exoip.local and the SMTP relay receive connector.
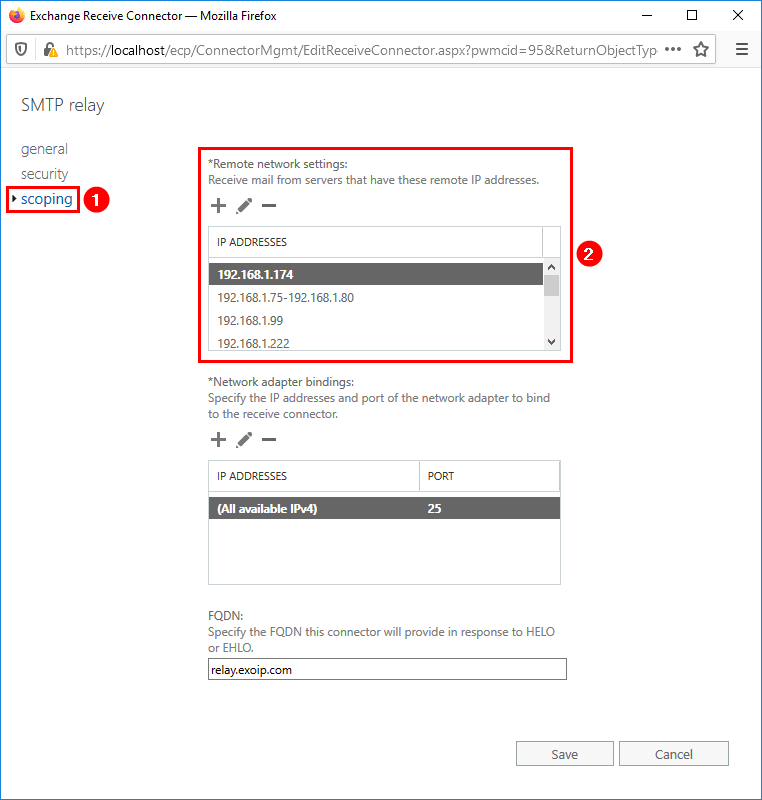
In the left menu, click on scoping and look at the section *Remote network settings. These are the remote IP addresses that we like to export.
What’s a great way to export the remote IP addresses from Exchange receive connector? One word: PowerShell.
Read more: List all SMTP addresses with PowerShell »
Get receive connector
Run Exchange Management Shell as administrator. Make use of Get-ReceiveConnector cmdlet.
Two Exchange Servers are running in the organization. On one of the Exchange Server, we have an SMTP relay receive connector configured. That’s because EX02-2016 is a new Exchange Server and only default receive connectors are installed.
[PS] C:\>Get-ReceiveConnector | Sort-Object Identity

Identity                                    Bindings                  Enabled
--------                                    --------                  -------
EX01-2016\Client Frontend EX01-2016         {[::]:587, 0.0.0.0:587}   True
EX01-2016\Client Proxy EX01-2016            {[::]:465, 0.0.0.0:465}   True
EX01-2016\Default EX01-2016                 {0.0.0.0:2525, [::]:2525} True
EX01-2016\Default Frontend EX01-2016        {[::]:25, 0.0.0.0:25}     True
EX01-2016\Outbound Proxy Frontend EX01-2016 {[::]:717, 0.0.0.0:717}   True
EX01-2016\SMTP relay                        {0.0.0.0:25}              True
EX02-2016\Client Frontend EX02-2016         {[::]:587, 0.0.0.0:587}   True
EX02-2016\Client Proxy EX02-2016            {[::]:465, 0.0.0.0:465}   True
EX02-2016\Default EX02-2016                 {0.0.0.0:2525, [::]:2525} True
EX02-2016\Default Frontend EX02-2016        {[::]:25, 0.0.0.0:25}     True
EX02-2016\Outbound Proxy Frontend EX02-2016 {[::]:717, 0.0.0.0:717}   True
Let’s add the -Server parameter and only filter on Exchange Server EX01-2016. The one that we are looking for is the SMTP relay receive connector.
[PS] C:\>Get-ReceiveConnector -Server "EX01-2016" | Sort-Object Identity

Identity                                    Bindings                  Enabled
--------                                    --------                  -------
EX01-2016\Client Frontend EX01-2016         {[::]:587, 0.0.0.0:587}   True
EX01-2016\Client Proxy EX01-2016            {[::]:465, 0.0.0.0:465}   True
EX01-2016\Default EX01-2016                 {0.0.0.0:2525, [::]:2525} True
EX01-2016\Default Frontend EX01-2016        {[::]:25, 0.0.0.0:25}     True
EX01-2016\Outbound Proxy Frontend EX01-2016 {[::]:717, 0.0.0.0:717}   True
EX01-2016\SMTP relay                        {0.0.0.0:25}              True
Now that we have identified the receive connector identity name, we can use it in the next step and get the remote IP addresses with PowerShell.
Get remote IP addresses from receive connector
Again, we will use the Get-ReceiveConnector cmdlet and this time with the -Identity parameter. Make use of the -RemoteIPRanges parameter and list all the remote IP addresses from the receive connector in a table.
Note: A table is easier to view than a list. If you like to have a list view instead, you can change Format-Table to Format-List in the cmdlet.
Everything looks great, and we can see the IP addresses in the Expression table.
[PS] C:\>(Get-ReceiveConnector -Identity "EX01-2016\SMTP relay").RemoteIPRanges | Sort-Object | Format-Table

LowerBound    UpperBound    Netmask CIDRLength   RangeFormat Size Expression
----------    ----------    ------- ----------   ----------- ---- ----------
192.168.1.70  192.168.1.80                              LoHi ::b  192.168.1.70-192.168.1.80
192.168.1.75  192.168.1.80                              LoHi ::6  192.168.1.75-192.168.1.80
192.168.1.99  192.168.1.99                     SingleAddress ::1  192.168.1.99
192.168.1.174 192.168.1.174                    SingleAddress ::1  192.168.1.174
192.168.1.221 192.168.1.221                    SingleAddress ::1  192.168.1.221
192.168.1.222 192.168.1.222                    SingleAddress ::1  192.168.1.222
192.168.1.234 192.168.1.234                    SingleAddress ::1  192.168.1.234
192.168.1.235 192.168.1.235                    SingleAddress ::1  192.168.1.235
192.168.1.240 192.168.1.240                    SingleAddress ::1  192.168.1.240
In the next step, we will export the output to a CSV file.
Export receive connector IP addresses
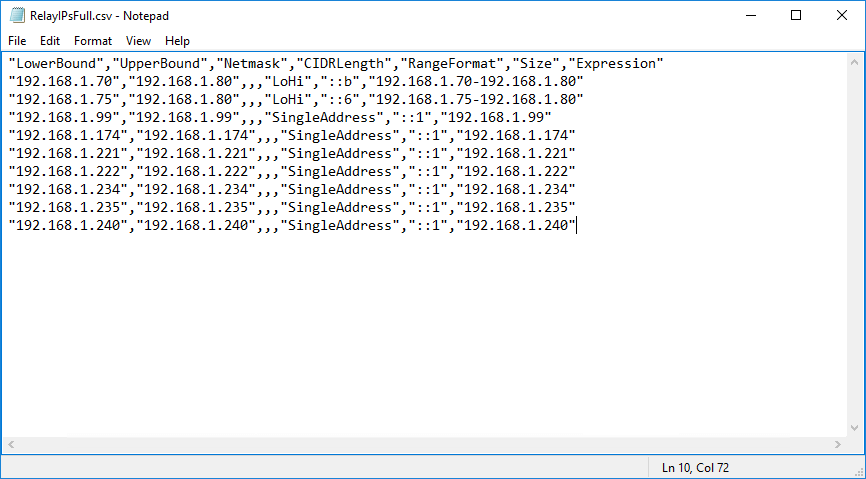
Export RemoteIPRanges to CSV file. Create a temp folder if you don’t have one already on the C: drive.
[PS] C:\>(Get-ReceiveConnector -Identity "EX01-2016\SMTP relay").RemoteIPRanges | Sort-Object | Export-Csv "C:\temp\RelayIPsFull.csv" -NoTypeInformationOpen the file RelayIPsFull.csv in Notepad or Microsoft Excel.
Get Remote IP addresses
We can only have an output of the table Expression, as that’s where the IP addresses are configured and what matters for us.
[PS] C:\>(Get-ReceiveConnector -Identity "EX01-2016\SMTP relay").RemoteIPRanges | Sort-Object | Select-Object Expression

Expression
----------
192.168.1.70-192.168.1.80
192.168.1.75-192.168.1.80
192.168.1.99
192.168.1.174
192.168.1.221
192.168.1.222
192.168.1.234
192.168.1.235
192.168.1.240
Export remote IP addresses
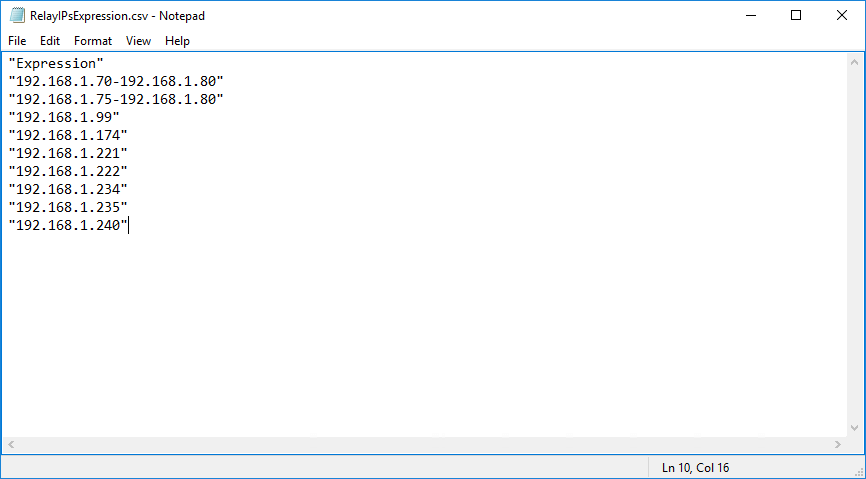
Everything looks fine in the output. Let’s export the output to a CSV file.
[PS] C:\>(Get-ReceiveConnector -Identity "EX01-2016\SMTP relay").RemoteIPRanges | Sort-Object | Select-Object Expression | Export-Csv "C:\temp\RelayIPsExpression.csv" -NoTypeInformationBy opening the CSV file RelayIPsExpression.csv in Notepad, we can confirm the output with the IP addresses.
In the next article, we will show how to import the IP addresses in a receive connector.
Keep reading: Find email addresses with PowerShell »
Conclusion
You learned how to export receive connector IP addresses from Exchange Server. In our example, we did export the remote IP addresses from the SMTP relay receive connector.
Next time someone asks you to export the IP addresses from a receive connector, run the cmdlet with PowerShell, and send the CSV file by email. Another reason is to export the remote IP addresses and look through them once in a while to know which IP addresses you can delete.
Did you enjoy this article? You may also like Exchange Server internal mail flow not working. Don’t forget to follow us and share this article.
What Others Are Reading

hello,
this was very useful for me!
Thanks a lot!
best Regards
Anita
Looks like this no longer works, at least not for more, expression is an empty array now so nothing is exported
It still works here with Exchange Server 2019.
Which Exchange Server version are you running it on?
This is for Exchange – is there a command to export the information from Exchange Online?
Dear Ali,
Thanks yours blog always help me on my daily routine task. GOD bless you. Ameen.
This was a great help.
Thanks
Hi Ali,
Found your blog most “to the point” blog and super clear steps. Appreciate your awesome efforts. God bless you.
Hi Ali
Just to let know, I recently found your blog which are very useful and to the point. Thank you very much and keep up the good work.
Regards
Tanvir