The Microsoft Exchange certificate is installed when you install an Exchange Server, and it's 5…
How to import certificate in Exchange Server
How to install a certificate in Exchange Server? It’s important to secure the Exchange Server with an SSL certificate. We have an SSL certificate that we like to import into Exchange Server. There are two ways to do that. One way is to install the certificate in Exchange Admin Center. The other way is to install the Exchange certificate with PowerShell. In this article, we will import a certificate with PowerShell and Exchange Admin Center.
Do you have more than one Exchange Server running in the organization? You can use the same certificate for other Exchange Servers.
Table of contents
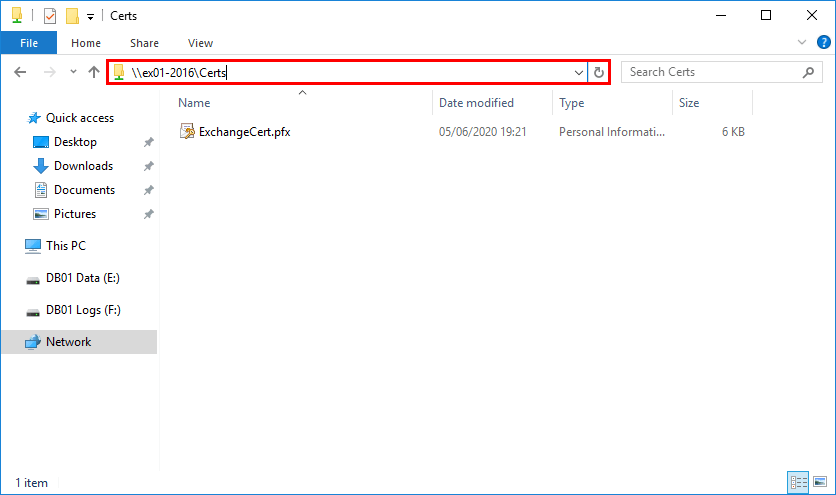
Create shared folder
Create a shared folder and place the SSL certificate in the folder. Make sure to assign permissions to the folder. For example, the SYSTEM account. If you don’t give permission, you cannot import the certificate, and an error will appear.
Import certificate in Exchange Server
Starting from Exchange Server 2016 CU23 and later and Exchange Server 2019 CU12 and later, the only option to import the Exchange certificate is with PowerShell (Exchange Management Shell).
Note: To prevent misuse of UNC paths by attackers, Microsoft removed the parameters that take UNC paths as inputs from the Exchange Server PowerShell cmdlets and the Exchange Admin Center. These changes will affect all cumulative update (CU) releases of Microsoft Exchange Server 2019 (CU12 and later) and Microsoft Exchange Server 2016 (CU23 and later). Read more in the article Exchange Server certificate changes.
Import Exchange certificate with PowerShell
Run Exchange Management Shell as administrator. Next, run the below command to import the certificate.
[PS] C:\>Import-ExchangeCertificate -Server "EX01-2016" -FileData ([System.IO.File]::ReadAllBytes('\\ex01-2016\Certs\ExchangeCert.pfx')) -PrivateKeyExportable:$true -Password (ConvertTo-SecureString -String 'P@ssw0rd1' -AsPlainText -Force)

Thumbprint                                Services   Subject
----------                                --------   -------
0C4C00B76EB7DB236573BF79258888D32C9B753D  .......    CN=mail.exoip.com
Read the article Install Exchange certificate with PowerShell.
The next step is to assign the certificate to the Exchange services.
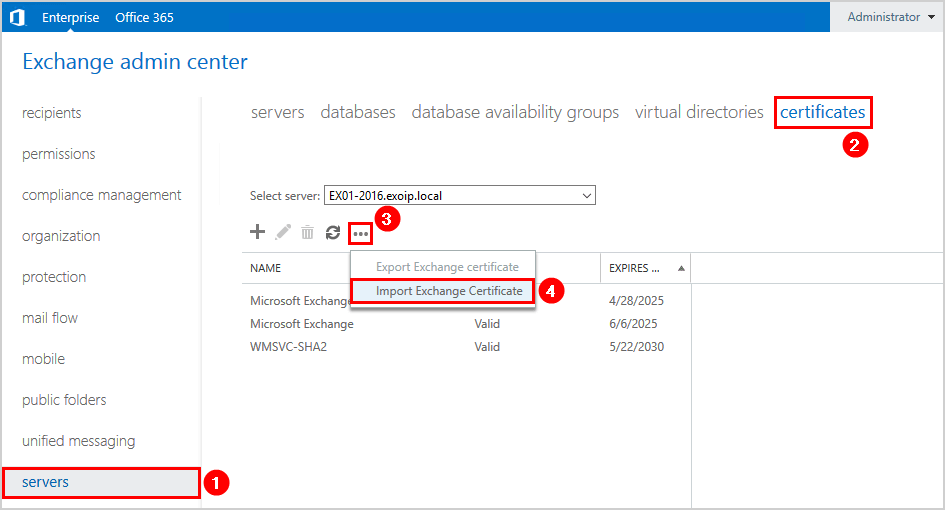
Import Exchange certificate in Exchange Admin Center
Suppose you have Exchange Server that is not running Exchange Server 2016 CU23 and later or Exchange Server 2019 CU12 and later, you can import the certificate in Exchange Admin Center.
Sign in to Exchange Admin Center. Click servers in the feature pane and click certificates in the tabs. Click … (More options) and select Import Exchange Certificate.
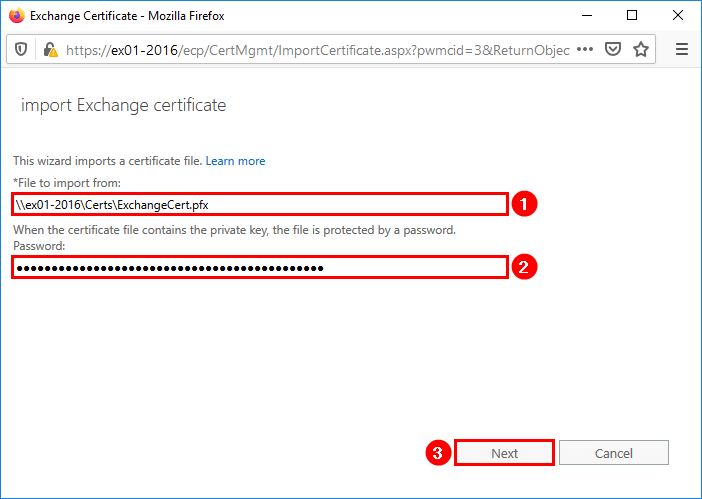
A new window will show up. Insert the path to the Exchange certificate. Fill in the password field. If there is no password configured for the certificate, you can leave it empty. Click Next.
Click + (Add) to select the Exchange Server.
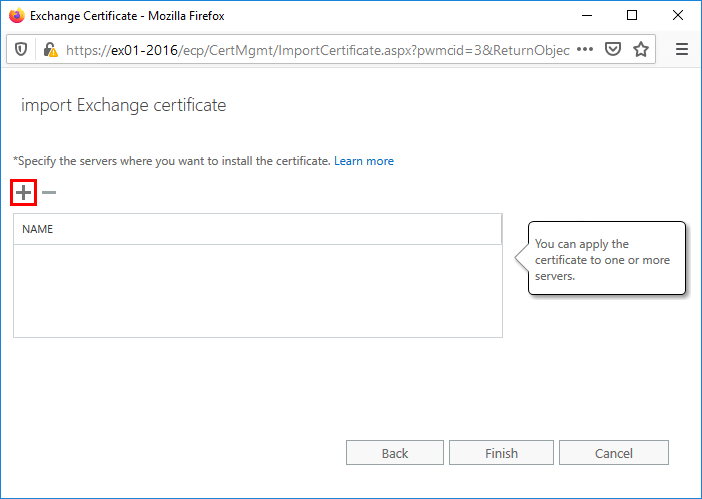
Select the Exchange Server. This is the server where the new certificate is going to be installed. Click Add and OK.
In my example, it’s EX01-2016.
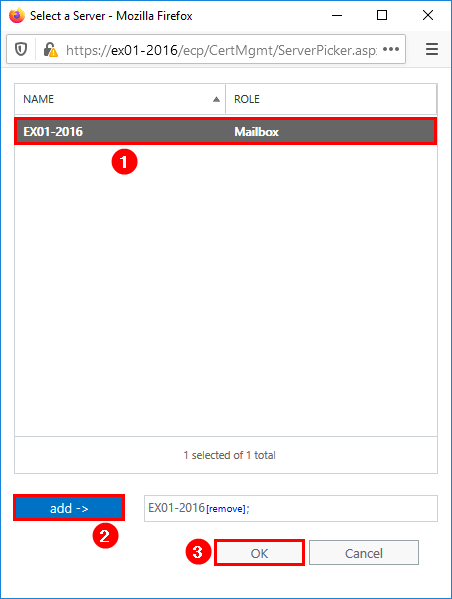
Click Finish.

The certificate is imported into Exchange Server. The next step is to assign the certificate to the Exchange services.
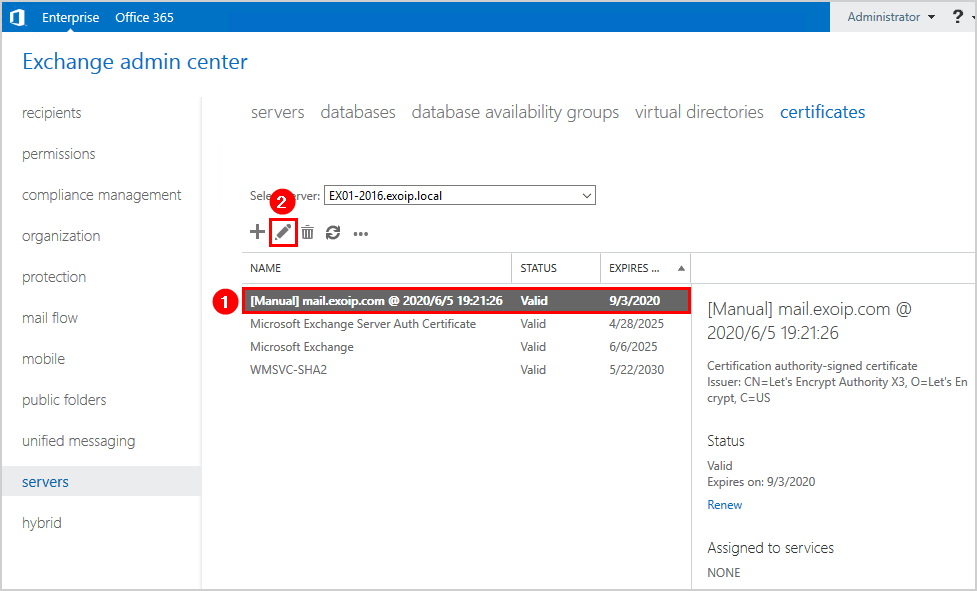
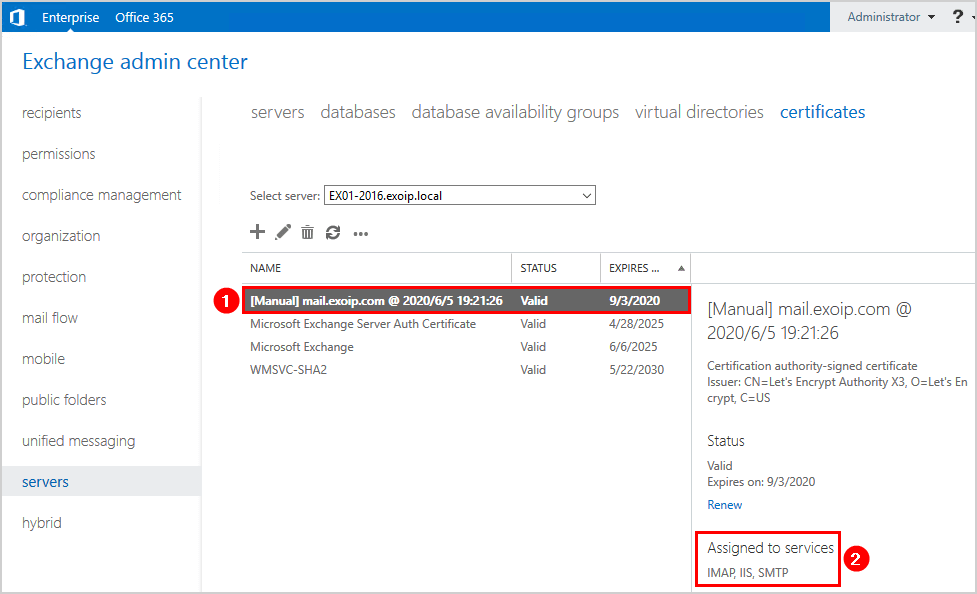
Assign Exchange services to certificate
Click on the imported certificate and follow with the Edit icon.
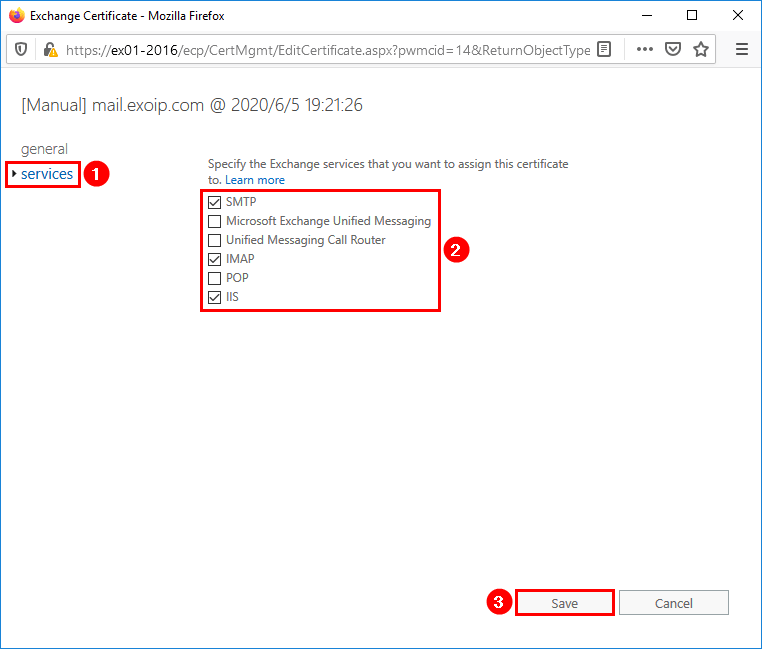
Click services in the left menu. Specify the Exchange services to assign this certificate to. Click Save.
In my example, the services SMTP, IMAP, and IIS are checked.
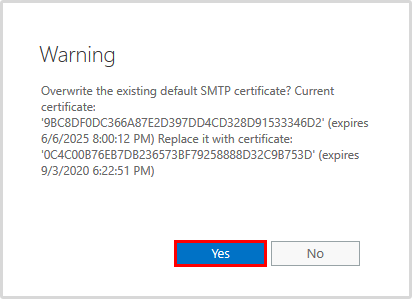
A warning appears if you want to overwrite the existing certificate. Click Yes.
Click the certificate in the list view. See the assigned services in the details pane. It’s assigned to the services that we selected.
In the next step, we will check the secured SSL certificate on the Exchange Server.
Test imported Exchange certificate
Go to Outlook Web Access (OWA) URL or Exchange Admin Center (EAC) URL. You can verify that the website is secure.
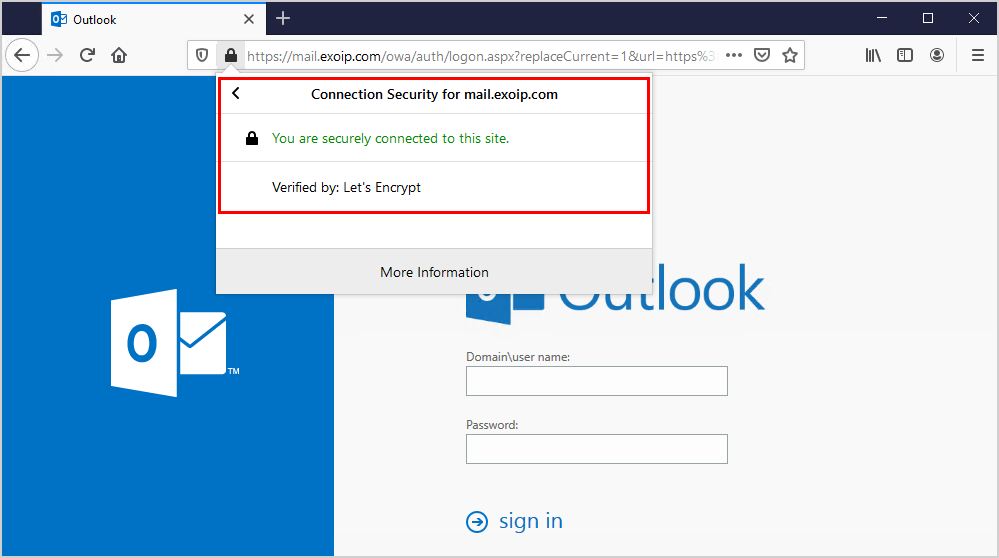
The certificate is successfully imported into Exchange Server. Did it help you to install the certificate in Exchange Server?
Keep on reading: Remove certificate in Exchange Server »
Conclusion
You learned how to import certificate in Exchange Server. Place the certificate in a shared folder before you start to import the certificate with PowerShell or with the import wizard in Exchange Admin Center.
Remember that in the latest Exchange Server versions, the import certificate functionality in Exchange Admin Center is removed, and the only way to import the Exchange certificate is with PowerShell.
When the certificate is imported, you’re not done. That’s because the new certificate needs to be assigned to the Exchange services. After assigning the services, verify the certificate by browsing to the OWA URL in your favorite browser.
Did you enjoy this article? You may also like the article Server Error in ‘/owa’ Application Exchange Server. Don’t forget to follow us and share this article.
What Others Are Reading


Hello,
I have 2 exchange servers installed in site A with HA, recently I renewed SSL and successfully installed in both the servers and valid.
Now i have added one more exchange server in Site B, Installation completed, URLs Set up is completed, SSL .pfx successfully imported but SHOWING INVALID CERT (Kindly help).
How to attach Existing databases present in Site A to this new server installed in site B (Any reference will be helpful) what else need to be done next?
Ali Tajran superb work.
Thankyou in advance.
I have a problem with excange 2019 CU 12.
Our old certificate expires…we buy another one and when to import to exchange it doesn’t make the private key exportable even if i make that option active:
Import-ExchangeCertificate -Server “EX01-2016” -FileData ([System.IO.File]::ReadAllBytes(‘\\ex01-2016\Certs\ExchangeCert.crt’)) -PrivateKeyExportable:$true -Password (ConvertTo-SecureString -String ‘P@ssw0rd1’ -AsPlainText -Force)
The import was from a .crt file from certificate provider.
Is something from microsoft who doesn’t want to let the private key make exportable anymore?
Hi Ali,
When I try to set the imported cert for IMAP service on 2019 CU 12, get this error:
This certificate with thumbprint 1CB033C33D75B120E328EF758ABC16D2F930A5CF and subject ‘*.daal.plus’ cannot used for IMAP SSL/TLS connections because the subject is not a Fully Qualified Domain Name (FQDN). Use command Set-IMAPSettings to set X509CertificateName to the FQDN of the service.
I must change IMAP FQDN?
Master Ali,
yesterday I imported the PFX with the command >
Import-ExchangeCertificate -Server “ServerName” -FileData ([System.IO.File]::ReadAllBytes(‘\\server\certs\CertName.pfx’)) -PrivateKeyExportable:$true -Password (ConvertTo-SecureString -String ‘zap0rka’ -AsPlainText -Force)
and I got the message that the certificate was successfully imported.
Unfortunately, the imported cert didn’t show in the EAC console. In shell, I tried the command >
Get-ExchangeCertificate | fl Subject, Issuer, RootCAType, Services, Status, NotAfter, NotBefore, Thumbprint
but I got only the infos of the old certificate.
I tried the first command again and got the error message >
The certificate with thumbprint XXXXXXXXXXXXXXXXXXXX was found but is not valid for use with Exchange Server (reason: PrivateKeyMissing).
Then I had to open MMC console with the snap Certificate for Local Computer and had to find the imported certificate. I copied its Serial Number and, in the shell, I ran the command >
certutil -repairstore my “SE RI AL NU MB ER”
Only then the imported certificate showed in the EAC. Of course, i checked the previously opened MMC console. The imported certificate, in the General tab, got the message >
You have a private key that corresponds to this certificate.
Can you explain why? Can you add this case in this manual?
Hi Ali, I have wildcard certificate expiring. CSR was generated on another server. I have a certificate with a password now. Should I only have to import with a password and delete old (existing) certificate? I do not have to click renew? Appreciate.
That’s correct. You only have to import the certificate and assign the Exchange services to the certificate. After that, remove the old certificate.
Just want to expand on my previous question, we have multiple servers in DAG and a wildcard certificate which is expiring soon. Certificate was auto renewed with public CA and now renewed certificate is downloaded using CSR from other application server (outside of Exchange servers). Originally currently installed expiring wildcard certificate was downloaded from the public CA using one of the Exchange servers CSR and then installed on all Exchange servers. This time we are not clicking renew on ecp or installing as a new certificate, rather we will just import on all the four servers and later bind it in IIS. Could you please let me know if this will not create any issue. Thank you in advance and you are doing amazing work with Exchange tutorials.
That’s the correct approach.
You can import the wildcard certificate to every Exchange Server and assign the Exchange services to the certificate. The last step is to restart IIS on every Exchange Server.
Hi Ali,
I replaced the old certificate with a new one and removed the old certificate. but still, users get an expired certificate warning when start outlook. Do I need to make any other settings?
Did you restart IIS later replace the certificate ?
Hi Ali
Import and export through GUI is no longer an option in the latest Exchange 2019 cumulative update. I have tried import with the -PrivateKeyExportable set to true in the cmdlet below to enable subsequent export, but so far likely with some syntax or other problems? At least it doesn’t take the switch and can’t then be exported to .pfx with password! The .crt is bundled with .req originally created on one server and will if imported to another server have coinciding thumbprint, so that don’t works. Alla other cmdlet seem to be working, but so far I failed in exporting the private key. Any thoughts of the syntax or other ideas of a way forward?
BR / Bengt
Import-ExchangeCertificate -FileData ([System.IO.File]::ReadAllBytes(”)) [-Password (ConvertTo-SecureString -String ‘ ‘ -AsPlainText -Force)] [-PrivateKeyExportable ] [-Server ]
Hi Bengt,
You can run the following commands to export the certificate, including private key:
The following command will import the certificate to a specific Exchange Server:
I updated the article with the Exchange Server certificate changes.
I noticed this feature disappeared after CU12 update.
I’m not sure if it went away after updating CU12 or after deploying a new mailbox server.
That is correct. It’s now only possible to manage certificates from Exchange Management Shell.
To prevent misuse of UNC paths by attackers, Microsoft removed parameters that take UNC paths as inputs from the Exchange Server PowerShell cmdlets and the Exchange Admin Center. These changes will affect all Cumulative Update (CU) releases of Microsoft Exchange Server 2019 (CU12 and later) and Microsoft Exchange Server 2016 (CU23 and later).
Read more in the article Exchange Server certificate changes.
Hey Ali
I just installed a second Exchange Server and the MS Exchange Server Auth Certificate is missing.
Did that ever happened to you as well?
Hi Andri,
Yes, this has happened to me before. In my case, I gave it some time, and it did show up eventually.