You like to remove a certificate in Exchange Server. After signing in to Exchange Admin…
Install FREE Let’s Encrypt certificate in Exchange Server
How to install FREE Let’s Encrypt certificate in Exchange Server? After configuring the internal and external DNS, we like to install a certificate in the Exchange Server. What is Let’s Encrypt, and why is it free in the first place? Read more in this article about configuring Let’s Encrypt certificate in Exchange Server.
Table of contents
What is Let’s Encrypt?
Let’s Encrypt is a free way to secure your web server using HTTPS with an SSL certificate. It ensures secure encrypted data transfer and connection between server and client. Let’s Encrypt does not charge a fee for the certificates. Let’s Encrypt is a nonprofit, and its mission is to create a more secure and privacy-respecting Web. They do that by promoting the widespread adoption of HTTPS. The services are free and easy to use so that everyone can deploy HTTPS.
Exchange Server certificate not trusted
When installing a new Exchange Server, the client connection is not securely installed. That’s by default. We will sign in to Outlook Web Access (OWA) to look at how it shows.
In Firefox, it’s showing a Warning: Potential Security Risk Ahead. Click on Advanced… and proceed further to see the OWA sign in page.
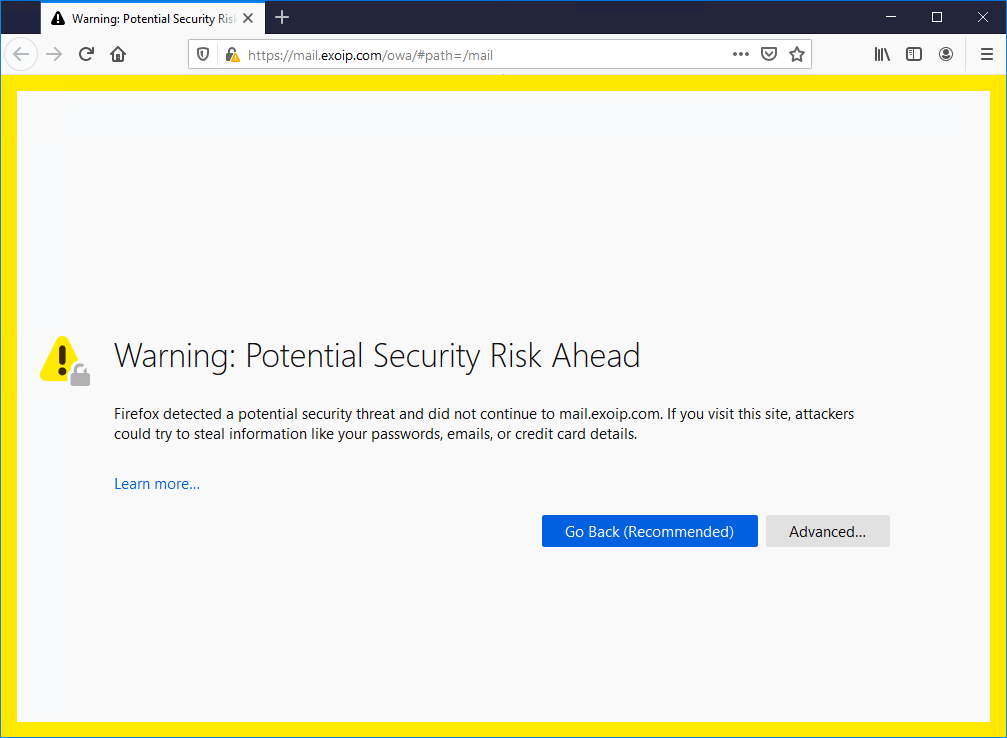
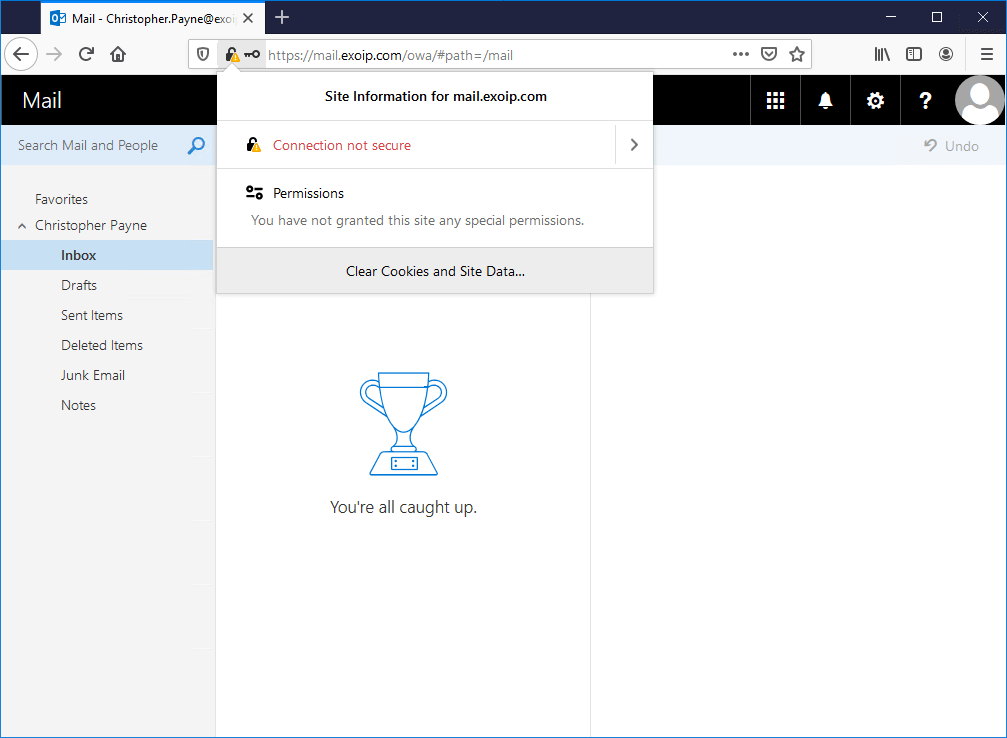
The Exchange Server OWA is functioning, but it’s not secure. The padlock icon shows a warning. If we click the padlock in the address bar, we can see that the connection is not secure.
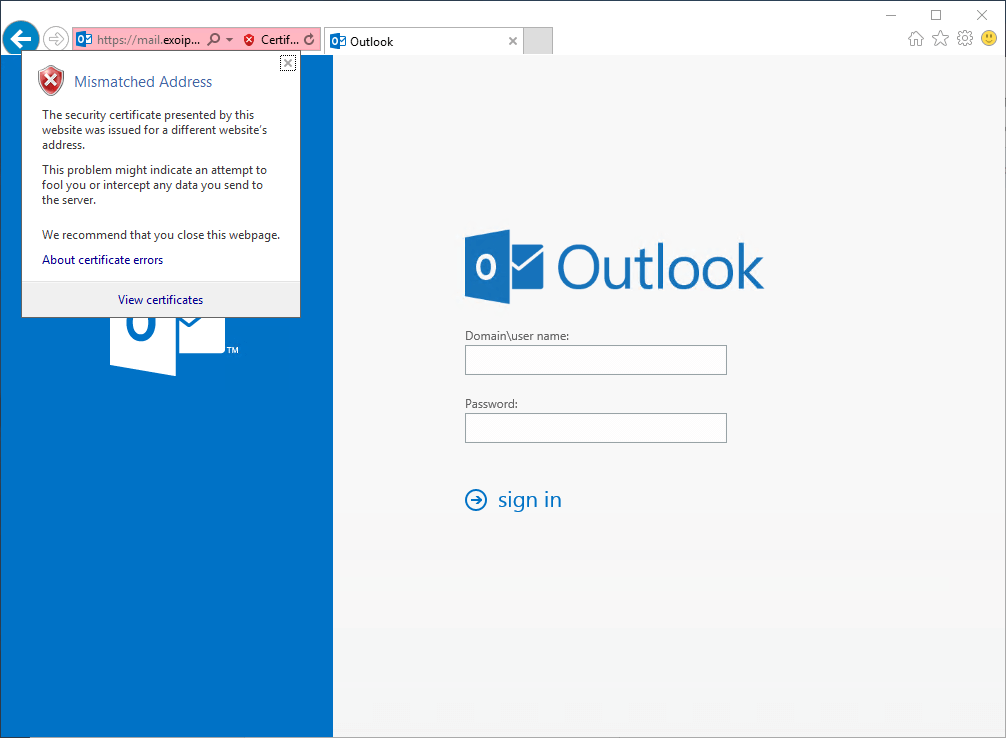
The same is happening with all other browsers. For example, Internet Explorer shows a red address bar. When clicking on the certificate in the toolbar, it shows that the certificate is a mismatched address. The Exchange Server connection is not secure.
We learned about Let’s Encrypt, and we have seen that Exchange Server connection is not secure. In the next part, we will prepare the application to configure the certificate. After that, we will request a free Let’s Encrypt certificate.
Prepare the Let’s Encrypt Win-ACME client
There is a list of ACME clients offered by third parties to use. We are going to use Windows ACME Simple (WACS). A simple ACME client for Windows – for use with Let’s Encrypt. It will automatically renew your certificates, so after you install and configure it, you’ll have a continually-secured web server.
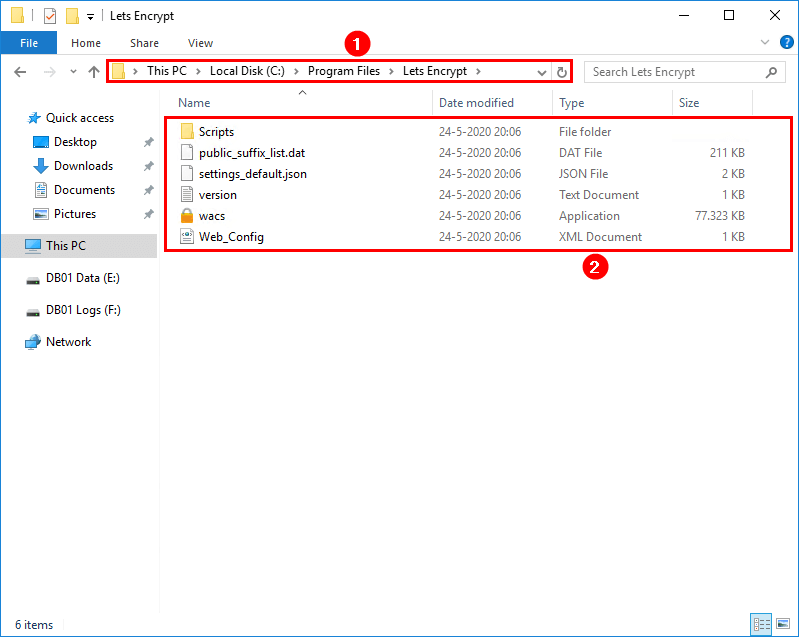
Download Win-ACME from GitHub or the official website. At the moment of writing, the file is win-acme.v2.1.22.1260.x64.pluggable. Create a folder named Lets Encrypt in C:\Program Files. Extract the files in the .zip to the folder C:\Program Files\Lets Encrypt.
You can use Win-ACME from the interactive menu or unattended mode (command line). With the command line, you don’t have to jump through the menus. Both will work, and it’s good to learn both ways.
Let’s Encrypt certificate private key
It’s best to export the certificate after it’s issued and downloaded from Let’s Encrypt. It means that you have to import the certificate’s private key to export the certificate. There are two ways of doing this.
Automatic certificate private key import
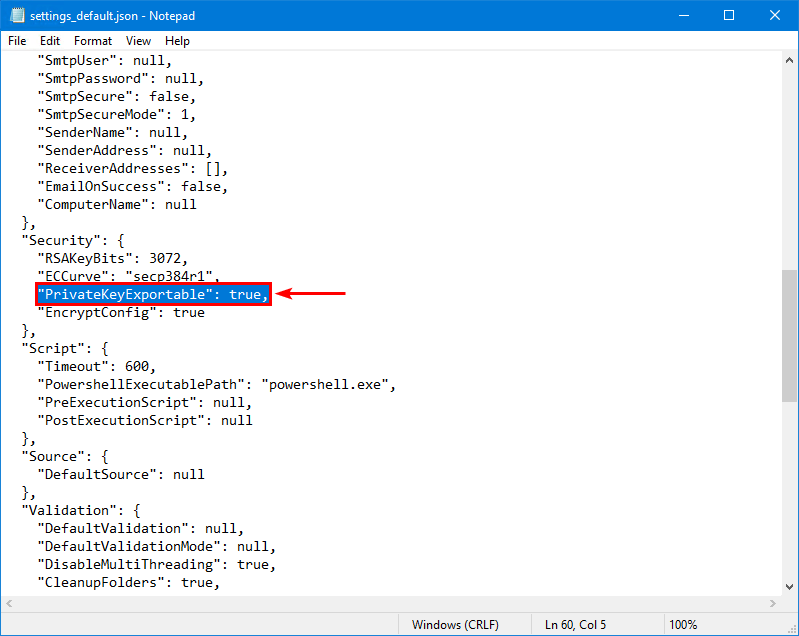
Adjust the settings_default.json before you request a certificate from Let’s Encrypt. This will automatically import the certificate’s private key to the certificate:
- Start File Explorer
- Go to path C:\Program Files\Lets Encrypt
- Open settings_default.json with Notepad
- Set PrivateKeyExportable to true
- Save the file
Note: The settings_default.json file will be copied with its settings to settings.json after you start Win-ACME. If you already did start Win-ACME, you will see settings.json in the folder. Edit the value in settings.json.
Manual certificate private key import
Get the private key after the certificate request from Let’s Encrypt. You will enter the certificate’s private key and import it to the certificate. More on that in the article Export Let’s Encrypt certificate in Windows Server.
Install Let’s Encrypt certificate in Exchange Server
After downloading and extracting the files, we are going to configure Let’s Encrypt certificate. We are going to show both the interactive menu and command line in the next steps.
Install Let’s Encrypt certificate using Interactive Menu
Right-click the application wacs. Click run as administrator to start the application.

Win-ACME client window will show up. Type M to create a renewal certificate (full option) and press Enter.
 A simple Windows ACMEv2 client (WACS)
 Software version 2.1.22.1260 (release, pluggable, standalone, 64-bit)
 Connecting to https://acme-v02.api.letsencrypt.org/...
 Scheduled task not configured yet
 Please report issues at https://github.com/win-acme/win-acme

 N: Create certificate (default settings)
 M: Create certificate (full options)
 R: Run renewals (0 currently due)
 A: Manage renewals (0 total)
 O: More options...
 Q: Quit

 Please choose from the menu: M
Type 2 for manual input and press Enter.
 Running in mode: Interactive, Advanced

 Please specify how the list of domain names that will be included in the
 certificate should be determined. If you choose for one of the "all bindings"
 options, the list will automatically be updated for future renewals to
 reflect the bindings at that time.

 1: Read bindings from IIS
 2: Manual input
 3: CSR created by another program
 C: Abort

 How shall we determine the domain(s) to include in the certificate?: 2
Enter a comma-separated list of hostnames. Have a look at your Exchange hostnames and fill them in. Have you configured the Exchange Server hostnames correctly? There should be no internal names, for example, EX01-2016.
Have a look at the article Exchange namespace design and planning. I recommend keeping the same namespace for the internal DNS and external DNS.
Add the download hostname to the host, and once the Let’s Encrypt certificate is downloaded and bound to the Exchange Server, read the article Configure Download Domains to address CVE-2021-1730 vulnerability.
In my example, I will be using the host:
- mail.exoip.com
- autodiscover.exoip.com
- download.mail.exoip.com
After that, press Enter.
 Description:        A host name to get a certificate for. This may be a
                     comma-separated list.

 Host: mail.exoip.com,autodiscover.exoip.com,download.mail.exoip.com
We will not enter anything for the suggested friendly name. Press Enter to continue.
 Source generated using plugin Manual: mail.exoip.com and 1 alternatives

 Friendly name '[Manual] mail.exoip.com'. <Enter> to accept or type desired name: <Enter>
The Let’s Encrypt ACME client will connect with Let’s Encrypt on port 80 through the firewall to request a certificate. If you don’t have port 80 enabled, do that before proceeding. Learn more about network ports for clients and mail flow in Exchange.
We don’t have to enable port 80 on the Exchange Server. We can use port 443, which is option 9 – TLS-ALPN-01. To handle the challenge correctly, we cannot go through the HTTP stack. We need direct control (exclusive access) over port 443, meaning that IIS needs to be shut down for it to work.
You don’t want to shut down IIS whenever requesting or updating the Exchange certificate. That’s why we did enable port 80 in the firewall and choose option 2.
 The ACME server will need to verify that you are the owner of the domain
 names that you are requesting the certificate for. This happens both during
 initial setup *and* for every future renewal. There are two main methods of
 doing so: answering specific http requests (http-01) or create specific dns
 records (dns-01). For wildcard domains the latter is the only option. Various
 additional plugins are available from https://github.com/win-acme/win-acme/.

 1: [http-01] Save verification files on (network) path
 2: [http-01] Serve verification files from memory
 3: [http-01] Upload verification files via FTP(S)
 4: [http-01] Upload verification files via SSH-FTP
 5: [http-01] Upload verification files via WebDav
 6: [dns-01] Create verification records manually (auto-renew not possible)
 7: [dns-01] Create verification records with acme-dns (https://github.com/joohoi/acme-dns)
 8: [dns-01] Create verification records with your own script
 9: [tls-alpn-01] Answer TLS verification request from win-acme
 C: Abort

 How would you like prove ownership for the domain(s)?: 2
Type 2 for RSA key and press Enter.
 After ownership of the domain(s) has been proven, we will create a
 Certificate Signing Request (CSR) to obtain the actual certificate. The CSR
 determines properties of the certificate like which (type of) key to use. If
 you are not sure what to pick here, RSA is the safe default.

 1: Elliptic Curve key
 2: RSA key
 C: Abort

 What kind of private key should be used for the certificate?: 2
Choose option 4 to store the certificate in the Windows Certificate Store and press Enter.
 When we have the certificate, you can store in one or more ways to make it
 accessible to your applications. The Windows Certificate Store is the default
 location for IIS (unless you are managing a cluster of them).

 1: IIS Central Certificate Store (.pfx per host)
 2: PEM encoded files (Apache, nginx, etc.)
 3: PFX archive
 4: Windows Certificate Store
 5: No (additional) store steps

 How would you like to store the certificate?: 4
Type 2 as we like to store it in the General computer store and press Enter.
 1: [WebHosting] - Dedicated store for IIS
 2: [My] - General computer store (for Exchange/RDS)
 3: [Default] - Use global default, currently WebHosting

 Choose store to use, or type the name of another unlisted store: 2
Type 5 as we don’t need to store it another way and press Enter.
 1: IIS Central Certificate Store (.pfx per host)
 2: PEM encoded files (Apache, nginx, etc.)
 3: PFX archive
 4: Windows Certificate Store
 5: No (additional) store steps

 Would you like to store it in another way too?: 5
Select 1 to create or update https bindings in IIS and press Enter.
 With the certificate saved to the store(s) of your choice, you may choose one
 or more steps to update your applications, e.g. to configure the new
 thumbprint, or to update bindings.

 1: Create or update bindings in IIS
 2: Start external script or program
 3: No (additional) installation steps

 Which installation step should run first?: 1
Type 1 for Default Web Site and press Enter.
 1: Default Web Site
 2: Exchange Back End

 Choose site to create new bindings: 1
Type 2 to start external script or program and press Enter.
 1: Create or update bindings in IIS
 2: Start external script or program
 3: No (additional) installation steps

 Add another installation step?: 2
Add the PowerShell script path ./Scripts/ImportExchange.ps1 and press Enter. The download of ACME includes the script. Have a look in the ACME scripts folder.
 Description:        Path to script file to run after retrieving the
                     certificate. This may be any executable file or a
                     Powershell (.ps1) script.

 File: ./Scripts/ImportExchange.ps1
Add the following parameters, including the services IIS, SMTP, and IMAP. Press Enter.
 {CertCommonName}:   Common name (primary domain name)
 {CachePassword}:    .pfx password
 {CacheFile}:        .pfx full path
 {CertFriendlyName}: Certificate friendly name
 {CertThumbprint}:   Certificate thumbprint
 {StoreType}:        Type of store (e.g. CentralSsl, CertificateStore,
                     PemFiles, ...)
 {StorePath}:        Path to the store
 {RenewalId}:        Renewal identifier
 {OldCertCommonName}: Common name (primary domain name) of the previously
                      issued certificate
 {OldCertFriendlyName}: Friendly name of the previously issued certificate
 {OldCertThumbprint}: Thumbprint of the previously issued certificate

 Description:        Parameters for the script to run after retrieving the
                     certificate. Refer to
                     https://win-acme.com/reference/plugins/installation/script
                     for further instructions.

 Parameters: '{CertThumbprint}' 'IIS,SMTP,IMAP' 1 '{CacheFile}' '{CachePassword}' '{CertFriendlyName}'
We don’t need to add another installation step. Press 3 and press Enter.
 1: Create or update bindings in IIS
 2: Start external script or program
 3: No (additional) installation steps

 Add another installation step?: 3
Press n to not open the terms of service and press Enter. We can always look at the terms of service by opening the PDF file in File Explorer.
Terms of service:   C:\ProgramData\win-acme\acme-v02.api.letsencrypt.org\LE-SA-v1.2-November-15-2017.pdf

 Open in default application? (y/n*) n
Press y to agree with the terms and press Enter.
Do you agree with the terms? (y*/n) yEnter your email and press Enter.
Enter email(s) for notifications about problems and abuse (comma seperated): info@exoip.comThe output will show that it’s configuring the Let’s Encrypt certificate.
 [autodiscover.exoip.com] Authorizing...
 [autodiscover.exoip.com] Authorizing using http-01 validation (SelfHosting)
 [autodiscover.exoip.com] Authorization result: valid
 [mail.exoip.com] Authorizing...
 [mail.exoip.com] Authorizing using http-01 validation (SelfHosting)
 [mail.exoip.com] Authorization result: valid
 Downloading certificate [Manual] mail.exoip.com
 Store with CertificateStore...
 Installing certificate in the certificate store
 Adding certificate [Manual] mail.exoip.com @ 2022/5/11 19:56:12 to store My
 Installation step 1/2: IIS...
 Our best match was the default binding and it seems there are other non-SNI enabled bindings listening to the same endpoint, which means we cannot update it without potentially causing problems. Instead, a new binding will be created. You may manually update the bindings if you want IIS to be configured in a different way.
 Our best match was the default binding and it seems there are other non-SNI enabled bindings listening to the same endpoint, which means we cannot update it without potentially causing problems. Instead, a new binding will be created. You may manually update the bindings if you want IIS to be configured in a different way.
 Adding new https binding *:443:mail.exoip.com
 Our best match was the default binding and it seems there are other non-SNI enabled bindings listening to the same endpoint, which means we cannot update it without potentially causing problems. Instead, a new binding will be created. You may manually update the bindings if you want IIS to be configured in a different way.
 Our best match was the default binding and it seems there are other non-SNI enabled bindings listening to the same endpoint, which means we cannot update it without potentially causing problems. Instead, a new binding will be created. You may manually update the bindings if you want IIS to be configured in a different way.
 Adding new https binding *:443:autodiscover.exoip.com
 Committing 2 https binding changes to IIS while updating site 1
 Installation step 2/2: Script...
 Script ./Scripts/ImportExchange.ps1 starting with parameters 'D8724E991E59BEA4D3EA364AC1E3EFB2668E932F' 'IIS,SMTP,IMAP' 1 'C:\ProgramData\win-acme\acme-v02.api.letsencrypt.org\Certificates\PTQ-g6p-2E6SpcZkRfpOQA-9abaf6286b9e2fb42d8311899c4c9eb496dd699e-temp.pfx' '********' '[Manual] mail.exoip.com @ 2021/12/12 20:23:25'
 Script finished
 Adding Task Scheduler entry with the following settings
 - Name win-acme renew (acme-v02.api.letsencrypt.org)
 - Path C:\Program Files\Lets Encrypt
 - Command wacs.exe --renew --baseuri "https://acme-v02.api.letsencrypt.org/"
 - Start at 09:00:00
 - Random delay 04:00:00
 - Time limit 02:00:00
We don’t want to specify a user for the task to run. Press n and press Enter. The SYSTEM user account will be used to run the task.
 Do you want to specify the user the task will run as? (y/n*) - no

 Adding renewal for [Manual] mail.exoip.com
 Next renewal due at 2022/7/5 19:55:25
 Certificate [Manual] mail.exoip.com created
Click Q and press Enter to exit Let’s Encrypt Win-ACME application.
 N: Create certificate (default settings)
 M: Create certificate (full options)
 R: Run renewals (0 currently due)
 A: Manage renewals (1 total)
 O: More options...
 Q: Quit

 Please choose from the menu: Q
Let’s Encrypt certificate is successfully configured in Exchange Server.
Install Let’s Encrypt certificate using the Command Line
Run Command Prompt as administrator. Change the path to the Lets Encrypt folder and run the command. Add –verbose at the end of the command to show you what is happening.
C:\>cd \program files\lets encrypt

C:\Program Files\Lets Encrypt>wacs.exe --target manual --host mail.exoip.com,autodiscover.exoip.com,download.mail.exoip.com --certificatestore My --acl-fullcontrol "network service,administrators" --installation iis,script --installationsiteid 1 --script "./Scripts/ImportExchange.ps1" --scriptparameters "'{CertThumbprint}' 'IIS,SMTP,IMAP' 1 '{CacheFile}' '{CachePassword}' '{CertFriendlyName}'" --verbose
After running the command, you will be asked a couple of questions regarding Terms of Service and to enter an email.
- Open Terms of Service in default application: Press n to not open the terms of service. We can always look at the terms of service by opening the PDF file in File Explorer.
- Agree with Terms of Service: Press y to agree with the terms.
- Email: Enter your email and press Enter.
Have a look below to see the full output after accepting the Terms of Service.
C:\>cd \program files\lets encrypt

C:\Program Files\Lets Encrypt>wacs.exe --target manual --host mail.exoip.com,autodiscover.exoip.com,download.mail.exoip.com --certificatestore My --acl-fullcontrol "network service,administrators" --installation iis,script --installationsiteid 1 --script "./Scripts/ImportExchange.ps1" --scriptparameters "'{CertThumbprint}' 'IIS,SMTP,IMAP' 1 '{CacheFile}' '{CachePassword}' '{CertFriendlyName}'" --verbose
 [VERB] Verbose mode logging enabled
 [VERB] ExePath: C:\Program Files\Lets Encrypt\wacs.exe
 [VERB] ResourcePath: C:\Program Files\Lets Encrypt\
 [VERB] PluginPath: C:\Program Files\Lets Encrypt\
 [VERB] Looking for settings.json in C:\Program Files\Lets Encrypt\
 [DBUG] Config folder: C:\ProgramData\win-acme\acme-v02.api.letsencrypt.org
 [DBUG] Log path: C:\ProgramData\win-acme\acme-v02.api.letsencrypt.org\Log
 [DBUG] Cache path: C:\ProgramData\win-acme\acme-v02.api.letsencrypt.org\Certificates
 [VERB] W3SVC detected and running
 [VERB] No FTPSVC detected
 [DBUG] secrets.json not found
 [VERB] Arguments: --target manual --host mail.exoip.com,autodiscover.exoip.com,download.mail.exoip.com --certificatestore My --acl-fullcontrol network service,administrators --installation iis,script --installationsiteid 1 --script ./Scripts/ImportExchange.ps1 --scriptparameters '{CertThumbprint}' 'IIS,SMTP,IMAP' 1 '{CacheFile}' '{CachePassword}' '{CertFriendlyName}' --verbose
 [DBUG] Renewal period: 55 days
 [VERB] Sending e-mails False

 [INFO] A simple Windows ACMEv2 client (WACS)
 [INFO] Software version 2.1.22.1260 (release, pluggable, standalone, 64-bit)
 [INFO] Connecting to https://acme-v02.api.letsencrypt.org/...
 [VERB] SecurityProtocol setting: SystemDefault
 [DBUG] Send GET to https://acme-v02.api.letsencrypt.org/directory
 [VERB] Request completed with status OK
 [DBUG] Connection OK!
 [DBUG] Running with administrator credentials
 [DBUG] IIS version 10.0
 [WARN] Scheduled task not configured yet
 [INFO] Please report issues at https://github.com/win-acme/win-acme
 [VERB] Unicode display test: Chinese/語言 Russian/язык Arab/لغة
 [INFO] Running in mode: Unattended
 [VERB] Adding 8.8.8.8 as DNS server
 [VERB] Adding 1.1.1.1 as DNS server
 [VERB] Adding 8.8.4.4 as DNS server
 [VERB] Parsed value for --host: mail.exoip.com,autodiscover.exoip.com,download.mail.exoip.com
 [VERB] No value provided for --commonname
 [INFO] Source generated using plugin Manual: mail.exoip.com and 2 alternatives
 [VERB] No value provided for --validationport
 [VERB] No value provided for --validationprotocol
 [VERB] Flag --ocsp-must-staple not present
 [VERB] Flag --reuse-privatekey not present
 [VERB] Parsed value for --certificatestore: My
 [VERB] Flag --keepexisting not present
 [VERB] Parsed value for --acl-fullcontrol: network service,administrators
 [VERB] No value provided for --ftpsiteid
 [VERB] Parsed value for --installationsiteid: 1
 [VERB] No value provided for --sslport
 [VERB] No value provided for --sslipaddress
 [VERB] Parsed value for --script: ./Scripts/ImportExchange.ps1
 [VERB] Parsed value for --scriptparameters: '{CertThumbprint}' 'IIS,SMTP,IMAP' 1 '{CacheFile}' '{CachePassword}' '{CertFriendlyName}'

 [VERB] Source converted into 1 order(s)
 [DBUG] Reading certificate cache
 [DBUG] No cache files found for renewal
 [DBUG] Reading certificate cache
 [DBUG] No cache files found for renewal
 [VERB] Obtain order details for Main
 [VERB] No existing order found
 [VERB] Creating order for hosts: ["DnsName: mail.exoip.com", "DnsName: autodiscover.exoip.com", "DnsName: download.mail.exoip.com"]
 [VERB] Constructing ACME protocol client...
 [VERB] Getting service directory...
 [DBUG] Send GET to https://acme-v02.api.letsencrypt.org/directory
 [VERB] Request completed with status OK
 [DBUG] No account found at C:\ProgramData\win-acme\acme-v02.api.letsencrypt.org\Registration_v2
 [VERB] No account found, creating new one
 [DBUG] Send GET to https://letsencrypt.org/documents/LE-SA-v1.2-November-15-2017.pdf
 [VERB] Request completed with status OK
 [VERB] Terms of service downloaded
 [VERB] Writing terms of service to C:\ProgramData\win-acme\acme-v02.api.letsencrypt.org\LE-SA-v1.2-November-15-2017.pdf

 Terms of service:   C:\ProgramData\win-acme\acme-v02.api.letsencrypt.org\LE-SA-v1.2-November-15-2017.pdf

 Open in default application? (y/n*) - no

 Do you agree with the terms? (y*/n) - yes

 Enter email(s) for notifications about problems and abuse (comma-separated): info@exoip.com

 [DBUG] Creating new ES256 signer
 [DBUG] Send HEAD to https://acme-v02.api.letsencrypt.org/acme/new-nonce
 [VERB] Request completed with status OK
 [DBUG] Send POST to https://acme-v02.api.letsencrypt.org/acme/new-acct
 [VERB] Request completed with status Created
 [DBUG] Saving signer to C:\ProgramData\win-acme\acme-v02.api.letsencrypt.org\Signer_v2
 [DBUG] Saving account to C:\ProgramData\win-acme\acme-v02.api.letsencrypt.org\Registration_v2
 [VERB] ACME client initialized
 [DBUG] Send POST to https://acme-v02.api.letsencrypt.org/acme/new-order
 [VERB] Request completed with status Created
 [VERB] Order https://acme-v02.api.letsencrypt.org/acme/order/539170266/87783048246 created
 [DBUG] Send POST to https://acme-v02.api.letsencrypt.org/acme/authz-v3/107516572406
 [VERB] Request completed with status OK
 [DBUG] Send POST to https://acme-v02.api.letsencrypt.org/acme/authz-v3/107516572416
 [VERB] Request completed with status OK
 [VERB] Handle authorization 1/2
 [INFO] [autodiscover.exoip.com] Authorizing...
 [VERB] [autodiscover.exoip.com] Initial authorization status: pending
 [VERB] [autodiscover.exoip.com] Challenge types available: ["http-01", "dns-01", "tls-alpn-01"]
 [VERB] [autodiscover.exoip.com] Initial challenge status: pending
 [INFO] [autodiscover.exoip.com] Authorizing using http-01 validation (SelfHosting)
 [VERB] Starting commit stage
 [VERB] Commit was succesful
 [DBUG] [autodiscover.exoip.com] Submitting challenge answer
 [DBUG] Send POST to https://acme-v02.api.letsencrypt.org/acme/chall-v3/107516572406/DsPOPQ
 [VERB] Request completed with status OK
 [VERB] SelfHosting plugin serving file /.well-known/acme-challenge/w7XzkVVwiXiMzx2QwJqSQkgwpemy6sVT-bts3XB3f6c
 [VERB] SelfHosting plugin serving file /.well-known/acme-challenge/w7XzkVVwiXiMzx2QwJqSQkgwpemy6sVT-bts3XB3f6c
 [VERB] SelfHosting plugin serving file /.well-known/acme-challenge/w7XzkVVwiXiMzx2QwJqSQkgwpemy6sVT-bts3XB3f6c
 [VERB] SelfHosting plugin serving file /.well-known/acme-challenge/w7XzkVVwiXiMzx2QwJqSQkgwpemy6sVT-bts3XB3f6c
 [DBUG] Refreshing authorization (1/15)
 [DBUG] Send POST to https://acme-v02.api.letsencrypt.org/acme/chall-v3/107516572406/DsPOPQ
 [VERB] Request completed with status OK
 [INFO] [autodiscover.exoip.com] Authorization result: valid
 [VERB] Starting post-validation cleanup
 [VERB] Post-validation cleanup was succesful
 [VERB] Handle authorization 2/2
 [INFO] [mail.exoip.com] Authorizing...
 [VERB] [mail.exoip.com] Initial authorization status: pending
 [VERB] [mail.exoip.com] Challenge types available: ["http-01", "dns-01", "tls-alpn-01"]
 [VERB] [mail.exoip.com] Initial challenge status: pending
 [INFO] [mail.exoip.com] Authorizing using http-01 validation (SelfHosting)
 [VERB] Starting commit stage
 [VERB] Commit was succesful
 [DBUG] [mail.exoip.com] Submitting challenge answer
 [DBUG] Send POST to https://acme-v02.api.letsencrypt.org/acme/chall-v3/107516572416/_yVW1w
 [VERB] Request completed with status OK
 [VERB] SelfHosting plugin serving file /.well-known/acme-challenge/NPd-4G3z1_o_g_EwNj4rFpW34gkDnSANgjyRWsFk9Kg
 [VERB] SelfHosting plugin serving file /.well-known/acme-challenge/NPd-4G3z1_o_g_EwNj4rFpW34gkDnSANgjyRWsFk9Kg
 [VERB] SelfHosting plugin serving file /.well-known/acme-challenge/NPd-4G3z1_o_g_EwNj4rFpW34gkDnSANgjyRWsFk9Kg
 [VERB] SelfHosting plugin serving file /.well-known/acme-challenge/NPd-4G3z1_o_g_EwNj4rFpW34gkDnSANgjyRWsFk9Kg
 [DBUG] Refreshing authorization (1/15)
 [DBUG] Send POST to https://acme-v02.api.letsencrypt.org/acme/chall-v3/107516572416/_yVW1w
 [VERB] Request completed with status OK
 [INFO] [mail.exoip.com] Authorization result: valid
 [VERB] Starting post-validation cleanup
 [VERB] Post-validation cleanup was succesful
 [VERB] Order 1/1 (Main): processing...
 [DBUG] Creating new private key at C:\ProgramData\win-acme\acme-v02.api.letsencrypt.org\Orders\b5d3bcd2fa5ffa09c7962df544e418b8922717c7.order.keys...
 [DBUG] CSR stored at PwxG1EbkUkeYllA4pTvN1A-main-9abaf6286b9e2fb42d8311899c4c9eb496dd699e-csr.pem in certificate cache folder C:\ProgramData\win-acme\acme-v02.api.letsencrypt.org\Certificates
 [VERB] Submitting CSR
 [DBUG] Waiting for order to get ready (1/15)
 [DBUG] Send POST to https://acme-v02.api.letsencrypt.org/acme/order/539170266/87783048246
 [VERB] Request completed with status OK
 [DBUG] Send POST to https://acme-v02.api.letsencrypt.org/acme/finalize/539170266/87783048246
 [VERB] Request completed with status OK
 [INFO] Downloading certificate [Manual] mail.exoip.com
 [DBUG] Send POST to https://acme-v02.api.letsencrypt.org/acme/cert/038380a9e2e6686f2e599cec3feee42be87d
 [VERB] Request completed with status OK
 [VERB] Parsing certificate from 5800 bytes received
 [VERB] Parsing PEM data at range 0..2048
 [VERB] Parsing PEM data at range 2050..3875
 [VERB] Parsing PEM data at range 3877..5799
 [DBUG] Send POST to https://acme-v02.api.letsencrypt.org/acme/cert/038380a9e2e6686f2e599cec3feee42be87d/1
 [VERB] Request completed with status OK
 [VERB] Parsing certificate from 3876 bytes received
 [VERB] Parsing PEM data at range 0..2048
 [VERB] Parsing PEM data at range 2050..3875
 [DBUG] Found 2 version(s) of the certificate
 [DBUG] Option 1 issued by DST Root CA X3 (thumb: 933C6DDEE95C9C41A40F9F50493D82BE03AD87BF)
 [DBUG] Option 2 issued by ISRG Root X1 (thumb: A053375BFE84E8B748782C7CEE15827A6AF5A405)
 [DBUG] Selected option 1
 [DBUG] Certificate written to cache file PwxG1EbkUkeYllA4pTvN1A-main-9abaf6286b9e2fb42d8311899c4c9eb496dd699e-temp.pfx in certificate cache folder C:\ProgramData\win-acme\acme-v02.api.letsencrypt.org\Certificates. It will be reused when renewing within 1 day(s) as long as the --source and --csr parameters remain the same and the --force switch is not used.
 [VERB] Processing order 1/1: Main
 [VERB] W3SVC detected and running
 [VERB] No FTPSVC detected
 [DBUG] Certificate store: My
 [INFO] Store with CertificateStore...
 [INFO] Installing certificate in the certificate store
 [DBUG] Opened certificate store My
 [INFO] Adding certificate [Manual] mail.exoip.com @ 2022/5/11 20:17:25 to store My
 [VERB] CN=mail.exoip.com - CN=R3, O=Let's Encrypt, C=US (E5EB2A04299D2EA7D652EE919A563C00059E292E)
 [DBUG] Closing certificate store
 [VERB] Private key found at C:\ProgramData\Microsoft\Crypto\RSA\MachineKeys\3f4cdf3b1f7376c3093ab6e08233d2a2_a3277ca2-c28c-4f25-ad1c-ecb55a72baa4
 [INFO] Add full control rights for network service
 [INFO] Add full control rights for administrators
 [VERB] CN=R3, O=Let's Encrypt, C=US - CN=ISRG Root X1, O=Internet Security Research Group, C=US (A053375BFE84E8B748782C7CEE15827A6AF5A405) already exists in CA
 [VERB] CN=ISRG Root X1, O=Internet Security Research Group, C=US - CN=DST Root CA X3, O=Digital Signature Trust Co. (933C6DDEE95C9C41A40F9F50493D82BE03AD87BF) already exists in CA
 [DBUG] Closing store CA
 [INFO] Installation step 1/2: IIS...
 [WARN] Our best match was the default binding and it seems there are other non-SNI enabled bindings listening to the same endpoint, which means we cannot update it without potentially causing problems. Instead, a new binding will be created. You may manually update the bindings if you want IIS to be configured in a different way.
 [WARN] Our best match was the default binding and it seems there are other non-SNI enabled bindings listening to the same endpoint, which means we cannot update it without potentially causing problems. Instead, a new binding will be created. You may manually update the bindings if you want IIS to be configured in a different way.
 [INFO] Adding new https binding *:443:mail.exoip.com
 [WARN] Our best match was the default binding and it seems there are other non-SNI enabled bindings listening to the same endpoint, which means we cannot update it without potentially causing problems. Instead, a new binding will be created. You may manually update the bindings if you want IIS to be configured in a different way.
 [WARN] Our best match was the default binding and it seems there are other non-SNI enabled bindings listening to the same endpoint, which means we cannot update it without potentially causing problems. Instead, a new binding will be created. You may manually update the bindings if you want IIS to be configured in a different way.
 [INFO] Adding new https binding *:443:autodiscover.exoip.com
 [INFO] Committing 2 https binding changes to IIS while updating site 1
 [DBUG] No update needed for default ftp site settings
 [INFO] Installation step 2/2: Script...
 [INFO] Script ./Scripts/ImportExchange.ps1 starting with parameters 'E5EB2A04299D2EA7D652EE919A563C00059E292E' 'IIS,SMTP,IMAP' 1 'C:\ProgramData\win-acme\acme-v02.api.letsencrypt.org\Certificates\PwxG1EbkUkeYllA4pTvN1A-main-9abaf6286b9e2fb42d8311899c4c9eb496dd699e-temp.pfx' '********' '[Manual] mail.exoip.com @ 2022/5/11 20:17:25'
 [DBUG] Process launched: powershell.exe (ID: 6616)
 [VERB] NewCertThumbprint: E5EB2A04299D2EA7D652EE919A563C00059E292E
 [VERB] ExchangeServices: IIS,SMTP,IMAP
 [VERB] LeaveOldExchangeCerts: 1
 [VERB] RenewalId:
 [VERB] CacheFile: C:\ProgramData\win-acme\acme-v02.api.letsencrypt.org\Certificates\PwxG1EbkUkeYllA4pTvN1A-main-9abaf6286b9e2fb42d8311899c4c9eb496dd699e-temp.pfx
 [VERB] FriendlyName: [Manual] mail.exoip.com @ 2022/5/11 20:17:25
 [VERB] Searching for Exchange snapin...
 [VERB] Microsoft.Exchange.Management.PowerShell.E2010
 [VERB] Microsoft.Exchange.Management.PowerShell.SnapIn
 [VERB] Checking if certificate can be found in the right store...
 [VERB] Waiting for process to finish...
 [VERB] Updating Exchange services...
 [VERB] Waiting for process to finish...
 [VERB] Certificate set for the following services: IIS,SMTP,IMAP
 [VERB] Process output without data received
 [VERB] Process error without data received
 [INFO] Script finished
 [VERB] Waiting for process to finish...
 [INFO] Adding Task Scheduler entry with the following settings
 [INFO] - Name win-acme renew (acme-v02.api.letsencrypt.org)
 [INFO] - Path C:\Program Files\Lets Encrypt
 [INFO] - Command wacs.exe --renew --baseuri "https://acme-v02.api.letsencrypt.org/"
 [INFO] - Start at 09:00:00
 [INFO] - Random delay 04:00:00
 [INFO] - Time limit 02:00:00
 [DBUG] Creating task to run as system user
 [INFO] Adding renewal for [Manual] mail.exoip.com
 [INFO] Next renewal due at 2022/7/5 20:16:38
 [INFO] Certificate [Manual] mail.exoip.com created
 [VERB] Exiting with status code 0
Win-ACME successfully downloaded the Let’s Encrypt certificate for Exchange Server. It also did bind it correctly to the Exchange services IIS, SMTP, and IMAP.
In the next article, we will verify the Let’s Encrypt configuration on Exchange Server. Keep reading on how to Check Let’s Encrypt certificate.
Did it help you to install Let’s Encrypt certificate in Exchange Server?
Conclusion
In this article, you learned how to install FREE Let’s Encrypt certificate in Exchange Server. Design and configure Exchange namespace before installing the Let’s Encrypt certificate. Remember to enable port 80 on the firewall. If you don’t, it can’t connect with Let’s Encrypt to issue a certificate.
Did you enjoy this article? You may also like Get Exchange certificate with PowerShell. Don’t forget to follow us and share this article.
What Others Are Reading


Hi Ali, thanks a lot for your great guidance article, how about if we have 2 exchange server, what’s is best practice to keep a same cert using lets encrypt? thanks in advance
cheers
Hi Dear Ali
I appreciate your very good article.
I did not see an option to verify domain ownership in this article.
I always use option number 6, which is dns-challenge, which does not have the ability to automatically renew.
In my opinion, ownership of the domain should be verified before issuing the certificate.
Thanks a lot
If we close port 80 after the install, will it not be able to auto renew? I prefer not to leave 80 open all the time.
hi mate
first of all thanks for this article , can i schedule for every 85 days for issue certs in automatically?
It will automatically renew your certificates (already written in the article).
Hi,
I tried to install letsencrypt certificate, and now when a try to connect on ecp, my connexion is reset. do you know this issue?
you are a legend works like a charm! thanks for this! thumbs up for you!
Hi Ali,
First of all thanks for posting the article.
We want to migrate our on-premise Exchange server to Office 365. It is currently not publicly accessible so we need to make it public temporarily and install a certificate as part of the cut-over.
You mention “it’s best to export the certificate after it’s issued and downloaded from Let’s Encrypt”. Is that a security concern or something that will be needed later?
Thanks
It’s always good to export the certificate and have a copy of it offline. So you can use it on another Exchange Server, or if something happens to the Exchange Server, you can easily import the certificate again.
Thanks for your great blog entry.
I followed it and the certificate was create flawlessly. However the binding wasn’t correct since SMTP is missing in my case. The new certificate is bound to IMAP, POP(?!?) and IIS. I cannot add SMTP manually in ECP. During setup entering the parameters was done per copy & paste by me.
There’s already a LE-Certificate bound to SMTP, which was created with CertificateAssistant_v3. I think that should not hold back win-acme from binding the new certificate to it.
Do you have any idea how to solve this?
Assign the certificate to the Exchange Server services with PowerShell. Read more in the article Install Exchange certificate with PowerShell.
Great article Ali, thanks!
You should have a follow up on how to renew the certs.
It will automatically renew your certificates (already written in the article).
Excellent article, enormously helpful in implementing a Let’s Encrypt certificate on my Exchange Server.
Just one bit of feedback, where you say:
“The Let’s Encrypt ACME client will connect with Let’s Encrypt on port 80 through the firewall to request a certificate. If you don’t have port 80 enabled, do that before proceeding.”
I thought you probably meant that port 80 must be allowed on the in-bound (as well as out-bound) back to the Exchange Server’s internal IP through port forwarding for it to work, but this wasn’t explicitly clear. On first reading it sounds like just having port 80 outbound opened (as is of course normally the case on most networks) is enough.
I tried it without port 80 inbound enabled and unsurprisingly it failed. As soon as enabled and retried the process, we had success 🙂
Many thanks again for your very useful guide and all the best 🙂
Not sure why this has happened but I get the following error after successfully adding the owa and autodiscover certificates to store –
Script ./Scripts/ImportExchange.ps1 starting with parameters ‘3251F73DD7456EC407C1B6E93290D4AA73A383EC’ ‘IIS,SMTP,IMAP’ 1 ‘C:\ProgramData\win-acme\acme-v02.api.letsencrypt.org\Certificates\bIIjSQECMESvVhQOspyOLA-main-6a9c156de0d135b0a2f60ce03a716d50ad6d8c8c-temp.pfx’ ‘********’ ‘[Manual] owa.example.co.uk @ 2022/6/30 14:52:54′
Script error: C:\Program Files\Lets Encrypt\Scripts\ImportExchange.ps1 : Exchange Management Tools for Powershell not installed
Script error: At line:1 char:3
Script error: + &{&’./Scripts/ImportExchange.ps1′ ‘3251F73DD7456EC407C1B6E93290D4AA73 …
Script error: + ~~~~~~~~~~~~~~~~~~~~~~~~~~~~~~~~~~~~~~~~~~~~~~~~~~~~~~~~~~~~~~~
Script error: + CategoryInfo : NotSpecified: (:) [Write-Error], WriteErrorException
Script error: + FullyQualifiedErrorId : Microsoft.PowerShell.Commands.WriteErrorException,ImportExchange.ps1
Script finished
And Certificate is not in Certificate Personal store but is in Exchange and marked as Active (no bindings however). ??
The error shows that you don’t have Exchange Management tools installed.
Thanks Ali. That’s what I thought but the Tools comprise The Exchange Toolbox & the Exchange Management Shell and these are installed as part of the Exchange installation. Is there an additional tool that needs installing or should these programs be open/running when running wacs as Admin?
Thanks for all your in detail courses Ali 🙂
It’s recommended to close all other applications before starting WACS or Command Prompt as administrator.
I just tried option two, generating a Let’s Encrypt certificate using the Command Line, and it did download and assign the certificate to the Exchange Server services.
There is also an ImportExchange.v2.ps1 PowerShell script that you can try. I also tried that one, and it works.
It will look like this:
Thanks for kindly testing these scenarios for me Ali. In the end I manually added the SMTP, IMAP and POP3 bindings to the installed Exchange certificate; shutdown the server for the weekend and when restarting all was working as expected and the certificate found in the Certificate library! I have quickly followed your instructions to back it up successfully, checked the scheduled Tasks and see all is set for the renewal and so it seems the only step the script failed to complete was the bindings (the why has left me scratching my head and I will spin up another server in due course and try and get to the bottom of it). With all working I am most grateful for your time and energy to illustrate this process. And for your continued feedback. Thank you.
Amazing Article ALI.
May I Suggest that you Add at the Start the Change in Win-ACME Settings.Json File to Make Private Key Exportable Before Certificate Generation Steps.
Also, Please Mention your Other Great Article of Re-Importing the Certificate with Private Key as it Was very Helpful and Saved me the Need to Re-issue
Glad that you find the article helpful, Mohamed.
I added the option to automatically and manually import the certificate’s private key to the article. Thanks for pointing it out.
Hi Ali,
would this work for the Edge server in a full classic hybrid setup as well?
Each time an Edge Transport server’s cert is updated the subscription must be recreated with New-EdgeSubscription being run at both Edge and Hub servers.
Thanks Ali, Do this goes with mutli-tenant DAG exchange ?
Hi Ali,
Thank you so much for this guide. May I ask why you did not include the actual domain exoip.com as one of the host in the certificate? Is mail.exoip.com and autodiscover.exoip.com enough?
The Exchange Server virtual directories are configured as mail.exoip.com and autodiscover.exoip.com. So we only need to request a certificate for these two hosts.
thanks Ali.. I asked this because after setting up the cert, I’m getting this error validating the Outbound connector and sending email from/to O365 “message expired, cannot connect to remote server, 451 5.7.3 STARTTLS is required to send mail”
For an Exchange Hybrid configuration, you might want to read: Renew certificate in Exchange Hybrid.
Thanks a lot brother. Worked as expected. Used the cli method and it was very quick. Had to restart IIS to connect to ECP as it was not allowing me login to Exchange Admin Center.
Hello,
i installed the certificate exactly like you did in the description. i added outlook.domain.com and autodiscover.domain.com as host name. (these also exist as DNS entry at my domain hoster).
win acme says everything is fine, i also can find the certificate in exchange but exchange says that my letsencrypt certificate is invalid?
can you please help me?
thanks
Muy agradecido por tu artículo. Me ha sido muy útil.
Excellent article, saved me a lot of time!
Cheers, Thomas
Hi, Good morning. I just tried using both methods but it failed to create the certificate. See my error code. This is just for testing.
.\wacs.exe –target manual –host mail.redacted.com.com,autodiscover.redacted.com –certificatestore My –acl-fullcontrol “network service,administrators” –installation iis,script –installationsiteid 1 –script “./Scripts/ImportExchange.ps1” –scriptparameters “‘{CertThumbprint}’ ‘IIS,SMTP,IMAP’ 1 ‘{CacheFile}’ ‘{CachePassword}’ ‘{CertFriendlyName}'” –verbose
You didn’t copy the exact command from the article. The command-line arguments need to have a double dash. Your command uses one dash at every command-line argument, which will fail.
Great article! I have a couple of questions.
Does this work with Exchange 2010, too?
Will this cause problems on clients, like every 3 months the need to load the new certificate in Outlook?
I did not try it on Exchange Server 2010. I don’t recommend you to use Exchange Server 2010 in any organization as it reached end-of-life support. Outlook clients will not have issues.
Yeah I know about end-of-life, but I found Exchange 2010 already installed on a customer’s server and they don’t want to change server for the time being, so I’m trying to make it work as best as possible.
Yes, this works with MSX 2010 – I’ve just used it with a client’s site. Use the ‘v1’ Exchange script so the 2010 management tools are used. [Yes, as Ali correctly points out, MSX 2010 is EoL but if that’s what the client is using…..]
Great article!
Thank you, it works like a charm!
Excellent article work like a charm !
Thank you very much !
How do you do same thing with DAG, how can we use and install same certificate on other members ?
I heard too that using the interactive mode for Exhange was not a good idea regarding of rights when installing a CU do you confirm ?
Regards.
You are welcome. I am glad that it worked.
At the moment, you have to manually export and import the certificate on another Exchange Server.
When I do have time, I will write a script to automate the process. This way, it will download the Let’s Encrypt certificate and assign it to all the Exchange Servers that you set up in the configuration.
For now, you can find more interesting articles about certificates over here.
Ok thank you for your answer, i took a look and it’s very usefull and detailed.
Thanks for all.
Very useful article. It saved me over 400€ with a free Lets Encrypt certificate instead of a paid one !
Thank you very much 🙂
Can you tell us how to automate the certificate update on the second Exchange server of a DAG ?
Keep on help us to manage our Exchange Servers, you do it very well indeed !
Pascal.
Just wondering if you automated use of Let’s Encrypt on multiple Exchange servers?
GREAT article btw!
Excellent work ! Thank you very much !
I just looked up your mail server and it is no longer certified with lets encrypt. It is currently on self signed certificate. Could you let us know what went wrong so we could learn from it and perhaps fix it.
I do a lot of building and testing in the environment. After setting up a new Exchange Server, I did not configure Let’s Encrypt on it. That’s why you see the self-signed certificate. I just followed the article, and Let’s Encrypt is configured again. Have a look at yourself.
Great Article and works perfectly. Thanks for wonderful work.
Great blog!! perfectly done…thanks a million….
Bravo!! Well done !! never seen such precise article with screenshot. Easily done with no time.
God bless you!!Thank you so much!! I did it for 2013 exchange with no issue. I had restart IIS since I was not able to login EAC , it was stuck in login loop
Great blog!! perfectly done.