Get Exchange mailbox database mount status with PowerShell. Sometimes you need to know the database…
Install second Exchange Server in domain
We have an existing Exchange organization with only one Exchange Server. For High Availability, we like to install a second Exchange Server in the domain. The steps will work for all on-premises Exchange Server versions. In this article, you will learn how to add a second Exchange Server in domain.
Table of contents
- Exchange Server prerequisites
- Before you start to install second Exchange Server in domain
- Find Exchange Server version
- Download Exchange Server
- Prepare Active Directory and domains for Exchange Server
- Install Exchange Server
- Get Exchange autodiscover URL
- Set Exchange autodiscover URL
- What’s next?
- Conclusion
Exchange Server prerequisites
Before you install Exchange Server, you need to have a Windows Server available. It’s because you will install Exchange Server on Windows Server.
You can install Exchange Server on these Windows Servers:
Exchange Server 2016
- Windows Server 2016 Standard or Datacenter (Exchange Server 2016 CU3 or later)
- Windows Server 2012 R2 Standard or Datacenter
- Windows Server 2012 Standard or Datacenter
- Windows Server Desktop Experience
Exchange Server 2019
- Windows Server 2022 Standard or Datacenter (Exchange Server 2019 CU12 or later)
- Windows Server 2019 Standard or Datacenter
- Windows Server Desktop Experience
- Windows Server Core
Read more in the article Install Exchange Server prerequisites.
Before you start to install second Exchange Server in domain
It’s good that after setting up the Exchange Server requirements on the Windows Server, to follow and configure these settings:
- Configure pagefile in Exchange Server
- Configure power plan in Exchange Server
- Disable NIC Power Management in Exchange Server
- Configure ReFS volume Exchange 2013/2016/2019
Find Exchange Server version
We recommend installing the latest Exchange Server version as the one that is running in the organization.
Start Exchange Management Shell as administrator. Run the Get-ExchangeServer cmdlet to check which Exchange Server version is running in the domain.
[PS] C:\>Get-ExchangeServer | Format-Table Name, Edition, AdminDisplayVersion

Name          Edition AdminDisplayVersion
----          ------- -------------------
EX01-2019  Enterprise Version 15.2 (Build 1118.7)
Exchange Server 2019 CU12 is running in the organization, and there is no newer version of Exchange Server 2019 at the moment of writing. So we will use that version for the second Exchange Server.
Note: Install Exchange Server Cumulative Update and Exchange Server Security Update to keep up to date with the latest features, bug fixes, and security patches.
Download Exchange Server
Download the latest Exchange Server 2019 CU ISO image. Open the ISO image and check to which drive letter it’s mapped. In our example, it’s the (E:) drive.
Prepare Active Directory and domains for Exchange Server
Do you need to prepare Active Directory and domains for Exchange Server?
- No, if it’s the same Exchange Server CU version
- Yes, if it’s a newer Exchange Server CU version
Install Exchange Server
Open Command Prompt as administrator. Run the command to install the Exchange Mailbox server role.
C:\>E:\Setup.exe /IAcceptExchangeServerLicenseTerms_DiagnosticDataOFF /mode:Install /r:MB

Microsoft Exchange Server 2019 Cumulative Update 12 Unattended Setup

Copying Files...
File copy complete. Setup will now collect additional information needed for installation.

Languages
Management tools
Mailbox role: Transport service
Mailbox role: Client Access service
Mailbox role: Mailbox service
Mailbox role: Front End Transport service
Mailbox role: Client Access Front End service

Performing Microsoft Exchange Server Prerequisite Check

    Configuring Prerequisites                                                                         COMPLETED
    Prerequisite Analysis                                                                             COMPLETED

Configuring Microsoft Exchange Server

    Preparing Setup                                                                                   COMPLETED
    Stopping Services                                                                                 COMPLETED
    Copying Exchange Files                                                                            COMPLETED
    Language Files                                                                                    COMPLETED
    Restoring Services                                                                                COMPLETED
    Language Configuration                                                                            COMPLETED
    Exchange Management Tools                                                                         COMPLETED
    Mailbox role: Transport service                                                                   COMPLETED
    Mailbox role: Client Access service                                                               COMPLETED
    Mailbox role: Mailbox service                                                                     COMPLETED
    Mailbox role: Front End Transport service                                                         COMPLETED
    Mailbox role: Client Access Front End service                                                     COMPLETED
    Finalizing Setup                                                                                  COMPLETED

The Exchange Server setup operation completed successfully.
Setup has made changes to operating system settings that require a reboot to take effect. Please reboot this server
prior to placing it into production.
Restart the Exchange Server after Exchange Server setup finishes.
Read more in the article Install Exchange Server.
Get Exchange autodiscover URL
After installing Exchange Server, we will get the Exchange autodiscover URL and set the Exchange autodiscover URL. Otherwise, the users will get a security alert certificate warning.
The users will see it as a security risk and will call the IT support desk. Save the support desk from these calls and immediately change the autodiscover URL after you install the second Exchange Server to the domain.
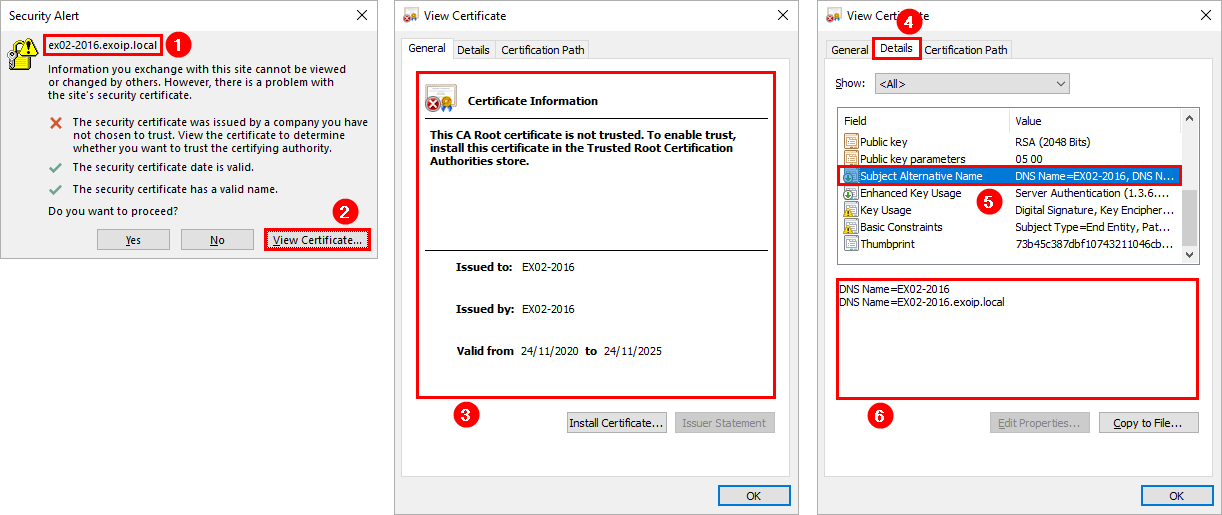
Run Exchange Management Shell as administrator. Run the cmdlet to get the Autodiscover URL.
We need to adjust the Exchange Server EX02-2019 AutoDiscoverServiceInternalUri to a generic namespace, just as EX01-2019 is already configured.
[PS] C:\>Get-ClientAccessServer | Select Name, AutoDiscoverServiceInternalUri, AutoDiscoverSiteScope | Format-List
WARNING:  The Get-ClientAccessServer cmdlet will be removed in a future version of Exchange. Use the Get-ClientAccessService cmdlet instead. If you have any scripts that use the Get-ClientAccessServer cmdlet, update
them to use the Get-ClientAccessService cmdlet.  For more information, see http://go.microsoft.com/fwlink/p/?LinkId=254711.


Name                           : EX01-2019
AutoDiscoverServiceInternalUri : https://autodiscover.exoip.com/Autodiscover/Autodiscover.xml
AutoDiscoverSiteScope          : {Default-First-Site-Name}

Name                           : EX02-2019
AutoDiscoverServiceInternalUri : https://ex02-2019.exoip.local/Autodiscover/Autodiscover.xml
AutoDiscoverSiteScope          : {Default-First-Site-Name}
Read more in the article: Find autodiscover URL in Exchange with PowerShell.
Set Exchange autodiscover URL
Set the autodiscover URL and restart IIS to apply the changes. We have seen in the past that it’s better to restart the Exchange Server after we configure autodiscover URL to have the change take immediate effect.
[PS] C:\>Set-ClientAccessServer -Identity "EX02-2019" -AutoDiscoverServiceInternalUri https://autodiscover.exoip.com/Autodiscover/Autodiscover.xml

[PS] C:\>iisreset

Attempting stop...
Internet services successfully stopped
Attempting start...
Internet services successfully restarted
Read more in the article: Configure autodiscover URL in Exchange with PowerShell.
After you set the autodiscover URL, you will not bother anyone in the organization with a certificate warning.
What’s next?
Configure the next steps on the second Exchange Server:
- Enter product key in Exchange Server
- Configure Internal and External URL in Exchange
- Move mail queue to another location in Exchange Server
- Cleanup Exchange logs automatically with scheduled task
- Antivirus exclusions for Exchange Server
Conclusion
You learned how to install a second Exchange Server in the domain. It’s the same process as installing the first Exchange Server. After you install a second Exchange Mailbox server, pay close attention, and change the autodiscover record. Otherwise, a certification security alert shows up in Outlook, which will bother the users.
Did you enjoy this article? You may also like Exchange database is mandatory on UserMailbox. Don’t forget to follow us and share this article.
What Others Are Reading
Dear Ali,
We have one exchange server 2019 CU13 running on a windows 2019 server. We also have a second exchange server 2019 on a 2nd windows 2019, but DAG has not been setup but the virtual directories are the same, poing to the 1st exchange server We need to upgrade the windows to 2022. There is no in-place upgrade for the windows in this case.
I was thinking to uninstall the exchange server in the 2nd server, upgrade the OS to 2022 and then reinstall the exchange 2019.
I can then setup the DAG. Then I can do the same to the 1st server to upgrade it to 2022.
Now what are the gotchas in uninstalling the exchange in the 2nd server?
Our environment is a VMware version 7 with vCenter and two Dell servers.
Any insight would be appreciated.
Thanks
Good Afternoon Ali,
This article is the best, as are several of your other articles that have helped me some some issues. I do have a question for you. I have just recently taken over for an IT Manager who wasn’t as competent with Exchange. I have a situation that they created with an SSL cert, originally my company purchased a 3-year cert and during the first year, the server moved most of the mailboxes to a new server because the old one was running out of HDD space. The SSL had a FQDN name such as EX.yourdomain.com which the “AutodiscoverServiceInternal Uri” for EX is set to. Any mailbox that is on EX2 gets the Outlook certificate error message. As your article indicates the solution, my question is can I just set EX2 to use the same “AutodiscoverServiceInternalUri” as ex to resolve the issue, or am I going to have to get a wildcard SSL and use that on both servers?
I like the structure of your pages – not “overloaded” with tons of info, crap & adds!
I’m in the process to migrate from Exch2016 to Exch2019 and i searched your site for a procedure and found “Install second Exchange Server in domain”. I’m in doubt if is just that or do i have to do step 2 & 3 in “Whats next” – or is there a migration procedure on your site that i didn’t discover?
/Lars
The second exchange server 2016 is already installed for coexistence with Exchange 2010. Each exchange has its independent MX.
From Ex2016 to Ex2010 and beyond, it sends without problems.
The problem is, I can’t send mail from Ex2010 and out to Ex2016.
The NDR error is 4.4.7 queue Expired.
EDIT RECEIVE CONNECTOR – DEFAULT FRONTEND EX2016
SCOPE = 0.0.0.0 – 255.255.255.255 TO 200.100.0.0/24
CREATE NEW CONNECTOR – ANONYMOUS RELAY CONNECTOR
SCOPE = 0.0.0.0 – 255.255.255.255 or 0.0.0.0/24
SERVER | MX | Priority
——————————————————–
Ex2010 | Ex2010.contoso.com | 10
Ex2016 | Ex2016.contoso.com | 20
If you cannot find the mailbox test@contoso. com, created in Ex2016 and does not exist in Ex2010. I should change the server asking if the mailbox exists, I don’t know how to verify this configuration.
Hi Ali, quick but strange question. Is it possible, and supported, to install an exchange 2016 in a site where there’s already an Exchange 2019? The opposite as you said in your article, practically. Thank you
If an Exchange Server 2016 was installed in the organization before you installed Exchange Server 2019, then yes. If Exchange Server 2016 never existed, then you can’t.
Dear Ali
we have 2 exchange servers server0.domain.com and server1.domain.com
we have DAG with witness server on site.
active database is on server0
Both servers are exchange 2016 on server 2016
However, i tried to model disaster. I put server1 offline, took the network off.
Some computers (we have 120 clients.) say server not available.
despite server0 is primary server and well computers try to access server1 and fail.
Some access server0 and are OK.
what to do?
Externally all is good. we have split DNS.
Someone help
Hey Ali. Thanks for your guidance. Your instructions have helped me more than once.
I want to ask about some unusual case.
I’m going to deploy the second exchange as usual, but unlike 100% replication/sync, I want only the last month’s data to be synchronized on the second exchange.
Is it possible to make the second exchange server only have data for the last month?
Hello,
Well I introduced the second server Exch19 in addition to the existing one Exh16. And the way exchange is receiving is really odd. Basically I had some users start reporting additional Spam right after Exch19 was introduced.
Only main/primary Exch16 it is supposed to filter/routing the SMTP traffic. Exch16 it has the Antispam Filter installed/and does the Antispam job. Get-TransportAgent on main/old Exch16 it shows clearly as priority 1 and 2 the special 3rd party Antispam Agent.
On the newly introduced Exchange 2019 there is not any special AntiSpam Filter installed yet, but I was expecting the Exch16 to remain the only Front-End Server that is playing the Front-End role (since the firewall is routing to Exch16 smtp traffic). Odd enough and cannot explain now any email received from outside if you check the Message Detailes/Header shows something like this with 3 Received records:
Received: from Exch19.blahblah.com (local ip of Exch19) by Exch16.blahblah.com
(local IP of Exch16) with Microsoft SMTP Server (version=TLS1_2,
cipher=TLS_ECDHE_RSA_WITH_AES_128_GCM_SHA256) id 15.1.2375.24 via Mailbox
Transport; Blah Blah Oct 2022 15:51:10 -0400
Received: from Exch16.blahblah.com (local ip of Exch16) by Exch19.blahblah.com
(local IP of Exch19) with Microsoft SMTP Server (version=TLS1_2,
cipher=TLS_ECDHE_RSA_WITH_AES_128_GCM_SHA256) id 15.2.1118.7; Blah Blah Oct
2022 15:51:09 -0400
Received: from outside domain lets say yahoo blah blah (yahoo ip blah blah) by Exch19.blahblah.com
(local IP of Exch16) with Microsoft SMTP Server (version=TLS1_2,
cipher=TLS_ECDHE_RSA_WITH_AES_128_GCM_SHA256) id 15.1.2375.24 via Frontend
Transport; Blah Blah Oct 2022 15:51:09 -0400
Somehow some spam messages are passing thru.
So far I disabled all received connectors on the new Exch19. Once migration is complete , and AntiSpam software installed I will re-enable. First I disabled just the default Front-End Receivers with no success… followed by dissabling the additional 2 Hub Transport receivers. Super odd.
Even with all receivers disabled messages are still flowing fine to the mailboxes located on the ne Exc19.
Best website for exchange server , keep it going !
thanks alot man .
Hi,
after successful installation of the second exchange server, how to set up mail flow for the second server or replication?
Mails will keep going to the first server or to both?
In case of failure of the first server, mails will be auto redirected?
Everything is explained in the course Exchange Server High Availability.
I am looking to stand up another 2016 Exchange server to an environment that is running a 2016 server already.
the reason for the new server is to try to migrate off all the mailboxes to this new server as the old server is having problems with the DB staying mounted (something must be corrupted as none of the repair options work).
The question that I have is, how to do you handle the transport service portion of it? Is Exchange/AD smart enough to recognize that there are 2 servers in the environment and route mail to the appropriate server that hosts the mailbox?
Exchange Server is smart enough to understand where the mailbox is hosted and route the mail to the particular mailbox when there are multiple Exchange Servers in the organization.
Hi Ali,
thank you for your courses. Your courses are very helpful.
I have a Exchange Server 2016 and two Windows 2019 Servers. Currenty we have not a DAG Configuration on our Ex2016 and we want to migrate our Ex2016 to Ex2019. Would you perform first your Migration Job or first your DAG Configuration for EX2019 Servers. Can I perform first a DAG configuration on EX2019 Servers and than migration from EX2016 to EX2019.
Thank you for your answer.
Best Regards
Hi Emre,
Glad that the courses are helpful.
Both will work.
Just ensure that when you have a DAG and you migrate many mailboxes, it needs to copy the data over to the other Exchange Server, which will cause some load.
Hi Ali,
Thanks for great articles that you have published. very helpful. One question please: What if I join a new member to existing DAG? is the same procedure?
Hi Juli,
Glad you find the articles helpful.
You have to install Exchange Server and go through the steps that I have shown in this article. After that, you can add the Exchange Server as a DAG member.
quick question, if you add a new exchange mailbox server how will it access the mailbox database from the existing MB server? or you migrate the mailboxes to the new Exchange?
thank you
Here are some examples which can help you:
– If this is a second Exchange Server and the same version already exists in the organization, create a DAG (Database Availablity Group). The mailboxes will be available on both Exchange Servers.
– If this is a second Exchange Server and newer than the existing Exchange Server in the organization, the mailboxes will up-proxy to the new Exchange Server.
>If this is a second Exchange Server and newer than the existing Exchange Server in the organization, the >mailboxes will up-proxy to the new Exchange Server.
What does this mean, “up-proxy”? The mailboxes are available on both the old 2013 and the new 2019 exchange? How to migrate the database storage then to the new 2019 in a second Step? Thanks, keep healthy.
Andreas
You can migrate mailboxes to Exchange Server 2019 and keep pointing the internal and external URLs to Exchange Server 2013. After migration, you can change the records.
But you can also do it the other way around, which is changing the internal and external DNS records to Exchange Server 2019 and migrating the mailboxes.
The mailboxes will up-proxy and down-proxy between Exchange Server 2013 and Exchange Server 2019.
In your case, the steps will be like this:
1. Point internal and external DNS records to Exchange Server 2019
2. Create new mailbox databases in Exchange Server 2019
3. Migrate all mailboxes from Exchange Server 2013 to Exchange Server 2019
4. Remove Exchange Server 2013 mailbox databases
5. Uninstall Exchange Server 2013