You want to enable Azure AD Multi-Factor Authentication. There is a per-user MFA and Conditional…
Migrate Azure AD Connect to new server
How to migrate Azure AD Connect to a new server? You have Azure AD Connect V1 running, and you want to upgrade to Azure AD Connect V2. However, Azure AD Connect V2 requires Windows Server 2016 or higher. This article will show how to move Azure AD Connect to another server.
Table of contents
- Introduction
- Why move Azure AD Connect to new server?
- Azure AD Connect V2.0 major changes
- Old Azure AD Connect server
- New Azure AD Connect server
- Enable TLS 1.2 on Azure AD Connect server
- Download Azure AD Connect V2
- Install Azure AD Connect V2
- Import synchronization settings
- User sign-in settings
- Create hybrid identity administrator account
- Connect to Azure AD
- Connect directories
- Ready to configure
- Verify Azure AD Connect version
- Verify Azure AD Connect synchronization
- Enable staging mode on old server
- Disable staging mode on new server
- Check Azure AD Connect synchronization
- Uninstall Azure Azure AD Connect
- Conclusion
Introduction
Are you new to Azure AD Connect? Learn more on how to install and configure Azure AD Connect. It’s good to make yourself familiar with Azure AD Connect before you migrate Azure AD Connect to another server.
The following Windows Server releases support Azure AD Connect V2:
- Windows Server 2016
- Windows Server 2019
- Windows Server 2022
Note: Azure AD Connect V2 requires Windows Server 2016 or higher. You must migrate Azure AD Connect to a new server if running an older Windows Server version.
Do you already have Azure AD Connect V1 installed on Windows Server 2016 or higher and want to upgrade? Or do you already have Azure AD Connect V2 running and want to upgrade to the latest version for new features and bug fixes? Read the articles:
Note: Upgrade Azure AD Connect to V2.x before August 31, 2022. Otherwise, several components will go out of support.
In our example, Azure AD Connect V1 is running on Windows Server 20212 R2. Now that we can’t have an in-place upgrade to Azure AD Connect V2 because it requires Windows Server 2016 or higher, we must migrate Azure AD Connect to another server. It can be a new server or an existing server.
In our scenario, this is how the setup looks like:
- DC01-2019: Windows Server 2019 (Domain Controller)
- AAD01-2012: Windows Server 2012 (Old Azure AD Connect server)
- AAD02-2019: Windows Server 2019 (New Azure AD Connect server)
Why move Azure AD Connect to new server?
There are different reasons why you need to migrate Azure AD Connect server to a new server:
- Azure AD Connect V2 supports Server 2016 and higher
- Azure AD Connect server fails to start
- Decommission old Windows Servers
Azure AD Connect V2.0 major changes
These are the new significant changes in Azure AD Connect V2.0:
- SQL Server 2019 LocalDB
- MSAL authentication library
- Visual C++ Redist 14
- TLS 1.2
- All binaries signed with SHA2
- Windows Server 2012 and Windows Server 2012 R2 are no longer supported
- PowerShell 5.0
Read the official Azure AD Connect V2.0 documentation.
Old Azure AD Connect server
Sign in to the old Azure AD Connect server. Go through the steps to check a couple of Azure AD Connect settings and write them down. Also, you need to export the Azure AD configuration.
In our example, it’s the server name AAD01-2012.
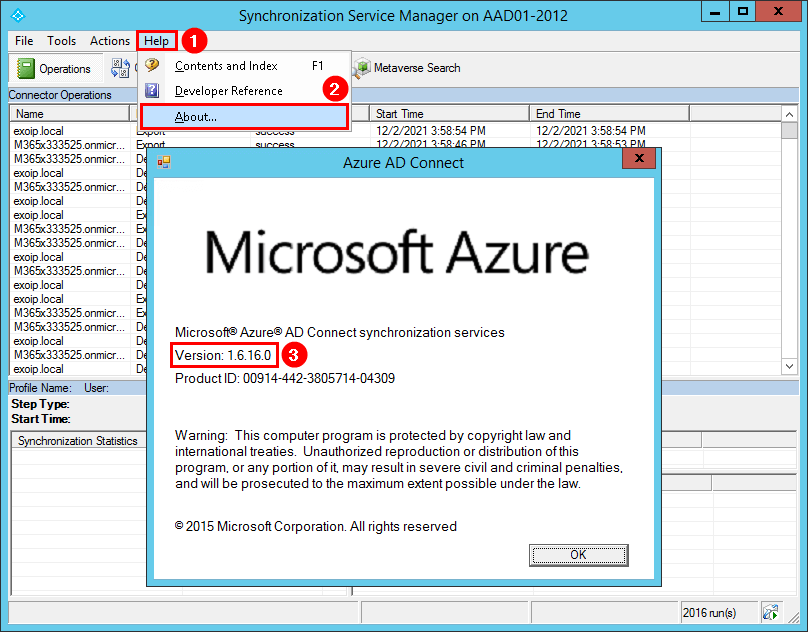
Check Azure AD Connect version
Start Azure Active Directory Synchronization Service from the programs menu. Click in the menu bar on Help > About. Azure AD Connect version 1.6.16.0 shows up.
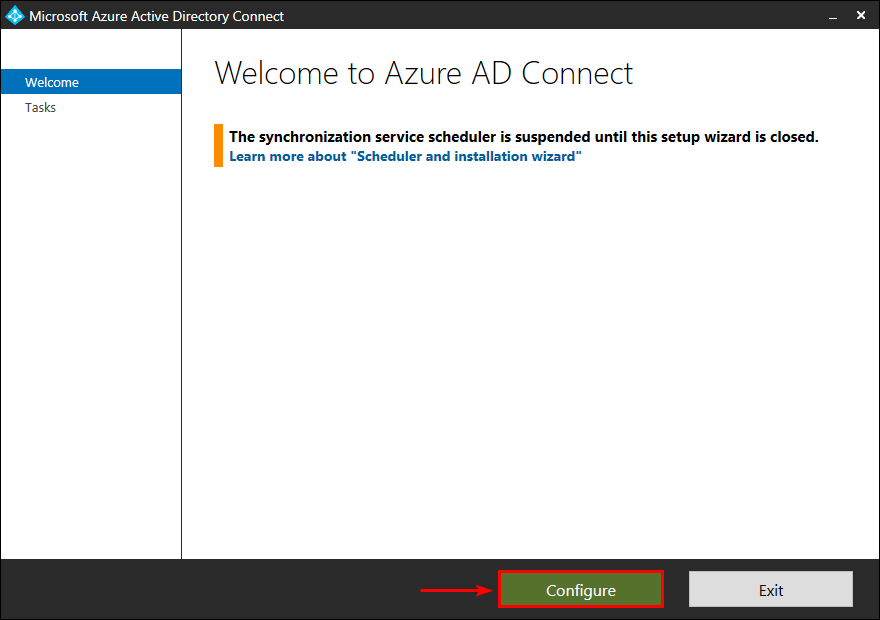
Export Azure AD Connect configuration
Before you migrate Azure AD Connect to another server, you must create an Azure AD Connect export configuration.
Start Microsoft Azure Active Directory Connect from the programs menu. Click on Configure.
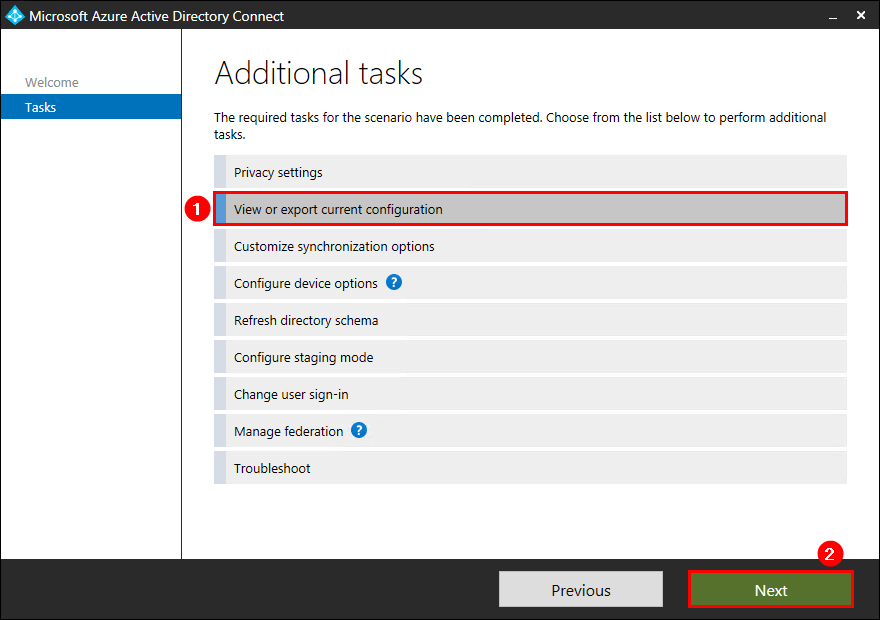
Click View or export current configuration. Click Next.
Click Export Settings.
Note: Upgrade to Azure AD Connect V1.6 if you don’t see the Export Settings option.
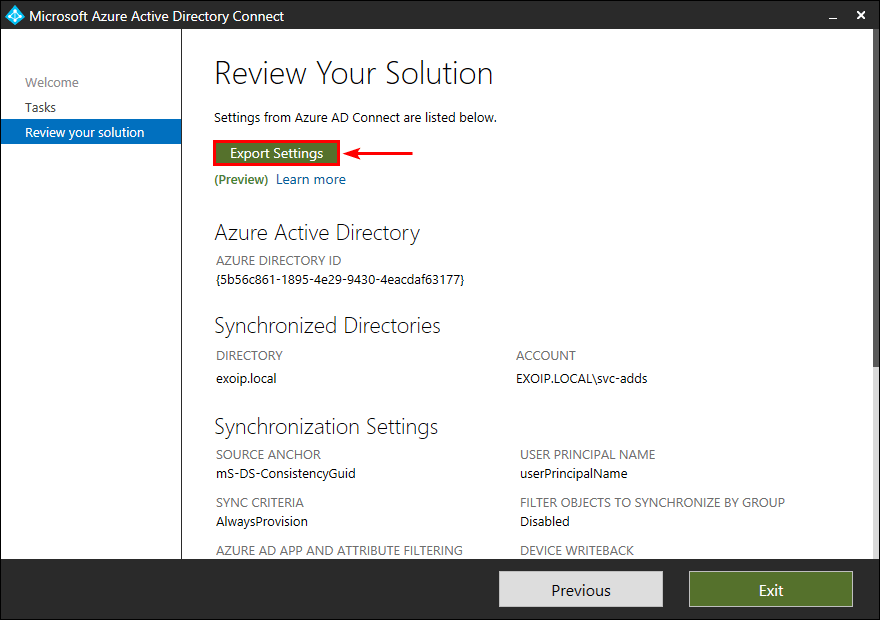
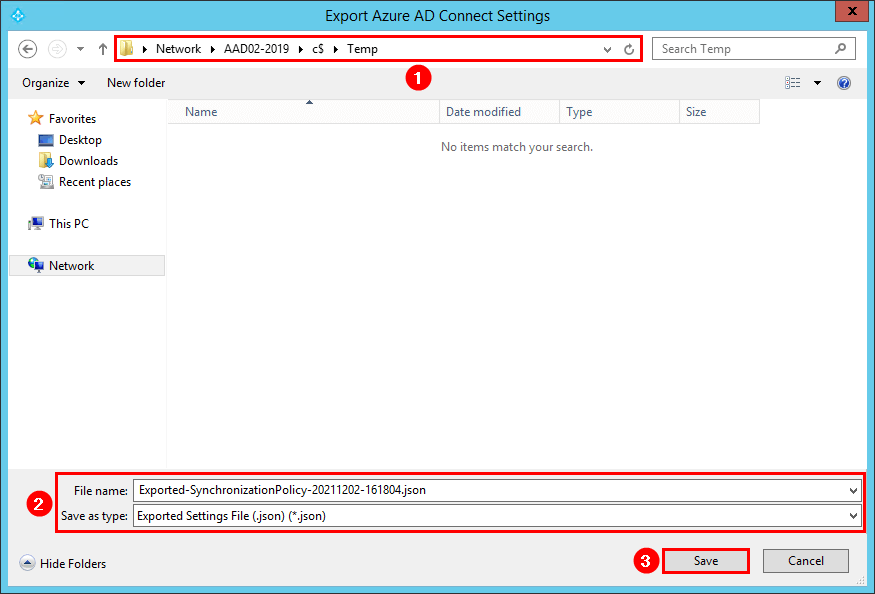
Save the .json file on the C:\temp folder of the new Windows Server that you will install Azure AD Connect on.
In our example, the new Windows Server is AAD02-2019.
Check Azure AD Connect user sign-in settings
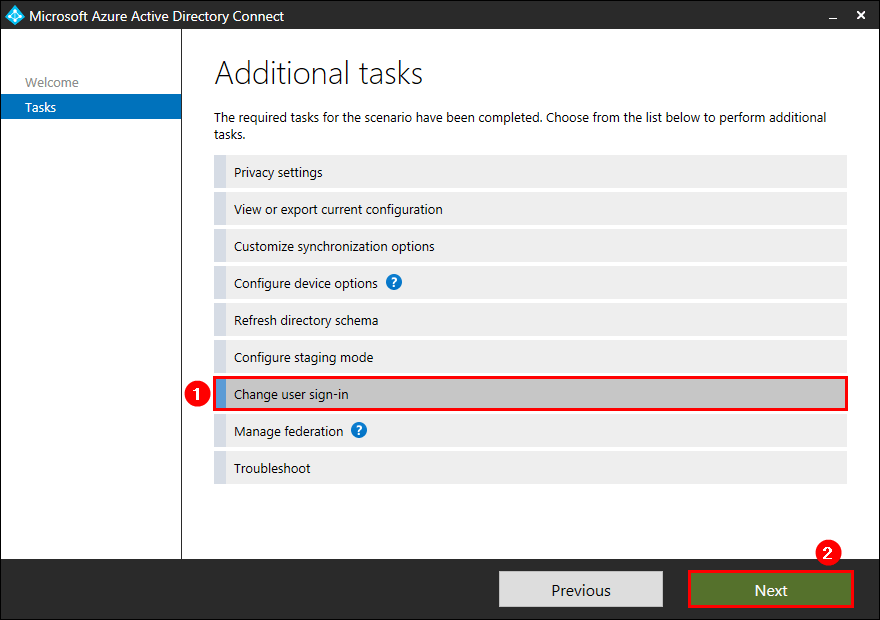
Go back to the Additional tasks. Click on Change user sign-in. Click Next.
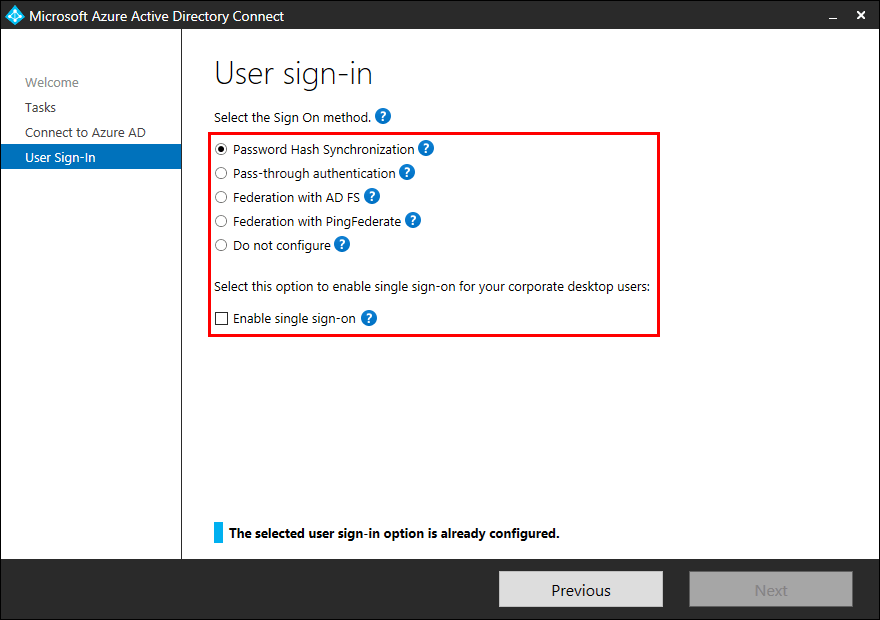
Write down or take a screenshot of the User sign-in settings. You will need to provide these settings in the Azure AD Connect setup wizard on the new Windows Server.
Note: The Azure AD export configuration will not export the User sign-in settings. Write the settings down.
New Azure AD Connect server
Sign in to the Windows Server that you will install Azure AD Connect on. Go through the steps to import the Azure AD configuration settings and install Azure AD Connect.
In our example, it’s the server AAD02-2019.
Enable TLS 1.2 on Azure AD Connect server
Before we download and run the upgrade to Azure AD Connect V2.x, we must enable TLS 1.2 on the Azure AD Connect server. If we don’t do that and run the Azure AD Connect setup file, we can get the Incorrect version of TLS message.
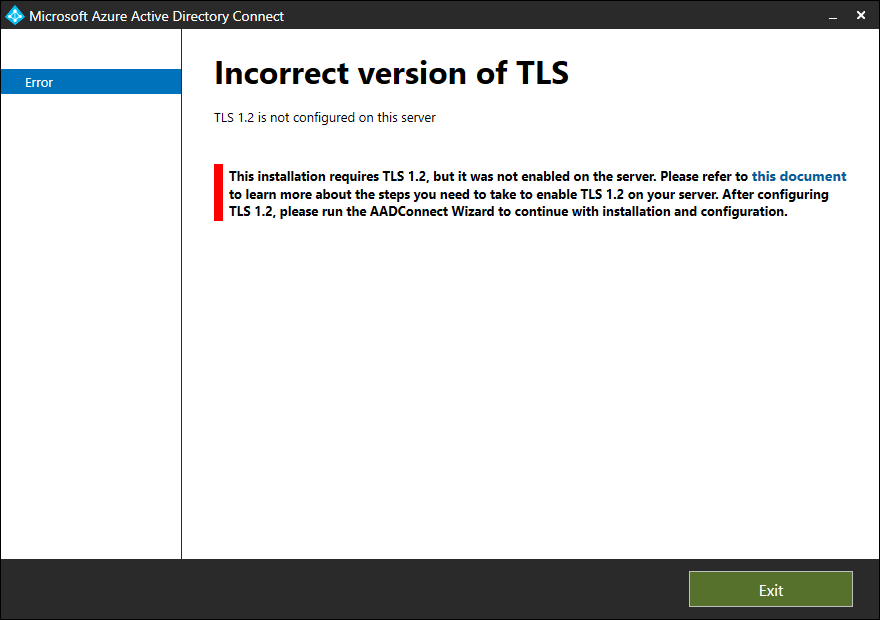
Incorrect version of TLS
TLS 1.2 is not configured on this server.
This installation requires TLS 1.2, but it was not enabled on the server. Please refer to this document to learn more about the steps you need to take to enable TLS 1.2 on your server. After configuring TLS 1.2, please run the AADConnect Wizard to continue with installation and configuration.
Run PowerShell ISE as administrator on the new server. Download Enable-TLS1.2.ps1 PowerShell script and run it from PowerShell. Another way is to copy the below PowerShell script.
If (-Not (Test-Path 'HKLM:\SOFTWARE\WOW6432Node\Microsoft\.NETFramework\v4.0.30319')) {
    New-Item 'HKLM:\SOFTWARE\WOW6432Node\Microsoft\.NETFramework\v4.0.30319' -Force | Out-Null
}
New-ItemProperty -Path 'HKLM:\SOFTWARE\WOW6432Node\Microsoft\.NETFramework\v4.0.30319' -Name 'SystemDefaultTlsVersions' -Value '1' -PropertyType 'DWord' -Force | Out-Null
New-ItemProperty -Path 'HKLM:\SOFTWARE\WOW6432Node\Microsoft\.NETFramework\v4.0.30319' -Name 'SchUseStrongCrypto' -Value '1' -PropertyType 'DWord' -Force | Out-Null

If (-Not (Test-Path 'HKLM:\SOFTWARE\Microsoft\.NETFramework\v4.0.30319')) {
    New-Item 'HKLM:\SOFTWARE\Microsoft\.NETFramework\v4.0.30319' -Force | Out-Null
}
New-ItemProperty -Path 'HKLM:\SOFTWARE\Microsoft\.NETFramework\v4.0.30319' -Name 'SystemDefaultTlsVersions' -Value '1' -PropertyType 'DWord' -Force | Out-Null
New-ItemProperty -Path 'HKLM:\SOFTWARE\Microsoft\.NETFramework\v4.0.30319' -Name 'SchUseStrongCrypto' -Value '1' -PropertyType 'DWord' -Force | Out-Null

If (-Not (Test-Path 'HKLM:\SYSTEM\CurrentControlSet\Control\SecurityProviders\SCHANNEL\Protocols\TLS 1.2\Server')) {
    New-Item 'HKLM:\SYSTEM\CurrentControlSet\Control\SecurityProviders\SCHANNEL\Protocols\TLS 1.2\Server' -Force | Out-Null
}
New-ItemProperty -Path 'HKLM:\SYSTEM\CurrentControlSet\Control\SecurityProviders\SCHANNEL\Protocols\TLS 1.2\Server' -Name 'Enabled' -Value '1' -PropertyType 'DWord' -Force | Out-Null
New-ItemProperty -Path 'HKLM:\SYSTEM\CurrentControlSet\Control\SecurityProviders\SCHANNEL\Protocols\TLS 1.2\Server' -Name 'DisabledByDefault' -Value '0' -PropertyType 'DWord' -Force | Out-Null

If (-Not (Test-Path 'HKLM:\SYSTEM\CurrentControlSet\Control\SecurityProviders\SCHANNEL\Protocols\TLS 1.2\Client')) {
    New-Item 'HKLM:\SYSTEM\CurrentControlSet\Control\SecurityProviders\SCHANNEL\Protocols\TLS 1.2\Client' -Force | Out-Null
}
New-ItemProperty -Path 'HKLM:\SYSTEM\CurrentControlSet\Control\SecurityProviders\SCHANNEL\Protocols\TLS 1.2\Client' -Name 'Enabled' -Value '1' -PropertyType 'DWord' -Force | Out-Null
New-ItemProperty -Path 'HKLM:\SYSTEM\CurrentControlSet\Control\SecurityProviders\SCHANNEL\Protocols\TLS 1.2\Client' -Name 'DisabledByDefault' -Value '0' -PropertyType 'DWord' -Force | Out-Null

Write-Host 'TLS 1.2 has been enabled. You must restart the Windows Server for the changes to take effect.' -ForegroundColor Cyan
Paste the script in PowerShell ISE and run the script.
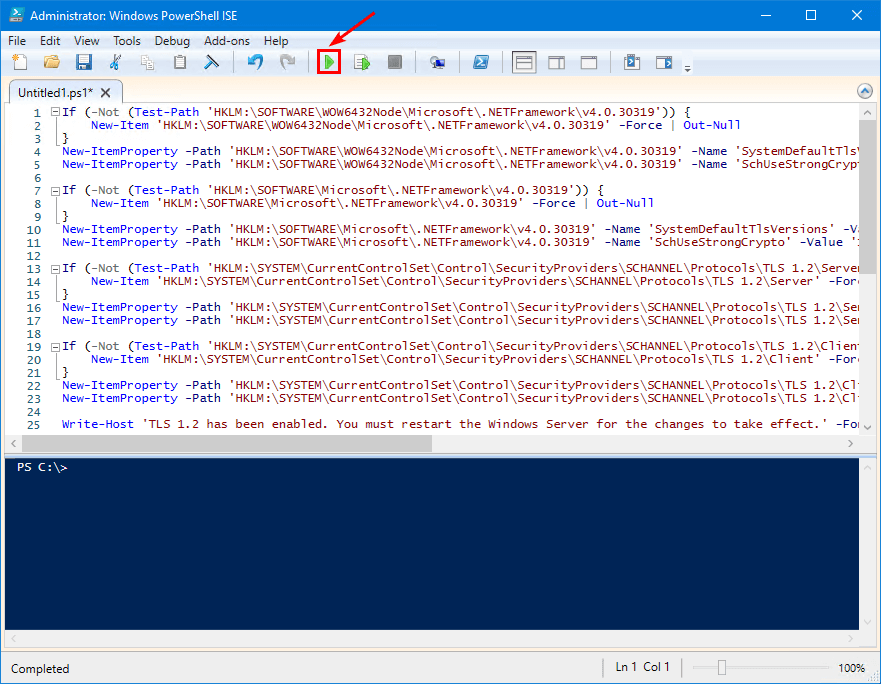
After running the script, you must restart the Windows Server for the changes to take effect.
Download Azure AD Connect V2
Download the latest Azure AD Connect version by going to the Microsoft Download Center. At the moment, the newest version is Azure AD Connect 2.0.28.0.
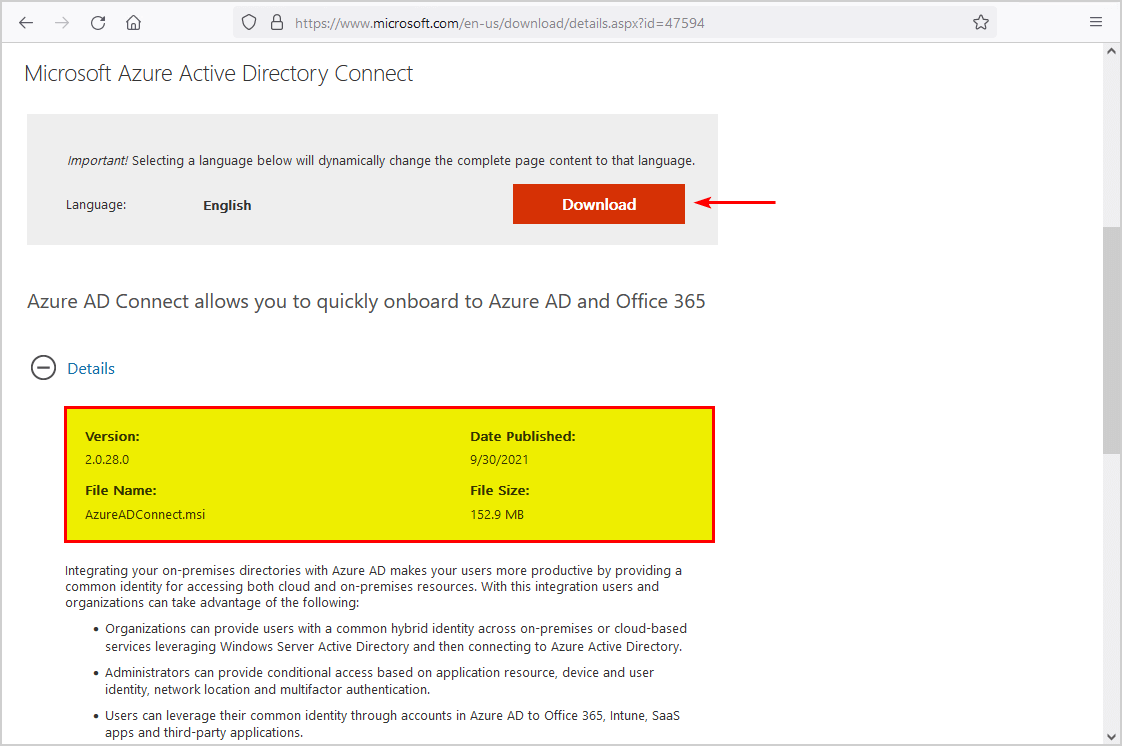
Save the AzureADConnect.msi file in C:\install folder.
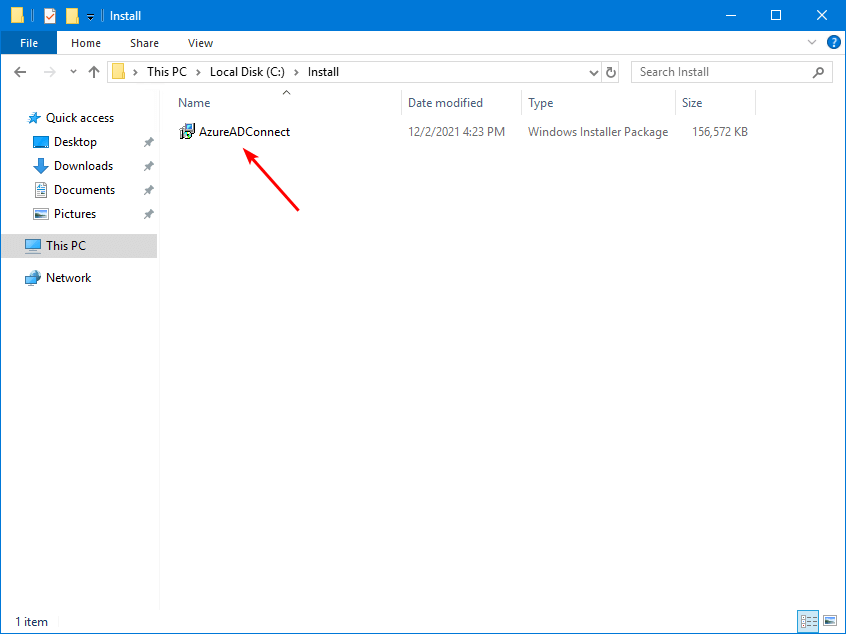
Install Azure AD Connect V2
Double-click the AzureADConnect.msi file, and let the setup extract the files. Agree to the license terms and click Continue.
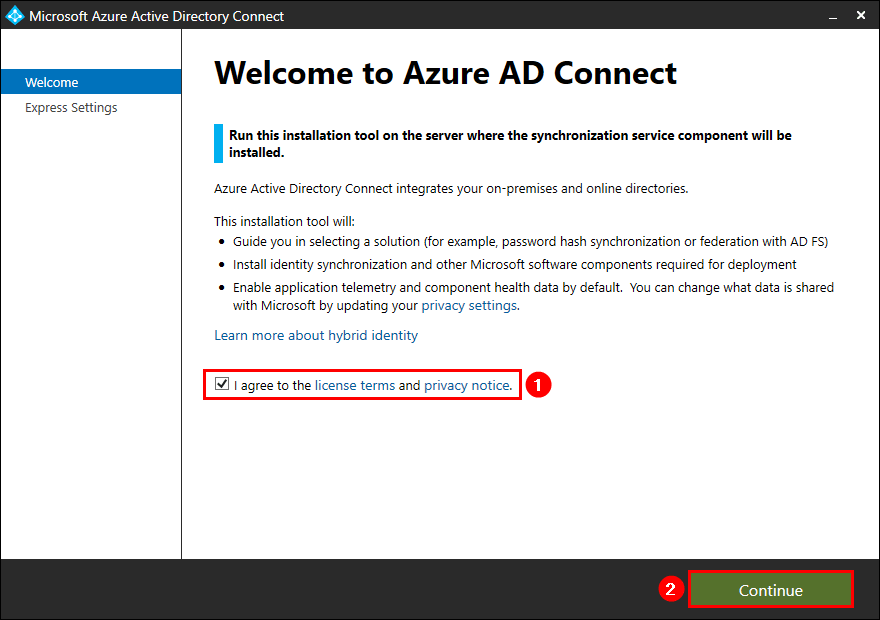
Click on Customize for a custom install.

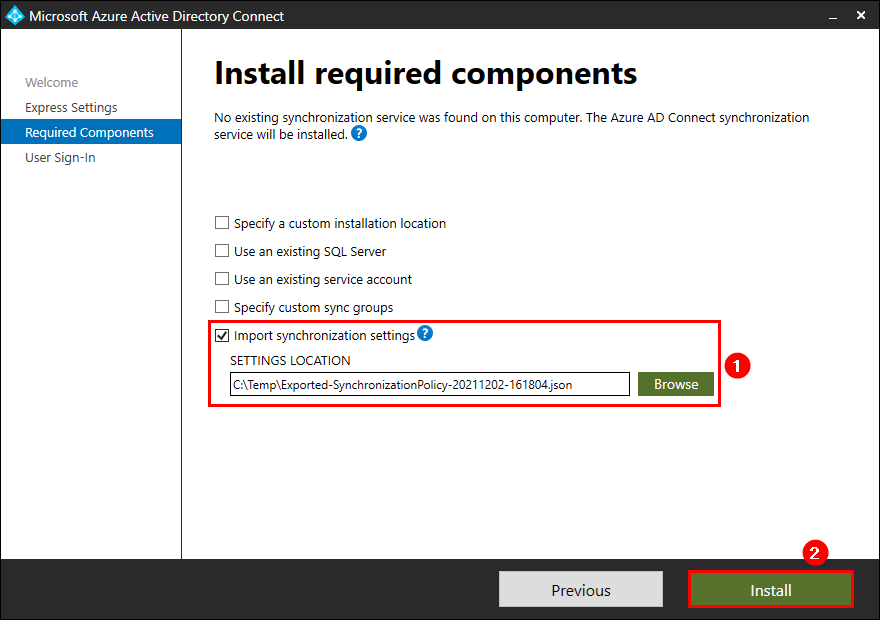
Import synchronization settings
Check the checkbox Import synchronization settings. Browse to the exported Azure AD Connect .json file. Click Install.
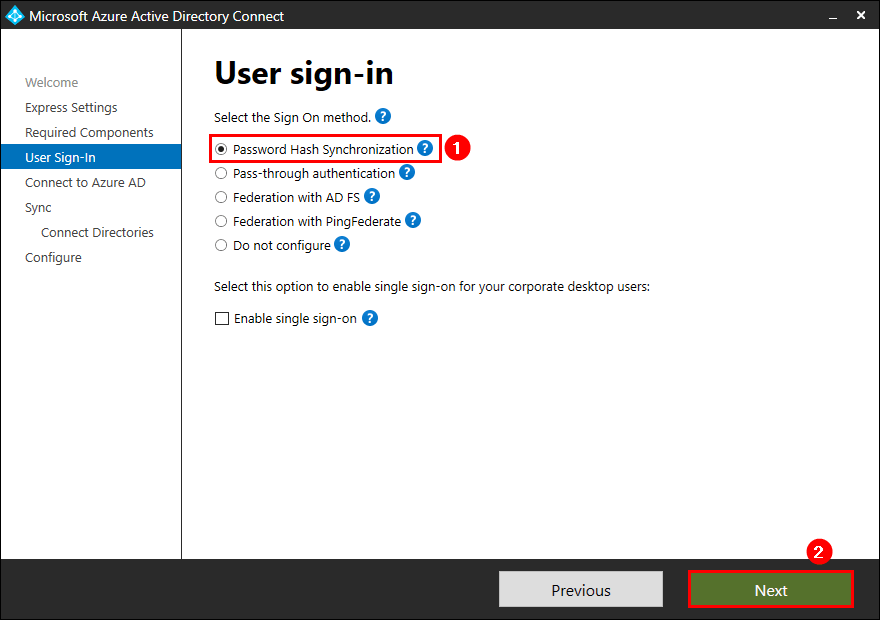
User sign-in settings
Select the same User sign-in settings configured on the old Azure AD Connect server. In the previous step, you did take a screenshot of these settings or wrote it down.
In our example, it’s Password Hash Synchronization. Click Next.
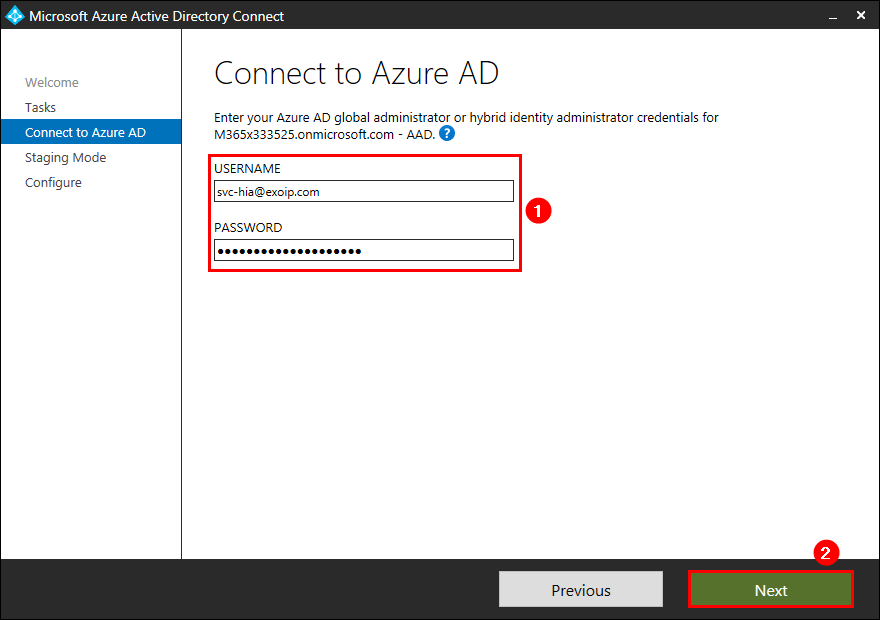
Create hybrid identity administrator account
With Azure AD Connect V1, we enter our Azure AD global administrator account. In Azure AD Connect V2, we can use a user account with the Hybrid Identity Administrator user role. We no longer need the Global Administrator role for this.
We recommend using an account with the least privileges. So, we will create a service account for the Hybrid Identity Administrator and use that from now on.
Read the Microsoft documentation about the Azure AD built-in roles.
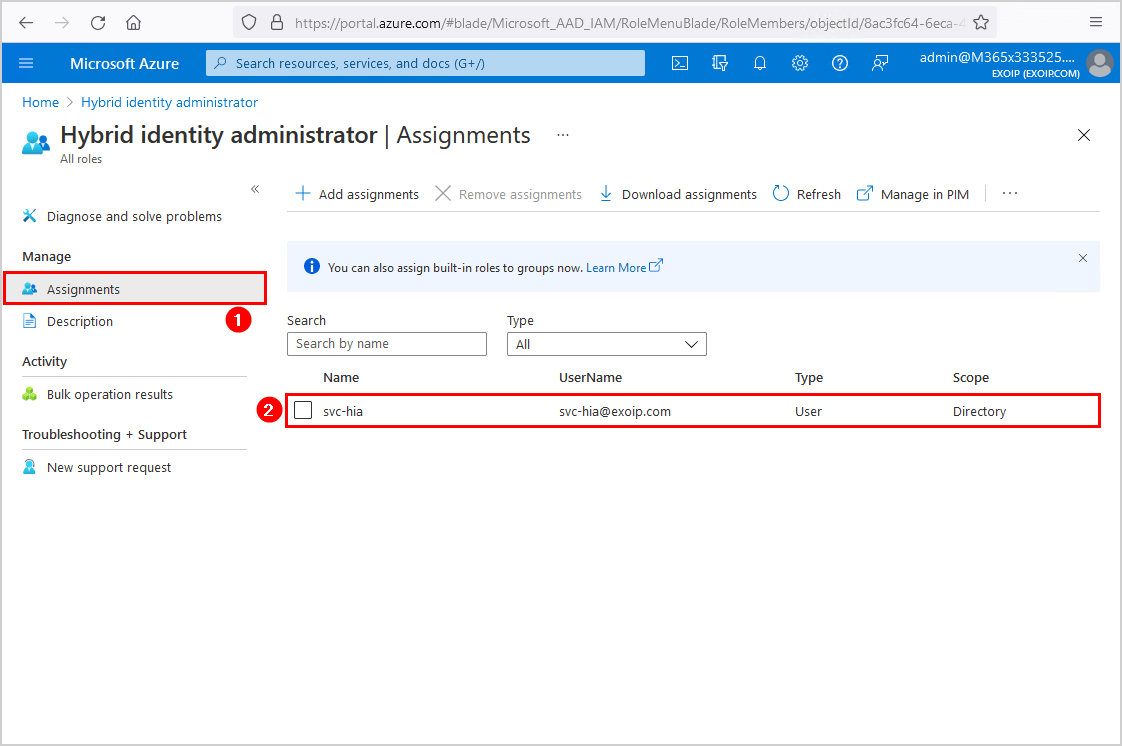
Sign in to the Azure AD portal. Navigate to Azure Active Directory > Roles and administrators. Search for the role Hybrid identity administrator. Assign the service account to the role.
In our example, it’s the user account svc-hia.
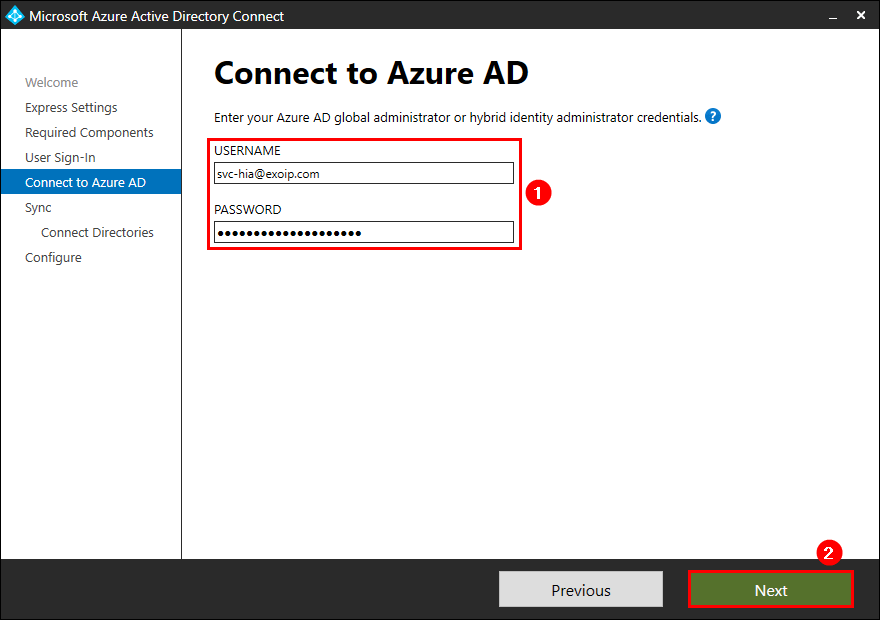
Connect to Azure AD
Enter your Azure AD global administrator credentials or the hybrid identity administrator credentials. Click on Next.
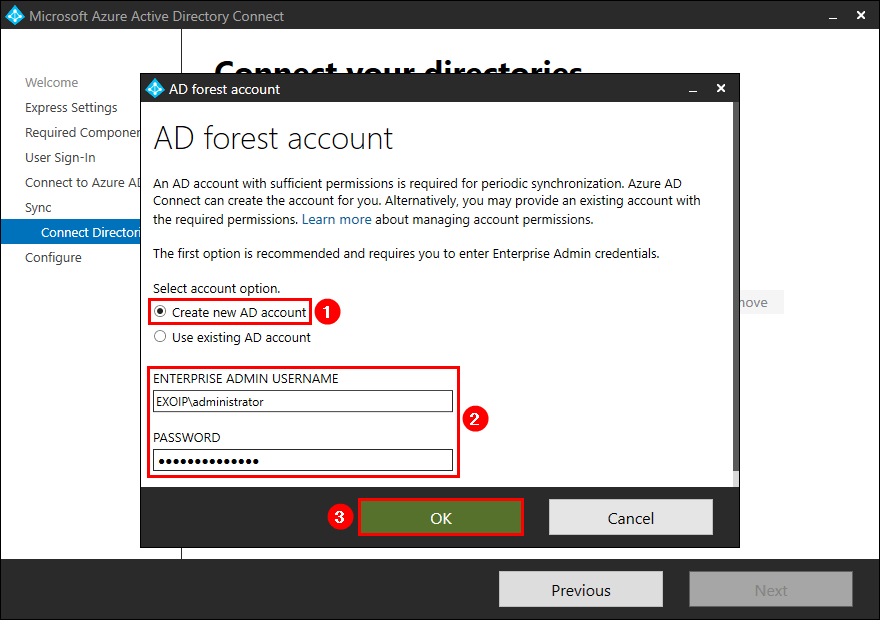
Connect directories
You can get an error that it can’t connect to Active Directory. Click on Change Credentials.
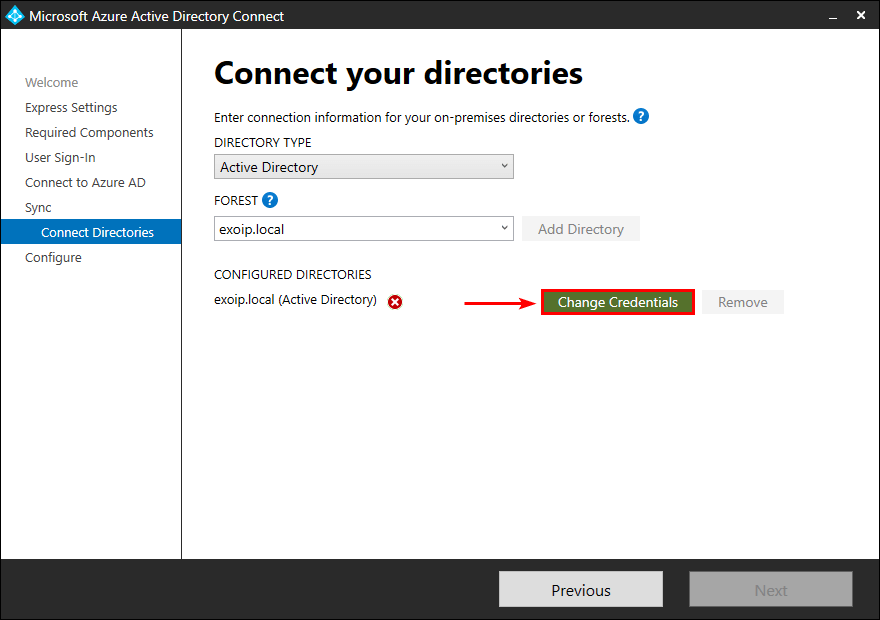
You can select account option:
- Create new AD account: Azure AD Connect will create an AD DS Connector account (MSOL_xxxxxxxxxx) in AD with all the necessary permissions.
- Use existing AD account: Provide an existing account with the required permissions. Read more on how to create an AD DS Connector account.
Fill in the credentials. Click on OK.
In our example, we will select the option Create new AD account.
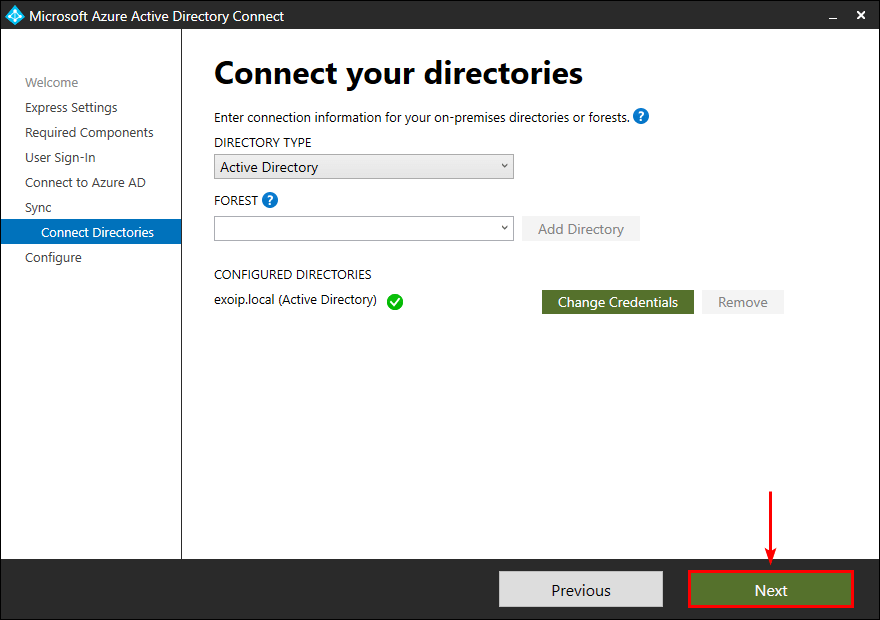
The Active Directory is successfully added. Click Next.
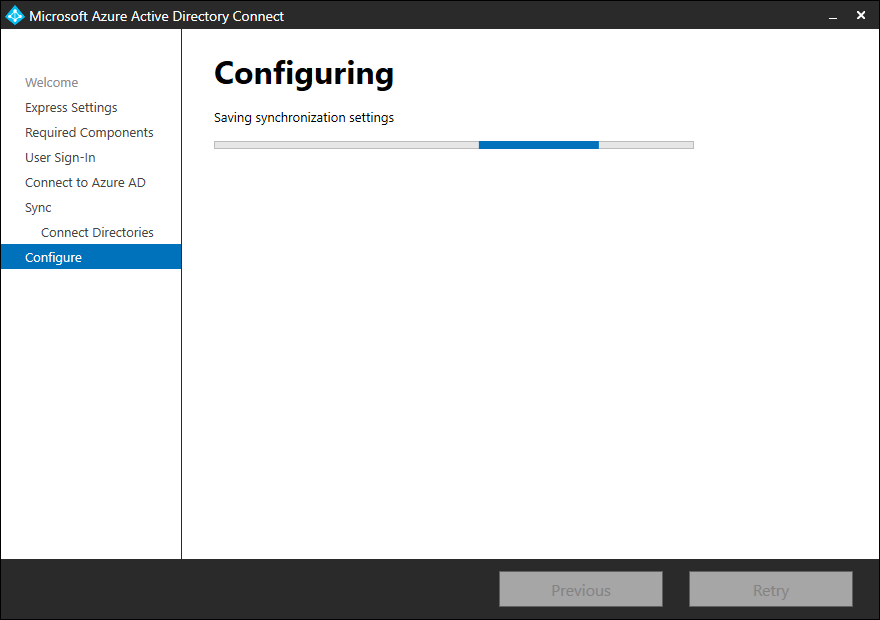
Ready to configure
Ensure that you check both checkboxes. Click Install.

Wait for the Azure AD Connect upgrade to finish.
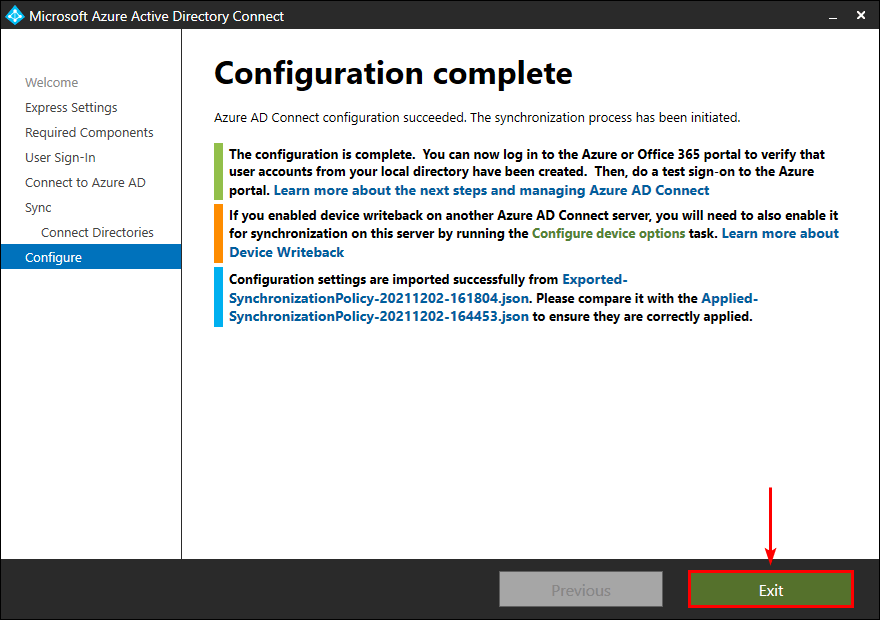
Configuration complete. Azure AD Connect configuration succeeded, and the synchronization process has been initiated. Click Exit.
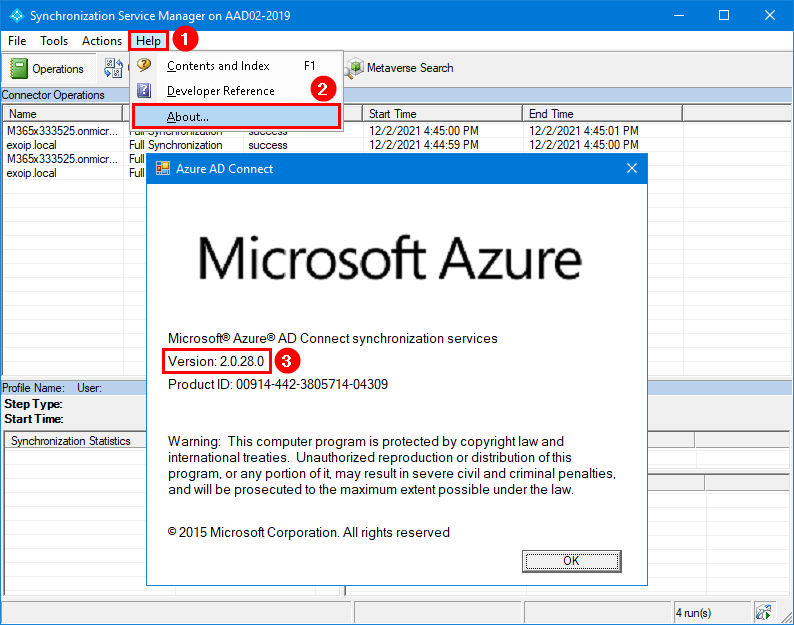
Verify Azure AD Connect version
Verify that Azure AD Connect V2 is successfully installed.
Start Azure Active Directory Synchronization Service from the programs menu. Click in the menu bar on Help > About. In our example, Azure AD Connect version 2.0.28.0 shows up.
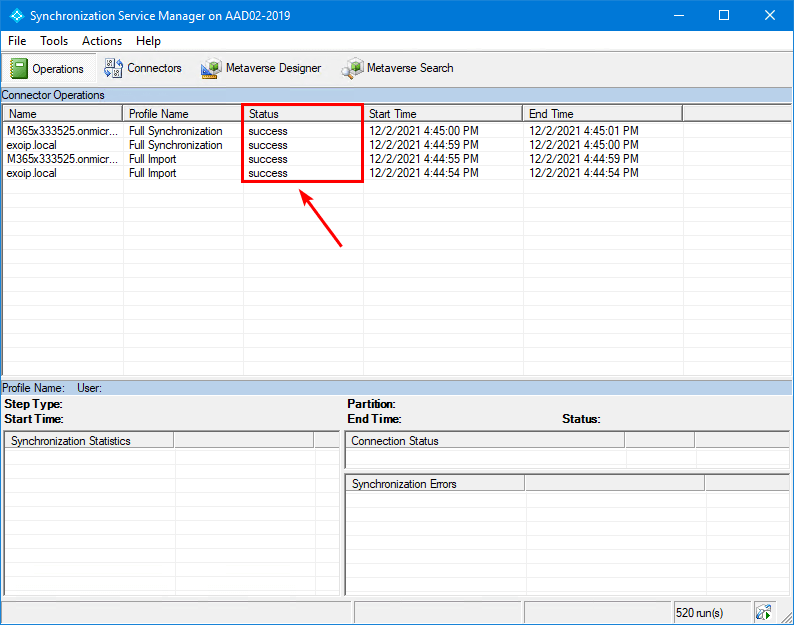
Verify Azure AD Connect synchronization
Verify that the synchronization status shows the status success. It should not show any errors or permissions issues.
Read more: Force sync Azure AD Connect with PowerShell »
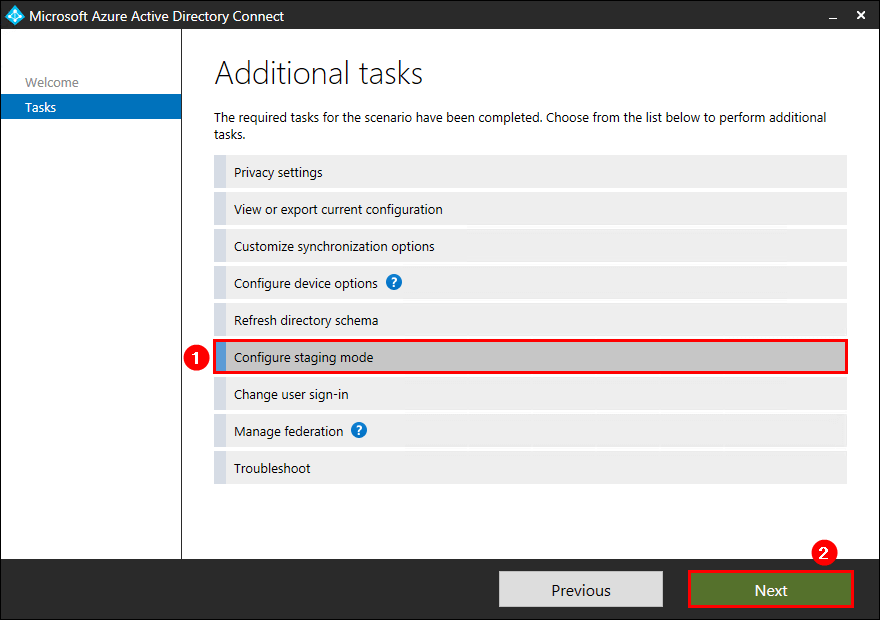
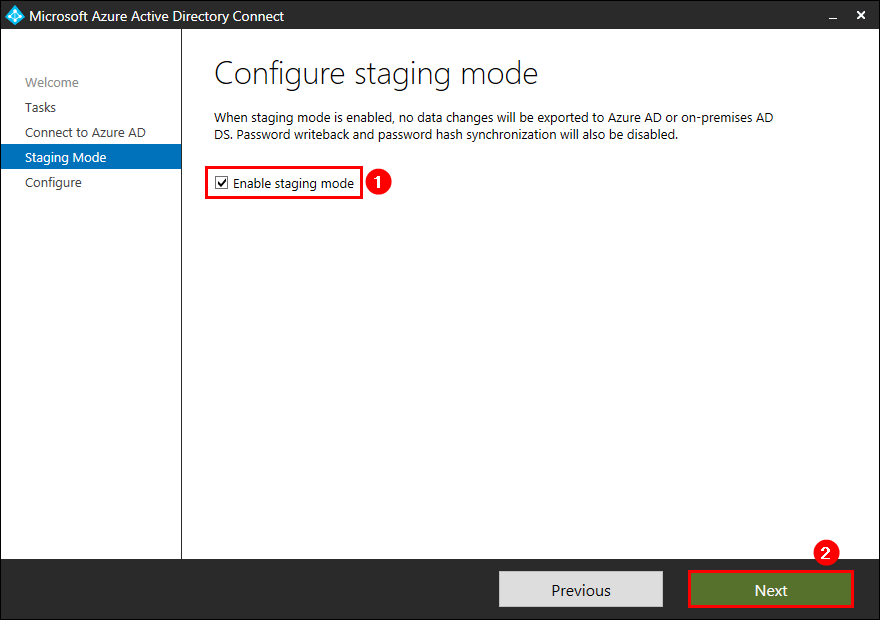
Enable staging mode on old server
On the old server, start Microsoft Azure Active Directory Connect. Click on Configure and select Configure staging mode. Click Next.
Fill in the Azure AD global administrator or hybrid identity administrator credentials. Click Next.
Check the checkbox Enable staging mode. Click Next.
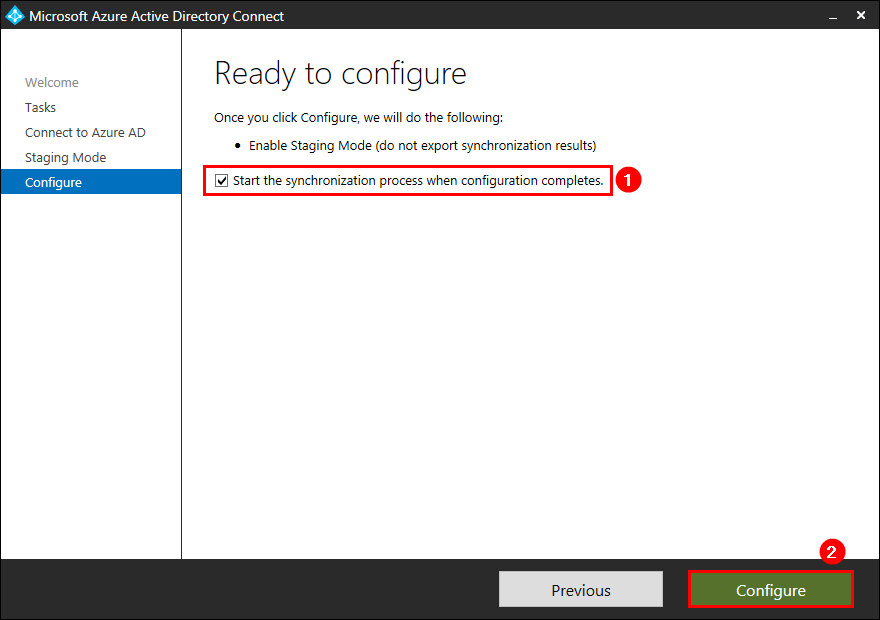
Check the checkbox Start the synchronization process when configuration completes. Click configure.
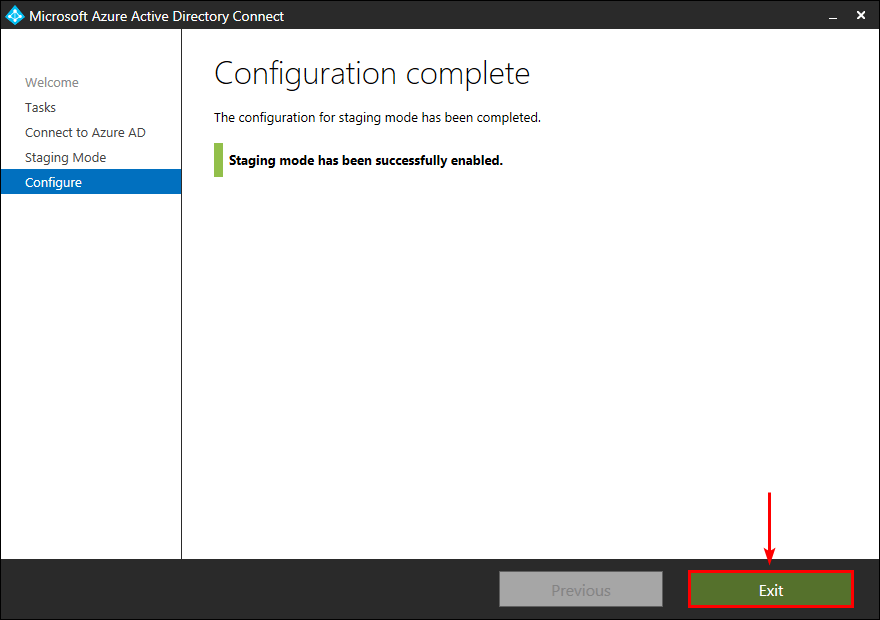
Staging mode is successfully enabled on the old Azure AD Connect server. Click Exit.
Disable staging mode on new server
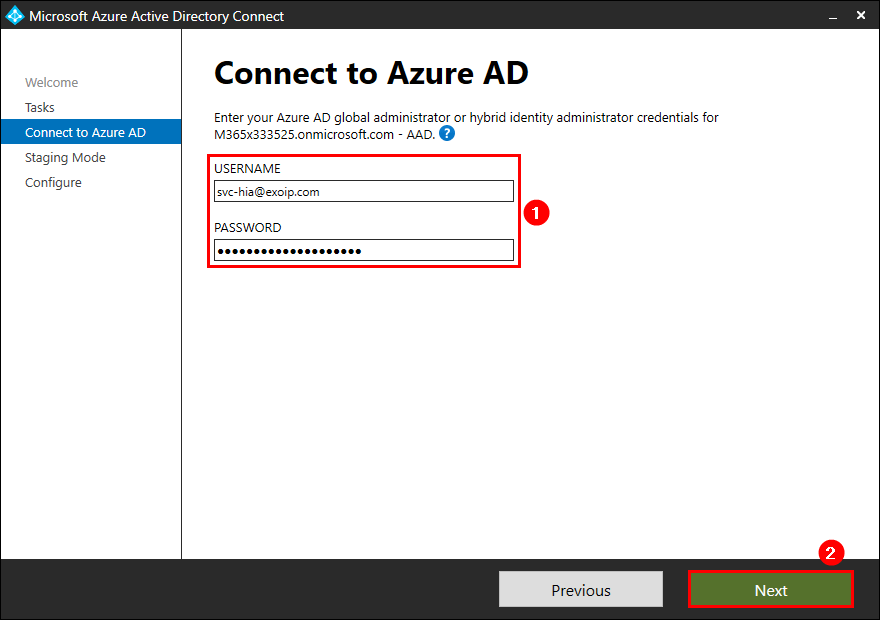
On the new server, start Microsoft Azure Active Directory Connect. Click on Configure and select Configure staging mode. Click Next.
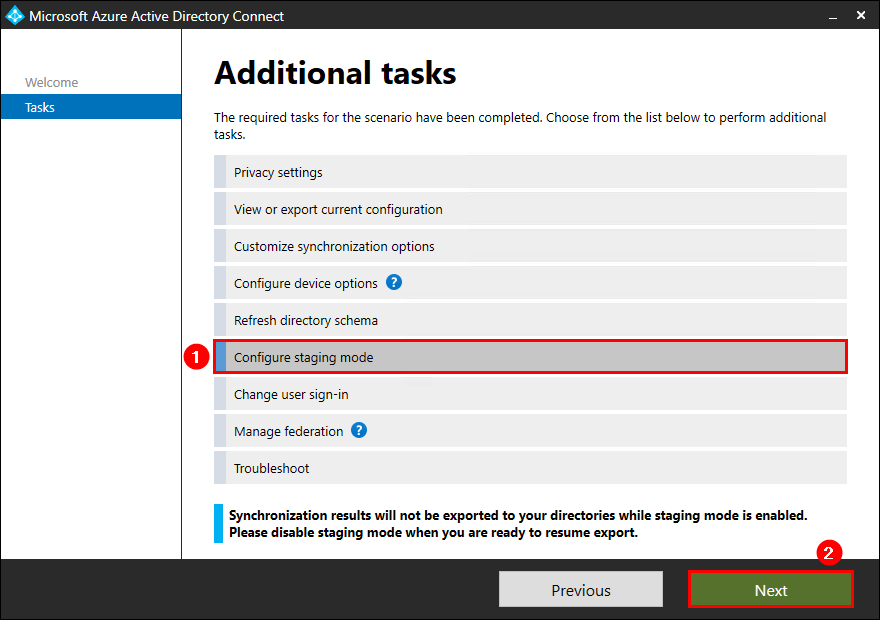
Fill in the Azure AD global administrator or hybrid identity administrator credentials. Click Next.
Uncheck the checkbox Enable staging mode. Click Next.

Check the checkbox Start the synchronization process when configuration completes. Click configure.

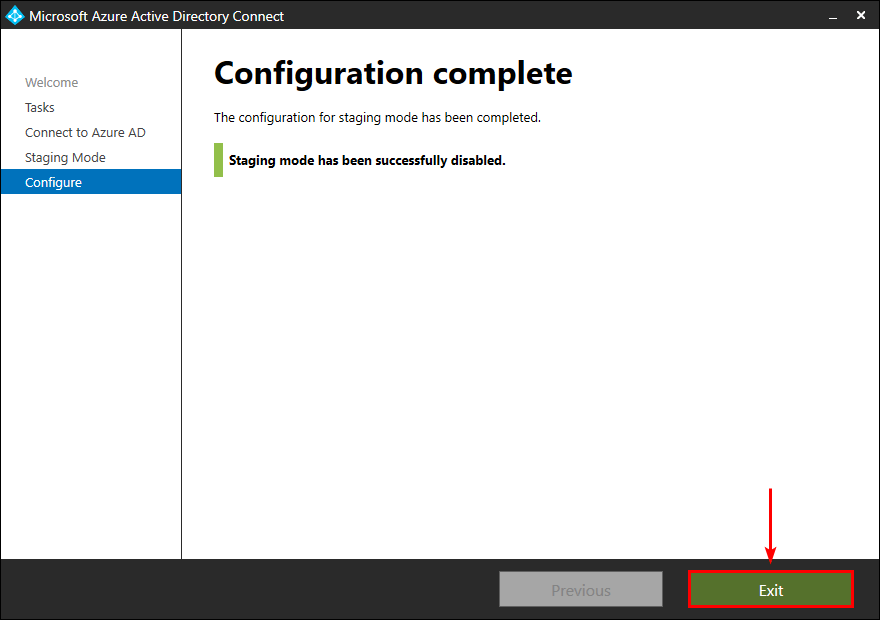
Staging mode is successfully disabled on the new Azure AD Connect server. Click Exit.
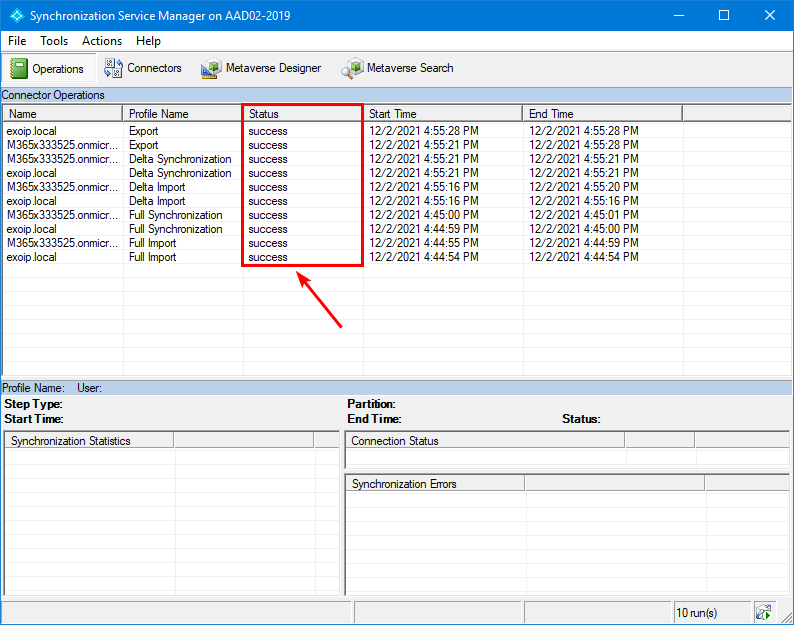
Check Azure AD Connect synchronization
Start Azure Active Directory Synchronization Service. Verify that the synchronization status shows as success.
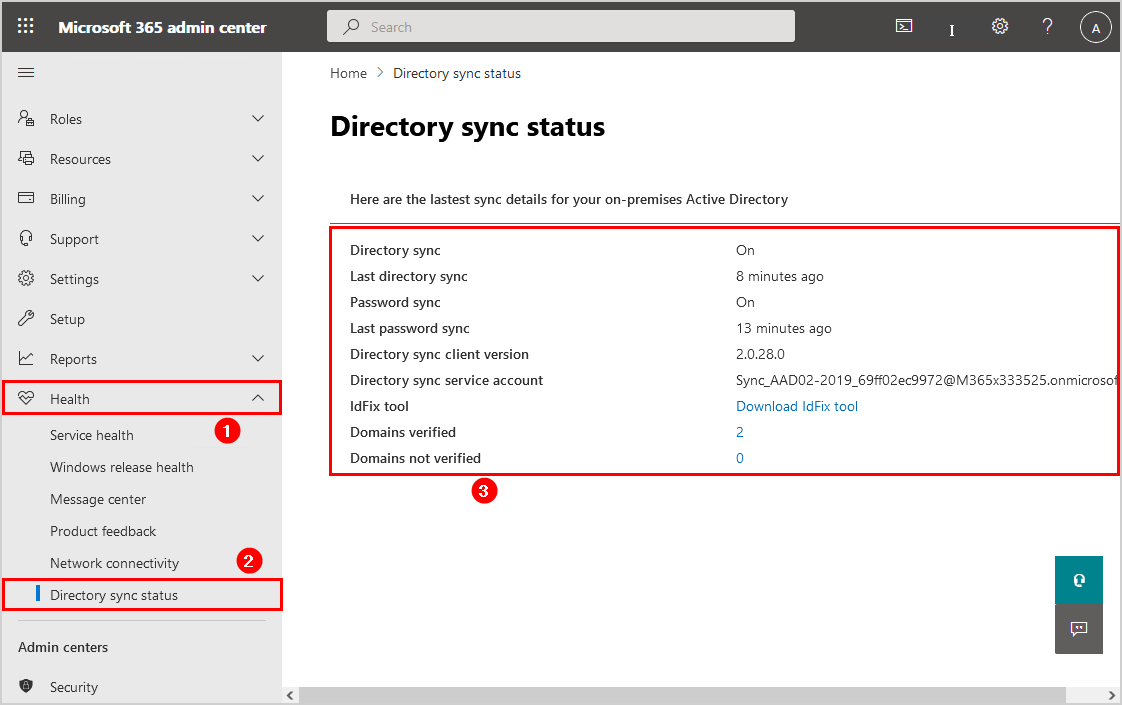
Sign in to the Microsoft 365 admin center. Click on the sync status in the Azure AD Connect tile.
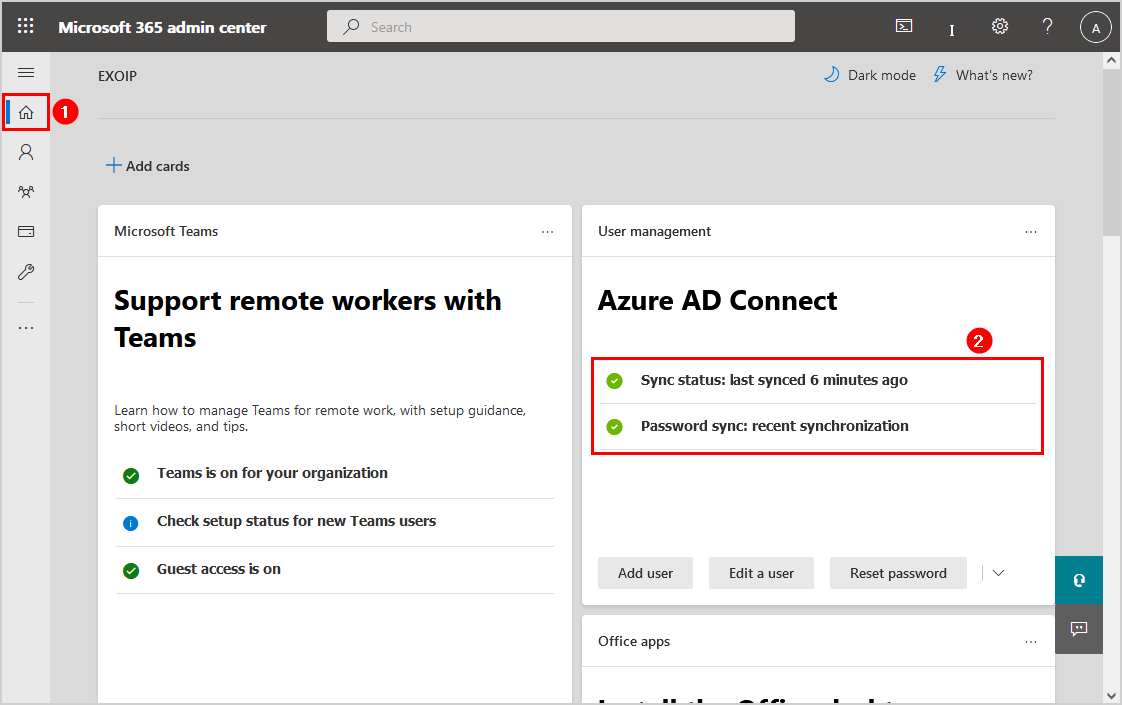
The directory sync status shows the Directory sync client version and Directory sync service account.
Our example is the version Azure AD Connect 2.0.28.0 and sync service account Sync_AAD02-2019.
Read more: Find Azure AD Connect accounts »
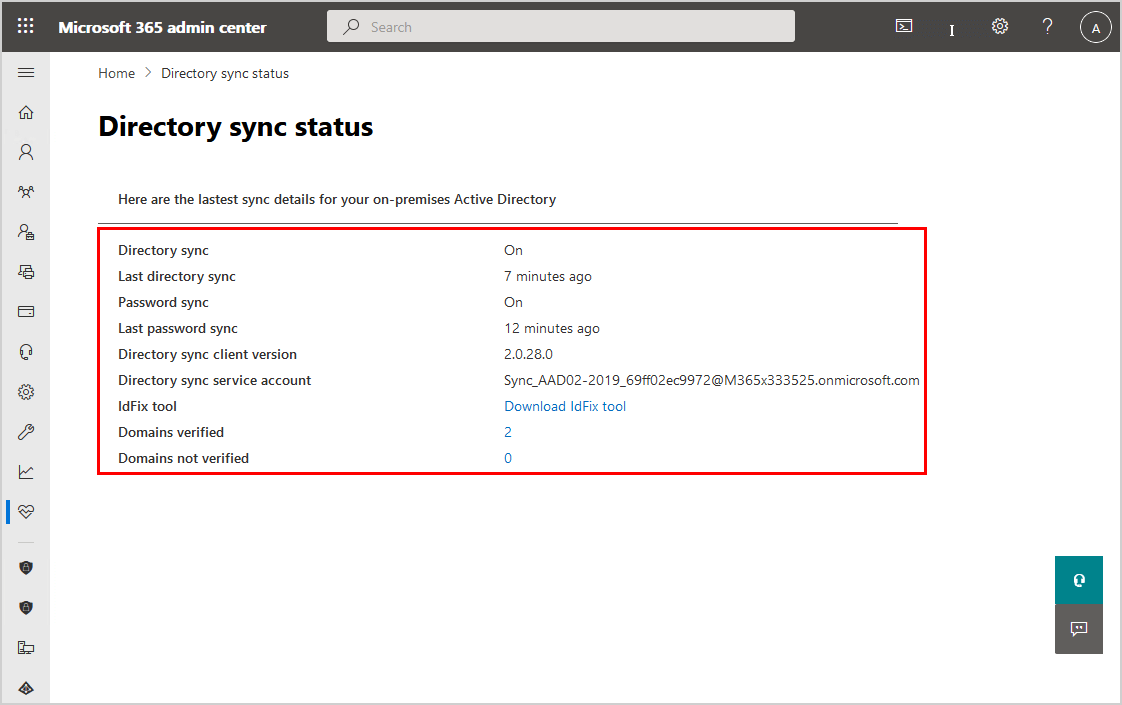
If you don’t have the Azure AD Connect tile, you can navigate to Health > Directory sync status.
Uninstall Azure Azure AD Connect
The last steps that you want to take care of on the old Azure AD Connect server are:
- Uninstall Azure AD Connect
- Remove old AD DS Connector account
- Remove old Azure AD Connector account
You can also shut down the old Azure AD Connect server for a couple of days just in case or disable the Azure AD Connect services. Then, after everything works as you expect, uninstall Azure AD Connect.
Read more: Uninstall Azure AD Connect »
That’s it!
Conclusion
You learned how to migrate Azure AD Connect to a new server. First, export Azure AD Connect configuration settings and load the config when installing Azure AD Connect on the new server. Then, verify that you did install the latest Azure AD Connect version successfully and that the synchronization works without any errors. As of last, uninstall Azure AD Connect on the old server and clean up the old service accounts.
Did you enjoy this article? You may also like Configure Microsoft Entra Password Protection for on-premises. Don’t forget to follow us and share this article.
What Others Are Reading
Great article, along with the one for creating a custom on-prem AD DS Connector account with only the required permissions. Much appreciated!
Hi Ali
Thanks for the guide, the issue is that I cannot log in to V1 to change to staging mode. It doesn’t authenticate. How can get the old server into staging mode? Can i just stop the services on the old server and disable staging on the new server to get the sync working?
Did you resolve this? I am having exactly the same issue.
Thanks
Rob
Try to enable staging mode on the old server with PowerShell instead. You can read more about it in this article: How to Configure Microsoft Entra Connect Sync staging mode.
If that doesn’t work, then yes, disable the services on the old server and disable staging on the new server.
All working fine, Thanks Ali.
Thank you for these guides, they are much appreciated. I followed along carefully three times and and have a problem. I upgraded the old server to Version 2.3.2.0, then installed it on the new. After enabling staging mode on the old server and disabling it on the new, the synchronization works in “Synchronization Service Manager” on the new and shows it’s working in M365 Admin Center but “Microsoft Entra Connect (Sync) Alerts” gives warnings and errors that “Health service data is not up to date in Azure Entra Connect”. Then outside mail stops coming in. If I switch them back mail flow resumes.
I noticed that Microsoft Entra Connect never shows the new server, always (only) the old. My research says having multiple Microsoft Entra Connect Sync servers connected to the same Microsoft Entra tenant is not supported, except for a staging server. Maybe that’s why.
I have the option of deleting the old server from Microsoft Entra Connect, will that make the new server show up and take over? If not, do you have any suggestions for me?
Thanks
Thank you for taking the time to provide this helpful guide. I was successfully able to migrate Azure AD Connect server.
Thanks
Abid Sheikh
Did anyone have issues with the directory sync status page in the admin center? It never updated with the latest sync server info and stated it hadn’t synced in a while. All of the imports were successful but when I took it out of staging for the onmicrosoft.com connector I was getting a stopped-extension-dll-exception in the status, other connector exported with no issues.
very helpfull and detailed step by step
This worked really well – Thanks. I needed to move from 2012R2 to 2022, so ideal.
The references to the Azure admin pages are out of date, as MS has changed everything again, and they confuse things by using the ‘Entra Connect’ name in documents while the software is still called Azure Connect – I spend about 15 mins checking I hadn’t installed the wrong thing!
Also the Directory Sync Status doesn’t seem to show client version any more – painful
Also I’m pretty sure the warning banners about v1 won’t go away until the old staging server is stopped or uninstalled – v1 Staging is still detected and flagged up
You can run this command in admin run powershell to get all the details like the version:
(Get-ADSyncGlobalSettings).Parameters | select Name, Value | sort Name
Thanks for the awesome post. I have already done it for a couple of clients.
I currently have a Server2012R2 machine with an older version (1.2.70.0) and as per your comment I need to upgrade to Azure AD Connect V1.6 first. Before I can utilize a new Server 2019 machine with the latest version.
My question is, do I just install V1.6 over the current version(1.2.70.0) on the 2012 Server?
> My question is, do I just install V1.6 over the current version(1.2.70.0) on the 2012 Server?
Yes.
Wonderful document step by step.
Thank you for this wonderful guide. We have Hybrid Azure AD Join configured and device writeback enabled on our current Azure AD Connect instance. Should I mirror those settings on the new server while in staging mode? Or do I need to wait until I decommission the old one before I do so?
that’s greats, very helpful,
awesome
I was able to migrate AD Connect from v1.6 on a 2012 server and decommission it. Thank you for this guide!
Finally forced to migrate to a new server as we are retiring the old one. Old is Windows 2012 R2 with AD Connect 1.6.16 and attempting to move it to Server 2022 with AD Connect 2.1.20.0
During the import step it gets all of the pre-requisites out of the way with no problem but then attempts to start the Microsoft Key Distribution Service and that fails with error 0x8007000A. So far I have not found a culprit or solution to this. Trying to avoid the recreation of the AD Connect settings.
Anyone seen this and resolved it?
Sometimes you need to refresh schema on old AD-Connect before export the settings
First of all, thanks for the guide. I have a problem: I have followed the entire guide step by step and in Office365 >Navigate to Health > Directory sync status, the new AD Connect 2 version already appears, but in Directory sync service account the old AD Connect account appears. How can this be possible? The old AD connect is in Staging mode, and the new AD connect is in normal mode. And I have checked that the old and new AD Connect sync account are obviously different. Now I’m afraid to uninstall the old AD Connect.
See below, it seems like TIME is the solution. So just leave it there…
In hopes of saving the next guy several days of putzing with this, I would like to point out a few extra steps that are required if you have universal MFA turned on in your tenant.
When you go to install Azure AD Connect on the new server, the install WILL say it failed to create the service account. What is actually happening is that it created the account in the tenant, but could not use the account due to the required MFA. Took me quite a bit of digging and googling to figure out the root cause. BEFORE retrying the operation as suggested in the error message, go to your tenant, find the account it created (will be named On-Premises Directory Synchronization Service Account) – you will have two – one for the old server and one for the new. Remove the MFA requirement for the new account (we did this in our tenant by adding the account to a ‘MFA bypass’ group). Then the retry or uninstall/reinstall will work without error. You should also include a note that you have to log off and back on to the new server before you can run the Synchronization Service monitor.
Thanks for the step-by-step.
In my situation i can see the version in the health monitor is the new one, but the Directory Syns Service account is still the old server.
Does this take time or is this changed after i removed the old connect software?
Cheers,
Time did the trick,…
Hi Dimitri,
I faced the same issue. Did you manage to resolve it?
Hi Ali,
Thank you for this, Really helpful! Much appreciated.
Thanks Ali, I always found your article very practical and helpful in live projects
Hi, I exported configuration using migratesettings.ps1 script since our is legacy adconnect.
I imported them to the new server but gets an error saying “Custom Synchronization rules have duplicate precedence:
Details
Precedence:100
-Custom Outbound rule “out to AAD – User join v.2”
-Default rule “in from Ad – User Join”
Any thoughts?
I am going to do a Swing migration for one of my clients, the client is running Azure AD Connect version 1.1.647.0, the auto update funktion is enabled but doesnt work. I would like to upgrade to version 1.6.16.0 before I do the swing upgrade to the latest version. AD connect is installed on a 2012R2 server and the new server is a win 2019 server. I cant find the version 1.6.16.0 for download does anyone now where can i download the latest version for 2012r2 server.
You can download it from my server: Azure AD Connect 1.6.16.0.
Note: This release is an update release of Azure AD Connect V1.x. This version is intended to be used by customers who are running an older version of Windows Server and can’t upgrade their server to Windows Server 2016 or newer at this time. You can’t use this version to update an Azure AD Connect V2 server.
Don’t install this release on Windows Server 2016 or newer. This release includes SQL Server 2012 components and will be retired on August 31, 2022. Upgrade your Server OS and Azure AD Connect version before that date.
When you upgrade to this V1.6 build or any newer builds, the group membership limit resets to 50,000. When a server is upgraded to this build, or any newer 1.6 builds, reapply the rule changes you applied when you initially increased the group membership limit to 250,000 before you enable sync for the server.
Great write up, as ever, Ali. Thank you.
After completing the swing migration can the old server simply be shut down (and VM deleted)? Or must the uninstall be completed first.
Uninstall Azure AD Connect from Programs and Features (Control Panel).
Thanks for the tutorial!
Everything seems to work, but when i check the running services, on the old server are the two services “AzureADConnectHealthSyncInsights” and “AzureADConnectHealthSyncMonitor” enabled and running, but on the new server they are disabled. Do i have to change (enable) them when i uninstall the AD Sync on the old server ?
And another problem i have, when i check online, which account is syncing is still the old Sync-Account responible.. not the new created hybrid-identity admin account.
Any ideas ?
thanks
Bruno
I experience the same. did you manage to fix it?
many thx sir
its a very useful article , i will try and update u
even Microsoft did not explain as u did
BR
This was a great article – worked perfectly for me. One thing I had to go back and look through to verify was that staging mode is enabled by default when setting up the new server (please correct me if I’m wrong). I was a bit confused when I got the step of disabling staging on the new server.
At any rate – thank you for the excellent documentation!
Very helpfull artical. Thanks for sharing steps in details, however i have one query. Can we migrate AD connect 1.5.30.0 to 2.1.16.0.
I recommend first upgrading to Azure AD Connect V1.6. After that, follow the steps in the article.
Thanks it helped a lot. I made an additional step, first i’ve had to upgrade the old server to v1.6 because the “view or export” configuration wasn’t available.
many thanks for the detailed step by step guide. Worked a treat.
Hi, we just came to know that version 1.x is no longer support and the AD connect now is no longer connect to the cloud. Howe we are going to get out from this situation? Is this method still working? We also even have very old version which cannot export the configuration.
Upgrade to Azure AD Connect V1.6. After that, you will have the export configuration option available.
Very helpfull tutorial, thanks for sharing.
This tutorial was amazing to upgrade my old server with version V1 to my new 2022 server with version V2. Thank you very much!
Great How-To – Thanks. Just what I was looking for.
Thank you. Very useful.
Thank you for taking the time to provide this. Useful guide.
Ive just migrated my AD Connect to another server. Sync appears to be working ok since the switch. If i encounter any problems can i simply disable new server and re-enable old one?
Cheers
You’re welcome.
Yes, that’s how it works. You enable staging on the new server and disable staging on the old server.
Hybrid Identity Administrator doesn’t work with pass-through authentication.
Thanks for your guidance. Do you have step-by-step notes on how to use AADConnectConfigDocumenter tool (https://github.com/Microsoft/AADConnectConfigDocumenter) from MIcrosoft. From Github its bit difficult to understand.