Microsoft updated the Exchange Server Antivirus exclusions list with a couple of changes. They removed…
Configure pagefile in Exchange Server
What are the best practice and recommended pagefile for Exchange Server 2013/2016/2019? This article will show the recommended pagefile for an Exchange Server, how to calculate the pagefile and how to configure the pagefile in Exchange Server 2013/2016/2019.
Table of contents
Pagefile recommend sizing
There is a difference between the recommended pagefile on Exchange Server 2013/2016 and Exchange Server 2019.
Exchange Server 2013/2016
- Pagefile sizing: RAM + 10 MB (maximum of 32 GB RAM + 10 MB)
- Mailbox: 8 GB minimum
- Edge Transport: 4 GB minimum
- Maximum RAM: 192 GB
If you want to configure the Exchange Server 2013/2016 pagefile. Here are some examples:
| RAM | Pagefile |
|---|---|
| 8 GB | 8202 MB |
| 16 GB | 16394 MB |
| 32 GB | 32778 MB |
| 64 GB | 32778 MB |
| 128 GB | 32778 MB |
| 192 GB | 32778 MB |
Exchange Server 2019
- Pagefile sizing: 25% of total RAM (maximum of 64 GB)
- Mailbox: 128 GB minimum
- Edge Transport: 64 GB minimum
- Maximum RAM: 256 GB
If you want to configure the Exchange Server 2019 pagefile. Here are some examples:
| RAM | Pagefile |
|---|---|
| 64 GB | 16384 MB |
| 96 GB | 24576 MB |
| 128 GB | 32768 MB |
| 160 GB | 40960 MB |
| 192 GB | 49152 MB |
| 256 GB | 65536 MB |
The pagefile recommendation to keep in mind:
- The pagefile should not be “System Managed”
- The pagefile “Initial size” and “Maximum size” should be the same
Configure pagefile on Exchange Server
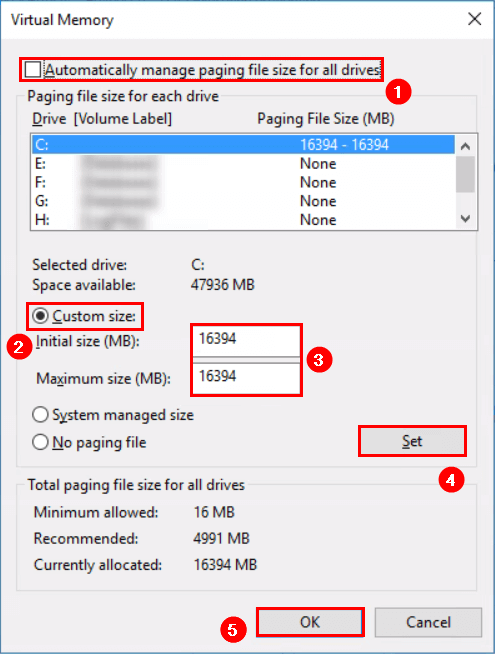
We have 16 GB configured as physical memory on the Exchange Server 2013/2016. It means that we need to configure 16394 MB as a pagefile. The pagefile will take 16 GB of size on the Exchange Server hard drive.
Note: Ensure that there is enough space free on the Exchange Server C: drive.
Follow the below steps to configure the Exchange Server pagefile:
- Right-click on This PC and click on Properties
- Select Advanced system settings
- Click Advanced tab
- Under Performance, click Settings
- Under Performance Options, click Advanced tab
- Now under Virtual memory, select Change
- Uncheck Automatically manage paging file size for all drives
- Select Custom size
- Initial size (MB): 16394
- Maximum size (MB): 16394
- Click Set
- Click three times on OK
- Restart your Exchange Server
Conclusion
You learned the pagefile recommendations and best practices for Exchange Server 2013/2016/2019. You must have a pagefile configured on the Exchange Server. If you have not configured the pagefile, I recommend you do. Read the blog by Microsoft if you want more information about the pagefile.
Did you enjoy this article? You may also like Get mailbox size of all users in Exchange with PowerShell. Don’t forget to follow us and share this article.
What Others Are Reading

Hi Ali
Actually the minimum RAM requirements of 128GB for Exchange 2019 is pure bullshit, it was meant to scare Exchange admins and somehow force them to go to the cloud.
thanks
Thanks for sharing, excellent instruction with pictures.