You are migrating mailboxes to Office 365, and the following error message is showing: MigrationPermanentException:…
Permanently delete users from Microsoft 365
How to permanently delete users from Office 365/Microsoft 365? When you remove users from Microsoft 365, they will move to the recycle bin. This is known as soft-delete. A soft-delete user account will stay for 30 days. After that, it will automatically be deleted by Microsoft. This is known as hard-delete. What if you don’t want to wait and like to remove the deleted users manually? Let’s look at how to force delete Microsoft 365 users with PowerShell.
Table of contents
- Soft-deleted user vs. Hard-deleted user
- Find deleted users in Microsoft 365 admin center
- Connect to Microsoft Entra ID with Microsoft Graph PowerShell
- Get all Microsoft 365 deleted users
- Get Microsoft 365 deleted users with specific domain
- Remove single deleted Microsoft 365 user
- Remove deleted Microsoft 365 users with specific domain
- Remove all deleted Microsoft 365 users
- Permanently delete users in Microsoft Entra admin center
- Conclusion
Soft-deleted user vs. Hard-deleted user
- A soft-deleted user is a user that has been deleted and has still been in the Microsoft Entra ID recycle bin for less than 30 days.
- A hard-deleted user is a user that has been deleted and is not available in the Microsoft Entra ID recycle bin.
Note: When you delete an object from the recycle bin (hard-delete), you cannot restore the object. Use the command with extreme caution because it’s permanent.
Find deleted users in Microsoft 365 admin center
You can find the deleted users in Microsoft 365 admin center. Navigate to Users > Deleted Users.
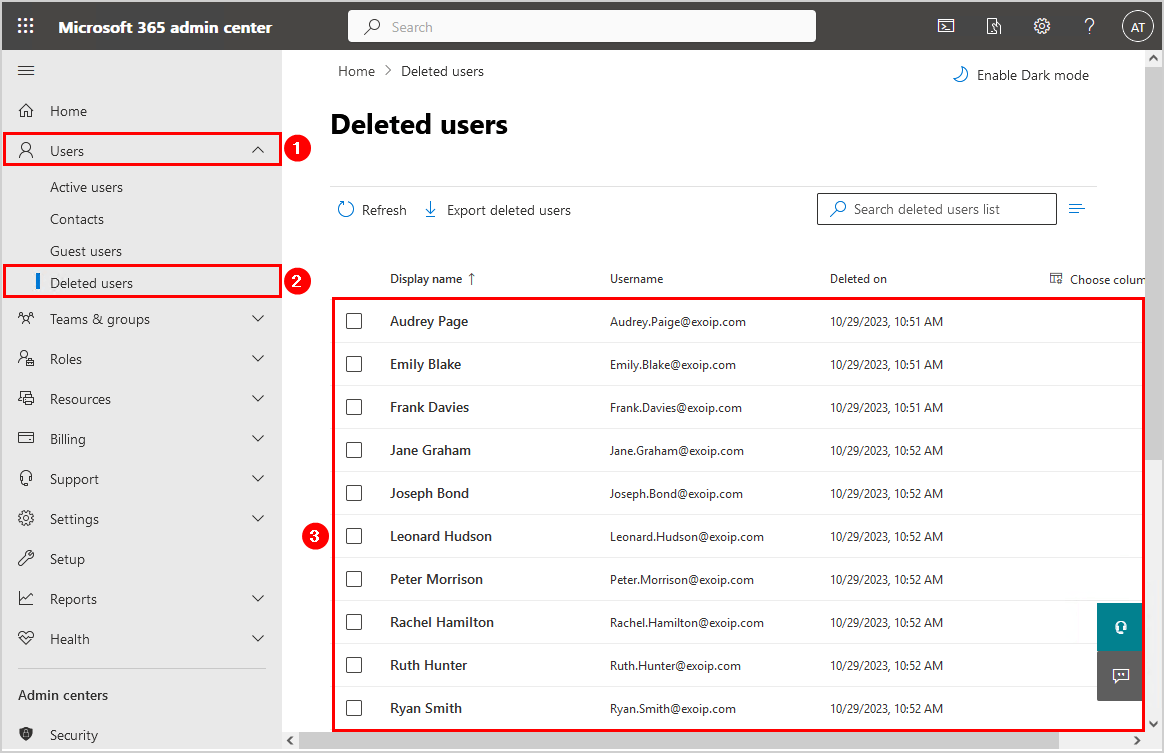
You can’t remove the deleted users from Microsoft 365 admin center. An excellent way to remove the deleted Microsoft 365 users is with PowerShell and Microsoft Entra admin center.
Let’s look at that in the next step.
Connect to Microsoft Entra ID with Microsoft Graph PowerShell
Start Windows PowerShell as administrator and Install Microsoft Graph PowerShell.
Install-Module Microsoft.Graph -ForceInstall-Module Microsoft.Graph.Beta -AllowClobber -ForceImportant: Always install the Microsoft Graph PowerShell and Microsoft Graph Beta PowerShell modules. That’s because some cmdlets are not yet available in the final version, and they will not work. Update both modules to the latest version before you run a cmdlet or script to prevent errors and incorrect results.
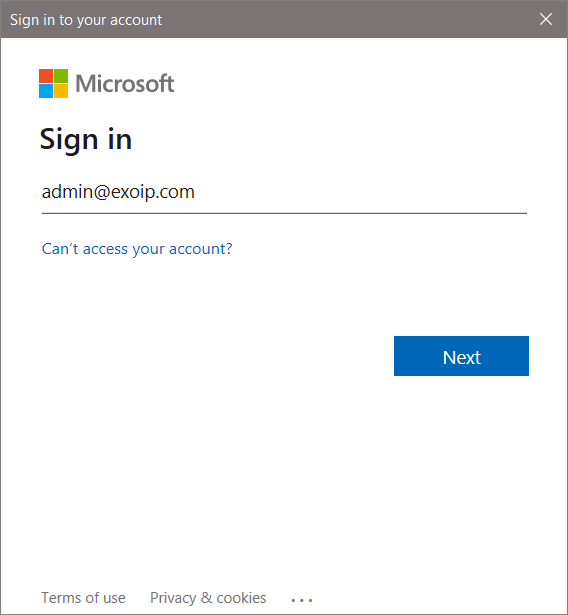
Run the Connect-MgGraph cmdlet to initiate a connection with Microsoft Entra ID.
Connect-MgGraph -Scopes "User.ReadWrite.All"After running the above cmdlet, the sign-in window shows up. Fill in the credentials and sign in.
After connecting to Microsoft Entra ID with PowerShell, let’s get the deleted Microsoft 365 users.
Get all Microsoft 365 deleted users
Find the Microsoft 365 deleted users with PowerShell. Run the below script that uses the Get-MgDirectoryDeletedItemAsUser cmdlet.
# Connect with privileges
Connect-MgGraph -Scopes "User.ReadWrite.All"

# Get properties
$Properties = @(
    'Id',
    'userPrincipalName',
    'displayName',
    'deletedDateTime',
    'userType'
)

# Retrieve deleted directory items
$DeletedItems = Get-MgDirectoryDeletedItemAsUser -All -Property $Properties | Select-Object $Properties

# Check if there are no deleted accounts
if ($DeletedItems.Count -eq 0) {
    Write-Host "No deleted accounts found in the recycle bin." -ForegroundColor Cyan
}
else {
    # Create an array to store the report
    $Report = @()

    # Loop through the deleted items
    foreach ($Item in $DeletedItems) {
        $DeletedDate = Get-Date($Item.DeletedDateTime)
        $DaysSinceDeletion = (New-TimeSpan $DeletedDate).Days

        # Create a custom object for each item and add it to the report
        $ReportLine = [PSCustomObject]@{
            Id                    = $Item.Id
            UserPrincipalName     = $Item.UserPrincipalName
            'Display Name'        = $Item.DisplayName
            Deleted               = $DeletedDate
            'Days Since Deletion' = $DaysSinceDeletion
            Type                  = $Item.UserType
        }
        $Report += $ReportLine
    }

    # Sort the report by 'Display Name'
    $Report | Sort-Object 'Display Name' | Format-Table
}
The output will show the deleted Microsoft 365 users.
Id                                   UserPrincipalName                                         Display Name    Deleted                Days Since Deletion
--                                   -----------------                                         ------------    -------                -------------------
e09cb6da-5d88-469f-bfbf-ec78b5b4d1e8 e09cb6da5d88469fbfbfec78b5b4d1e8Audrey.Paige@exoip.com    Audrey Page     10/29/2023 10:51:54 AM                   0
4b9d97bc-2af6-4424-be3e-79b237193c5e 4b9d97bc2af64424be3e79b237193c5eEmily.Blake@exoip.com     Emily Blake     10/29/2023 10:51:56 AM                   0
ec9e69d8-8db5-47ab-827c-915f1d3fd25e ec9e69d88db547ab827c915f1d3fd25eFrank.Davies@exoip.com    Frank Davies    10/29/2023 10:51:58 AM                   0
205bab92-1422-4cd7-b5f4-70c48af828c2 205bab9214224cd7b5f470c48af828c2Jane.Graham@exoip.com     Jane Graham     10/29/2023 10:52:00 AM                   0
faa16dd9-7b0d-4088-b3f9-ccb5ec34bb44 faa16dd97b0d4088b3f9ccb5ec34bb44Joseph.Bond@exoip.com     Joseph Bond     10/29/2023 10:52:01 AM                   0
482d12a1-a803-44a3-8b20-c4b43b65ed12 482d12a1a80344a38b20c4b43b65ed12Leonard.Hudson@exoip.com  Leonard Hudson  10/29/2023 10:52:03 AM                   0
41981ec4-5106-4b0e-b00e-9605b6d820cb 41981ec451064b0eb00e9605b6d820cbPeter.Morrison@exoip.com  Peter Morrison  10/29/2023 10:52:05 AM                   0
e6160ee2-0d56-4763-899c-950bd53e0ac6 e6160ee20d564763899c950bd53e0ac6Rachel.Hamilton@exoip.com Rachel Hamilton 10/29/2023 10:52:07 AM                   0
86945f71-b2db-46b3-9e38-4652e09aeb46 86945f71b2db46b39e384652e09aeb46Ruth.Hunter@exoip.com     Ruth Hunter     10/29/2023 10:52:09 AM                   0
f343e332-b768-49c0-b946-dcc91a6f280a f343e332b76849c0b946dcc91a6f280aRyan.Smith@exoip.com      Ryan Smith      10/29/2023 10:52:11 AM                   0
7b2727b6-1d03-41e0-97ba-f5154d186f4f 7b2727b61d0341e097baf5154d186f4fSophie.Lewis@exoip.com    Sophie Lewis    10/29/2023 10:52:13 AM                   0
ac0b87d5-1647-40b9-9fb7-568270fe68e0 ac0b87d5164740b99fb7568270fe68e0svd-adds@exoip.com        svd-adds        10/29/2023 10:52:15 AM                   0
Get Microsoft 365 deleted users with specific domain
Find the Microsoft 365 deleted users with a specific domain with PowerShell. Run the below script that uses the Get-MgDirectoryDeletedItemAsUser cmdlet.
Change on line 5 the domain name.
# Connect with privileges
Connect-MgGraph -Scopes "User.ReadWrite.All"

# Specify the domain name for filtering
$DomainName = "tajran.com"

# Get properties
$Properties = @(
    'Id',
    'userPrincipalName',
    'displayName',
    'deletedDateTime',
    'userType'
)

# Retrieve deleted directory items
$DeletedItems = Get-MgDirectoryDeletedItemAsUser -All -Property $Properties | Select-Object $Properties

# Check if there are no deleted accounts from the specified domain
$DomainSpecificDeletedItems = $DeletedItems | Where-Object { $_.userPrincipalName -like "*@$DomainName" }

if ($DomainSpecificDeletedItems.count -eq 0) {
    Write-Host "No deleted accounts found in the recycle bin for the domain $DomainName." -ForegroundColor Cyan
}
else {
    # Create an array to store the report
    $Report = @()

    # Loop through the deleted items and filter based on the domain name
    foreach ($Item in $DomainSpecificDeletedItems) {
        $DeletedDate = Get-Date($Item.DeletedDateTime)
        $DaysSinceDeletion = (New-TimeSpan $DeletedDate).Days

        # Create a custom object for each item and add it to the report
        $ReportLine = [PSCustomObject]@{
            Id                    = $Item.Id
            UserPrincipalName     = $Item.UserPrincipalName
            'Display Name'        = $Item.DisplayName
            Deleted               = $DeletedDate
            'Days Since Deletion' = $DaysSinceDeletion
            Type                  = $Item.UserType
        }
        $Report += $ReportLine
    }

    # Sort the report by 'Display Name'
    $Report | Sort-Object 'Display Name' | Format-Table
}
The output will show only the Microsoft 365 deleted users with that specific domain.
Id                                   UserPrincipalName                                       Display Name    Deleted                Days Since Deletion
--                                   -----------------                                       ------------    -------                -------------------
a02cb6da-5d88-469f-bfbf-ec78b5b4d1e8 a02cb6da5d88469fbfbfec78b5b4d1e8Ali.Tajran@tajran.com   Ali Tajran      10/29/2023 10:56:52 AM                   0
Remove single deleted Microsoft 365 user
Permanently remove a single deleted user.
Remove-MgDirectoryDeletedItem -DirectoryObjectId "e09cb6da-5d88-469f-bfbf-ec78b5b4d1e8"Remove deleted Microsoft 365 users with specific domain
If you like to permanently remove deleted Microsoft 365 users that end with a specific domain, you can filter on UserPrincipalName.
Change the domain on line 5.
# Connect with privileges
Connect-MgGraph -Scopes "User.ReadWrite.All"

# Specify the domain name for filtering
$DomainName = "tajran.com"

# Get properties
$Properties = @(
    'Id',
    'userPrincipalName',
    'displayName'
)

# Retrieve deleted directory items
$DeletedItems = Get-MgDirectoryDeletedItemAsUser -All -Property $Properties | Select-Object $Properties

# Check if there are no deleted accounts from the specified domain
$DomainSpecificDeletedItems = $DeletedItems | Where-Object { $_.userPrincipalName -like "*@$DomainName" }

if ($DomainSpecificDeletedItems.count -eq 0) {
    Write-Host "No deleted accounts found in the recycle bin for the domain $DomainName." -ForegroundColor Cyan
}
else {
    # Create an array to store the deleted user IDs
    $DeletedIds = @()

    # Loop through the deleted items
    foreach ($Item in $DomainSpecificDeletedItems) {
        $DeletedIds += $Item.Id

        # Display the name of the item being deleted
        Write-Host "Deleted $($Item.DisplayName)" -ForegroundColor Green

        # Hard delete the items
        Remove-MgDirectoryDeletedItem -DirectoryObjectId $Item.Id #-WhatIf
    }
}
Remove all deleted Microsoft 365 users
Run the below PowerShell script to permanently remove all deleted users.
# Connect with privileges
Connect-MgGraph -Scopes "User.ReadWrite.All"
# Get properties
$Properties = @(
'Id',
'userPrincipalName',
'displayName'
)
# Retrieve deleted directory items
$DeletedItems = Get-MgDirectoryDeletedItemAsUser -All -Property $Properties | Select-Object $Properties
# Check if there are no deleted accounts
if ($DeletedItems.Count -eq 0) {
Write-Host "No deleted accounts found in the recycle bin." -ForegroundColor Cyan
}
else {
# Create an array to store the deleted user IDs
$DeletedIds = @()
# Loop through the deleted items
foreach ($Item in $DeletedItems) {
$DeletedIds += $Item.Id
# Display the name of the item being deleted
Write-Host "Deleted $($Item.DisplayName)" -ForegroundColor Green
# Hard delete the items
Remove-MgDirectoryDeletedItem -DirectoryObjectId $Item.Id #-WhatIf
}
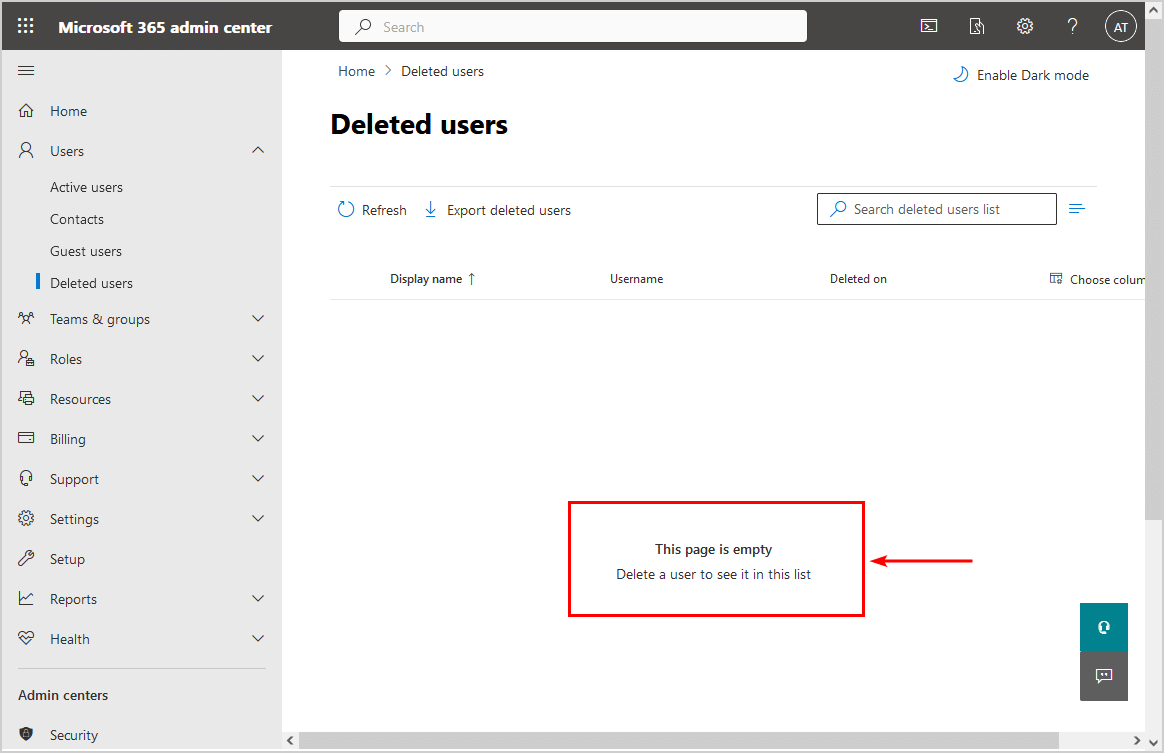
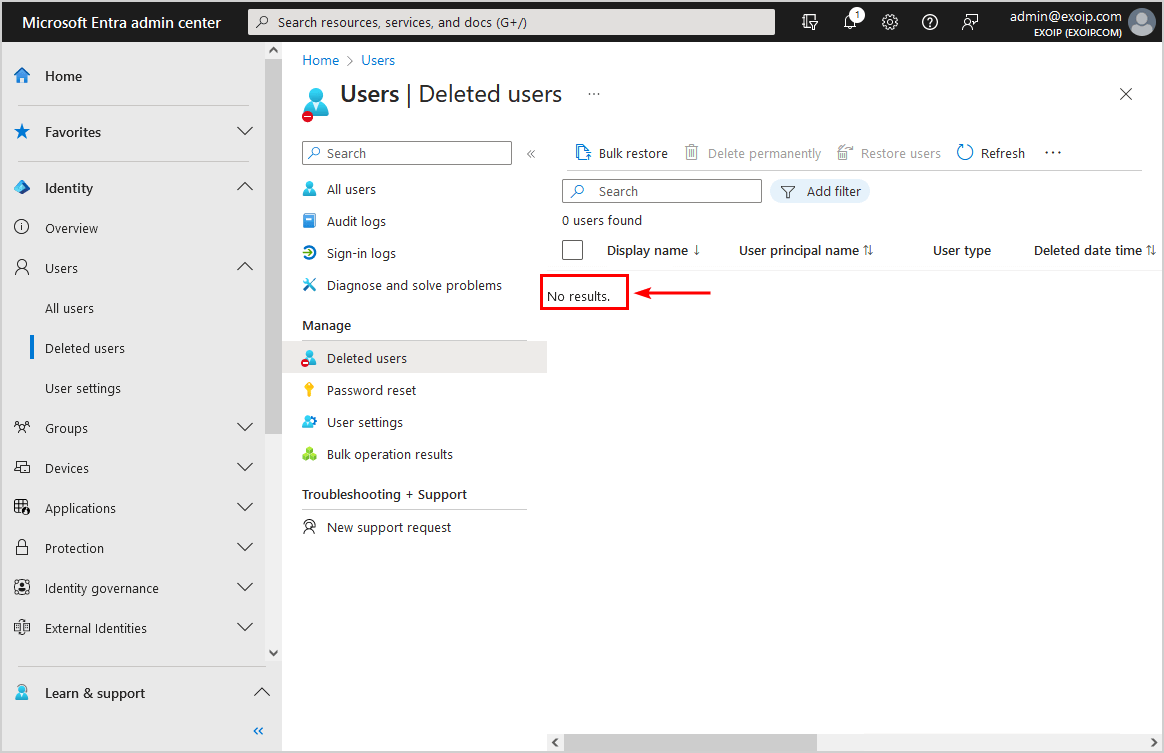
}After running the above command, we can verify that the deleted users page is empty.
Permanently delete users in Microsoft Entra admin center
To remove the users permanently in Microsoft Entra admin center, follow the below steps:
- Sign in to Microsoft Entra admin center
- Expand Identity
- Click Users > Deleted users
- Select the users
- Click Delete permanently
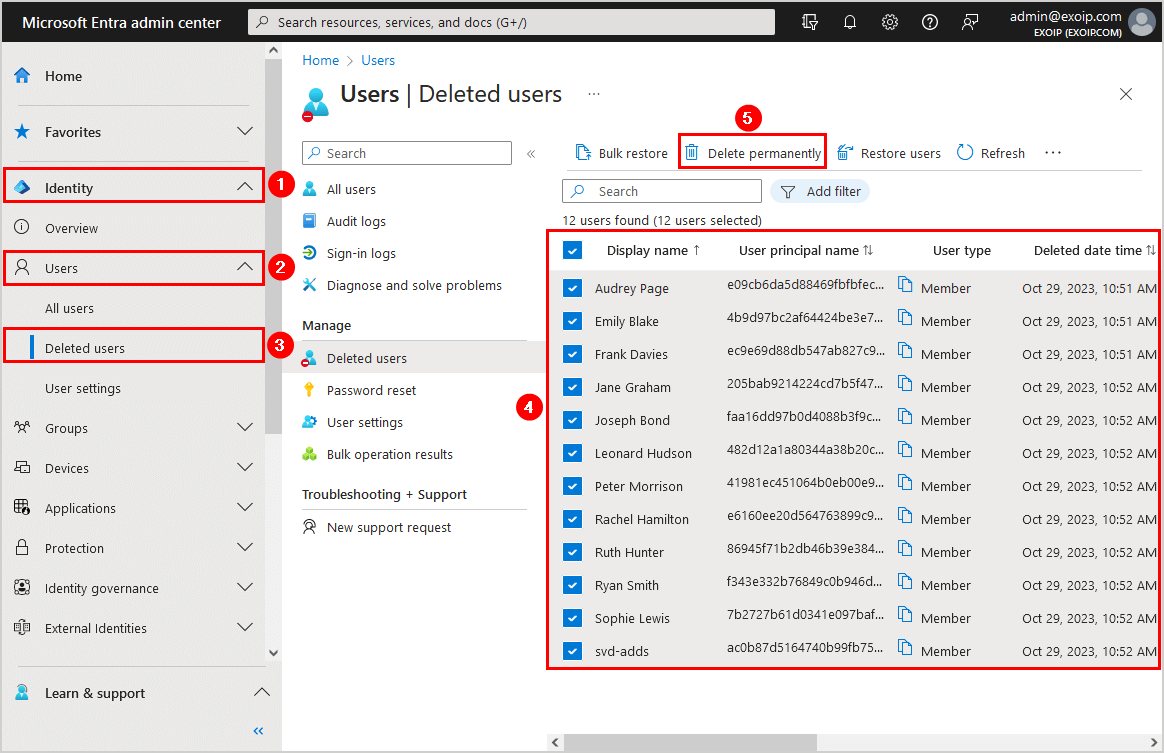
- All the users are permanently deleted
That’s it! Did this help you to force delete Microsoft 365 users from recycle bin?
Read more: Export Office 365 mailbox permissions to CSV »
Conclusion
You learned how to delete users from Microsoft 365 permanently. Most of the time, you delete users, and they will move automatically to the Microsoft Entra ID recycle bin (soft-delete). After 30 days, Microsoft will remove the deleted users from Microsoft Entra ID recycle bin (hard-delete). The next time you want to hard-delete the users and don’t want to wait 30 days, you can use PowerShell or Microsoft Entra admin center.
Did you enjoy this article? You may also like Export Office 365 mailbox to PST. Don’t forget to follow us and share this article.
What Others Are Reading

thnx for your article. this helped me a lot!! with the full explain of how to install in powershell and how to delete!
thank you very much!! cheers from the netherlands!
Thank you very musch! You saved my day 😀