Microsoft released Cumulative Update 13 for Exchange Server 2019 (KB5020999) on May 3, 2023. Also…
Recover Exchange DAG member server
The time has come, the Exchange Server DAG (Database Availability Group) member failed, and it’s not starting anymore. Of course, this is not great news because one Exchange Server failed. However, as long as you have a DAG configured, the mailbox databases are switched over, and users will not notice anything. In this article, you will learn how to recover a failed Exchange DAG member.
Table of contents
- Introduction
- Step 1. Check current situation
- Step 2. Remove database copies from failed DAG member
- Step 3. Remove failed DAG member from DAG
- Step 4. Remove failed Exchange DAG member server
- Step 5. Reset Exchange Server computer account
- Step 6. Install Windows Server
- Step 7. Find Exchange Server version
- Step 8. Download Exchange Server ISO
- Step 9. Install Exchange Server prerequisites
- Step 10. Create disk drives or mount points
- Step 11. Set account permissions
- Step 12. Get Exchange location path
- Step 13. Recover Exchange Server
- Step 14. Import and assign SSL certificate
- Step 15. Extra checks
- Conclusion
Introduction
Good to know is that we have a DAG configuration with two Exchange servers in the organization.
- 1x DAG (DAG01-2016)
- 2x Exchange Server (EX01-2016, EX02-2016)
Do you want to configure a DAG, or do you like to learn more about the setup? Follow the below articles:
In our example, one of the Exchange Server DAG members failed, and it will not boot. It’s the EX01-2016 mailbox server. The mailbox database hosted on the failed Exchange DAG member automatically becomes active on the other Exchange Server. That’s the EX02-2016 mailbox server.
Note: One of the big reasons you want to configure an Exchange DAG is for High Availability. If one Exchange Server fails, the mail flow in the environment keeps on going until you repair or rebuild the broken Exchange Server.
What if you have a standalone Exchange Server and failed? The approach is different, and you can follow Recover Exchange Server.
Let’s look at how to rebuild the Exchange DAG member EX01-2016.
Step 1. Check current situation
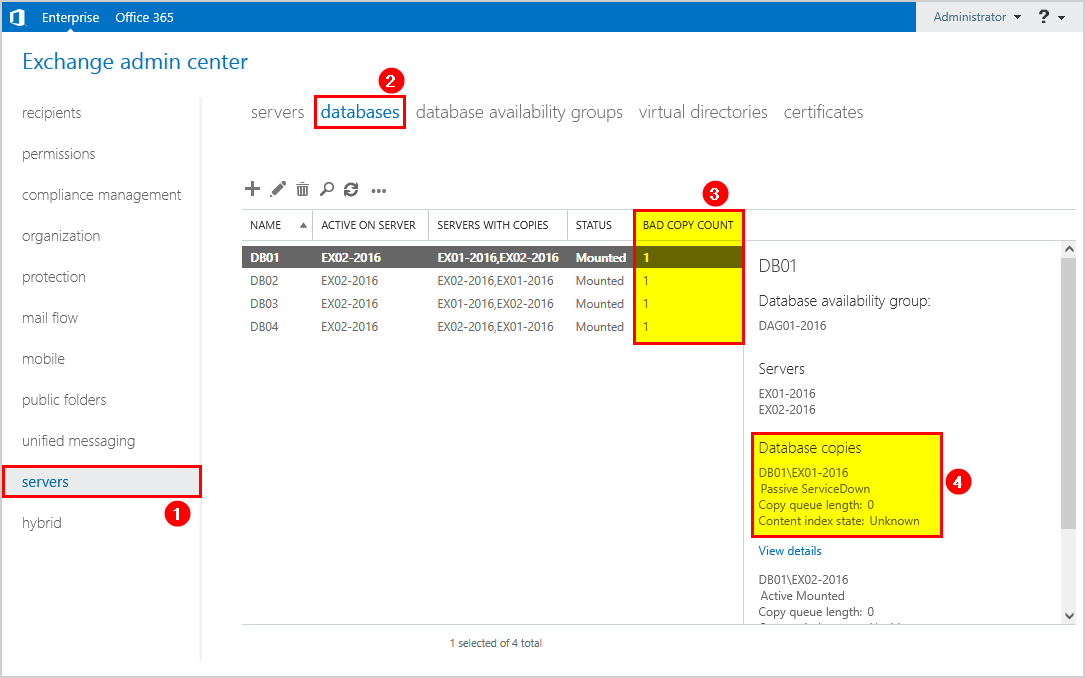
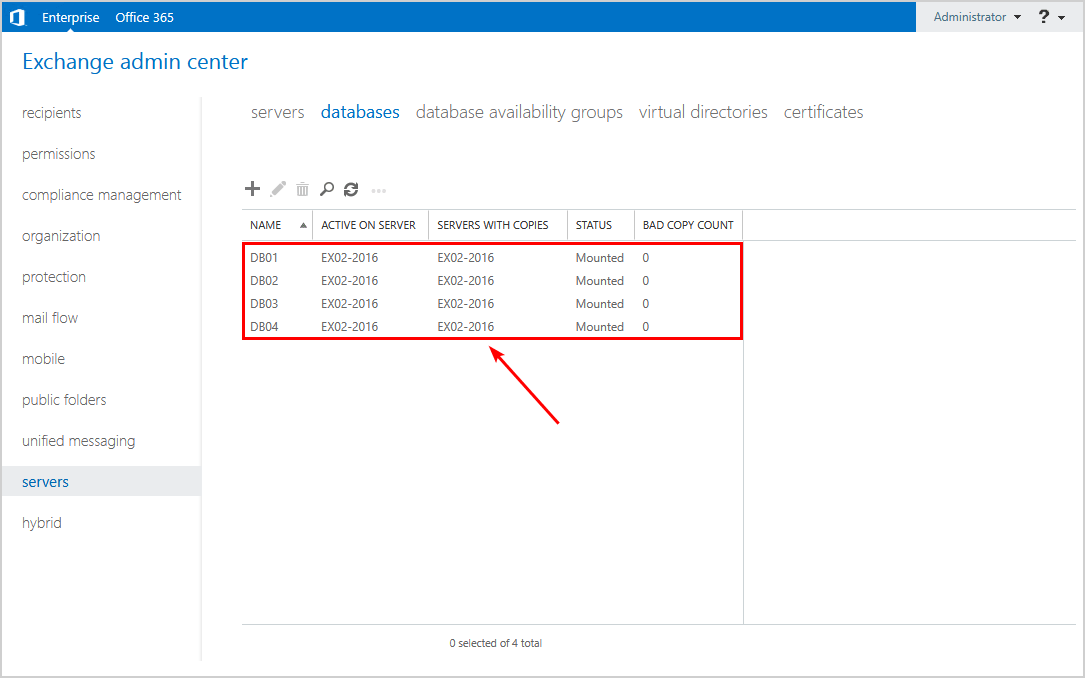
Before you start, it’s essential to check the current situation in the environment. Sign in to Exchange Admin Center and navigate to servers > databases.
We can see that there are bad copy counts and that the database copies on Exchange Server EX01-2016 are down.
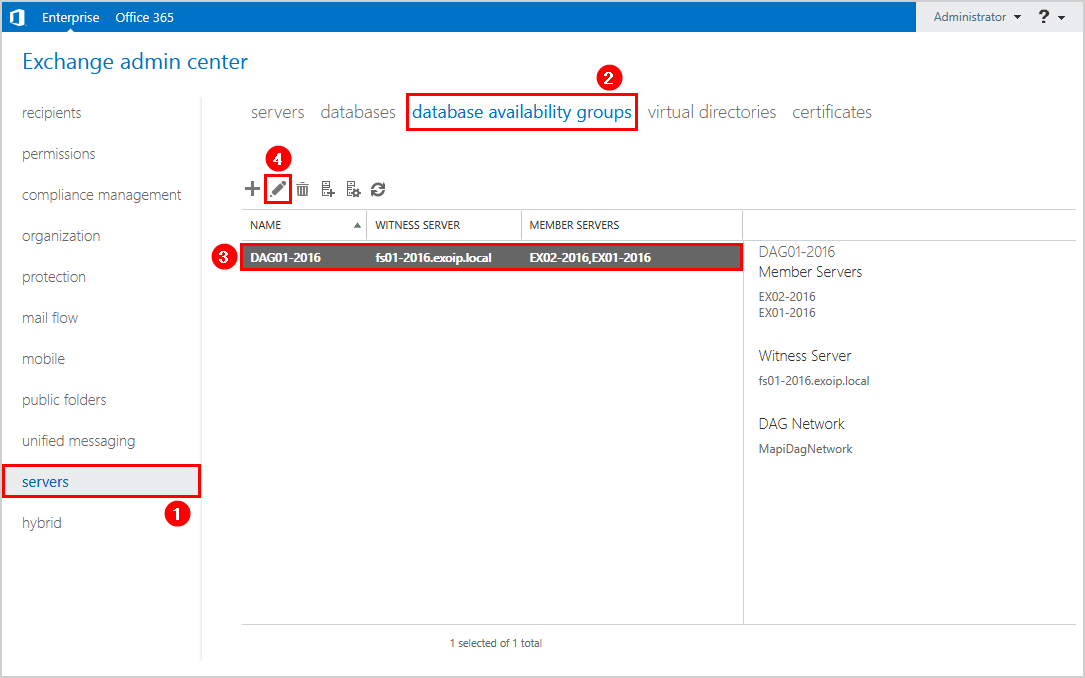
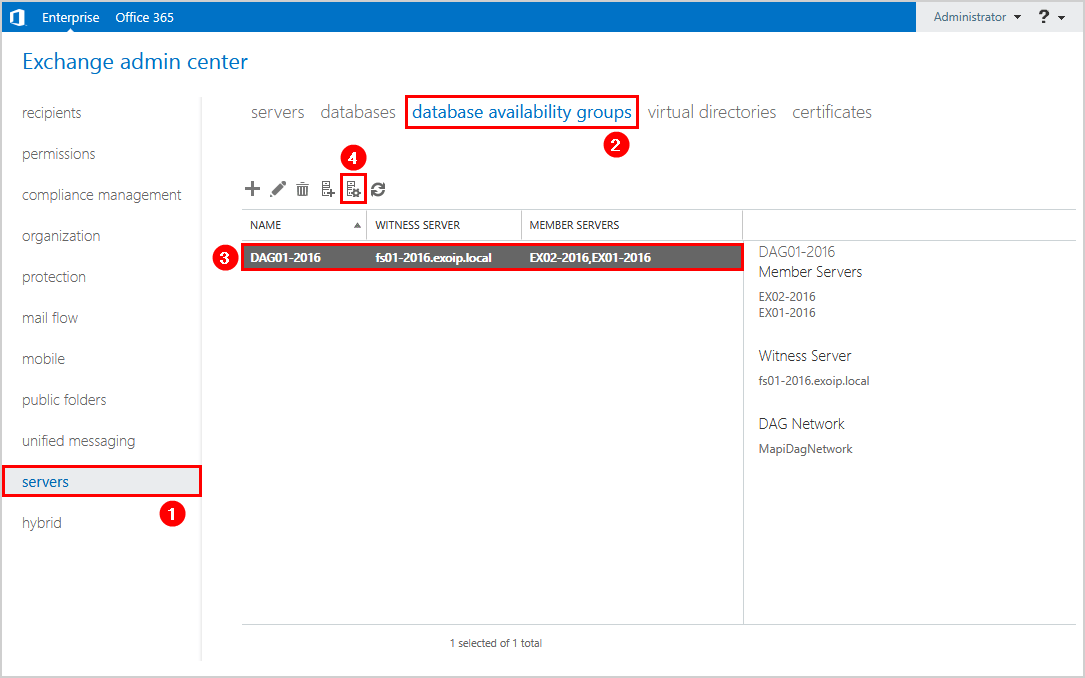
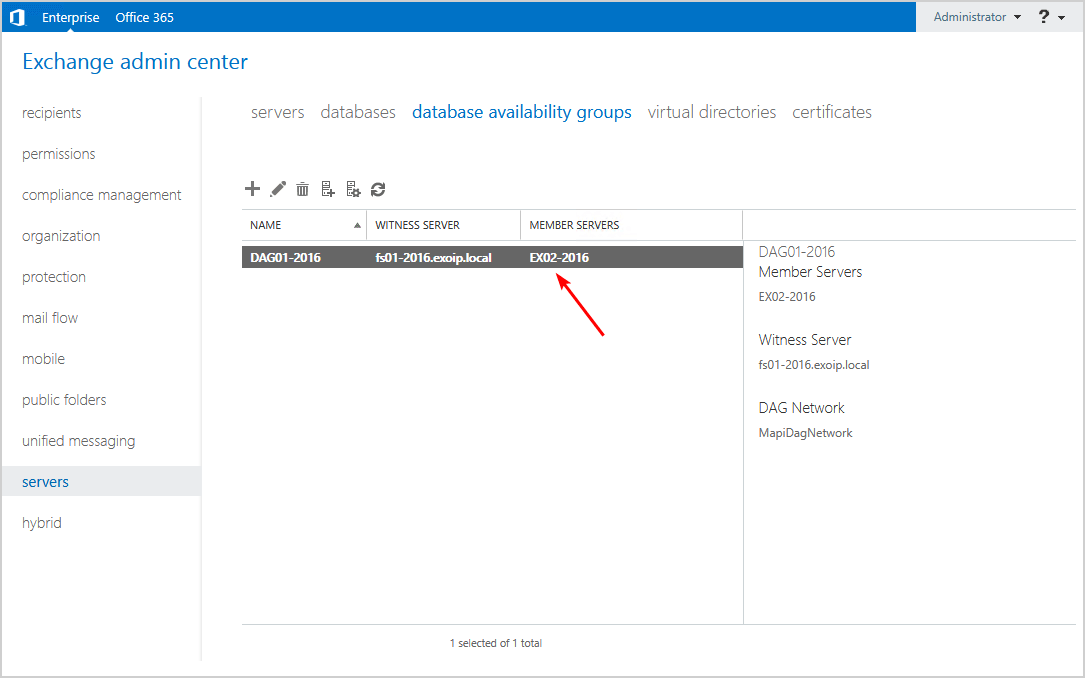
Click on servers > database availability groups. Next, click on the list on the DAG and follow with the edit icon in the toolbar.
In our example, we have the following DAG configuration:
- Name: DAG01-2016
- Witness server: FS01-2016
- Member servers: EX01-2016, EX02-2016
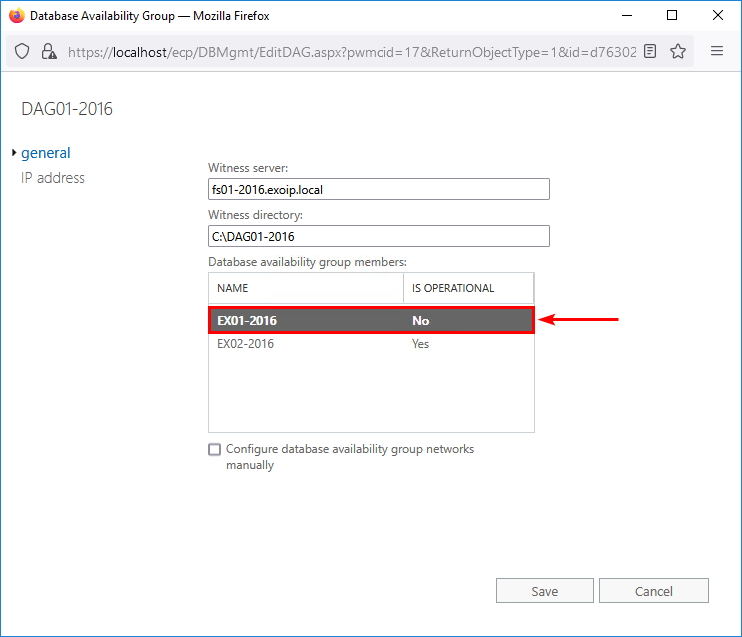
The Database Availability Group member EX01-2016 shows not operational.
Now that we identified what’s happening, we can proceed further.
Step 2. Remove database copies from failed DAG member
Sign in to the Exchange Server that’s active or Management Server and start Exchange Management Shell. Run the Get-MailboxDatabaseCopyStatus cmdlet to list the database copies.
We can see that the Status shows as ServiceDown for mailbox database copies hosted on the Exchange Server EX01-2016.
[PS] C:\>Get-MailboxDatabaseCopyStatus * | ft -AutoSize

Name           Status      CopyQueueLength ReplayQueueLength LastInspectedLogTime ContentIndexState
----           ------      --------------- ----------------- -------------------- -----------------
DB01\EX01-2016 ServiceDown 0               0                                      Unknown
DB02\EX01-2016 ServiceDown 0               0                                      Unknown
DB03\EX01-2016 ServiceDown 0               0                                      Unknown
DB04\EX01-2016 ServiceDown 0               0                                      Unknown
DB01\EX02-2016 Mounted     0               0                                      Healthy
DB02\EX02-2016 Mounted     0               0                                      Healthy
DB04\EX02-2016 Mounted     0               0                                      Healthy
DB03\EX02-2016 Mounted     0               0                                      Healthy
Run the Remove-MailboxDatabaseCopy cmdlet and insert the database, including the failed Exchange Server. You will get a confirmation message. Click on Y and press Enter.
[PS] C:\>Remove-MailboxDatabaseCopy -Identity "DB01\EX01-2016"

Confirm
Are you sure you want to perform this action?
Removing database copy for database "DB01" on server "EX01-2016".
[Y] Yes  [A] Yes to All  [N] No  [L] No to All  [?] Help (default is "Y"): Y

WARNING: Couldn't communicate with the Microsoft Exchange Replication service on server "EX01-2016.exoip.local" to pick
up new configuration changes for database "DB01". Make sure that the service is running and that the server has
network connectivity. Error: A server-side administrative operation has failed. The Microsoft Exchange Replication
service may not be running on server EX01-2016.exoip.local. Specific RPC error message: Error 0x6ba (The RPC server is
unavailable) from cli_RpcsNotifyChangedReplayConfiguration [Server: EX01-2016.exoip.local]
WARNING: Couldn't delete the replication state for database 'DB01' on server EX01-2016. Error: The attempt to access
the registry on machine 'EX01-2016.exoip.local' did not succeed after 10 seconds.
WARNING: The copy of mailbox database "DB01" on server "EX01-2016" has been removed. If necessary, manually delete the
database copy's files located at "F:\DB01" and "E:\DB01\DB01.edb" on that server.
You can get warning messages after you run the command. Ignore that warning because it can’t reach the failed Exchange Server. That’s correct because it’s offline.
WARNING: Couldn’t communicate with the Microsoft Exchange Replication service on server “EX01-2016.exoip.local” to pick up new configuration changes for database “DB01”. Make sure that the service is running and that the server has network connectivity. Error: A server-side administrative operation has failed. The Microsoft Exchange Replication service may not be running on server EX01-2016.exoip.local. Specific RPC error message: Error 0x6ba (The RPC server is unavailable) from cli_RpcsNotifyChangedReplayConfiguration [Server: EX01-2016.exoip.local]
WARNING: Couldn’t delete the replication state for database ‘DB01’ on server EX01-2016. Error: The attempt to access the registry on machine ‘EX01-2016.exoip.local’ did not succeed after 10 seconds.
WARNING: The copy of mailbox database “DB01” on server “EX01-2016” has been removed. If necessary, manually delete the database copy’s files located at “F:\DB01” and “E:\DB01\DB01.edb” on that server.
Verify that the command did delete the mailbox database copy successfully.
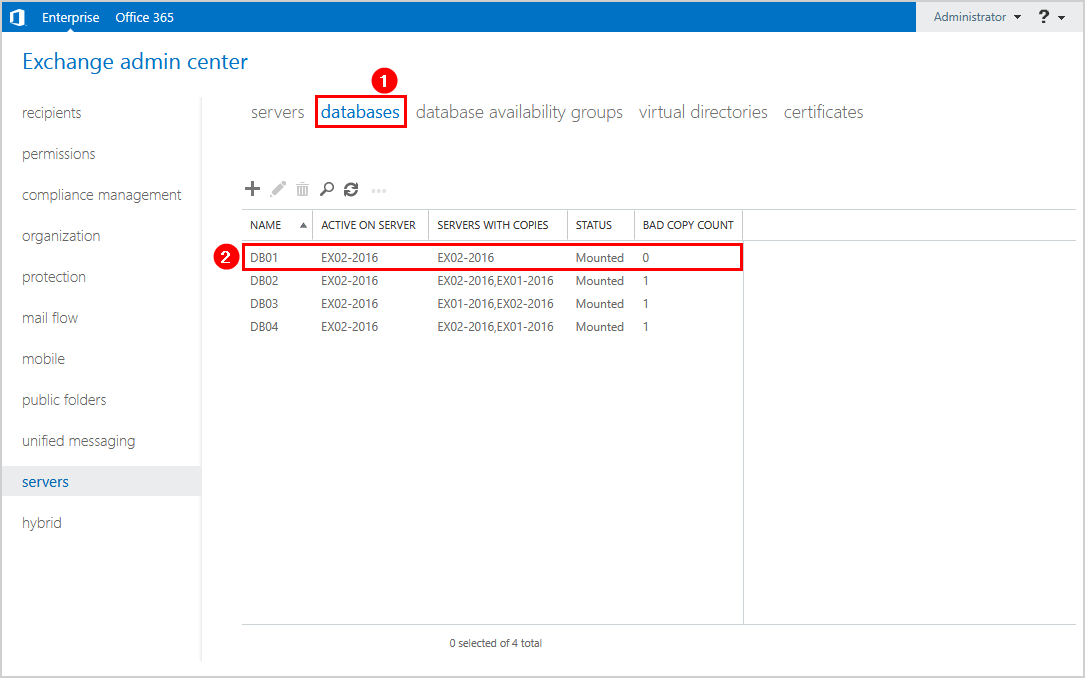
Click on databases. The bad copy count shows 0, and the server with copies shows only the Exchange Server EX02-2016.
Another way to check that the mailbox database copy is deleted is to run Get-MailboxDatabaseCopyStatus.
[PS] C:\>Get-MailboxDatabaseCopyStatus * | ft -AutoSize

Name           Status      CopyQueueLength ReplayQueueLength LastInspectedLogTime ContentIndexState
----           ------      --------------- ----------------- -------------------- -----------------
DB02\EX01-2016 ServiceDown 0               0                                      Unknown
DB03\EX01-2016 ServiceDown 0               0                                      Unknown
DB04\EX01-2016 ServiceDown 0               0                                      Unknown
DB01\EX02-2016 Mounted     0               0                                      Healthy
DB02\EX02-2016 Mounted     0               0                                      Healthy
DB04\EX02-2016 Mounted     0               0                                      Healthy
DB03\EX02-2016 Mounted     0               0                                      Healthy
Do the same step for the other database copies. Run the Remove-MailboxDatabaseCopy cmdlet and specify the other mailbox database copies one by one, which is mount to the EX01-2016.
If you want to speed up the database copy removal, select the DAG member server and remove all the mailbox database copies. First, list the database copies on the failed Exchange Server EX01-2016.
[PS] C:\>Get-MailboxDatabaseCopyStatus -Server "EX01-2016" | ft -AutoSize

Name           Status      CopyQueueLength ReplayQueueLength LastInspectedLogTime   ContentIndex
----           ------      --------------- ----------------- --------------------   ------------
DB02\EX01-2016 ServiceDown 0               0                                        Unknown
DB03\EX01-2016 ServiceDown 0               0                                        Unknown
DB04\EX01-2016 ServiceDown 0               0                                        Unknown
Add the Remove-MailboxDatabaseCopy cmdlet to the command. Also, add the skip confirmation prompt by using the exact syntax -Confirm:$false.
[PS] C:\>Get-MailboxDatabaseCopyStatus -Server "EX01-2016" | Remove-MailboxDatabaseCopy -Confirm:$falseYou will get the same warning messages as the first mailbox database copy removal. Again, it’s because the Exchange Server DAG member is unavailable, and it can’t be reached.
Check that the column Servers with copies do not show the failed Exchange Server EX01-2016. Also, the bad copy count column will show 0.
You can get the same results by running the Get-MailboxDatabaseCopyStatus cmdlet.
[PS] C:\>Get-MailboxDatabaseCopyStatus * | ft -AutoSize

Name           Status  CopyQueueLength ReplayQueueLength LastInspectedLogTime ContentIndexState
----           ------  --------------- ----------------- -------------------- -----------------
DB01\EX02-2016 Mounted 0               0                                      Healthy
DB02\EX02-2016 Mounted 0               0                                      Healthy
DB04\EX02-2016 Mounted 0               0                                      Healthy
DB03\EX02-2016 Mounted 0               0                                      Healthy
Now that the mailbox database copies are successfully removed from the failed Exchange Server, we can proceed further.
Step 3. Remove failed DAG member from DAG
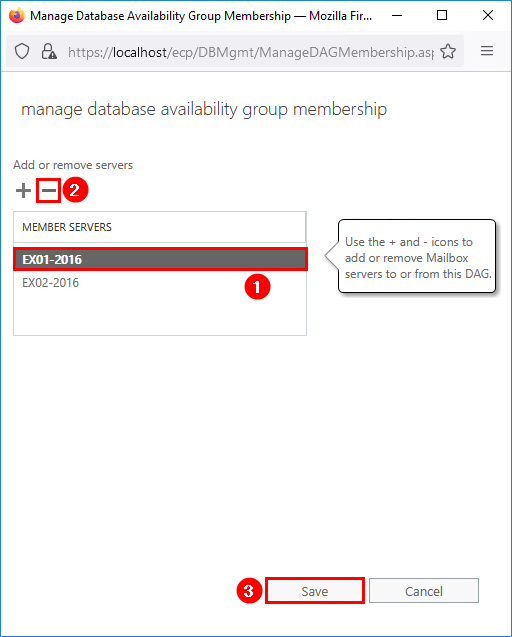
Navigate to servers > database availability groups. Click in the list on the DAG and follow with the Manage DAG membership icon in the toolbar.
Select the mailbox server and click the remove icon. Click on Save.
Give it some time to process the removal. After that, you will see the completed successfully message.
Verify that the member servers column does not show the failed Exchange Server.
We did remove the DAG member server successfully. Let’s proceed further.
Step 4. Remove failed Exchange DAG member server
Remove the failed Exchange Server DAG member. In our example, Exchange Server EX01-2016 is a virtual machine that is hosted in VMware ESXi. This action will also remove the files in the VMware datastore.
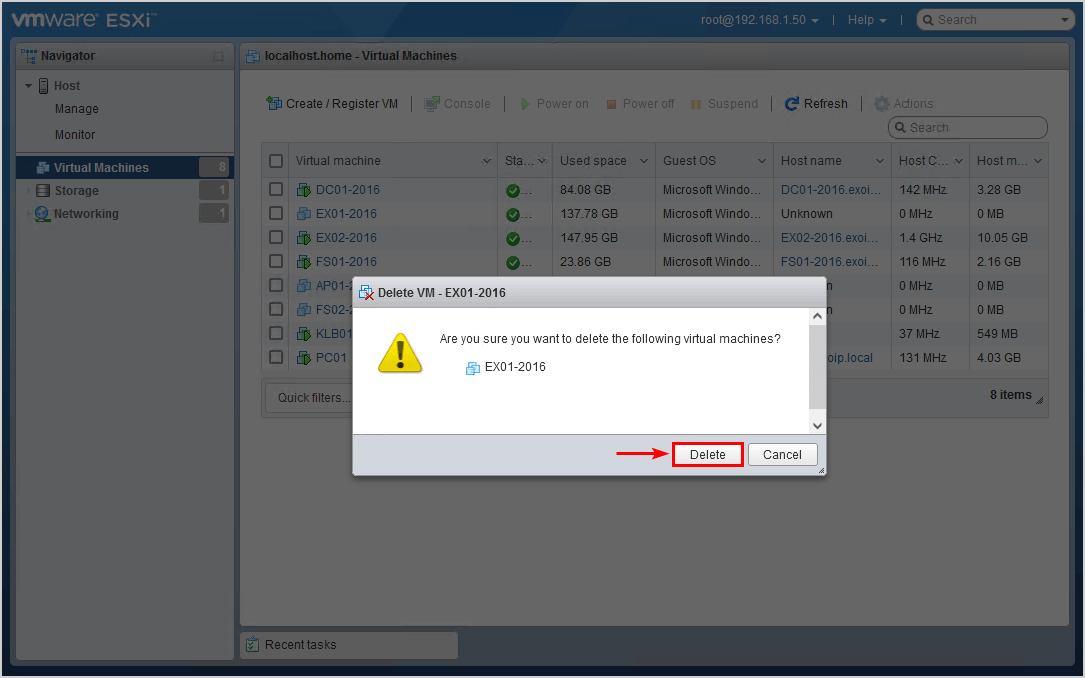
Now that we removed the Exchange Server and its files, we can proceed to the next step.
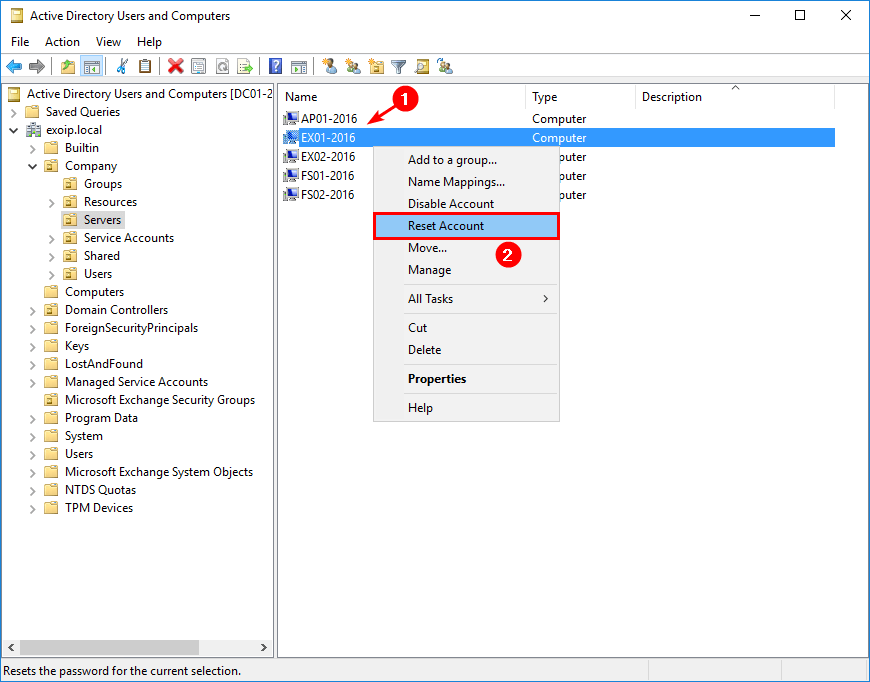
Step 5. Reset Exchange Server computer account
Reset the Active Directory computer account for the failed Exchange Server. We will do that because:
- We will be able to rejoin the new server to Active Directory under the old computer name
- It allows the recovery process to retrieve all configuration data from Active Directory for the failed Exchange Server
Important: Do NOT DELETE the computer account but RESET the computer account.
Start Active Directory Users and Computers (ADUC). Find the Exchange Server computer account. Right-click the computer account and click on Reset Account.
Step 6. Install Windows Server
Install a new Windows Server or spin up a template if you have that. After that:
- Active Windows Server
- Download and install the latest Windows Updates
- Configure computer name with the same name as the old one
- Configure static IP address with the same IP address as the old one
- Join the computer to the domain
Note: The target server must use the same Windows Server version as the lost server. For example, you can’t recover a lost Exchange 2016 server that was running Windows 2012 R2 on a new server that’s running Windows 2016, or vice-versa.
In our example, we set the computer name EX01-2016, with internal IP address 192.168.1.52, and joined to the domain exoip.local.
Step 7. Find Exchange Server version
Read more in the article Find Exchange version with PowerShell.
Run the Get-ExchangeServer cmdlet and check which Exchange Server version was running on the failed Exchange Server.
Note: The failed Exchange Server will show in the list, and that’s correct. Because it’s not DELETED, and it still exists in the organization. That’s the whole point of recovering the Exchange Server.
[PS] C:\>Get-ExchangeServer | Format-Table Name, Edition, AdminDisplayVersion

Name         Edition AdminDisplayVersion
----         ------- -------------------
EX01-2016 Enterprise Version 15.1 (Build 2242.4)
EX02-2016 Enterprise Version 15.1 (Build 2242.4)
Step 8. Download Exchange Server ISO
Go to the following page to get a list of the Exchange Server versions. The page will show you the Exchange Server build numbers and release dates. Scroll down to the Exchange Server that you need. Download and save the ISO image. Microsoft does remove older Exchange CUs when newer versions are released. You can use an unofficial website to download an older Exchange Server ISO file.
Suppose you do not have the installation media for the Cumulative Update (CU) version that was installed on the server to be recovered, you can recover a server using the latest available Cumulative Update. Once the upgrade is successful, AdminDisplayVersion in Exchange Management Shell or msExchVersion attribute on the recovered server will show the old build number and this is cosmetic in nature. We can either run setup /m:upgrade /IAcceptEchangeServerLicenseTerms or wait for the next Cumulative Update release and perform the upgrade which will correct this.
In our example, we are not running the latest Exchange Server build. Therefore, we will download and recover the Exchange Server EX01-2016 with the latest available Cumulative Update. Once we are recovered, and everything is functioning, we will upgrade the operational Exchange Server (EX02-2016).
Step 9. Install Exchange Server prerequisites
Read more in the article Install Exchange Server prerequisites.
Note: The target server should have the same general performance characteristics and hardware configuration as the lost server.
- Install required Windows components
- Install .NET Framework
- Install Visual C++ Redistributable for Visual Studio 2012
- Install Visual C++ Redistributable Package for Visual Studio 2013
- Install IIS URL Rewrite Module
- Install Unified Communications Managed API 4.0 Runtime
After all of the above tasks are completed, reboot the server.
Step 10. Create disk drives or mount points
Read more in the article Configure ReFS volume Exchange 2013/2016/2019.
Note: Create the disk volumes identical to the other Exchange Server in the DAG. The same disk drive letters that were used for mounted databases on the lost server must also exist on the target server.
In our example, the operational Exchange Server is EX02-2016. This is what the drives look like.

This is how we did configure the drives on Server EX01-2016. The database data and the logs are separate. Also, the disk volumes are empty because there is no data yet on them.
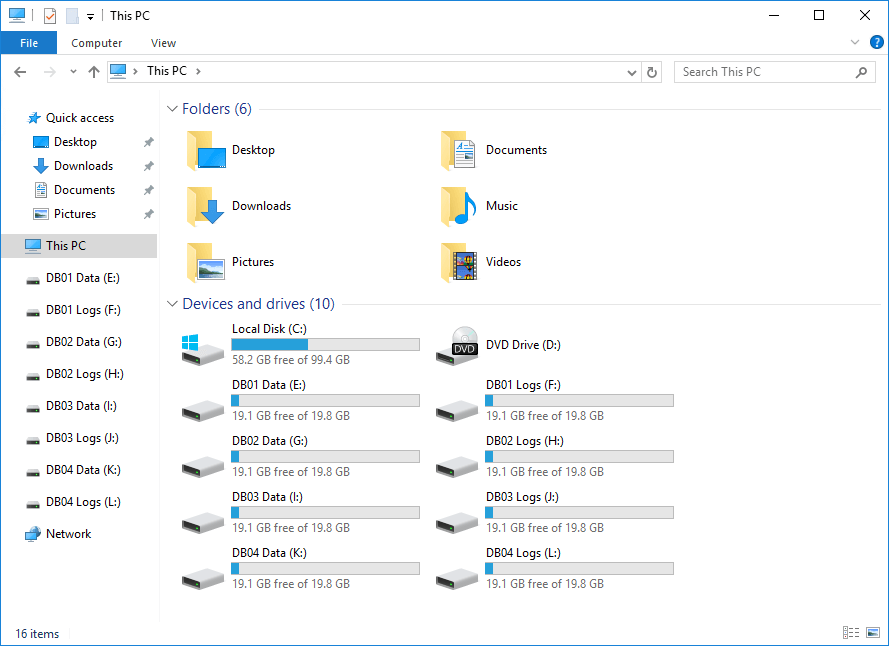
Now that we configure the disks for the database copies, the next step is to recover the failed Exchange Server.
Step 11. Set account permissions
The account that you’ll use to make the server recovery requires the following permissions:
- Domain Admins security group membership
- Exchange Organization Management role group membership
Step 12. Get Exchange location path
If Exchange is installed in a location other than the default location of %ProgramFiles%\Microsoft\Exchange Server\V15, you must include the /TargetDir:<Path> switch in the Setup.exe /Mode:RecoverServer command to specify the location of the Exchange program (binary) files. If you don’t use the /TargetDir switch, the Exchange files will be installed in the default location when you recover the Exchange server.
Note: Check the failed Exchange Server location. If it’s not in the default location, you must include the target directory in the command.
To find the install location of Exchange on the lost Exchange server, do the following steps:
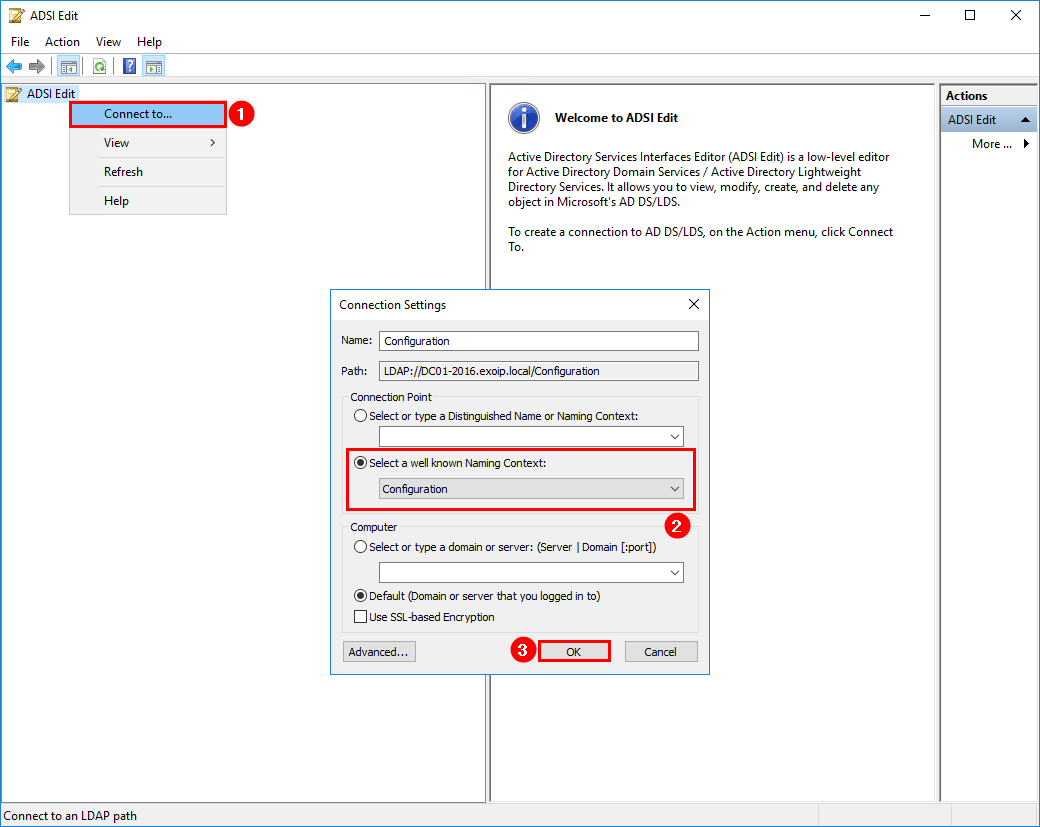
Open Administrative Tools and start ADSI Edit. Another way is to type adsiedit.msc in the Windows Search. Once opened, right-click ADSI Edit in the left pane and select Connect to. Select Configuration in the well known Naming Context. Click OK.
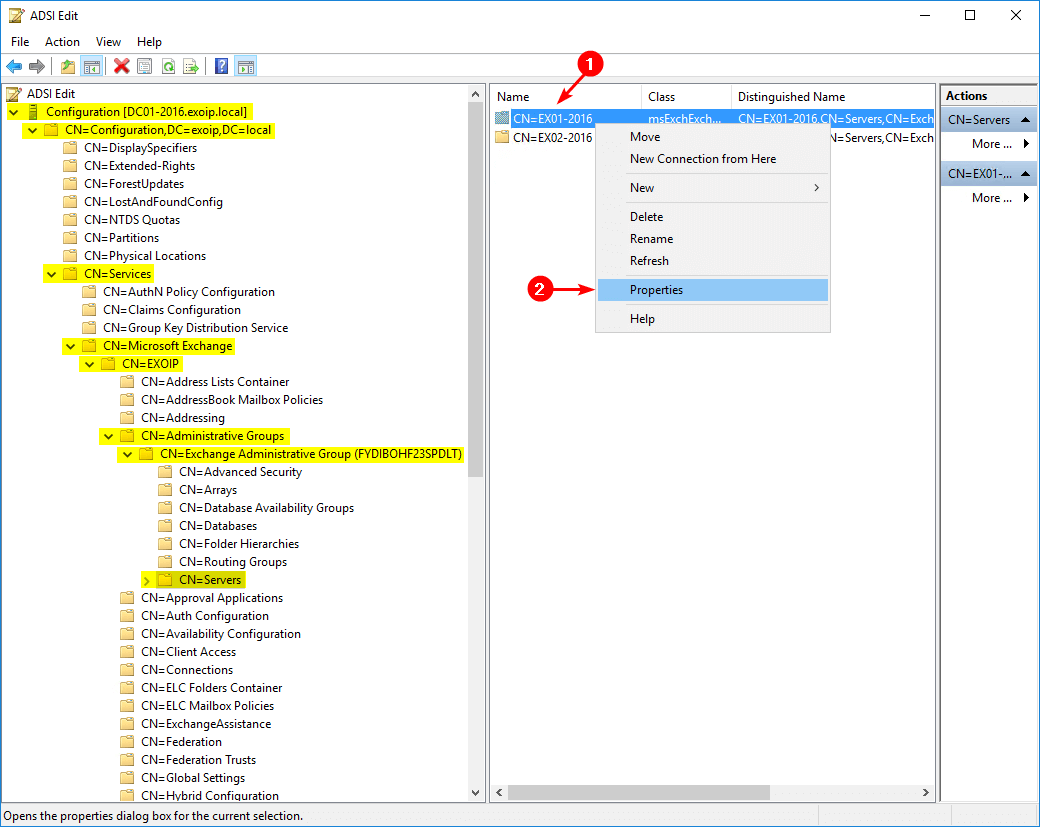
Navigate in ADSI Edit:
Configuration > CN=Configuration,DC=exoip,DC=local > CN=Services > CN=Microsoft Exchange > CN=EXOIP > CN=Administrative Groups > CN=Exchange Administrative Group (FYDIBOHF23SPDLT) > CN=Servers.
Right-click the failed Exchange Server object. Select Properties.
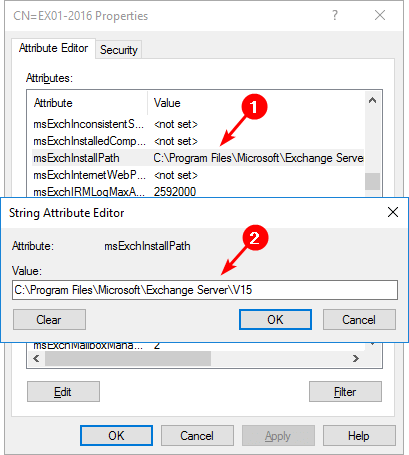
Find the msExchInstallPath attribute. This attribute stores the current installation path. In our example, the default Exchange install location was used. So, we will not use the /TargetDir:<Path> switch.
Step 13. Recover Exchange Server
Mount the Exchange Server ISO.
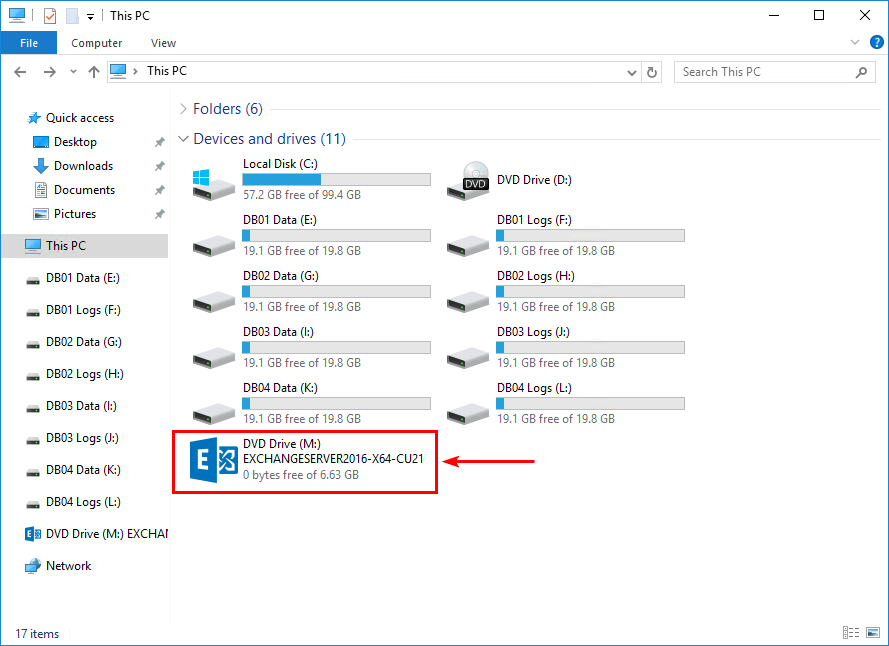
Start Command Prompt as administrator. Run the Setup.exe /Mode:RecoverServer command to restore Exchange Server. In our example, the ISO is mounted to the (M:) drive.
C:\>M:\Setup.exe /IAcceptExchangeServerLicenseTerms_DiagnosticDataOFF /Mode:RecoverServer

Microsoft Exchange Server 2016 Cumulative Update 21 Unattended Setup

Copying Files...
File copy complete. Setup will now collect additional information needed for installation.

Languages
Mailbox role: Transport service
Mailbox role: Client Access service
Mailbox role: Unified Messaging service
Mailbox role: Mailbox service
Management tools
Mailbox role: Client Access Front End service
Mailbox role: Front End Transport service

Performing Microsoft Exchange Server Prerequisite Check

    Configuring Prerequisites                                                                         COMPLETED
    Prerequisite Analysis                                                                             COMPLETED

Configuring Microsoft Exchange Server

    Preparing Setup                                                                                   COMPLETED
    Stopping Services                                                                                 COMPLETED
    Copying Exchange Files                                                                            COMPLETED
    Language Files                                                                                    COMPLETED
    Restoring Services                                                                                COMPLETED
    Language Configuration                                                                            COMPLETED
    Mailbox role: Transport service                                                                   COMPLETED
    Mailbox role: Client Access service                                                               COMPLETED
    Mailbox role: Unified Messaging service                                                           COMPLETED
    Mailbox role: Mailbox service                                                                     COMPLETED
    Exchange Management Tools                                                                         COMPLETED
    Mailbox role: Client Access Front End service                                                     COMPLETED
    Mailbox role: Front End Transport service                                                         COMPLETED
    Finalizing Setup                                                                                  COMPLETED

The Exchange Server setup operation completed successfully.
Setup has made changes to operating system settings that require a reboot to take effect. Please reboot this server
prior to placing it into production.
Exchange Server recovery finished. Reboot the server.
Step 14. Import and assign SSL certificate
Read more in the articles How to export certificate in Exchange Server and How to import certificate in Exchange Server.
The /Mode:RecoverServer switch assigns a self-signed certificate to all Exchange Services that require SSL/TLS. If the server previously used an SSL/TLS certificate that was issued by a different certification authority, you’ll need to re-import the certificate and configure the services to use the certificate. Otherwise, users will get a certificate prompt when they try to connect (for example, in Outlook).
Step 15. Extra checks
After the recovery, go through the below configurations and configure them if it’s not set:
- Exchange Server license
- Virtual directories URLs
- Send connector
- Receive connector
- DAG member server
- Mailbox database copy
- Custom IIS settings
Note: Everything stored on Exchange Server will not recover. Only what’s stored in Active Directory.
Conclusion
We showed the steps on how to rebuild an Exchange Server DAG member. It can be a panic moment when a DAG member server fails to start. But, as long as the users are not affected and can continue their work, everything is fine. In the background, you are already recovering the Exchange DAG member server by going through these steps.
Did you enjoy this article? You may also like Install Exchange Security Update step by step. Don’t forget to follow us and share this article.
What Others Are Reading

Hello, thanx for the article. But if i had 2 DAG member servers and all of them are failed, how to recover exchange?
Hi Ali,
Same to this question how to recover when all DAG members failed, there are no EAC and Exchange powershell available to follow your article. Thanks.
Hi Arifin,
If all the Exchange Servers can’t start anymore, you need to recover Exchange Server.
Once the first Exchange Server is up and running, you return to this article for the second Exchange Server.
Hi,@ALI Your article really helped me a lot, thanks! At present, I have the following questions to ask you: At present, the DAG server is deployed alone, but there is no DAG high availability solution on Microsoft’s official website. Is there a way to configure the DAG for high availability? Or customized snapshot backup and recovery, can this method be used?Thanks!
Hi,
There is no way to configure DAG for high availability.
You can add more than one mailbox server to the DAG (up to 16 Mailbox Servers) and add database copies. That’s what a DAG offers. When a mailbox server goes offline, the mailbox databases will become active on another mailbox server.
Read more about Exchange Server high availability.
Hello Ali.
Another wonderful essay which explains the ways to perform a correct recovery. Thanks a lot.
I would like to ask you if it was also ok to perform the command cluster node EX01-2016 /forcecleanup instead of resetting the computer account through Active Directory? In other words, Could this command be used instead of resetting the computer account through Active Directory?
Hi Fırat,
No, that’s a different command. Reset the computer account as I showed through Active Directory Users and Computers. You can also reset the computer account with PowerShell: