We see a mailbox with a different mailbox type in Exchange on-premises and Exchange Online.…
Renew Microsoft Exchange certificate
The Microsoft Exchange certificate is installed when you install an Exchange Server, and it’s 5 years active. Most of the time, you don’t look into that certificate because, within 5 years, you will have a new Exchange Server and decommission the old Exchange Server. What if you have to renew the certificate? The Microsoft Exchange self-signed certificate is expiring, and it will not renew automatically. In this article, you will learn how to renew Microsoft Exchange certificate.
Table of contents
- Exchange Server certificates
- How to renew Microsoft Exchange certificate
- 1. Get Microsoft Exchange certificate
- 2. Create new Microsoft Exchange certificate
- 3. Copy new Microsoft Exchange certificate
- 4. Assign IIS services to certificate
- 5. Remove old certificate
- 6. Check IIS site bindings
- 7. Restart IIS (Internet Information Services)
- 8. Verify Microsoft Exchange certificate validity
- Conclusion
Exchange Server certificates
There are three default certificates created when Installing Exchange Server:
- WMSVC or WMSVC-SHA2 (depends on the Exchange Server version) (self-signed)
- Microsoft Exchange Server Auth Certificate (self-signed)
- Microsoft Exchange (self-signed)
In addition to the above default self-signed certificates, you must install a third-party certificate which you obtain from a certification authority (CA) on the Exchange Server:
How to renew Microsoft Exchange certificate
Let’s look at the steps to renew the self-signed Microsoft Exchange certificate. Run the below commands in Exchange Management Shell.
Important: Do the below steps after working hours, even if you have a DAG configuration. That’s because the certificates can unbind the Default Web Site certificates, and users will get certificate errors. You have to do the steps on all the Exchange Servers.
1. Get Microsoft Exchange certificate
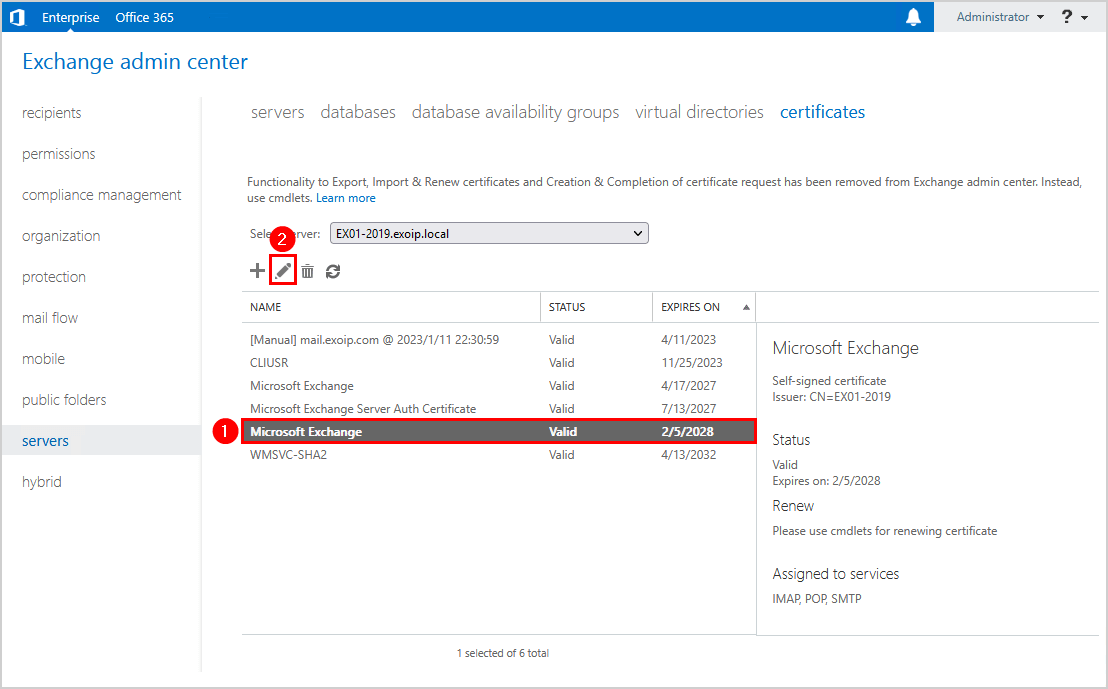
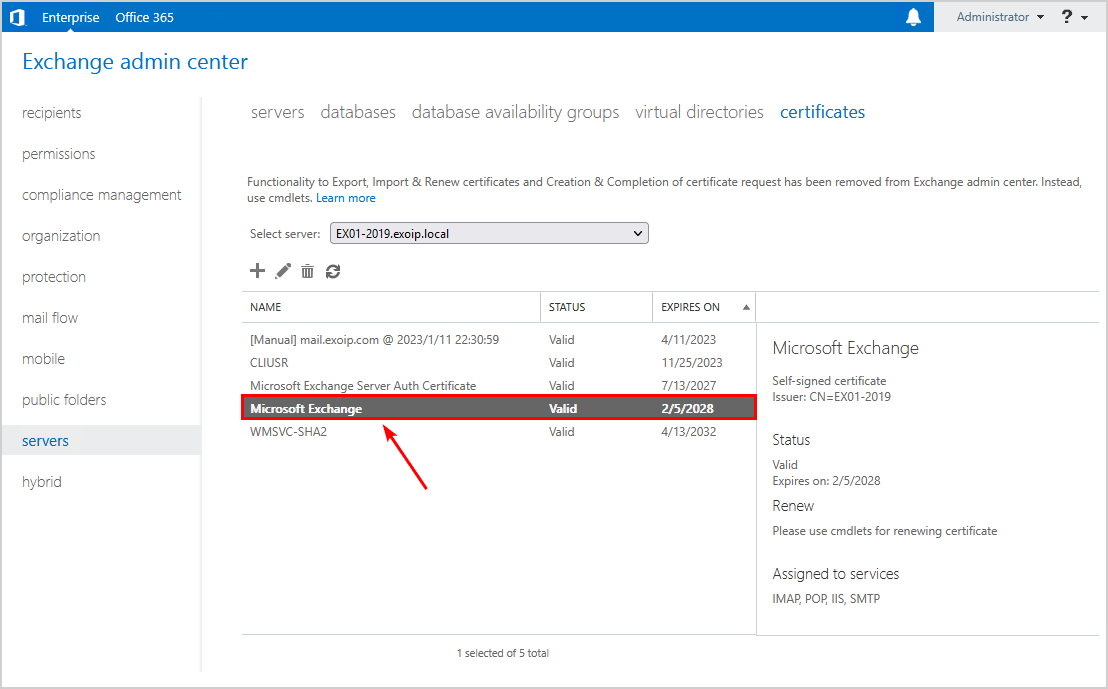
Sign in to Exchange Admin Center on-premises. Navigate to servers > certificates. Select the Exchange Server if you have more than one Exchange Server running in the organization. Double-click the Microsoft Exchange certificate.
In our example, we did select the Exchange Server EX01-2019.
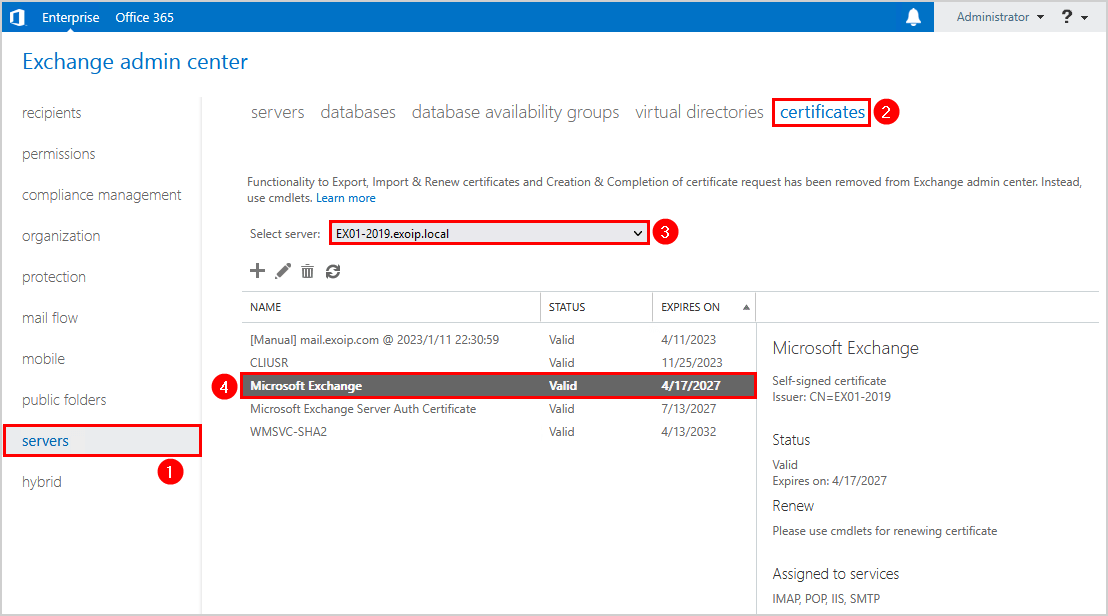
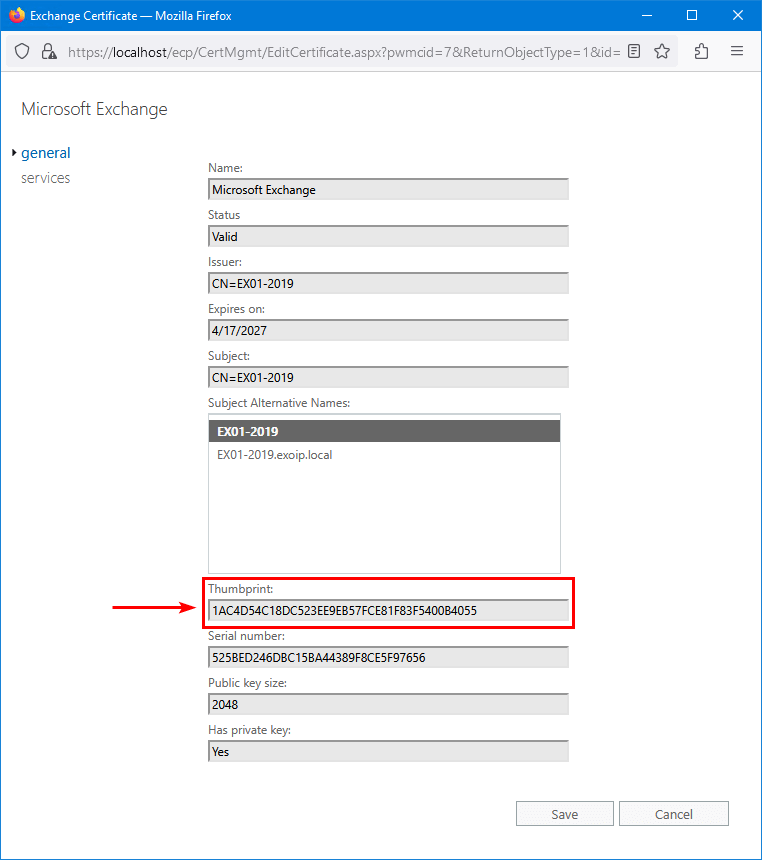
We do see that the certificate thumbprint starts with 1AC4D5.
Let’s verify the Exchange Server certificate with Exchange Management Shell.
Run Exchange Management Shell as administrator on Exchange on-premises. Run the Get-ExchangeCertificate cmdlet to check the existing Microsoft Exchange certificate status.
Note: Copy the certificate thumbprint because you need it when you renew Microsoft Exchange certificate in the next step.
Get-ExchangeCertificate | Where-Object {$_.FriendlyName -like "Microsoft Exchange"} | Format-List FriendlyName,Subject,CertificateDomains,Thumbprint,RootCAType,*PrivateKey*,NotBefore,NotAfterThe below output appears.
FriendlyName         : Microsoft Exchange
Subject              : CN=EX01-2019
CertificateDomains   : {EX01-2019, EX01-2019.exoip.local}
Thumbprint           : 1AC4D54C18DC523EE9EB57FCE81F83F5400B4055
RootCAType           : Registry
PrivateKeyExportable : False
HasPrivateKey        : True
PrivateKey           : System.Security.Cryptography.RSACryptoServiceProvider
NotBefore            : 4/17/2022 10:09:49 AM
NotAfter             : 4/17/2027 10:09:49 AM
Not all properties are visible in the standard view in Exchange Management Shell. Use Format-List * if you want to get all the Microsoft Exchange certificate properties.
Get-ExchangeCertificate | Where-Object {$_.FriendlyName -like "Microsoft Exchange"} | Format-List *In the next step, we will renew the Microsoft Exchange certificate.
2. Create new Microsoft Exchange certificate
Create a new Microsoft Exchange certificate. Run the New-ExchangeCertificate cmdlet and paste the previously copied certificate thumbprint in the command.
Note: You can’t remove the Microsoft Exchange certificate in most cases. You will be able to remove the certificate after you create and publish a new Microsoft Exchange certificate.
Get-ExchangeCertificate -Thumbprint "1AC4D54C18DC523EE9EB57FCE81F83F5400B4055" | New-ExchangeCertificate -Force -PrivateKeyExportable $falseThe below output appears.
Thumbprint                                Services   Subject
----------                                --------   -------
F7C9380B3D7C4FCFE7AD8C7ACE17AEA0F6399DBD  IP..S..    CN=EX01-2019
If you don’t have a Microsoft Exchange certificate, you should run the below command.
New-ExchangeCertificate -Force -PrivateKeyExportable $false3. Copy new Microsoft Exchange certificate
Copy the new Microsoft Exchange certificate from the Personal store to the Trusted Root Certification Authorities store.
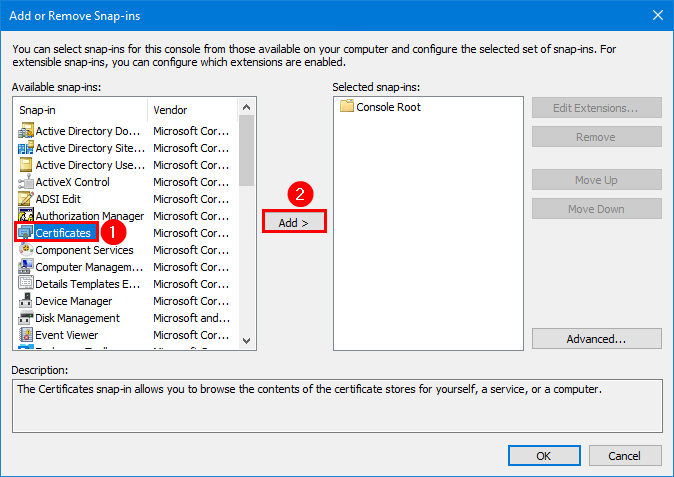
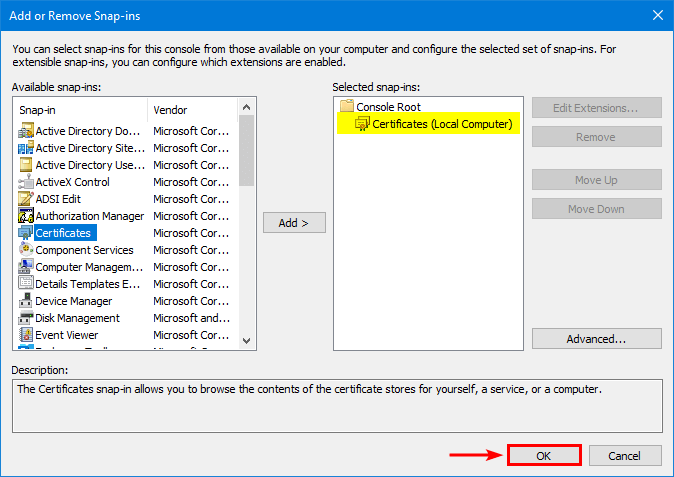
Start Microsoft Management Console (MMC) and add the Certificates snap-in.
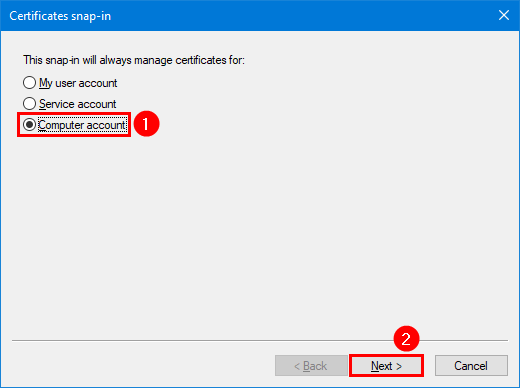
Select Computer account and click Next.
Click on OK.
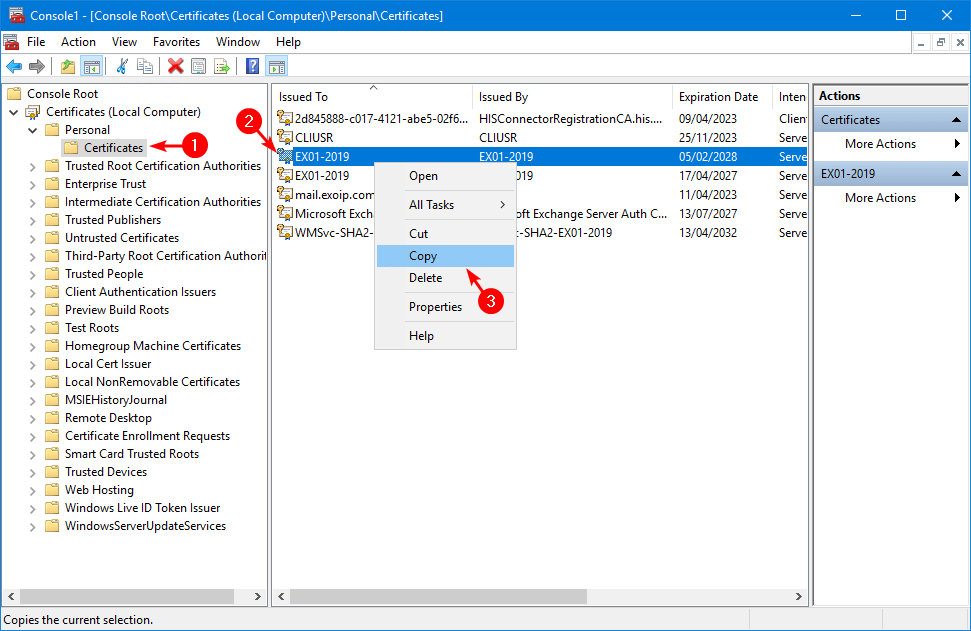
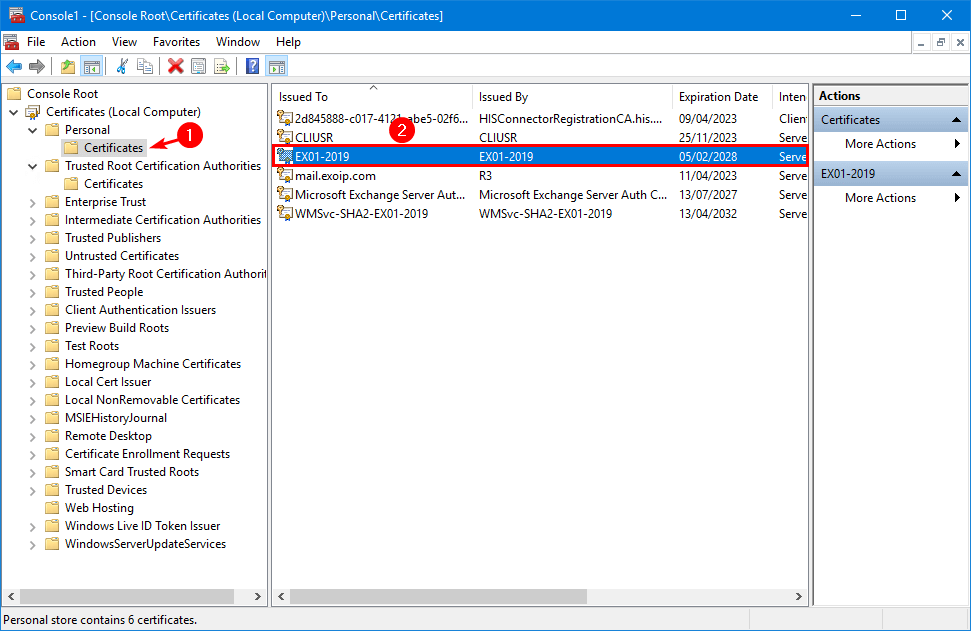
Expand the folders Personal > Certificates. Right-click the new certificate and click on Copy.
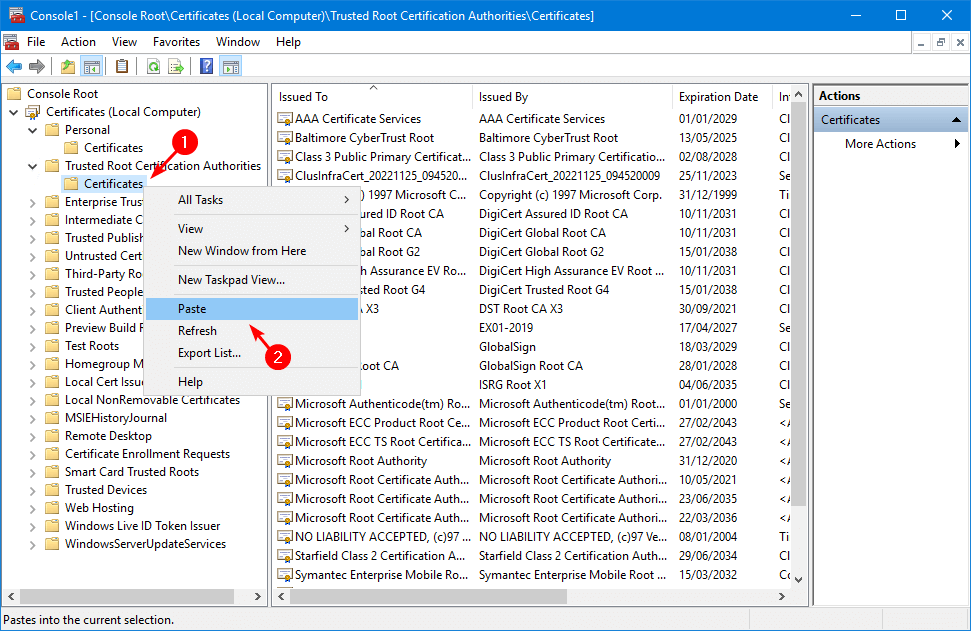
Expand the folders Trusted Root Certification Authorities > Certificates. Right-click on the folder Certificates and click Paste.
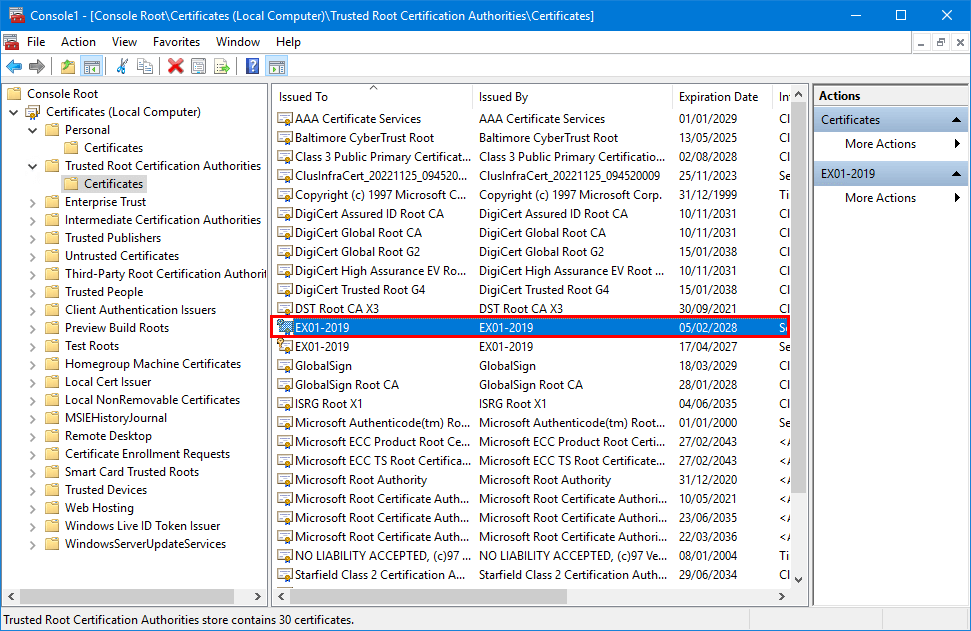
Verify that the new Microsoft Exchange certificate appears in the list.
4. Assign IIS services to certificate
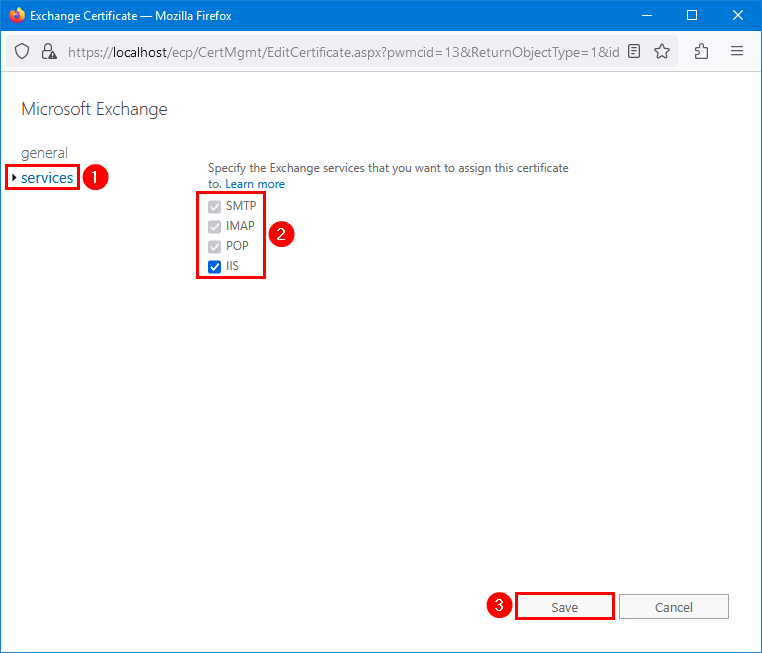
Refresh the Exchange admin center page or click the refresh button in the toolbar. You will see the new certificate in the list. Click on the new certificate and edit the certificate.
Click on services. Ensure that the services SMTP, IMAP, POP, IIS are checked. Click Save.
Note: Some Exchange services are greyed out, and that’s completely fine.
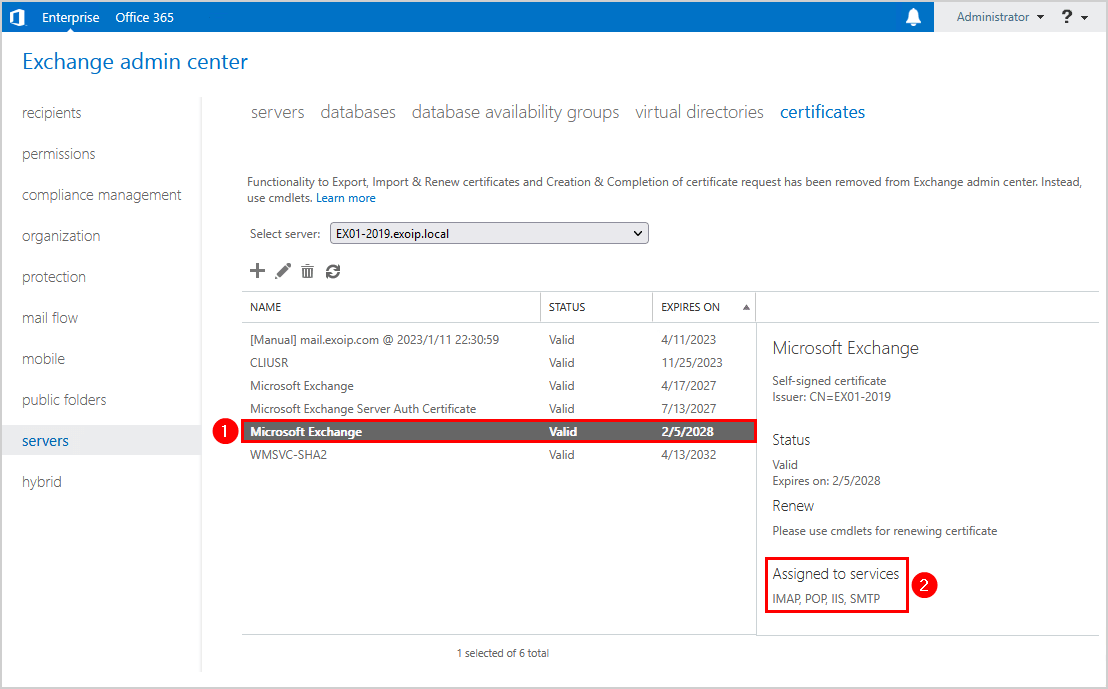
Verify that the new Microsoft Exchange certificate assigned to services shows IMAP, POP, IIS, SMTP.
5. Remove old certificate
Select the old certificate in the list and click the delete icon in the toolbar.
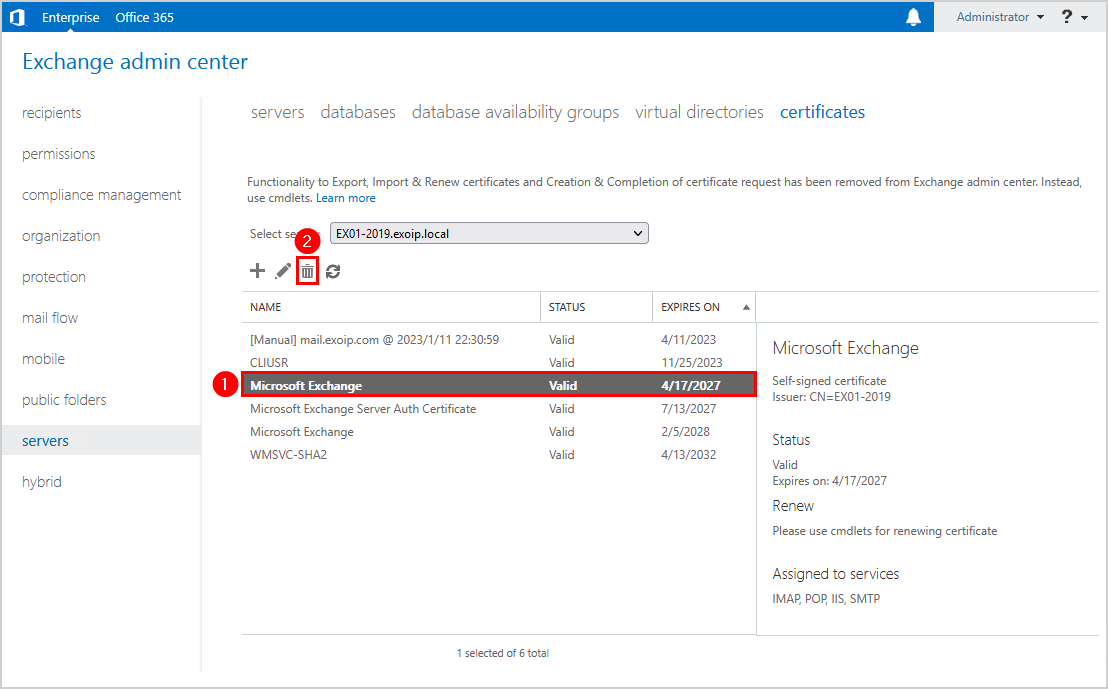
You will have only one Microsoft Exchange certificate in the certificates list.
Go back to MMC and expand the folders Personal > Certificates. Verify that you only see one Microsoft Exchange certificate.
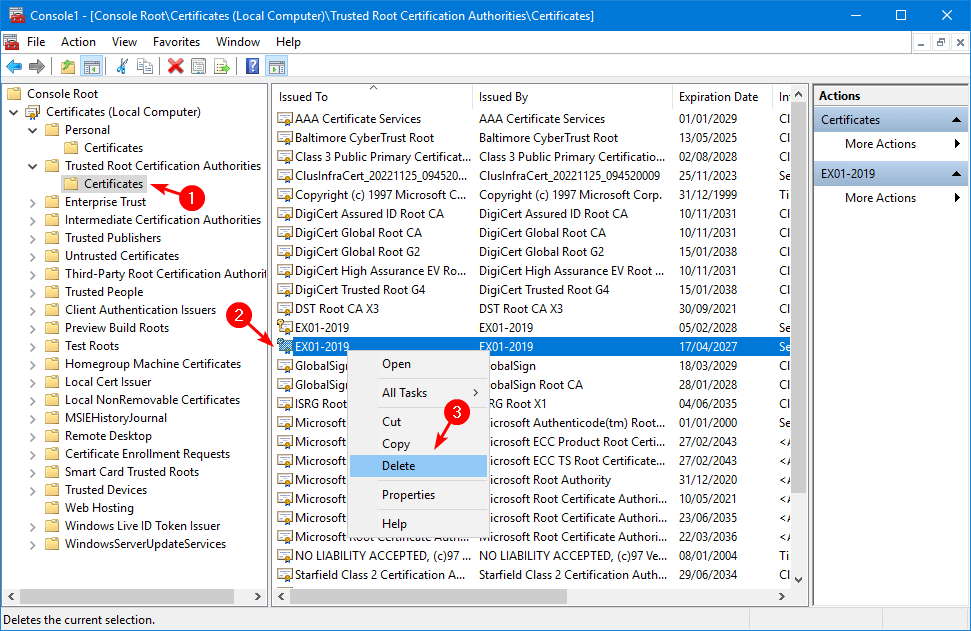
Expand the folders Trusted Root Certification Authorities > Certificates. Right-click the old Exchange Server certificate and click Delete.
6. Check IIS site bindings
Verify that the new Microsoft Exchange self-signed certificate is bound correctly in the Exchange back end. Also, verify that the Default Web Site has the third-party certificate bound.
Important: Removing, renewing, or assigning services to the certificate can remove the certificate from Exchange Back End and Default Web Site. It’s essential that you check the certificate bindings and apply the correct certificates.
Exchange Back End
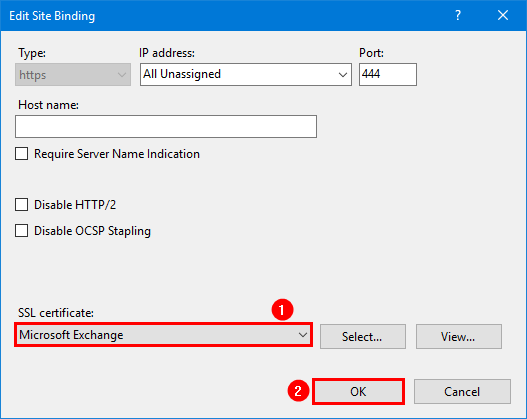
Start Internet Information Services (IIS) Manager. Click on Exchange Back End. Select Bindings. Edit the type https with port 444.

Select the Microsoft Exchange certificate. Click OK.
Default Web site
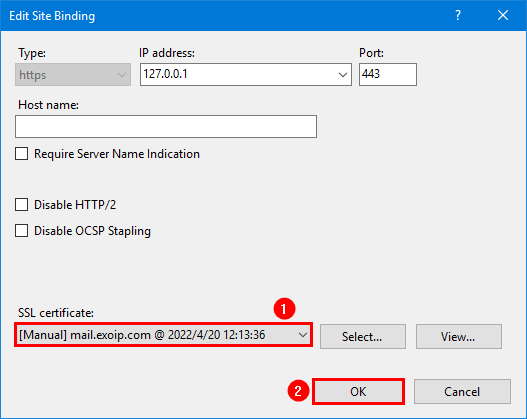
Click on Default Web Site. Select Bindings. Go through and edit all the types https with port 443.
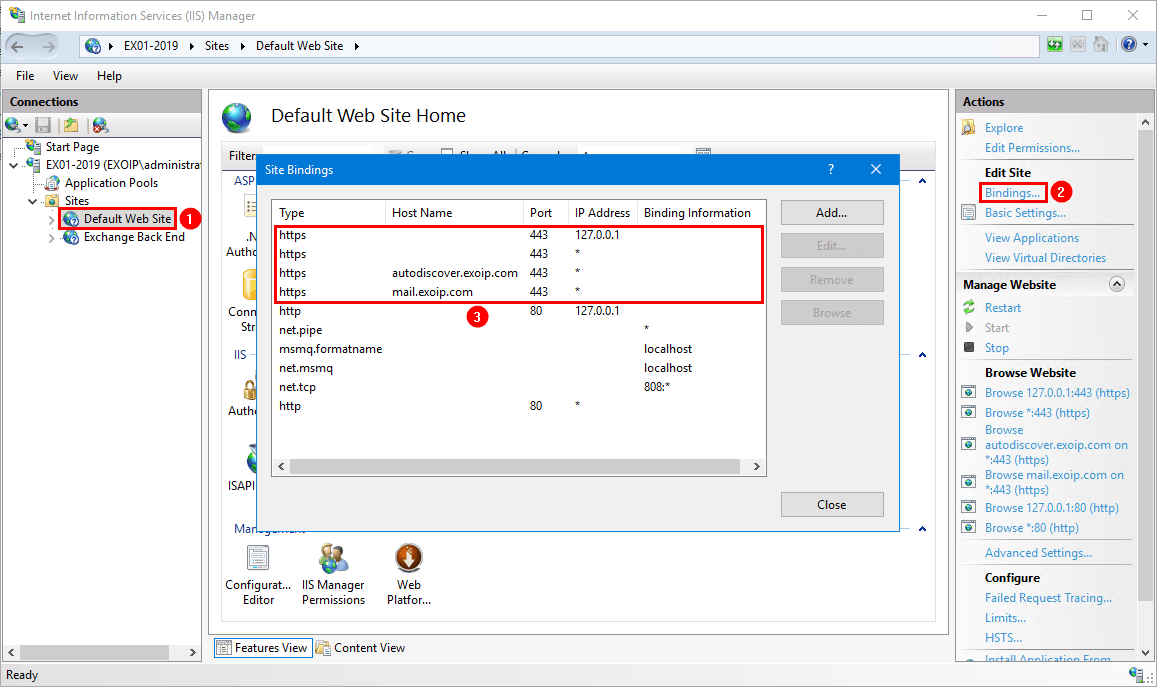
Select the third-party certificate. Click OK.
7. Restart IIS (Internet Information Services)
Run the IISReset command to restart IIS.
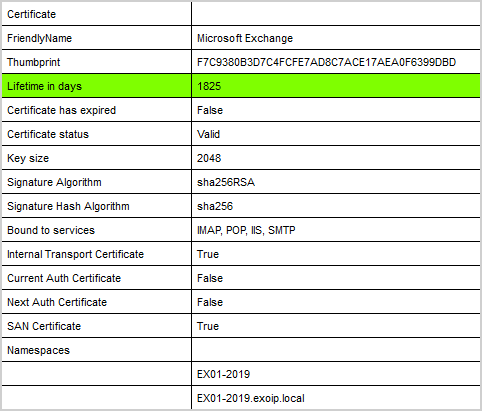
iisreset8. Verify Microsoft Exchange certificate validity
Run the Exchange Server Health Checker script to verify that the Microsoft Exchange certificate status is valid.
Read more: Renew certificate in Exchange Hybrid »
Conclusion
We showed how to renew the Microsoft Exchange certificate. First, go through the steps to renew the Microsoft Exchange certificate. After that, remove the old Microsoft Exchange certificate. Next, verify that the IIS site bindings on Exchange Back End and Default Website have the correct certificates. Finally, reset IIS. Do the steps on every Exchange Server if you have more than one running in the organization.
Did you enjoy this article? You may also like How to import certificate in Exchange Server. Don’t forget to follow us and share this article.
Hi,
Thanks for blogging, i bookmarked it. Could you please also help me how to renew wild card certificate on exchange (*.domain name). IIS and SMTP service is enabled on it. And IIS 443 binding is on this certificate.
You should follow the article How to Create certificate in Exchange Server to renew the third-party certificate. This can be a SAN or wildcard certificate. Both options are shown.
Can i update self signed cert , before expiration of current one ? as we are using force parameter to replace it
Yes, you can.
Thank All of them work
Hello Dear Ali,
thank you very much for your courses.
I am learning a lot of things from your courses.
I have a question about Hybrid Environments.
Can we perform this steps also without running HCW if we have a Hybrid Organisation ?
Thank you for your answer
Yes, you don’t need to rerun the HCW after renewing the Microsoft Exchange certificate.
Ali Tajran,
I wanted to thank you very much for this blog. Very well written and very clear. Dealing with certificates on Exchange is very different and more complicated than other Windows servers, and since we stick with an Exchange build for 5 years, I don’t get a lot of practice on this!
One thing that might be helpful to people like me, may be to point out the following about the thumbprint, because initially, I thought I did something wrong. Because the PowerShell create certificate command has the expiring thumbprint pasted in, my expectation was that after the command ran, I would see the thumbprint replicated in the new certificate. However, after the new cert is created, the summary shows it to have a different thumbprint than what was pasted into the command. So I’m left with the impression that pasting the old thumbprint simply creates an association from the old cert to the new. Am I correct in my understanding?
That’s correct.
are those steps you mention in this article can renew SSL certificate that issued by third party
No, this article shows how to renew the self-signed Microsoft Exchange certificate.
If you like to renew a third-party certificate in Exchange Server, follow the article How to create certificate in Exchange Server.
Thanks a lot really appreciate your support
excellent article. have just used it to renew the exchange certificate. simple to follow and straight forward.
Great article; one question, as our default Exchange certificate is expiring in a few days and is assigned to the SMTP service only. We also have a 3rd party cert (mail.company.com) that is currently assigned to all services (IIS, SMTP, IMPA, POP), and is valid for the rest of the year. Do we even need to bother renewing the default self-signed cert for SMTP services? Won’t it continue to use the 3rd cert assigned to the service?
It will work with a third-party certificate, and it will not cause any problems. But you will get errors in the event logs, and you want to avoid that. So you have to renew the Microsoft Exchange certificate.
Gotcha. Thank you very much!
Hello,@ALI,
PS:Do the steps on every Exchange Server if you have more than one running in the organization.
After the certificate is renewed, isn’t the certificate automatically updated to exchange02? Still need to create updates manually?
No, it will not automatically update the “Microsoft Exchange” certificate to the other Exchange Servers, and you have to do the steps on the other Exchange Servers too.
Every Exchange Server will have a unique self-signed “Microsoft Exchange” certificate.
Hi,
Thanks for blogging, It’s really useful and accurate. I would like to add my 2 cents if appreciated to keep up the quality :).
Anyway I could be wrong but here is my feedback to your excellent blogs! thanks again and regards,
Arian van der Pijl!
I added your information to the article, and now it should be perfect.
Thank you for the step-by-step approach, Arian.
My MS Exchange 2016 CU21 certificate expired and successfully created a new one by following this article. Thank you, sir. However, only mobile devices still get SSL errors despite their mailboxes on Exchange Online. (Hybrid environment)
A very good discription of how to renew the Exchange Certificate!
Legend!