Microsoft, Google, and other major mail providers are strengthing their mail security. They only allow…
Sync Azure AD user to on-premises AD
Azure AD Connect is an excellent tool that syncs AD on-premises objects to Azure AD. What if the user object is created in the cloud directly, and there is no AD on-premises object? Azure AD Connect will not create the user in AD on-premises. Deleting the cloud user and recreating it on-premises is a way, but what if the user uses the account with Exchange Online, Teams, SharePoint, and more services? In this article, we will look at how to sync Azure AD user to on-premises AD without deleting the Azure AD user.
Table of contents
Correct way to create AD objects on-premises
It’s essential to create the AD objects on-premises when you have a Hybrid environment. That’s because the Azure AD Connect software will sync the on-premises AD objects to Azure AD. Not doing this will cause problems for the account. Not only that, it will not give precise reports when you want to check AD objects.
See below articles on how to create AD cloud objects from on-premises:
- Create Office 365 mailbox in Exchange Hybrid
- Create Office 365 shared mailbox in Exchange Hybrid
- Create Office 365 resource mailbox in Exchange Hybrid
- Bulk create Office 365 mailboxes in Exchange Hybrid
Check AD object sync status
Suppose the AD on-premises object is not present, and the user is created in the cloud. The user already uses the account and has data in the Exchange Online mailbox. Not only there but also in Sharepoint, Teams, and more.
To check the user sync status, follow these steps:
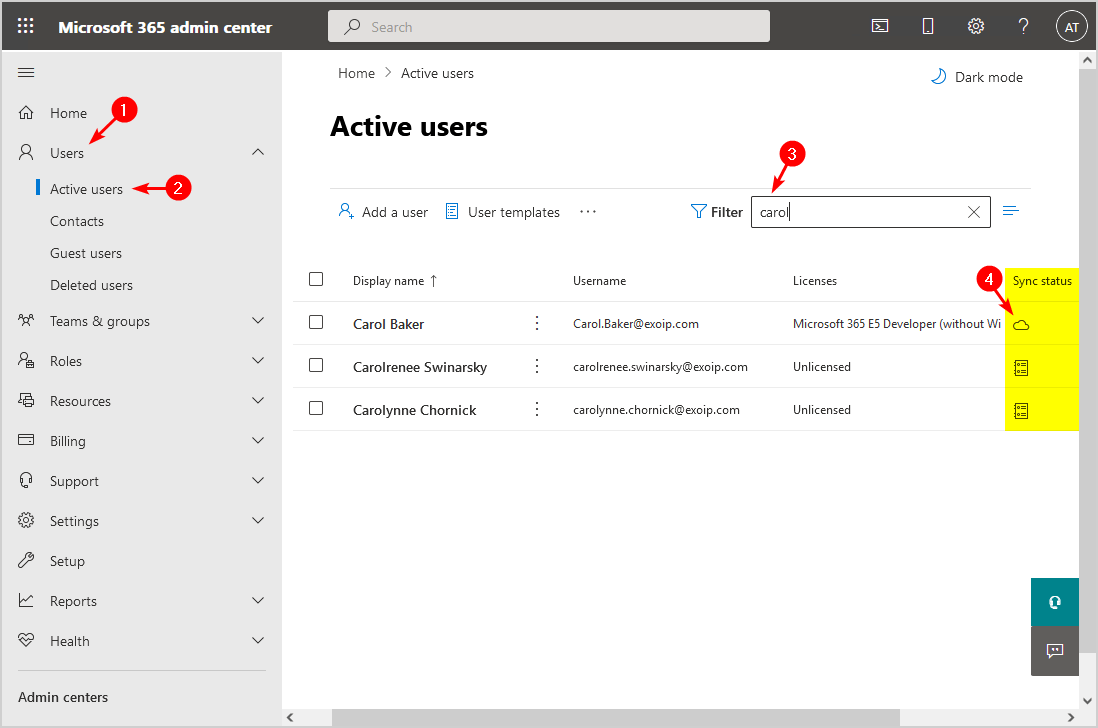
- Sign in to Microsoft 365 admin center
- Expand Users and click on Active users
- Enable the Sync status column
- Search the user
- Find sync status
The sync status will show one of the following:
- In cloud
- Synced from on-premises
The below screen shows that the user Carol Baker is in the cloud and not synced from AD on-premises. However, the other two users are synced from on-premises.
So how do we change the object in the cloud to synced from on-premises? Let’s look at how to sync the Azure AD user to on-premises AD in the next step.
How to sync Azure AD user to on-premises AD
To sync an Azure AD user to on-premises AD, follow these steps:
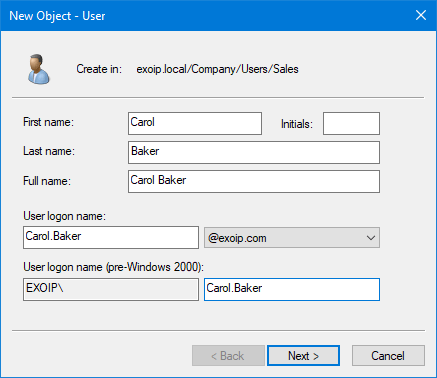
Step 1. Create on-premises AD user object
It’s essential to create an AD object identical to the cloud object:
- User logon name (UserPrincipalName)
- ProxyAddresses
Create an on-premises AD user object and fill in the details. Ensure that you fill in the user logon name identically to the cloud object.
Note: The password will reset to the one you create in AD on-premises. So it’s good to inform the user before you apply the change. Then, the user can reset the password later.
Fill in the E-mail identical to the cloud object.
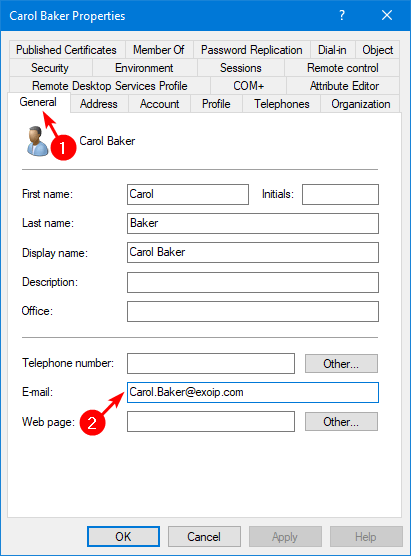
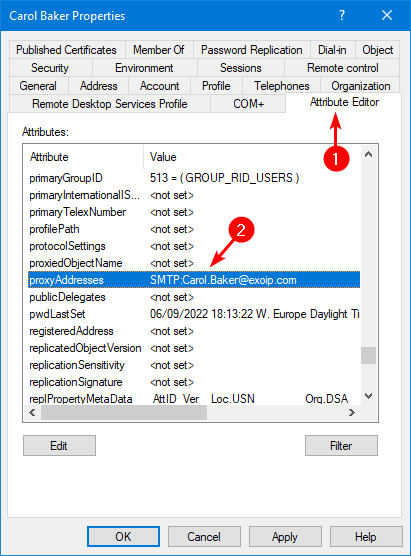
Fill in the proxyaddresses.
If the user has aliases, add them. Remember that SMTP (capital letters) is the primary email address and that smtp (small letters) are aliases.
Step 2. Force Azure AD sync
Sign in to the Azure AD Connect server and force a delta sync with PowerShell.
Start-ADSyncSyncCycle -PolicyType DeltaStep 3. Check Azure AD Connect synchronization service
Start the Azure AD Connect Synchronization Service Manager on the Azure AD Connect server. Verify that it adds the on-premises AD user object to Azure AD and that there are no errors.
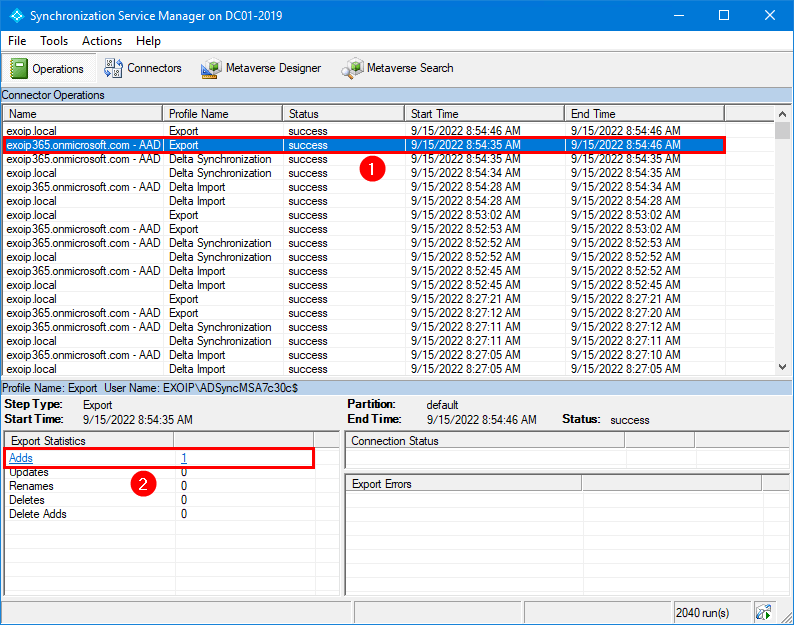
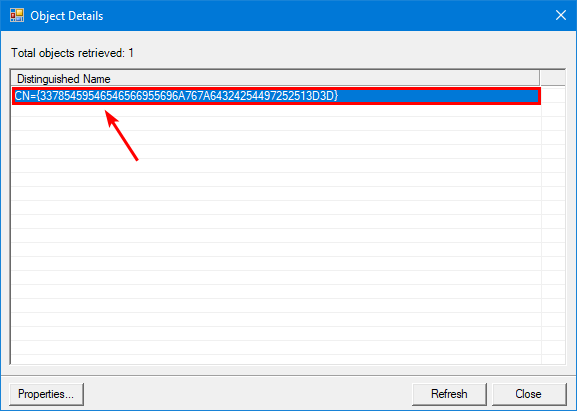
Click on the Distinguished Name.
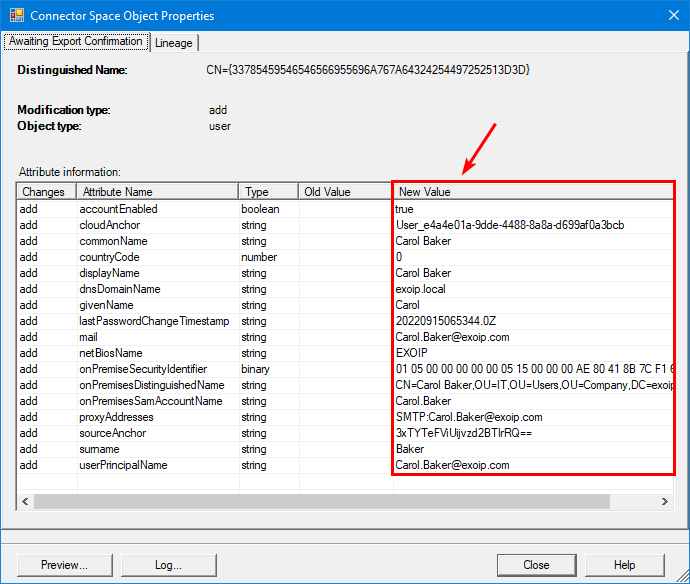
Verify that it adds the AD object and look closely at the sourceAnchor attribute value because you will verify it in the next step.
Step 4. Verify AD object sync status
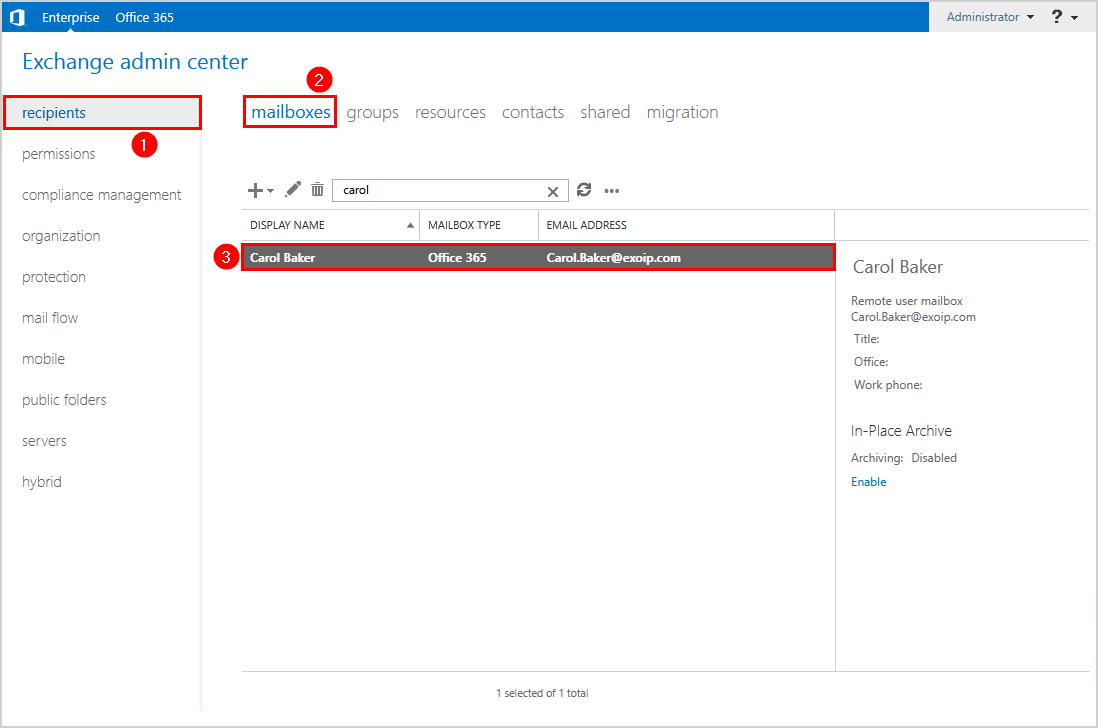
It’s good to give the Azure AD Connect synchronization service a little time (5-10 minutes) before you jump into Microsoft 365 admin center and check the sync status.
The Microsoft 365 admin center shows the sync status as synced from on-premises.

Step 5. Verify objectGUID and OnPremisesImmutableID attribute
Another way is to compare the on-premises AD attribute objectGUID with the Microsoft Entra ID attribute OnPremisesImmutableId. They need to match identically.
Note: The on-premises AD object values are GUIDs, whereas Microsoft Entra ID is a base64 encoded text string. So you have to convert the base64 to GUID or the other way around to compare the values.
Run PowerShell as administrator and run the Get-ADUser cmdlet to get the ad user objectGUID.
Get-ADUser "Carol.Baker" | fl UserPrincipalName,objectGUIDOr you can search on UserPrincipalName.
Get-ADUser -Filter { UserPrincipalName -eq "Carol.Baker@exoip.com" } | fl UserPrincipalName, objectGUIDThe objectGUID is 4dd814df-55e1-4889-a3bf-377605396b45.
UserPrincipalName : Carol.Baker@exoip.com
objectGUID        : 4dd814df-55e1-4889-a3bf-377605396b45
Run PowerShell as administrator and connect to Microsoft Graph PowerShell.
Connect-MgGraph -Scopes "User.ReadWrite.All"Run the Get-MgUser cmdlet to get the Microsoft Entra ID user OnPremisesImmutableId.
Get-MgUser -UserId "Carol.Baker@exoip.com" -Property OnPremisesImmutableId, UserPrincipalName | fl UserPrincipalName, OnPremisesImmutableIdThe OnPremisesImmutableID is 3xTYTeFViUijvzd2BTlrRQ==.
UserPrincipalName     : Carol.Baker@exoip.com
OnPremisesImmutableId : 3xTYTeFViUijvzd2BTlrRQ==
Copy the OnPremisesImmutableID and paste it into the below command to convert the base64 string to GUID.
[GUID][system.convert]::FromBase64String("3xTYTeFViUijvzd2BTlrRQ==")The output will appear.
Guid
----
4dd814df-55e1-4889-a3bf-377605396b45
Suppose you want to convert the GUID to base64 string, copy the GUID and paste it into the below command.
[Convert]::ToBase64String([guid]::New("4dd814df-55e1-4889-a3bf-377605396b45").ToByteArray())The output will appear.
3xTYTeFViUijvzd2BTlrRQ==The on-premises AD object and Microsoft Entra ID object are the same.
Step 6. Make cloud mailbox visible in Exchange on-premises
Ensure you make the cloud mailbox visible in Exchange on-premises by following the article Office 365 mailbox not showing in Exchange Hybrid on-premises.
Read more: Find Azure AD Connect accounts »
Conclusion
You learned how to sync missing on-premises AD objects from Microsoft Entra ID. Create the on-premises AD object and sync it with Azure AD Connect. Ensure there are no errors and verify the attributes GUID and OnPremisesImmutableId match. By doing this, there is no need to delete and recreate the AD object on-premises and sync it to Microsoft Entra ID. That will take time, and you must export and import all the settings.
Did you enjoy this article? You may also like Upgrade Azure AD Connect. Don’t forget to follow us and share this article.
What Others Are Reading


Is there a way to create a Distribution List (not security group) in Exchange Online and do a writeback to AD on-premises? I have configured the Cloud Sync in Microsoft Entra and enabled the writeback, but for some reasons i cant see it back in AD on-premises.
Great article Ali.
In context of Entra ID’s Cross-tenant synchronization and Exchange hybrid, I believe the only feasable solution is to create e.g. Distribution Lists in Exchange Online if it will have members from the synchronized tenant.
Thank you a lot. This article helped us very much.
Do you have an instruction what should we do to revert this sync?
We have transfered our Azure user to on-premises AD and now wish to switch back. Is it possible?
I am using AD Cloud sync and this worked perfectly, but I do have a question. My research shows that the SourceAnchor (ImmutableId) by default is now the Ms-Ds-ConsistencyGUID attribute and falls back objectGUID. I have a new AD forest and while this tutorial worked, Cloud Sync is using objectGUID vs the default of Ms-Ds-ConsistencyGUID. Doesn anyone have any idea why this is so?
Hi,
Great article and worked perfectly every time.
Dear Ali,
Quick update: it worked like a charm, again thank you so much
Jazak Allah Khairan
Dear Ali,
I’ve been digging the internet for that solution; I didn’t try the solution yet, however regardless it will work or not, I thank you from the bottom of my heart for such effort and the simplesty of the explanation.
Thank you
I’m setting up a new on-premise AD. I’ve got an existing Azure AD which is currently in use. When I create a new user with the instructions above, I get stuck on step 3. Instead of “success” I get “completed-export-errors”. The error is “AttributeValueMustBeUnique”. What am I doing wrong?
hi Ray, if the user you are syncing has following roles “User Administrator”, “Exchange Administrator”, “Global Administrator”. while syncing from AD to Azure you will get this error of “AttributreValueMustBeUnique”. 1st remove all roles. then sync. after successfully syncing assign back roles in Exchange /Office 365 Admin Center.
Thank you! This resolved my issue where the AD account was being created separately in Azure AD with the identifier upn23452@companyname.onmicrosoft.com. It wouldn’t sync or merge with the existing account. After reading your comment, I discovered I had an Administrator role assigned. Removing that role, deleting the duplicated AAD role, and re-syncing Azure AD Connect led to a successful merge.
Good article! Thanks!
What if I have a shared mailbox in the cloud and an on-prem user with the same UPN / username as the shared mailbox? What would happen when I enable AD Sync?
Will this help in converting the Mailbox Type from User to Office 365? I think the troubled account was setup incorrectly, maybe the order of creation (in cloud first). Thank you for your time.
Scott
Hi Ali
Will this work even if I don’t have exchange on premise?
Yes. You just don’t have to carry out the last step.
Do you need any license to force sync?
No, you don’t.
Brilliant! Thank you!
You turned a task which I was worried about into something straightforward. Thank you.