You are getting a call from the deployment team that is rolling out all the…
Turn off Windows Defender in Windows 10 permanently
How to turn off Windows Defender in Windows 10 permanently? Sometimes you want to disable Windows Defender for testing purposes. If you have an Antivirus application running, Windows Defender will be automatically disabled. That’s because your Antivirus software will take over the security from now on. This article will teach you how to turn off Windows Defender in Windows 10 temporarily and permanently.
Table of contents
Windows Defender unable to stop service
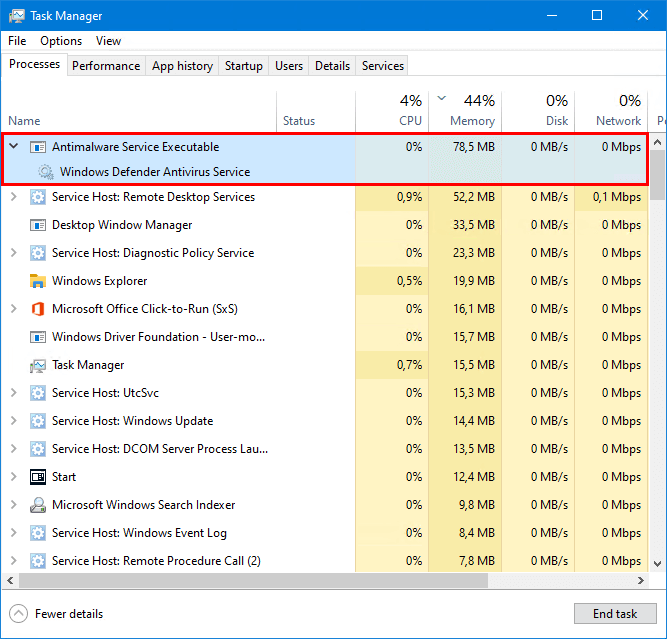
Start Task Manager on Windows 10. Find the Windows Defender service that is running. Search for the task name Antimalware Service Executable and the service Windows Defender Antivirus Service.
Right-click the Windows Defender Antivirus Service and click Stop.
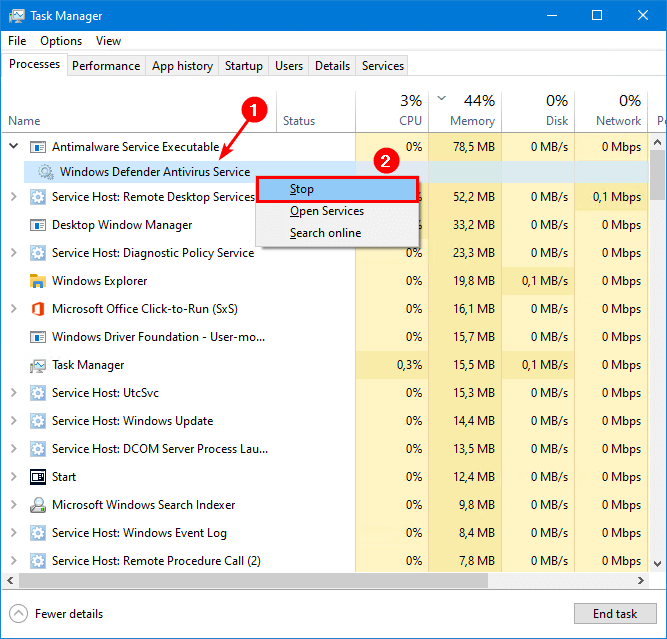
An error will show up that the operation could not be completed. Access is denied. It’s unable to stop the service.

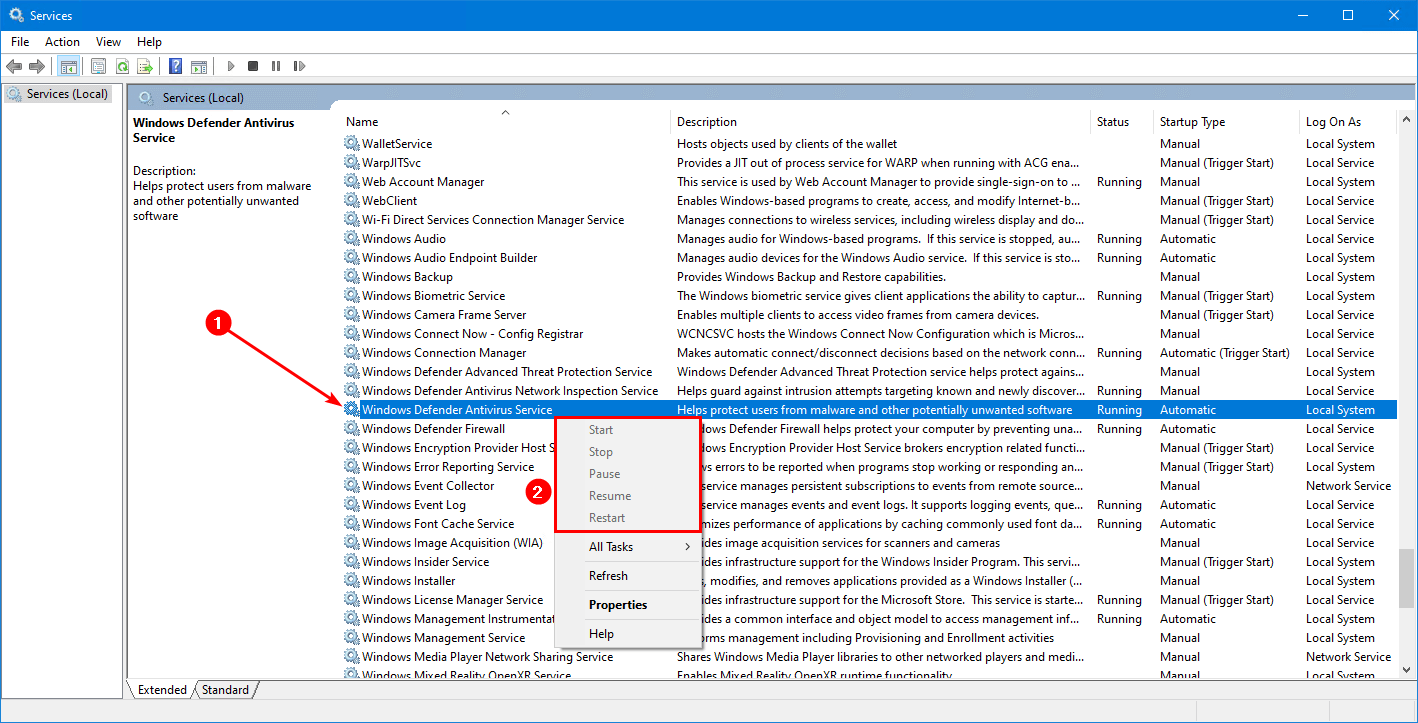
Start the application Services and right-click on Windows Defender Antivirus Service. You can see that the following options are greyed out:
- Start
- Stop
- Pause
- Resume
- Restart
Check status Windows Defender in Windows Security
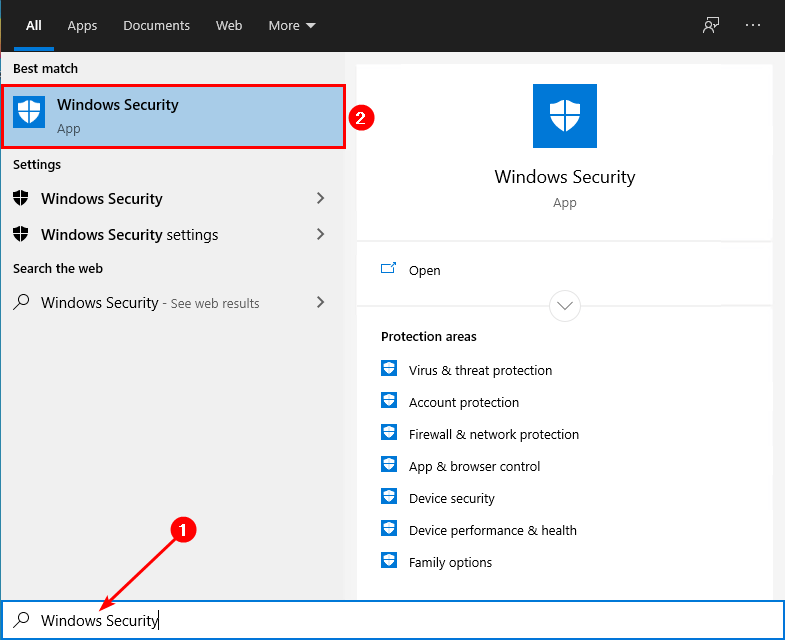
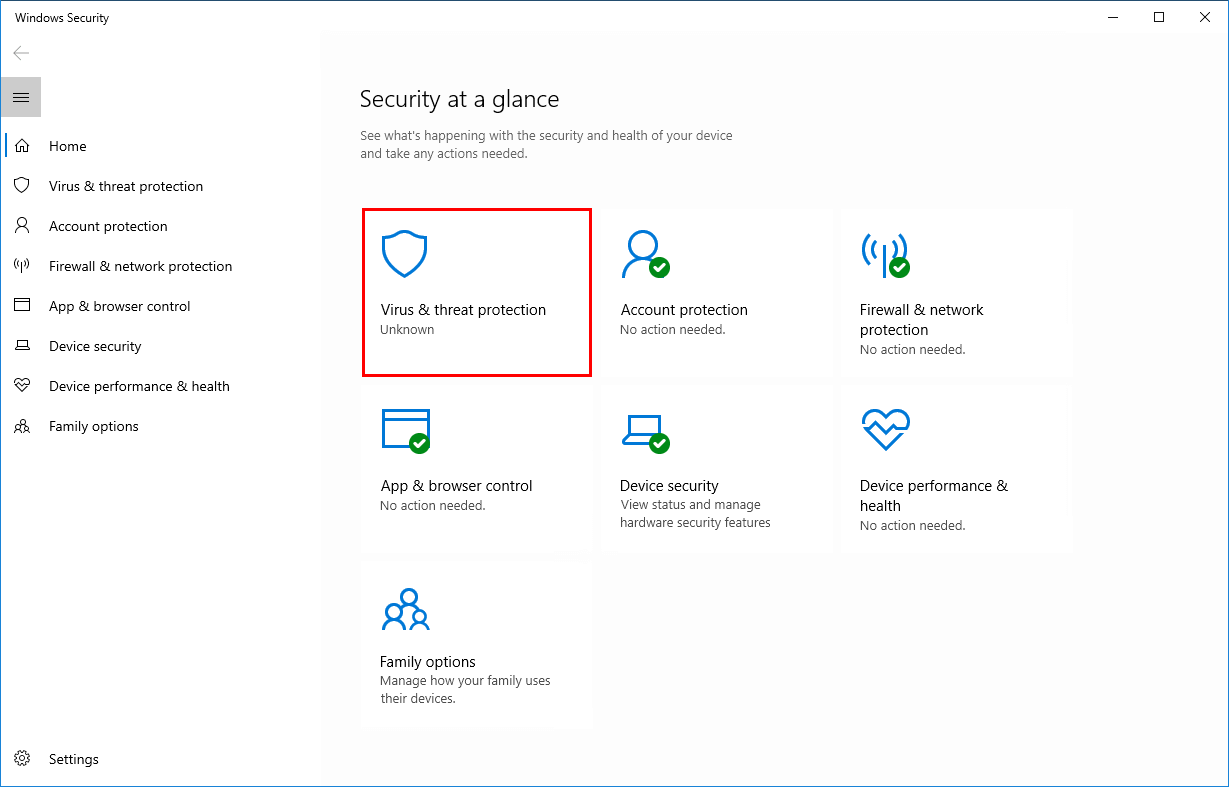
Open the Windows Start menu. Type Windows Security.
Click on Virus & threat protection.
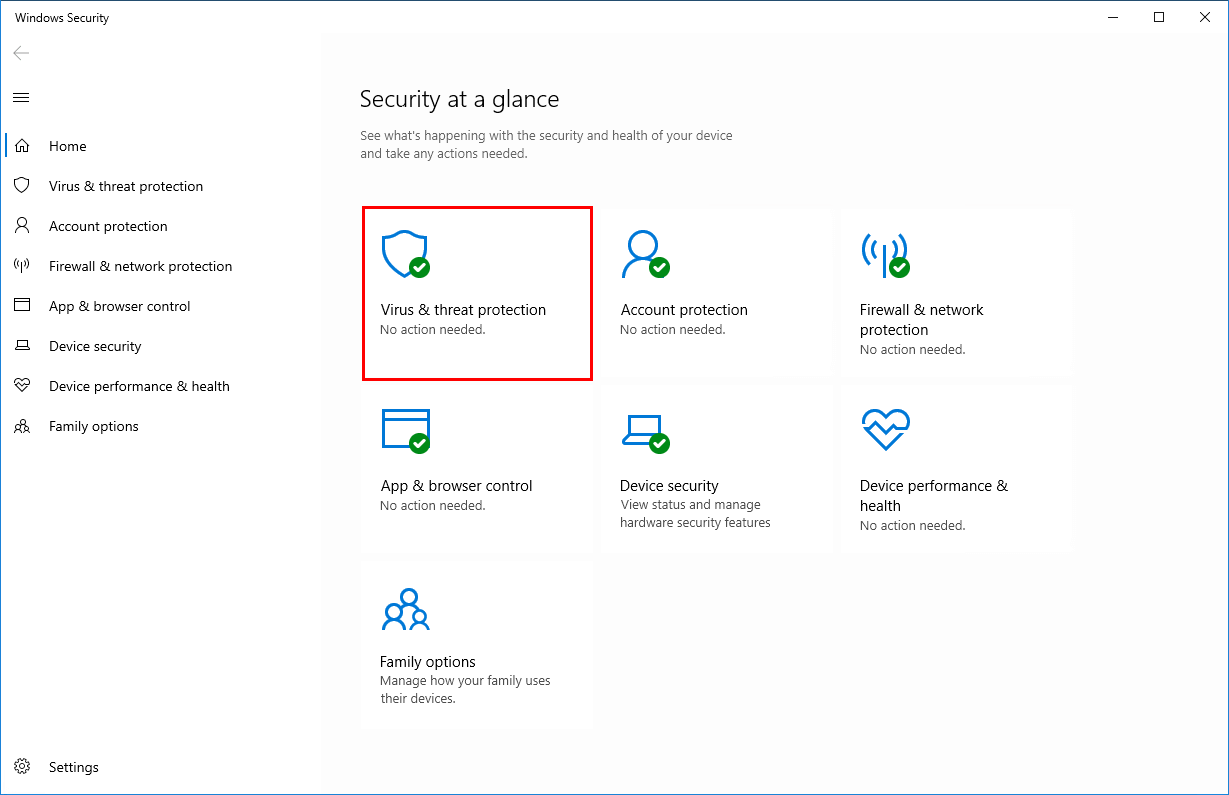
Windows Defender is enabled.

If you installed another security product, you would see the following screen.
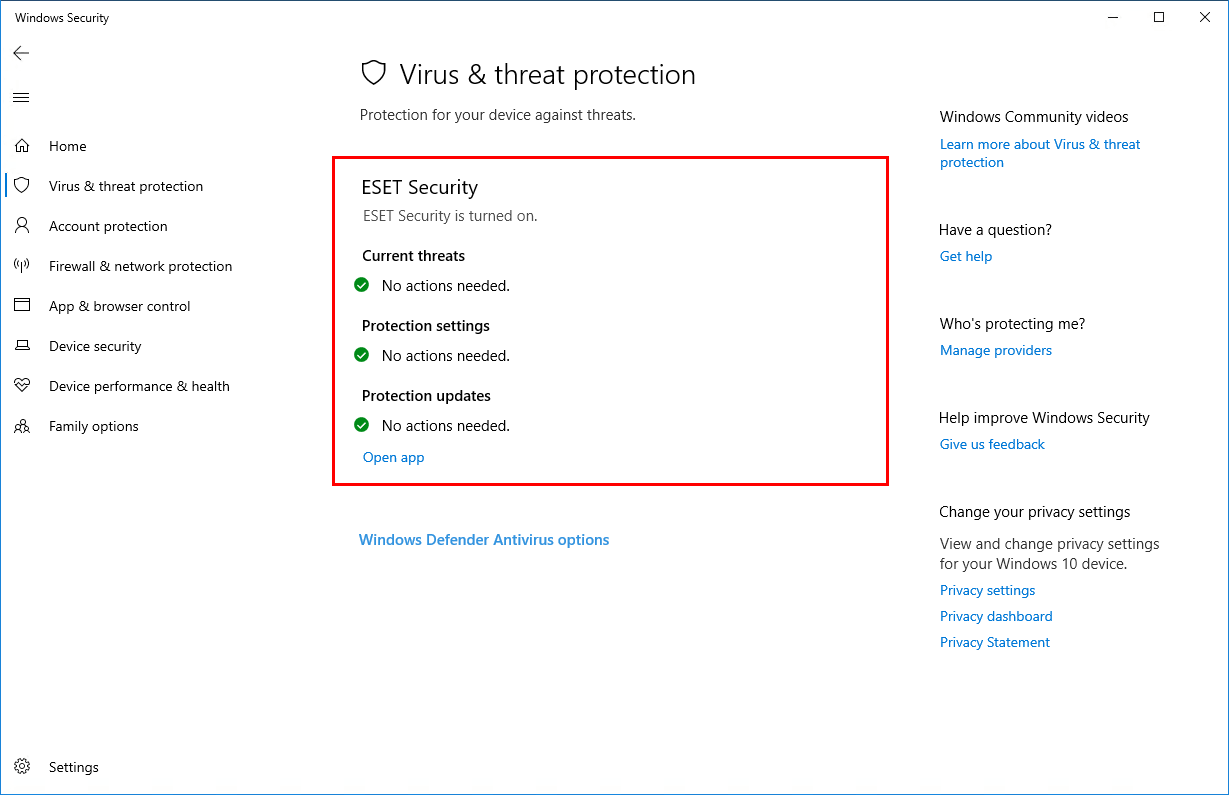
Windows Defender will automatically disable and not run if periodic scanning is turned off (which is the default when you install a third-party security product). However, when turning on periodic scanning, Windows Defender will run simultaneously with the third-party security product.
Disable Windows Defender in Windows 10 temporarily
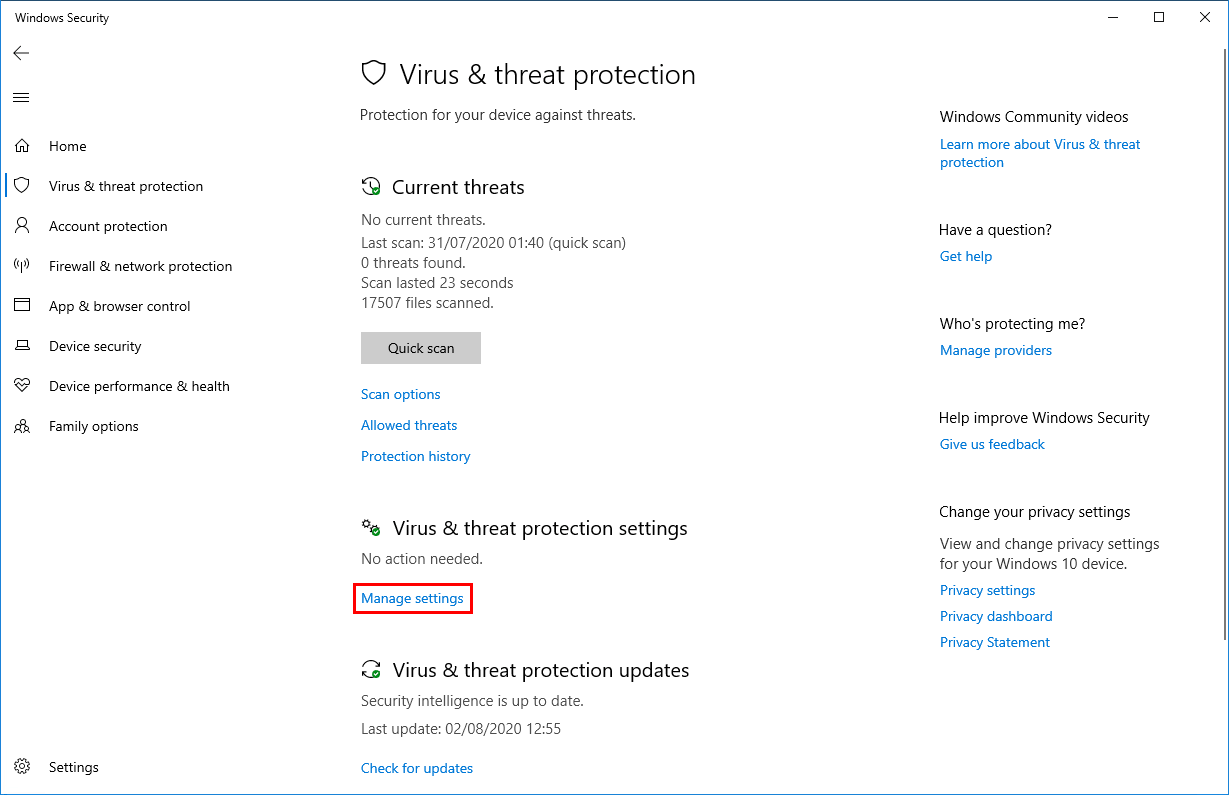
In Windows Security, click on Virus & threat protection.
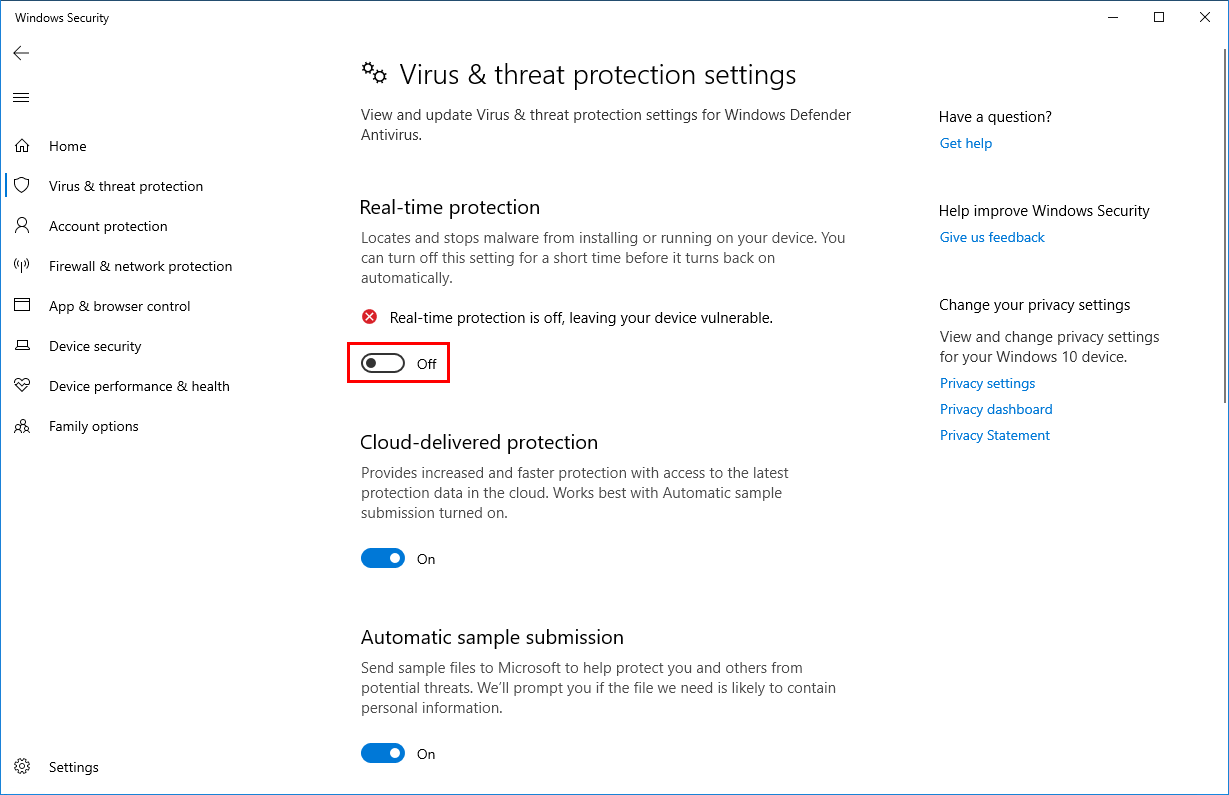
Click on Manage Settings.
Click the toggle button under Real-time protection to turn off Windows Defender Antivirus.
Doing that, you can see that:
- The service is still running in the background
- A reboot will automatically enable Windows Defender
How can you disable Windows Defender service completely and keep it disabled after a reboot? Find out in the next step.
How to turn off Windows Defender in Windows 10 permanently
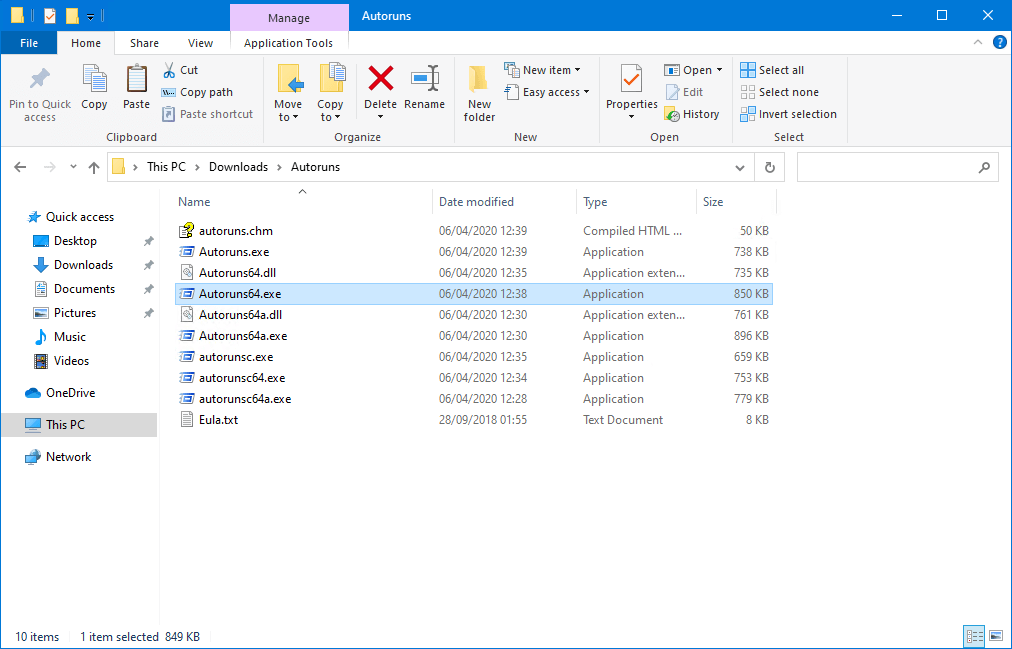
Step 1. Download Autoruns for Windows
Download Autoruns for Windows. Extract the zip file. You don’t need to do anything yet. You need Autoruns at a later stage.
Step 2. Turn off Real-time protection
As shown in the previous step, make sure that Real-time protection is Off.
Important: Turn off Real-time protection.
Step 3. Boot into safe mode
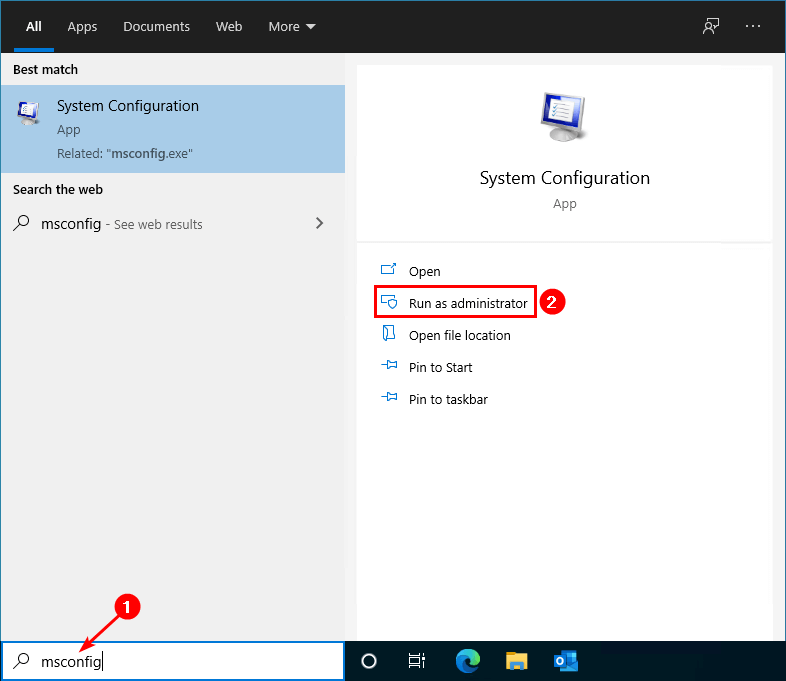
Click on Windows Start and search for msconfig. Run System Configuration as administrator.
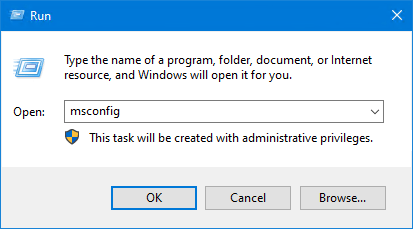
You can also start the program Run. Type msconfig and click on OK.
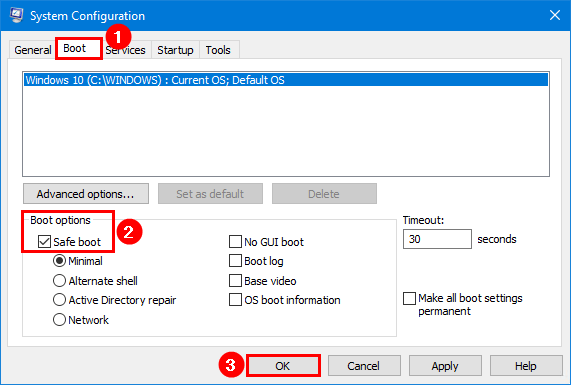
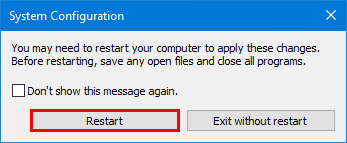
Select the tab Boot. In the section Boot options, enable Safe boot. Click on OK.
Click on Restart.
Step 4. Start Autoruns for Windows
In the previous step, you already did download and extract Autoruns for Windows. Browse to the Autoruns folder and start the executable Autoruns64.exe. If you are running Windows 10 32-bit, start Autoruns.exe.

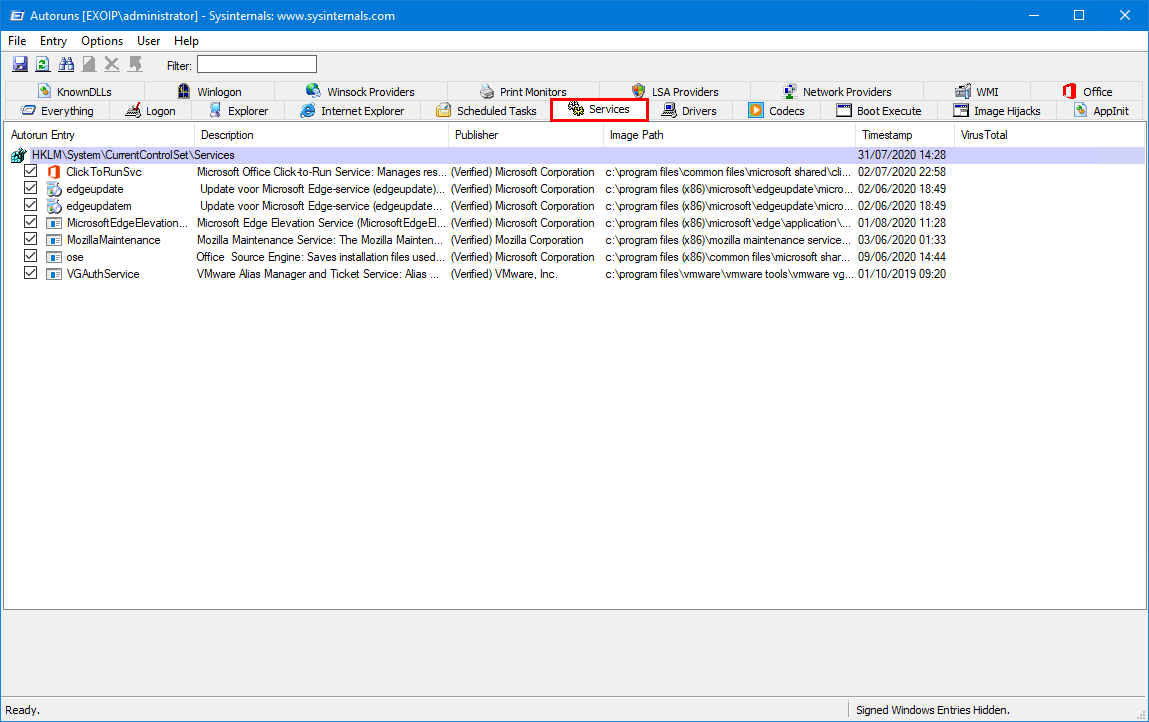
Step 5. Enable Windows Services in Autoruns
Go to the tab Services. It will not show many services. That’s because Windows services are not showing by default.
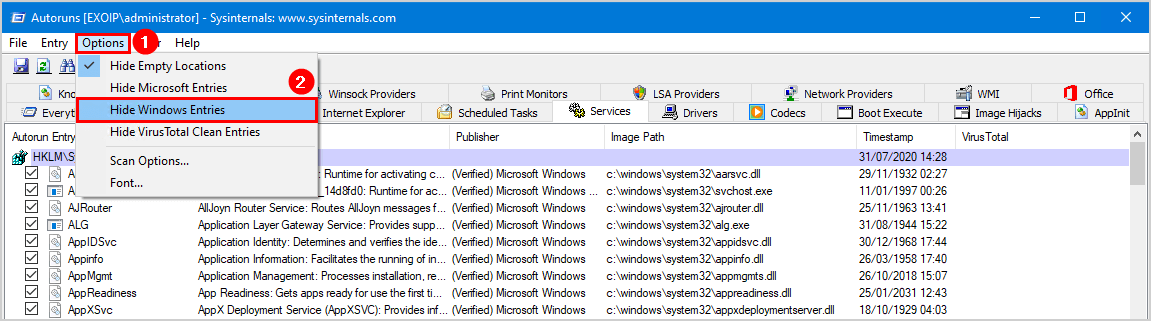
Click in the menu bar on Options. Uncheck Hide Windows Entries. It will show the Windows services in the list view.
Step 6. Uncheck Windows Defender Antivirus Service
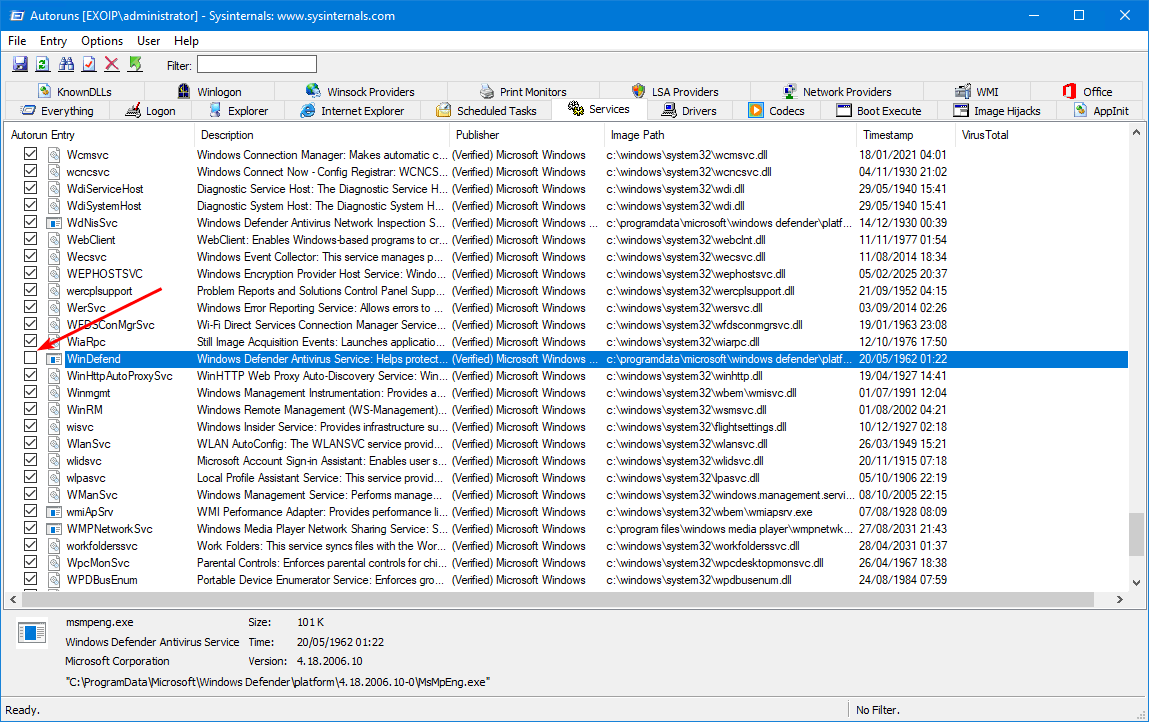
Search for WinDefend and uncheck the checkbox. Unchecking will prevent the Windows Defender automatic startup after every reboot.
Step 7. Boot into normal startup
Start the application msconfig.
Select the Normal startup. Click on OK.
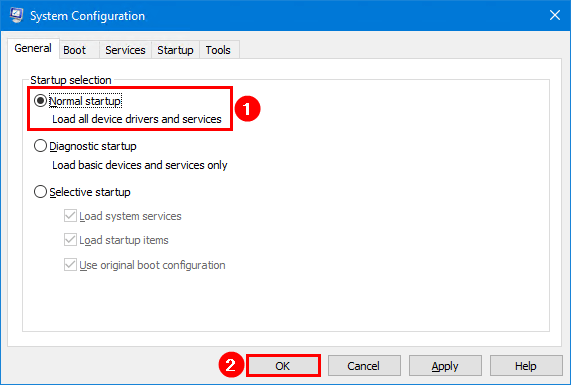
Click on Restart.
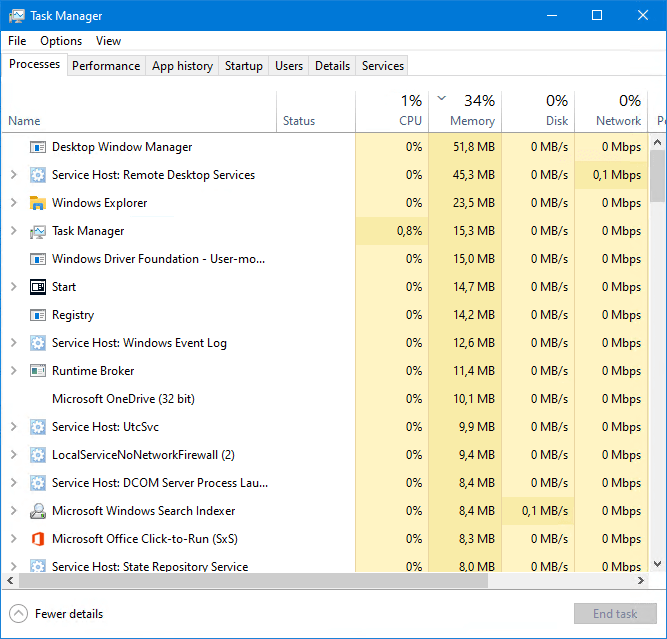
Verify that Windows Defender is kept turned off after Windows 10 restart
After a restart, start Task Manager. There is no more Windows Defender service running.
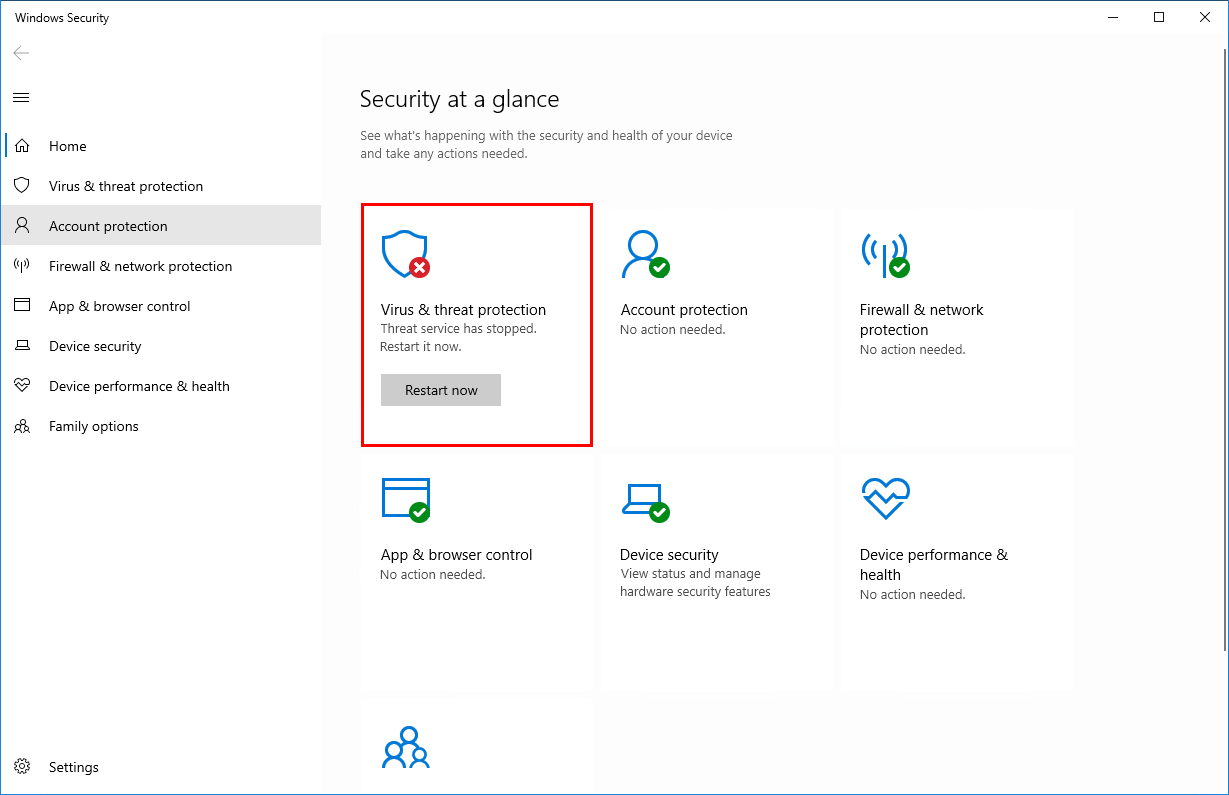
Start Windows Security and have a look at Virus & threat protection. You will see that there is a spinning icon, or the status is showing as unknown. That’s because it’s fetching the information.
Important: Do not click on the Virus & threat protection tile while it’s fetching information or the status is unknown. If you do that, it will enable Windows Defender. Keep waiting till you see it’s disabled.
Give it a couple of minutes. After that, you will see that Virus & threat protection is disabled.
Note: The first attempt might not work, and you have to do the steps a second time before it will turn off Windows Defender permanently.
Microsoft releases big Windows 10 OS updates a couple of times a year. After it’s installed and the Windows 10 OS is up to date with the new version, it sometimes triggers the Windows Defender service settings and starts automatically again. This means you must go through the steps to ensure that Windows Defender doesn’t start.
Revert the changes
Suppose you like to revert the changes. Then, click on the Restart Now button in Windows Security. Another way is to boot into safe mode, start Autoruns, and check the WinDefend service.
Keep on reading: Disable Windows Firewall with PowerShell »
Conclusion
In this article, you learned how to turn off Windows Defender in Windows 10 permanently. Make sure to follow the exact steps, as shown in the article. After doing that, Windows Defender will be kept turned off.
Did you enjoy this article? You may also like Disable Symantec Endpoint Protection (SEP). Don’t forget to follow us and share this article.
What Others Are Reading

If i disable Defender, will be i able to delete folders in C:\ProgramData\Microsoft\Windows Defender\Definition Updates
Yes (just tested).
Yes i was able to delete all folders and files i this folder. When size will be once again over 5 GB, i will repeat this task.
I wonder if it is possible add a fake 3rd party antivirus so that Windows Defender would go to sleep voluntarily? Is it a strict list? By fake meaning the 3rd party software stays idle too
Thank you so much for this article!
Not only does it provide the answer I was looking for, it also gives a good overview of how we got here and what is going on now. This is the only article I could find that’s worth the read!
All threads on MS forums go like “did you sfc? did you repair? did you reinstall?”
or simply deny the god-complex Windows (OS) managers have and say “don’t you dare even think about disabling our glorious safety measures!” (even if they leave the system utterly unusable ???? ).
And everything else is either outdated or leads to a “tool” that will “automate the process” ????
Best wishes & thanks for the time — much appreciated!
Thank you Ali!
Confirmed working. Wunderfull 🙂
Though using “Selective start” in msconfig. Havent tried normal start.
Running
Windows 10 Home
Version 22H2
Installed 2022-11-09
OS-version 19045.2251
Gränssnitt Windows Feature Experience Pack 120.2212.4180.0
Being too dumb to figure out how to use “AdvancedRun”, as mentioned in the comments–though I know I was close :)–this is what I did:
Lacking any option to turn of real time protection in safe mode, as I previously posted, In regular mode (non-safe mode) I placed “Autoruns64.exe” on the desktop and then turned off all real time protection settings. Then I rebooted to safe mode and as soon as the desktop came up, I ran “Autoruns64.exe” and followed the rest of your instructions. So far so good, running 21H2 build 19044.1766. Rebooted twice now and both times it stays off. A nice beautiful white “X” inside a red circle over “Virus & threat protection”. Muah! Thank you.
This used to work on a older Win 10 install but now when I reboot in safe mode and go to Windows Security, all I see is “security at a glance” and nothing below it. No options to select. Unsure how to deal with this.
You have to turn off Real-time protection first. After that, reboot in safe mode and proceed further.
figured how to permanently delete entire defender folder and keep it deleted
1. go to safeboot
2. disable service same as in guide above
3. reboot system, keep safeboot enabled for now
4. as soon as it starts (gotta go fast before defender service can re-enable itself) go to folder C:\ProgramData\Microsoft\
5. rename folders “Windows Defender” and “Windows Defender Advanced Threat Protection”, add “old” at the end or something
6. create new empty folders “Windows Defender” and “Windows Defender Advanced Threat Protection”
7. right click new empty “Windows Defender” folder, go to Properties, Permissions, Advanced, Take Ownership of folder, (set to your windows user name), close all opened folder property windows (has to be done for some reason), then go back to Advanced Permissions
8. Disable Inheritance button to remove all existing permissions
9. Add new permission for “SYSTEM”, set to Deny, check all checkmarks (including hidden advanced ones)
10. Add second permission for “Everyone” just in case, deny everything
11. repeat points 6 to 9 for second folder “Windows Defender Advanced Threat Protection”
12. done. defender folders now are empty and locked, can’t be accessed or restored even by system
13. reboot system back to normal mode, defender is gone for good. everything seem to be working fine, no errors, no problems etc
i’m thinking can one delete the defender an other think from the ISO , before even be installed ?
So at first it looked like the solution you came up with worked, but in the end it didn’t for me.
I did everything listed and saw that Windows Defender was no longer running in the Task Manager. But when I then went to settings to look at Windows Security, instead of saying unknown, it said everything was running normally. When I then went back to the Task Manager Windows Defender was running again. So I disabled it again and didn’t go back to the settings window and it stayed off across multiple restarts. But as soon as I went back to settings it started up again.
I’m using version 21H1, build 19043.
Same here. It seems to “repair” itself after a few minutes. It´s active and locked again.
worked for me too
You rock Ali Tajran. Worked for me. My laptop with external display is always experiencing flickering or no signal issue. Updating latest graphics drivers do not solve the problem, and after searching high and low I suspect the culprit is msmpeng.exe.
So I disabled windows update and BITs services every time I logon windows. It had been working fine for a long while, today the issue came back on, and worst it had no signal on the external monitor. Now using your solution to turn off windows defender seems bring my monitor back on, best no flickering. I hope permanently.
I think my laptop is the only one in the world that is experiencing this issue.
Anyway, thank you so much.
Finally a solution that really works. I was looking for this for a long time. I just hope it stays disabled when Windows Update updates the anti-malware database. Thank you very much.
thanks ali tajran you are the best.
All of the help I’ve found by Googling about disabling Windows Defender permanently were Useless
Therefore I used the Autorun.exe method you’ve described above:
I started Windows 10 in safe mode and unchecked the WinDefend services in Autoruns and it worked!, Thank you very much Ali Tajran you are my Hero.
In other words, I would like to know how to disable the irritating error message that “These files might be harmful to your computer” and that “Your internet security settings suggest that one or more files may be harmful. Do you want to use it anyway?” when I move or copy files from the D drive to my Desktop ( I don’t use Network, and my operating system is Windows 10 64bit)
Thanks
Thank you! My Lenovo Yoga has 16 Gigs of Ram and windows defender was taking up a little over 20%. Just opened up almost 3.5 GB. Absolutely rediculous that it would allow it to use that much.
Thank you !!!
thank you very much, antimalware was taking up 20% of my computers memory at all times and now runs much more smoothly, thanks again
Autoruns can also be ran through AdvancedRun with TrustedInstaller privileges, skipping the whole safe boot part. The checkbox can just be unticked this way. (Maybe this’ll help with the access denied error messages.)
This is correct.
That helped me.
On safe mode I was not able to open Autoruns and nothing more at all (???), but with AdvancedRun I opened Autoruns and disabled WinDefend.
Thanks!!
Autoruns.exe run as Administrator, Services uncheck WinDef “Access denied.”
Start Windows 10 in safe mode and uncheck the WinDefend service in Autoruns. I updated the article with the steps.
as of Windows 10 version 21H1 do this :
– Reboot to safemode.
– Start the executable Autoruns64.exe.
– Make sur Hide Windows Entries is unchecked under Options menu.
– Type in “defender” without quotes in the search box.
– Uncheck all “Windows Defender” related Services and Drivers under their respective tabs.
– reboot.
More info here https://learn.microsoft.com/en-us/windows-hardware/customize/desktop/unattend/security-malware-windows-defender-disableantispyware
As a workaround, you can run the following command to put Defender to a platform version, then you can disable services and change registry
C:\Program Files\Microsoft Defender\MpCmdRun.exe -resetplatform
You can only disable the defender service if you first disable defender. If not, its impossible to change the start-up of the service as the key is protected whilst the service is running. In 20h2, it seems you also have to first disable defender (either with the registery, gpedit or by usibg a third party AV), AND disable the security services as well! Then after a restart you can disable the Defender Antivirus Service itself and the others eg Defender Network Inspection Service.
I followed all the steps but I get this error when I try to change the state in the Autoruns:
Error changing item state: Access denied.
Start Windows 10 in safe mode and uncheck the WinDefend service in Autoruns. I updated the article with the steps.
For me is all or nothing, I don’t settle for half measures. So, here is what I did to completely remove Defender, it won’t even show up in Windows Security anymore.
Of course, you do this at your own risk, for me it worked. Worst case scenario, for others, this might render the system unbootable. So, here goes:
1. Download a customized WinPE distribution (google for Sergei Strelec, for example), put it on a thumb drive and boot from it.
2. Navigate to C:\ProgramData\Microsoft\Windows Defender\ and rename the Paltform folder to something else. This is the folder where Windows Defender service executable resides.
3. Reboot into Windows and check Windows Security. Defender gone for good.
Should this render your system unbootable you can boot again from the WinPE thumb drive and undo the renaming of the Platform folder. That should get you back on track.
not working anymore can u find another solution
Start Windows 10 in safe mode and uncheck the WinDefend service in Autoruns. I updated the article with the steps.
Here’s what i did.
no matter what I’ve tried damn thing always came back. finally, I used the gpedit.exe in safe mode w\network and it worked ????.
I also used winruns for good measure… pretty much I used everything that was possible and at the end did gpedit.
the damn windows antivirus behaves like virus in itself. several programs stopped running because it removed something on its own.
Still working April 2021 on 20H2 (19042.906).
Boot into safe mode first or it will not work!
This is the way.
This sucks. It doesn’t work anymore. I just want to shut it down as it keeps running in the background when I really don’t need it. It comes with all the stupid shit they put in windows 10 that you want to turn off because you don’t need it but you can’t.
Unfortunately, it no longer works. You can start autoruns in safe mode and uncheck windefend, but defender still runs.
for anyone getting “access denied” reboot to safemode and try again
yes, help 🙁
worked for me. thx
Yep, it works in the Safe Mode. Thanks!
It worked until now 08/03/2021. Thanks.
as of 8th March 20021 it does not work anymore
Nothin can help..((
But we will wait and believe.
So sad, but even Autorans not helps.. Access denied.
And I sure I didn’t missed any guide steps..
Start Windows 10 in safe mode and uncheck the WinDefend service in Autoruns. I updated the article with the steps.
You Sire, are the best, BEST, BESTESSST, BEST !!!!!!!!!
Thanks so much for saving the day 🙂 !!!!!!!!!!!!!!!!!!
Great !!!! It’s the only way I found working !!!!! Congratulations !!
Thanks, it’s only solution that works.
I don’t know.In autorun it shows error that i can’t do it -.-
Thanks again,
Currently in dec 2020, your tip is the only one that works on the entire internet to disable WD permanently
There is one final step which worked
one of these extra steps helped
this is for ver 20h2, other ver may vary
I disabled WD in group policy
in registry under WD 2 keys need to be set to 1
disableantivirus disableantispyware to 1 using ExecTI
your steps kill WD but still some remnants keep running
Finally confirm with app like speccy to see WD disabled
kudos to your tip, without it there was no hope
thanks so much
It’s great that you didn’t give up. That’s what I do like to see! You’re welcome, and thanks for sharing what worked for you. It can help others.
VER 20H2 questionable, speccy app says win def enabled still
I followed all the steps, unchecked in autorun
All of you should verify in speccy or any other similar app
Author please verify and update any solutions
Not working for me. In Autoruns, displaying Access denied.
Fantastic, it didnt work until another reboot. Thanks for your hard work.
Finally, a working solution
Thanks a lot… Am some happy now I can disable anything I feel like ??,,, I mean any thing.. These Autoruns??????
Thanks for the tutorial, finally this worked for me,( P.S i turned off real time protection but after i while it started back, for those with “state denied access”, turn off protection again and start autorun again, everything will work.
Thanks man working like a charm.
damn man, access is still denied. Is it because of 3rd party antivirus.? I turned real time scanning off, but I am not able to do shit….
Can anyone help…….
Also I have updated the windows…. is it anyway related to october updates????
Thanks Ali ,
how can we block any Windows Defender Auto-updates ?
Your solution worked thanks
It worked great!! I shared it with my facebook community. Thank you.
No.. still access denied.
I just tested it on two Windows 10 systems by following the steps in the article. Windows Defender is disabled permanently on both the Windows 10 systems:
– Windows 10 version 1909
– Windows 10 version 2004
Thanks Ali tajran, it worked for me
It did work after I restarted my PC but then I shut my PC down and later when I opened again it was still showing on task manager.
thanks,
the policy and registry tweaks don’t work now. but this method worked
That’s right. We used to add a registry or edit the policy. It was not working anymore, and I had to find a solution. You are most welcome.
it still says access is denied…
You did get an access denied message when you missed a step. Take your time and do the steps carefully. It should work.