The user has a primary mailbox and an archive mailbox. You only want to move…
Set TCP KeepAliveTime in Exchange Server
It’s essential to configure the TCP KeepAliveTime in Exchange Server. By default, it’s not set, and you have to do that yourself by creating a DWORD (32-bit) value in the Windows Registry. In this article, you will learn how to set TCP KeepAliveTime in Exchange Server.
Table of contents
TCP KeepAliveTime
Microsoft recommends setting the TCP KeepAliveTime registry entry on the Exchange Server to a decimal value between 900000 and 1800000 (15 to 30 minutes in milliseconds). If there’s no entry in the registry for KeepAliveTime, then the default value is 2 hours.
If not set correctly, this value can affect both connectivity and performance. You must ensure that the load balancer and any other devices in the path from client to Exchange are configured correctly.
The goal is to set Exchange with the lowest value so that client sessions, when ended, are ended by Exchange and not by the device.
Check TCP KeepAliveTime setting
An excellent way to check the TCP KeepAliveTime setting is to create an Exchange Server Health Report with the Exchange Health Checker PowerShell script.
This is what the Exchange Server Health Report looks like in our example.
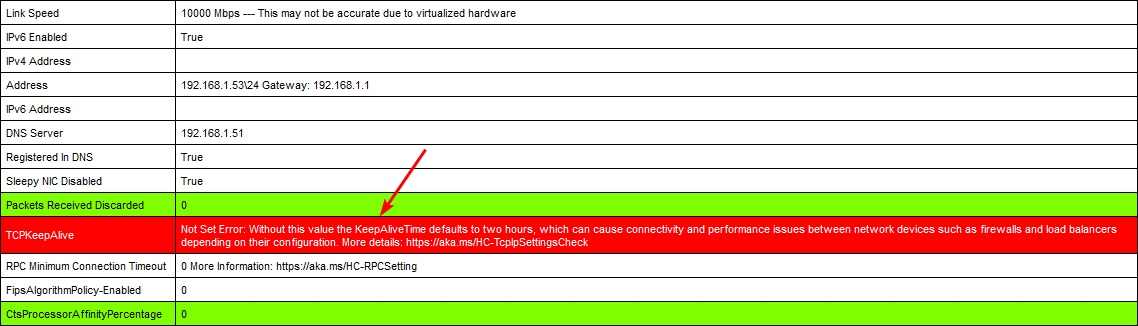
Not Set Error: Without this value the KeepAliveTime defaults to two hours, which can cause connectivity and performance issues between network devices such as firewalls and load balancers depending on their configuration. More details: https://aka.ms/HC-TcpIpSettingsCheck
How to set TCP KeepAliveTime in Exchange Server
Set TCP KeepAliveTime in Exchange Server by following one of the methods below.
Method 1: Registry Editor (GUI)
- Open the Registry Editor on the Exchange Server.
- Navigate to the following registry key:
HKEY_LOCAL_MACHINE\System\CurrentControlSet\Services\TcpIp\Parameters- Right-click the Parameters key, select New, and then select DWORD (32-bit) Value.
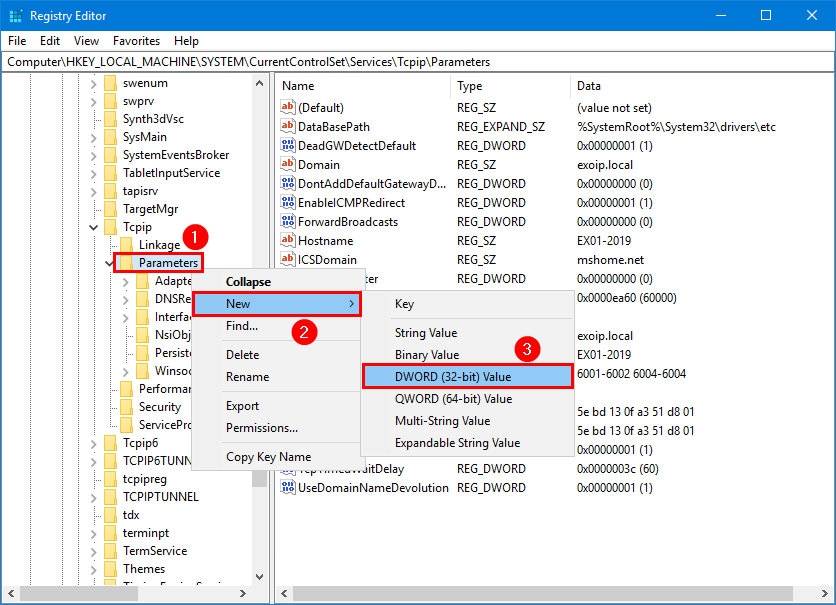
- Type KeepAliveTime as the name for the new value, and then press Enter.
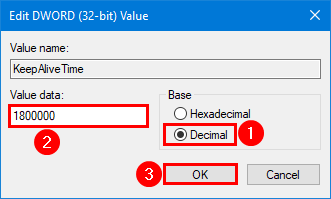
- Double-click the new KeepAliveTime value, select Decimal as the base, type 1800000 as the value data, and click OK.
Note: The value data 1800000 specifies the time (in milliseconds) that TCP will wait before sending a keepalive packet on an idle connection. In this example, the keepalive packet will be sent every 30 minutes.
- Close the Registry Editor.
- Restart the Exchange Server.
Note: Changes to the registry require a restart of the computer to take effect.
Method 2: PowerShell
- Start Windows PowerShell as administrator
- Run the below command
New-ItemProperty -Path "HKLM:\System\CurrentControlSet\Services\TcpIp\Parameters" -Name "KeepAliveTime" -PropertyType DWORD -Value 1800000 -Force- Restart the Exchange Server
Note: Changes to the registry require a restart of the computer to take effect.
Verify TCP KeepAliveTime setting
Run the Exchange Health Checker script and check the TCP KeepAlive setting in the Exchange Server Health Report.
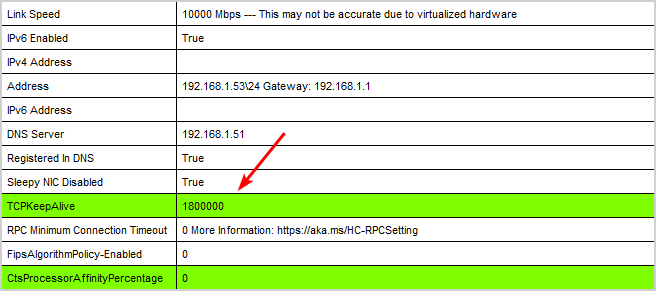
Everything looks great!
Read more: Check Exchange health mailboxes »
Conclusion
You learned how to set TCP KeepAliveTime in Exchange Server. It’s essential to set the TCP KeepAlive DWORD registry with the correct value to prevent connectivity and performance issues.
Did you enjoy this article? You may also like Configure HSTS on Exchange Server. Don’t forget to follow us and share this article.
What Others Are Reading

Short:
REG ADD HKLM\System\CurrentControlSet\Services\TcpIp\Parameters /v KeepAliveTime /t REG_DWORD /d 1800000 /f
Thanks, Tom.
It’s definitely faster to use the shell instead of the GUI (Registry Editor) to add the value.
I added the PowerShell method to the article.