We have an existing Azure AD Connect synchronization with Microsoft 365 tenant. We did create…
How to export Conditional Access policies
How to export Conditional Access policies? A Microsoft Entra tenant has multiple Conditional Access policies, and all the configurations that are set work perfectly. We like to create the same CA policies on another tenant. Creating the CA policies will take time, and we might miss a configuration. So, how to back up Conditional Access policies and import them into another tenant? In this article, you will learn how to export Conditional Access policies, including all configurations, to a JSON file with PowerShell.
Table of contents
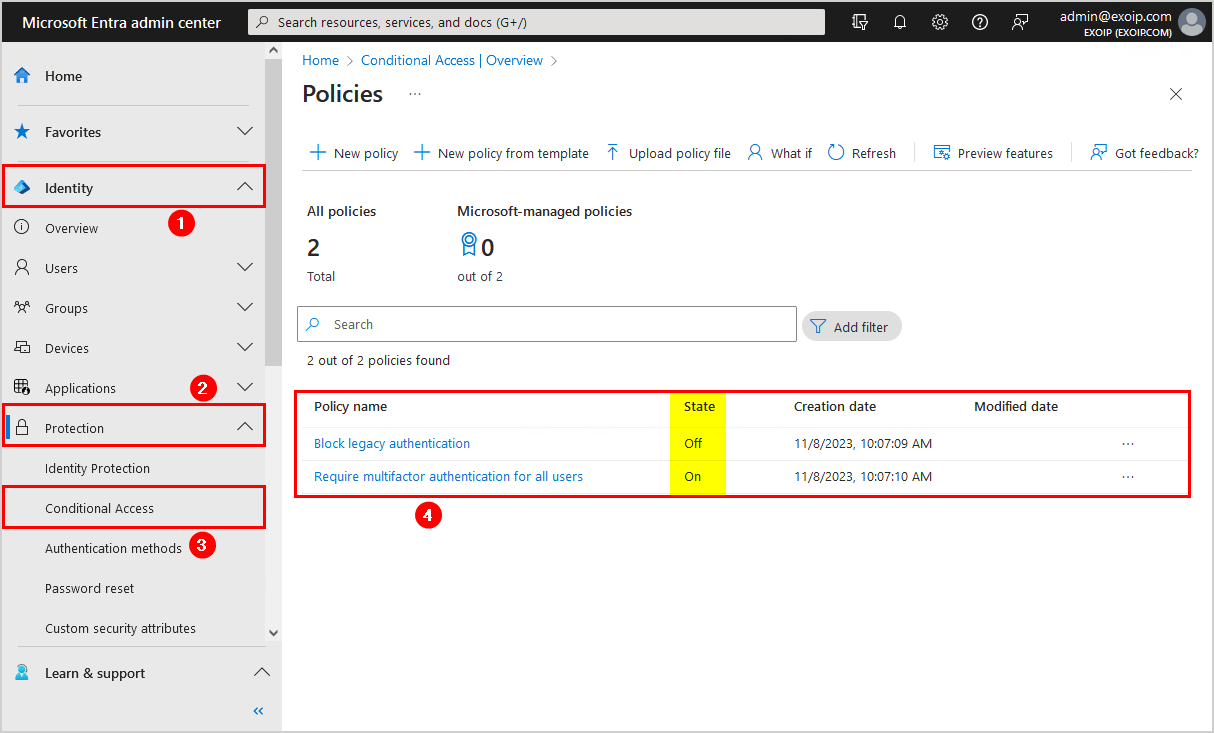
Check Conditional Access policies in Microsoft Entra admin center
Let’s check the Conditional Access policies and their status in Microsoft Entra:
- Sign in to Microsoft Entra admin center
- Expand Identity > Protection
- Click on Conditional Access
- Select View all policies
In our example, we have two CA policies. One of the policies is enabled, and the other one is disabled.
What if we want to export the Conditional Access policies? The only method to export the Conditional Access policies is with PowerShell. It’s an excellent way to back up the CA policies so you can look into the configuration if any changes are set in the future, and you want to return to your default configuration.
In the next step, we will show how to back up all Conditional Access policies to your computer.
Install Microsoft Graph PowerShell
Before we can proceed further and get all the Conditional Access policies from the Microsoft Entra tenant, we need to Install Microsoft Graph PowerShell.
Start Windows PowerShell as administrator and run the below commands.
Install-Module Microsoft.Graph -ForceInstall-Module Microsoft.Graph.Beta -AllowClobber -ForceImportant: Always install the Microsoft Graph PowerShell and Microsoft Graph Beta PowerShell modules. That’s because some cmdlets are not yet available in the final version, and they will not work. Update both modules to the latest version before you run a cmdlet or script to prevent errors and incorrect results.
Now that we have the Microsoft Graph PowerShell SDK module installed, we can go to the next step.
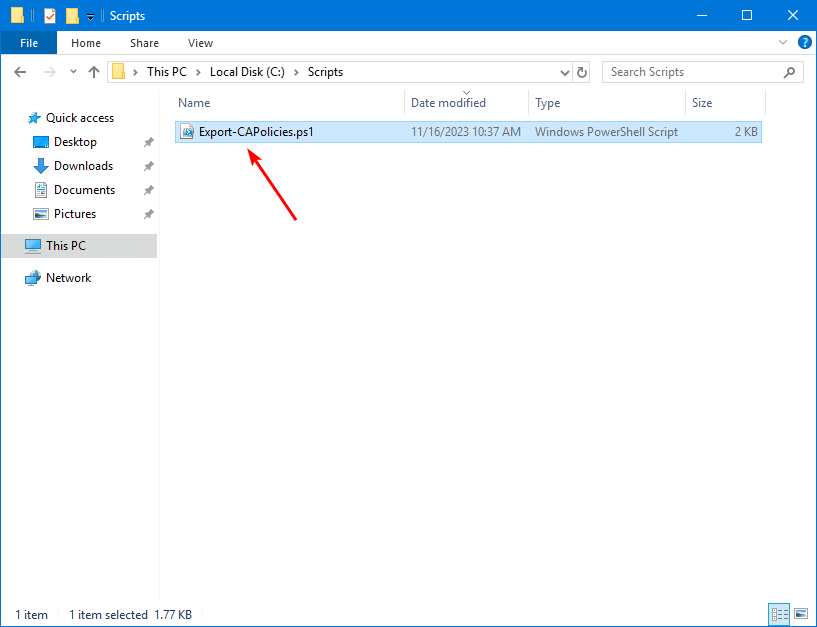
Prepare Export-CAPolicies PowerShell script
Create two folders on the (C:) drive:
- Temp
- Scripts
Download and place Export-CAPolicies.ps1 PowerShell script in the C:\scripts folder. The script will export the JSON files to the C:\temp folder.
Ensure the file is unblocked to prevent errors when running the script. Read more in the article Not digitally signed error when running PowerShell script.
Another option is to copy and paste the below code into Notepad. Give it the name Export-CAPolicies.ps1 and place it in the C:\scripts folder.
<#
    .SYNOPSIS
    Export-CAPolicies.ps1

    .DESCRIPTION
    Export Conditional Access policies to JSON files for backup purposes.

    .LINK
    www.alitajran.com/export-conditional-access-policies/

    .NOTES
    Written by: ALI TAJRAN
    Website:    www.alitajran.com
    LinkedIn:   linkedin.com/in/alitajran

    .CHANGELOG
    V1.00, 11/16/2023 - Initial version
#>

# Connect to Microsoft Graph API
Connect-MgGraph -Scopes 'Policy.Read.All'

# Export path for CA policies
$ExportPath = "C:\temp\"

try {
    # Retrieve all conditional access policies from Microsoft Graph API
    $AllPolicies = Get-MgIdentityConditionalAccessPolicy -All

    if ($AllPolicies.Count -eq 0) {
        Write-Host "There are no CA policies found to export." -ForegroundColor Yellow
    }
    else {
        # Iterate through each policy
        foreach ($Policy in $AllPolicies) {
            try {
                # Get the display name of the policy
                $PolicyName = $Policy.DisplayName

                # Convert the policy object to JSON with a depth of 6
                $PolicyJSON = $Policy | ConvertTo-Json -Depth 6

                # Write the JSON to a file in the export path
                $PolicyJSON | Out-File "$ExportPath\$PolicyName.json" -Force

                # Print a success message for the policy backup
                Write-Host "Successfully backed up CA policy: $($PolicyName)" -ForegroundColor Green
            }
            catch {
                # Print an error message for the policy backup
                Write-Host "Error occurred while backing up CA policy: $($Policy.DisplayName). $($_.Exception.Message)" -ForegroundColor Red
            }
        }
    }
}
catch {
    # Print a generic error message
    Write-Host "Error occurred: $($_.Exception.Message)" -ForegroundColor Red
}
This is how it looks.
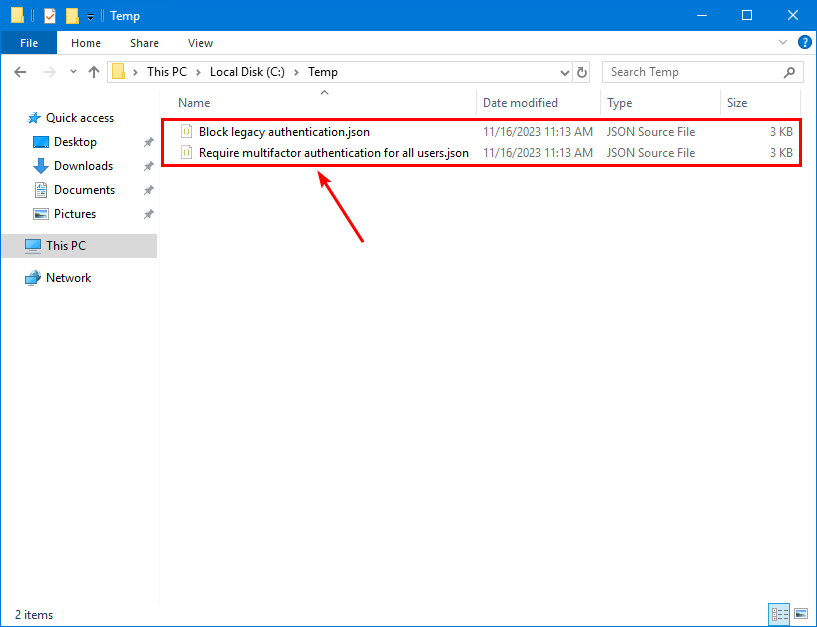
Run Export Conditional Access policies PowerShell script
Run the Export-CAPolicies.ps1 PowerShell script to get all the policies and export them in JSON files in the temp folder.
C:\scripts\Export-CAPolicies.ps1The output shows:
Successfully backed up CA policy: Block legacy authentication
Successfully backed up CA policy: Require multifactor authentication for all users
It might fail to export the CA policy if special characters are present in the policy name. We recommend not using special characters in the policy name and keeping the names as simple as possible.
Open Conditional Access policy JSON file
The Export-CAPolicies.ps1 PowerShell script will export all policies to JSON files. Find the JSON files in the path C:\temp.
Open the CA policy JSON file with your favorite application. For example, Notepad, Notepad++, or Visual Studio Code.
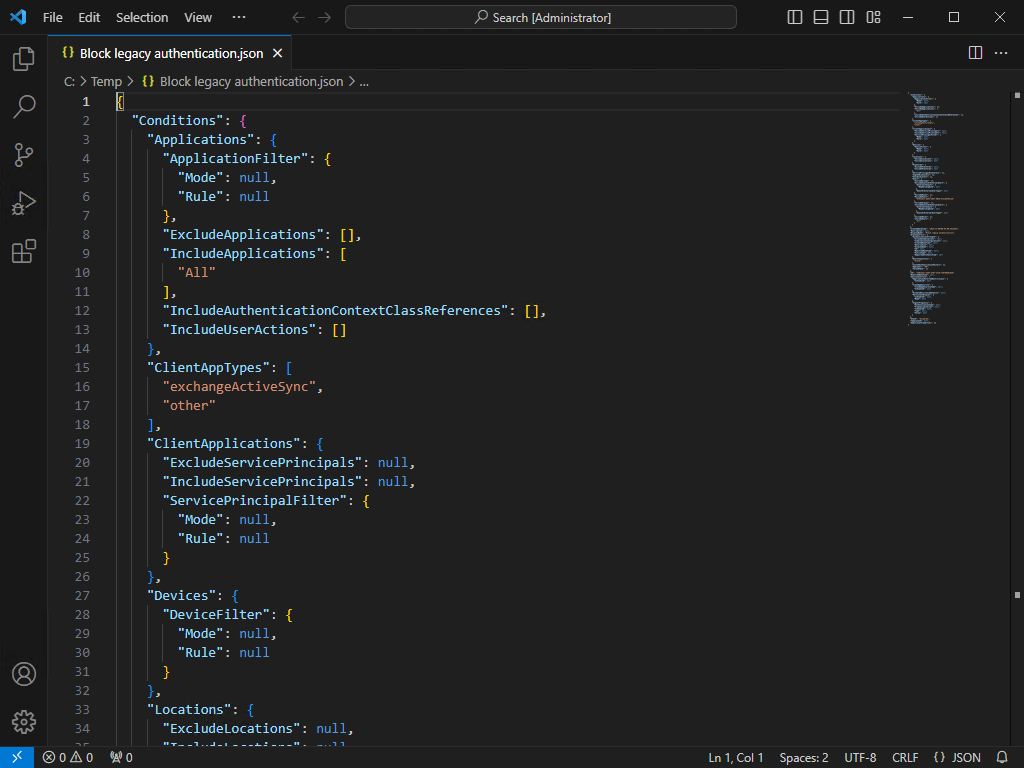
The CA policies JSON file looks excellent.
Did this help you to back up Conditional Access policies to JSON files?
Read more: Configure Azure AD Multi-Factor Authentication »
Conclusion
You learned how to export Conditional Access policies with PowerShell. First, connect to Microsoft Graph PowerShell and run the Export-CAPolicies PowerShell script. After that, all the Conditional Access policies configurations are available in JSON files for backup reasons. It’s also an excellent way to import Conditional Access policies into another Microsoft Entra tenant.
Did you enjoy this article? You may also like Move from per-user MFA to Conditional Access MFA. Don’t forget to follow us and share this article.
What Others Are Reading


Thx a lot, it was very helpful!
Here is my adjustment:
Just changed row
$PolicyName = $Policy.DisplayName
to
$Policy.DisplayName -replace ‘[^ a-zA-Z0-9]’, ”
Best Regards,
Moha
Thanks Ali!
I had the same issue as Alexander, so have modified the script to sanitise the name of the file, but keep the filename original in the json so they can be re-created as they were. Thanks to Alexander for the code.
Hi Ali,
thanks for your work and this method to export. There is one point to improve. We have lot of conditional access policies with special characters in the displayname. So exporting failed because there is no way to create a file with for example ‘:’. I created a short workaround
maybe helpful for other people using this script. Thanks for your blog.
I have my own so I know the amount of time to write articles.
BR
Alexander
Hi Alexander,
Thanks for the script adjustment.
Yes, that’s correct, and that’s why I added in the article to rename the CA policies without special characters. This way, you fix it at the core and not within the script.
When removing the special characters, the JSON output name will differ from what appears in Microsoft Entra.
Another option is to export on CA policy identity. This would always work. The downside is that it’s difficult to understand which JSON file is linked to which name unless you open the JSON file and look for the name.
Your comment will help others who want to keep and export the CA policies with special characters. Note again to everyone reading this that it will not have the exact name as shown in Microsoft Entra.
Yes, it takes a lot of time to write these articles; hopefully, others understand this too.