There are different methods to connect to Microsoft Graph PowerShell to manage your Microsoft 365…
Configure Azure AD Multi-Factor Authentication
You want to enable Azure AD Multi-Factor Authentication. There is a per-user MFA and Conditional Access based MFA. Before you can deploy Azure AD Conditional Access based Multi-Factor Authentication, you need Azure AD Premium plan 1 or 2. In this article, you will learn how to configure Azure AD Multi-Factor Authentication step by step.
Table of contents
Before you enable Azure AD Multi-Factor authentication
Do not enable MFA for all users at once. The IT support team will get phone calls and emails about the MFA enrollment or that applications are not functioning.
- Configure Conditional Access MFA with a couple of test users or with a Pilot group first before applying the MFA policy for all users.
- Create an instruction on how to set up MFA. Send the instruction to the users by email, print them out, place them on their desks, or place them on the intranet.
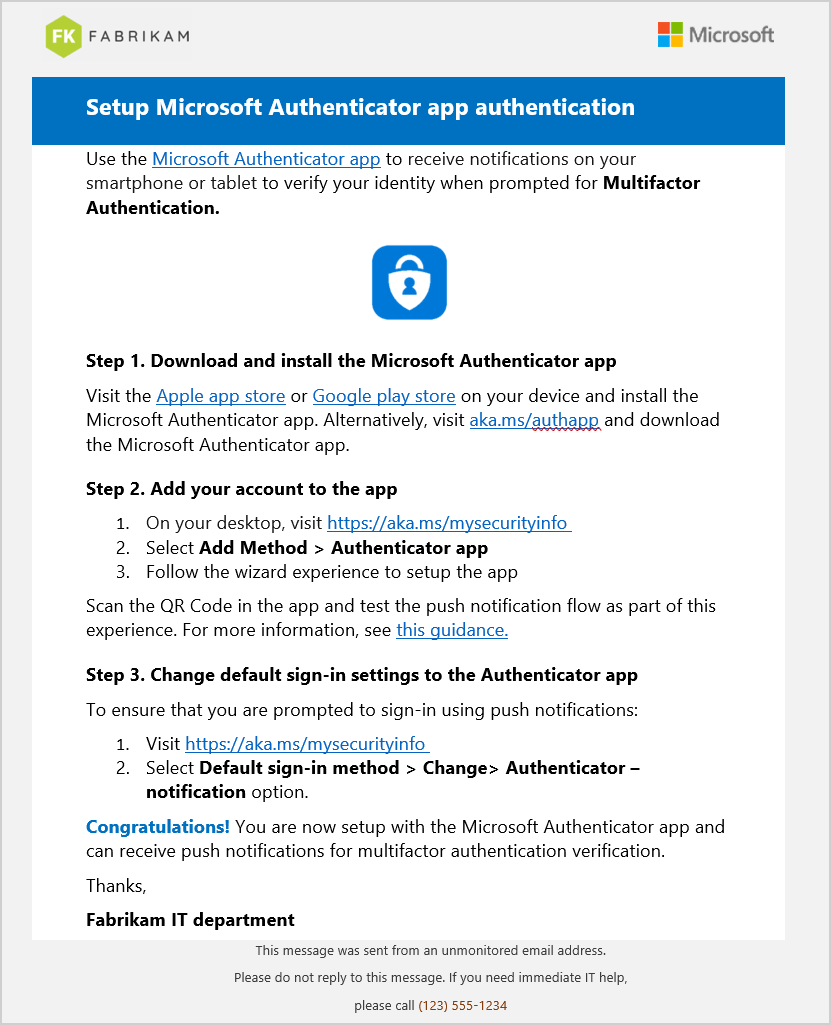
Microsoft did create excellent Multi-Factor Authentication rollout materials that you can download, edit and send to the users. The instruction that we always use is the Setup Microsoft Authenticator app authentication.
Do you already have per-user MFA configured in Microsoft 365 tenant, and do you want to move to Conditional Access based MFA? Find out how to move from per-user MFA to Conditional Access MFA.
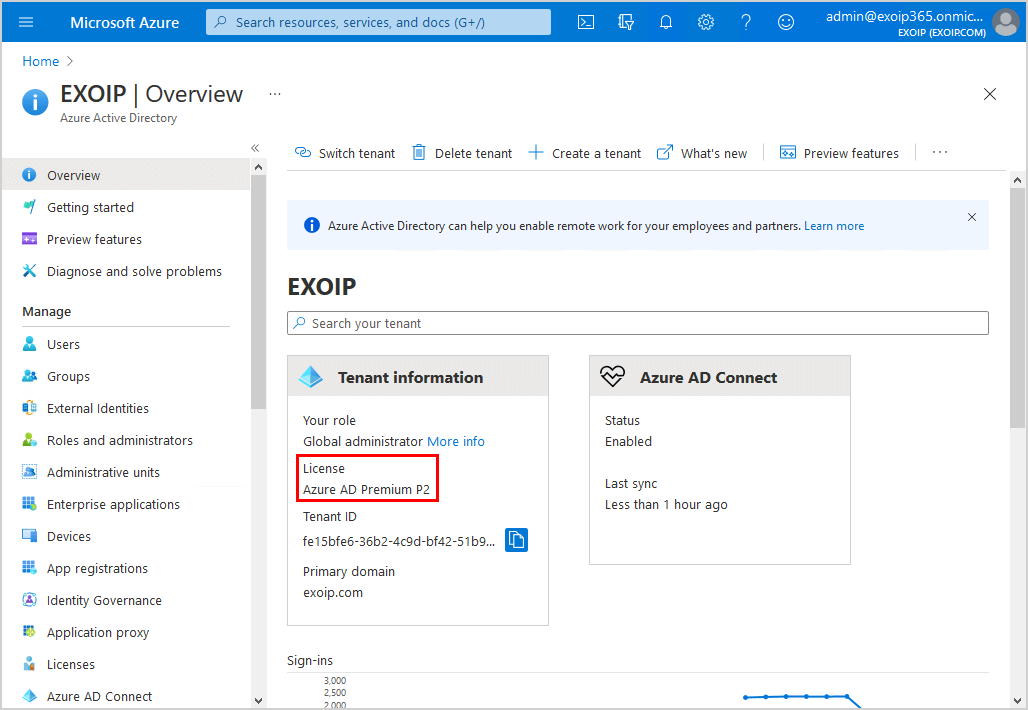
Check Azure AD Premium license
Check that you have Azure AD Premium plan 1 or 2:
- Sign in to Microsoft Azure portal
- Click on Azure Active Directory > Overview
- Find the license plan under Tenant information
In the example below, we have an Azure AD Premium P2 license.
In the next step, you will choose the verification methods for the users.
Choose verification methods
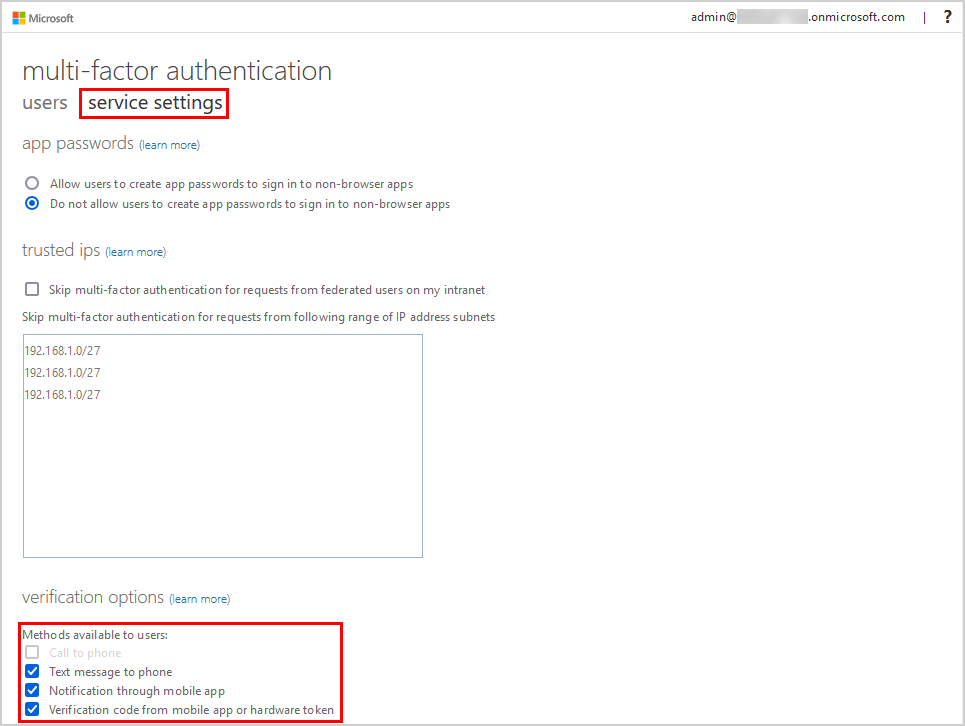
Check MFA verifications methods:
- Sign in to Microsoft Azure portal
- Click on Azure Active Directory > Security > Multifactor authentication
- Click on Getting started > Additional cloud-based MFA settings

- Under the tab service settings, you can choose the verification methods available to the users. Microsoft recommends enabling only the secure methods:
- Call to phone (not secure)
- Text message to phone (not secure)
- Notification through mobile app (secure)
- Verification code from mobile app or hardware token (secure)
In the next step, you will add locations to exclude from MFA.
Configure named locations
You don’t want to let users use MFA in the organization because they are in a trusted network. To allowlist the IP address locations, we will use the Named locations feature in Azure Active Directory.
- Select Azure Active Directory > Security
- Click on Named locations > IP ranges location
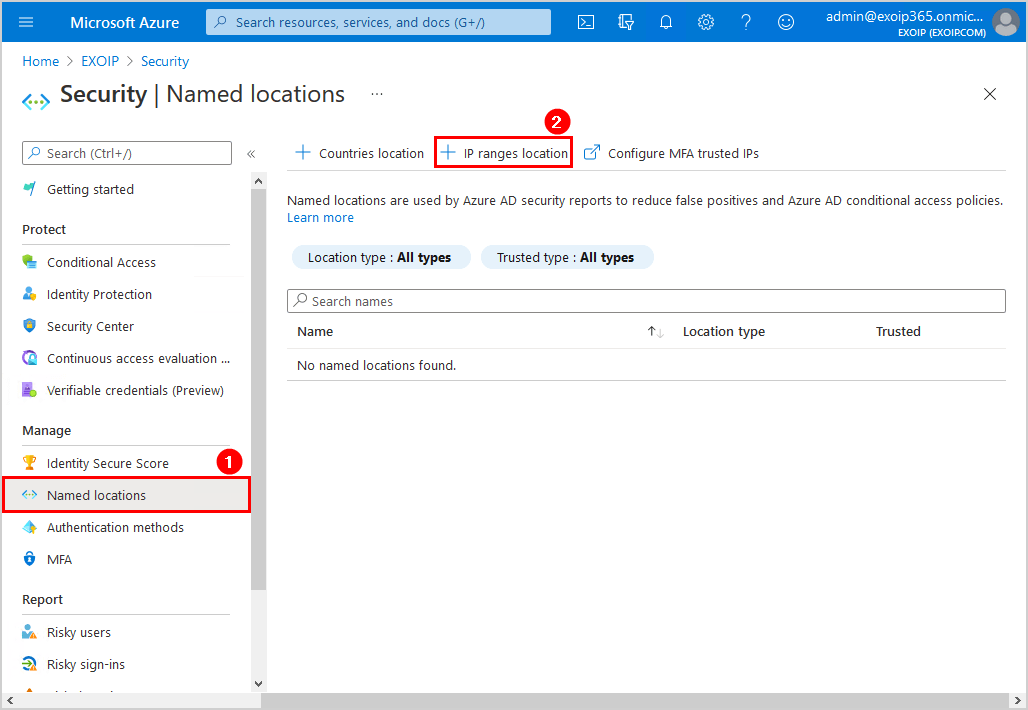
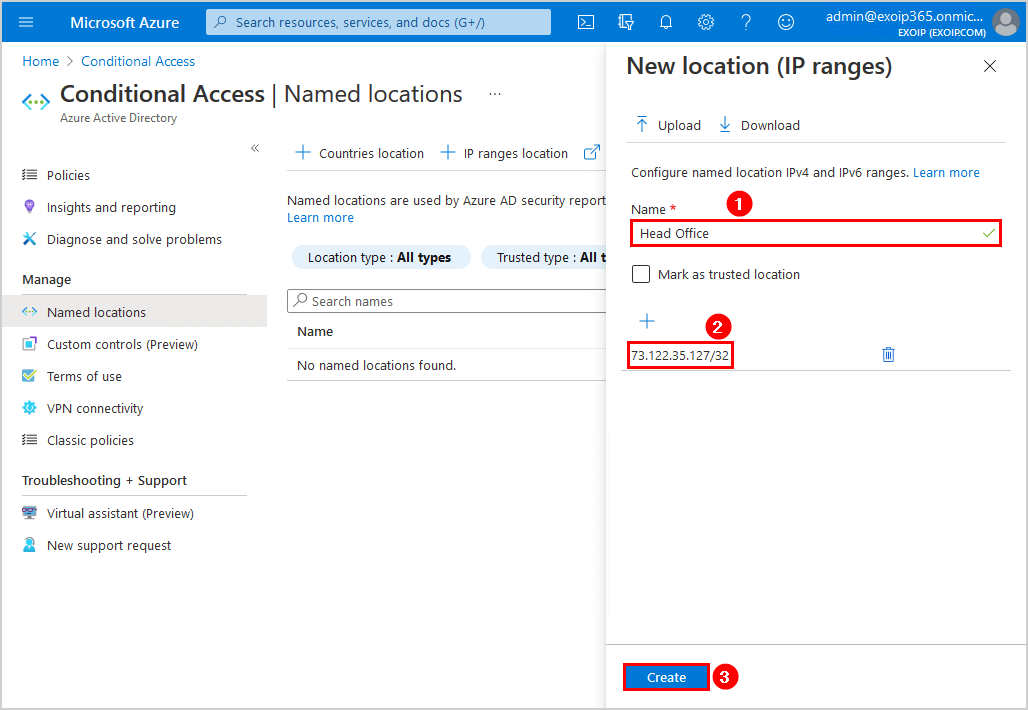
- Add the name and external IP location
In this example, we will add two locations. That’s the Head Office and Branch Office that we like to exclude from MFA.
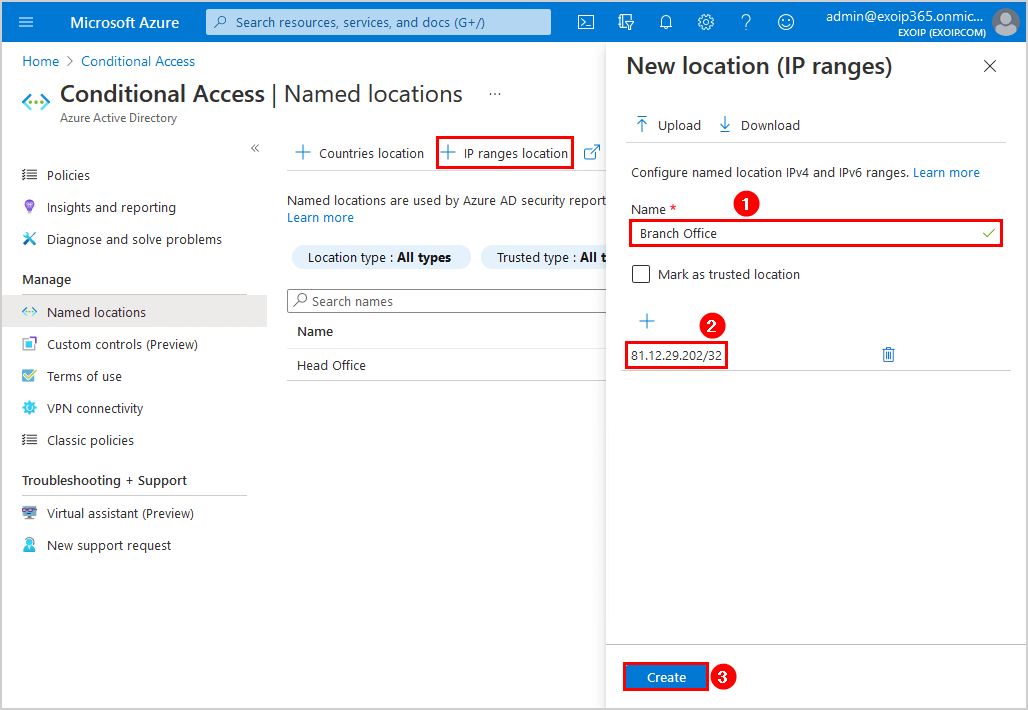
- Repeat and add other locations
We will add the Branch Office location external IP to exclude from MFA.
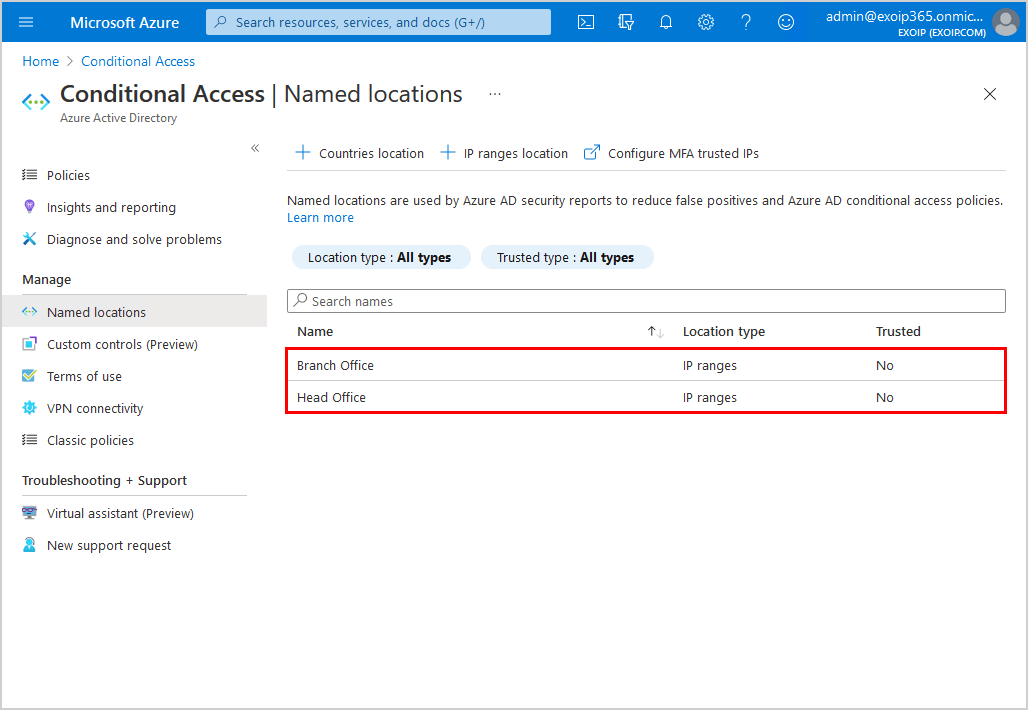
- The external IP addresses show up in the Conditional Access named location list
In the next step, you will create a Non-MFA security group for the accounts you will exclude from MFA.
Create Non-MFA security group
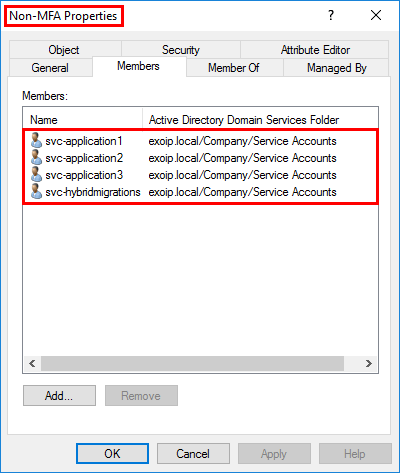
It’s good to know that you need to exclude Service Accounts from MFA. Service accounts are non-interactive accounts that are not tied to any particular user. They are usually used by back-end services allowing programmatic access to applications but are also used to sign in to systems for administrative purposes. Service accounts like these should be excluded since MFA can’t be completed programmatically.
Note: If you don’t have an on-premises Active Directory synced with Azure AD Connect (Hybrid Cloud), create a security group in Azure AD.
- Go to Active Directory Users and Computers
- Create a security group with the name Non-MFA
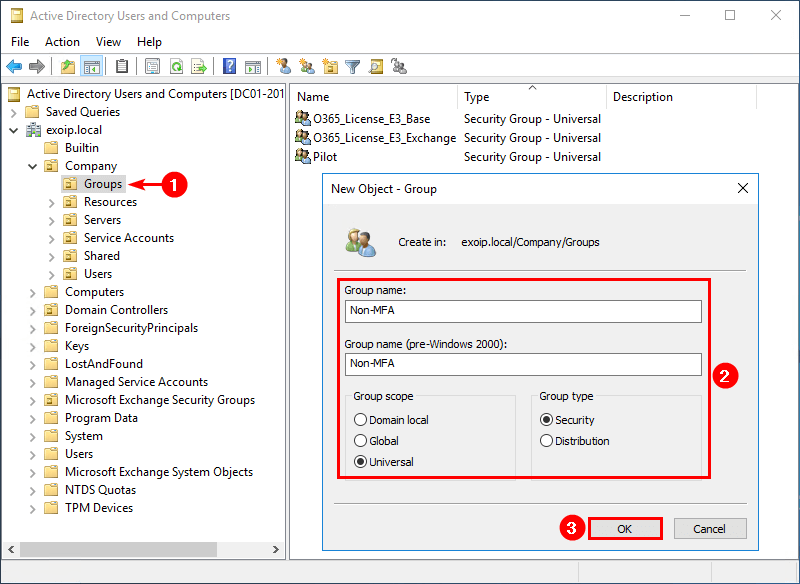
- Double-click the Non-MFA security group
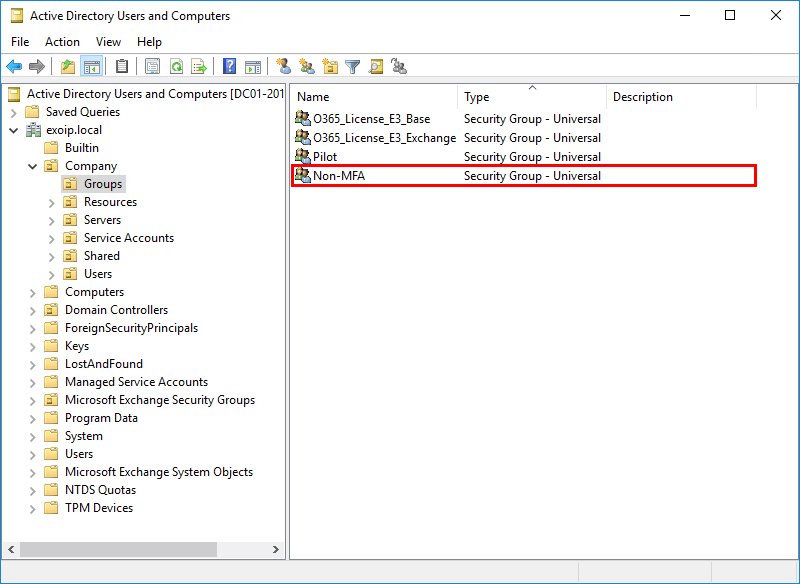
- Add the Service Accounts to the group
- Force sync Azure AD Connect or wait 30 minutes before the changes are in sync with the cloud.
In the next step, you will enable MFA for all users with Azure AD Conditional Access.
Configure Azure AD Conditional Access MFA
Create a Conditional Access Policy to force MFA for all the users. You can select only a selected group of users. But, we recommend enabling MFA for all users.
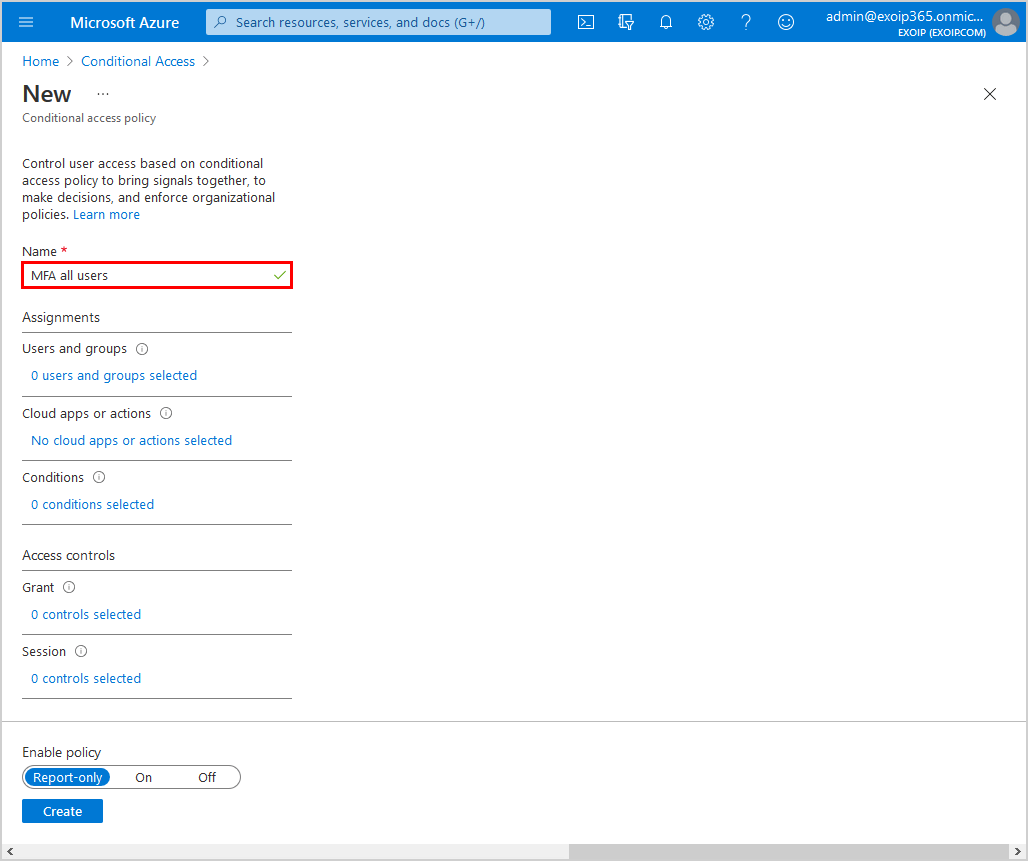
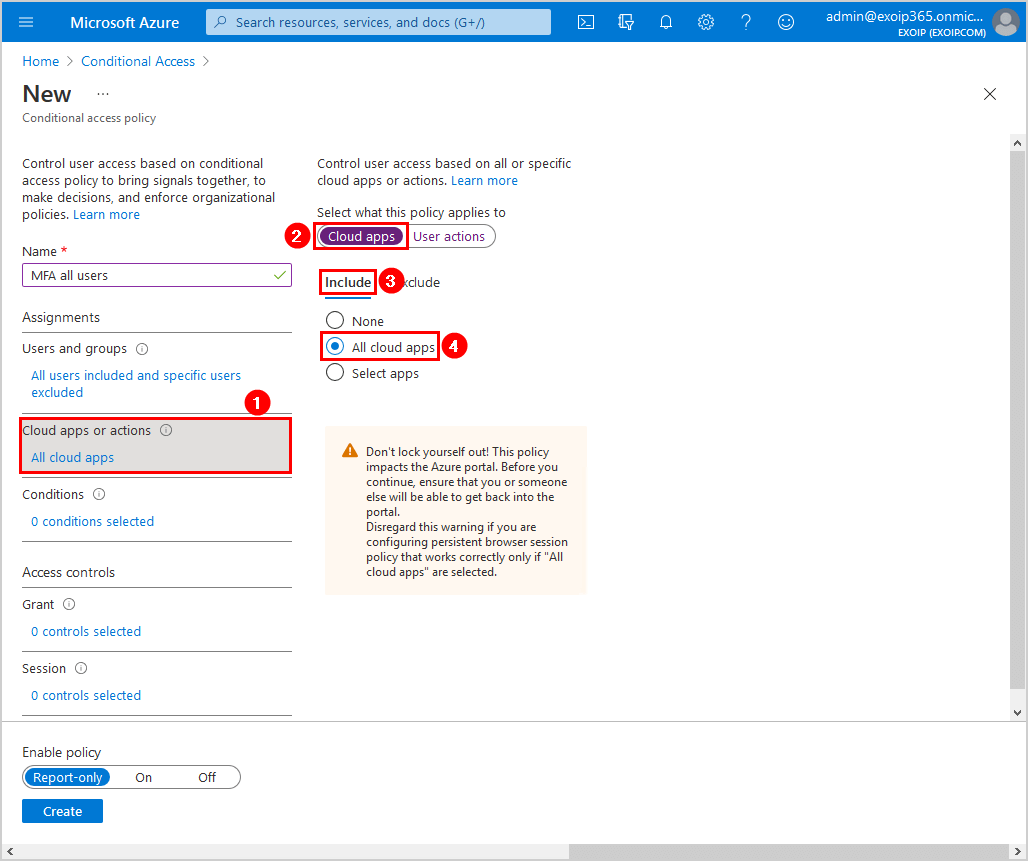
Step 1: New Policy
Browse to Active Directory > Security > Conditional Access > Policies. Click on New policy.

Step 2: Name
Give it the name MFA all users.
Step 3: Assignments
Click Users and groups > Include. Select All users.
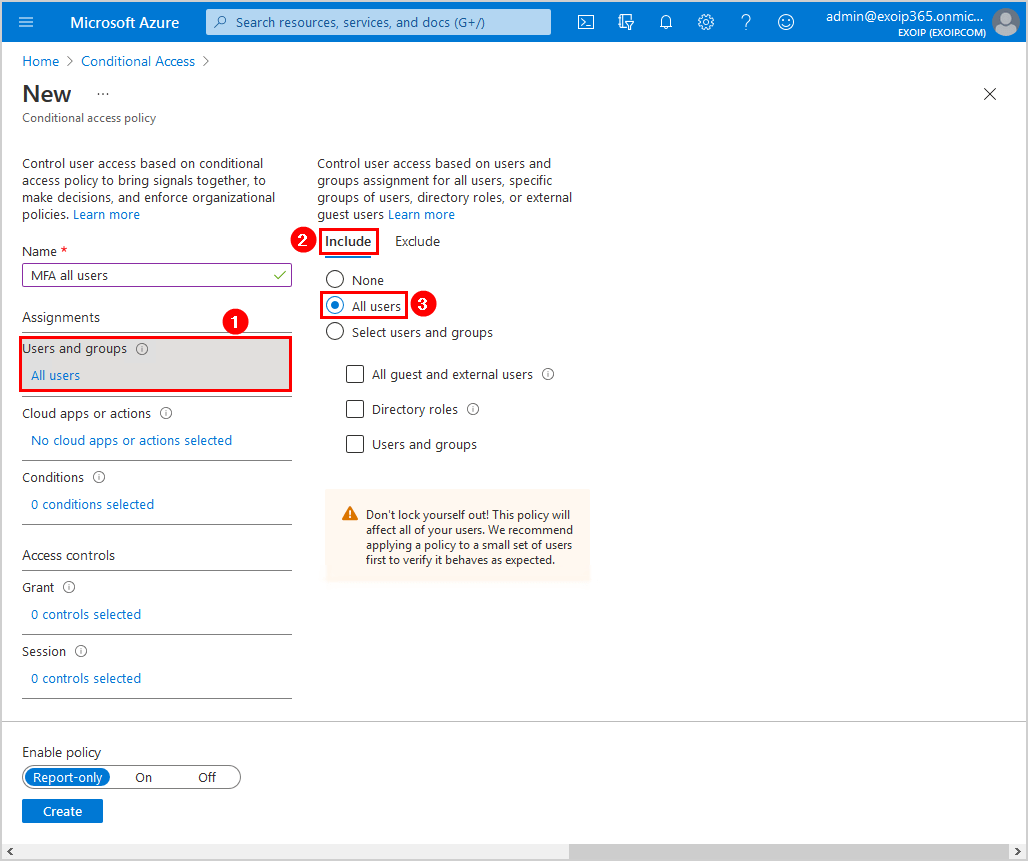
Click Exclude. Select Users and groups. Select the Non-MFA security group which you created in the previous steps.
Do you have Azure AD Connect? Don’t forget to exclude MFA for Azure AD Connect Sync Account. Read more about that in Conditional Access MFA breaks Azure AD Connect synchronization.
Do you have more Service Accounts in Azure AD? Create a Non-MFA-Azure security group in Azure AD and add these accounts to the group. After that, add the Non-MFA-Azure security group to the excluded policy setting.

Step 4: Cloud apps or actions
Click Cloud apps > Include. Select All cloud apps.
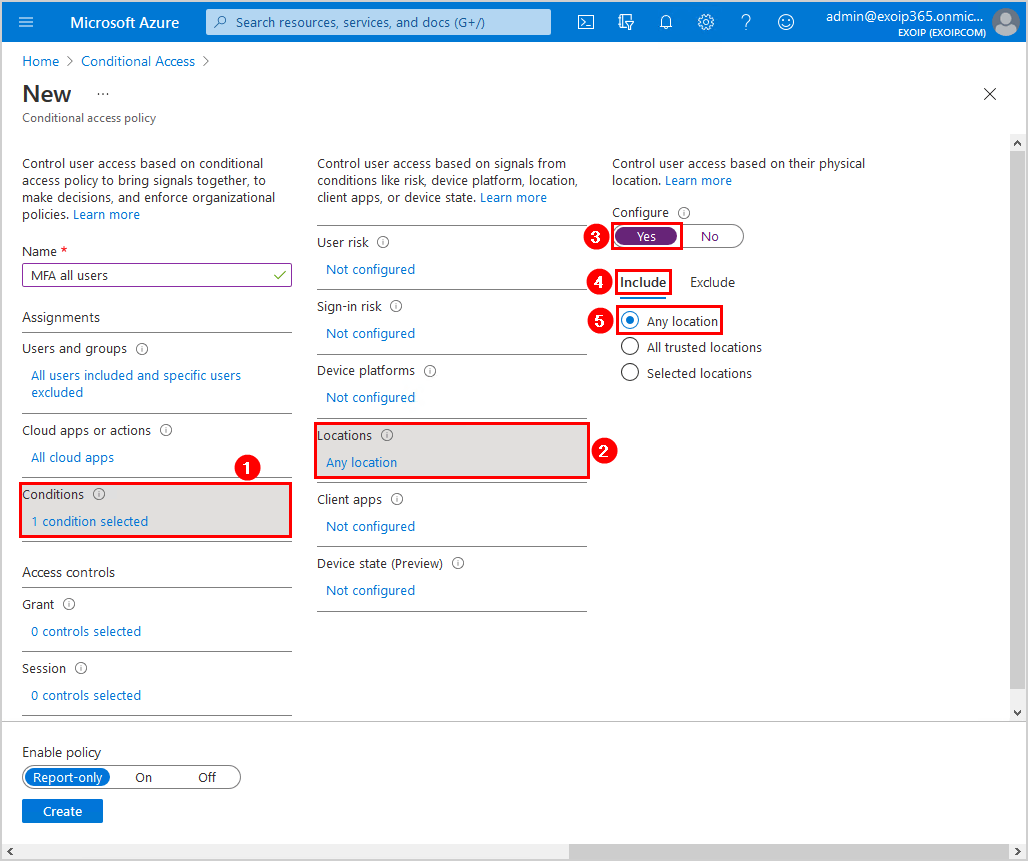
Step 5: Conditions
Click Conditions > Locations. Click on Yes. Click Include and select Any location.
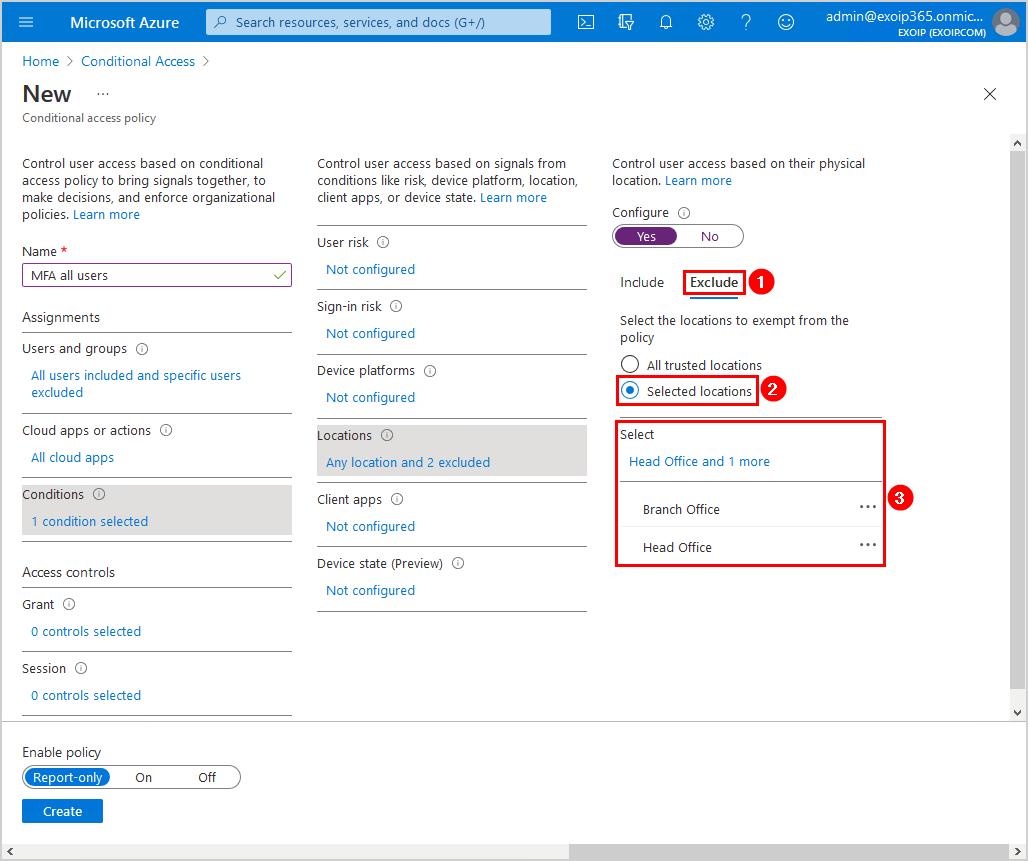
Click Exclude and select Selected locations. Select the named locations that you created in the previous steps.
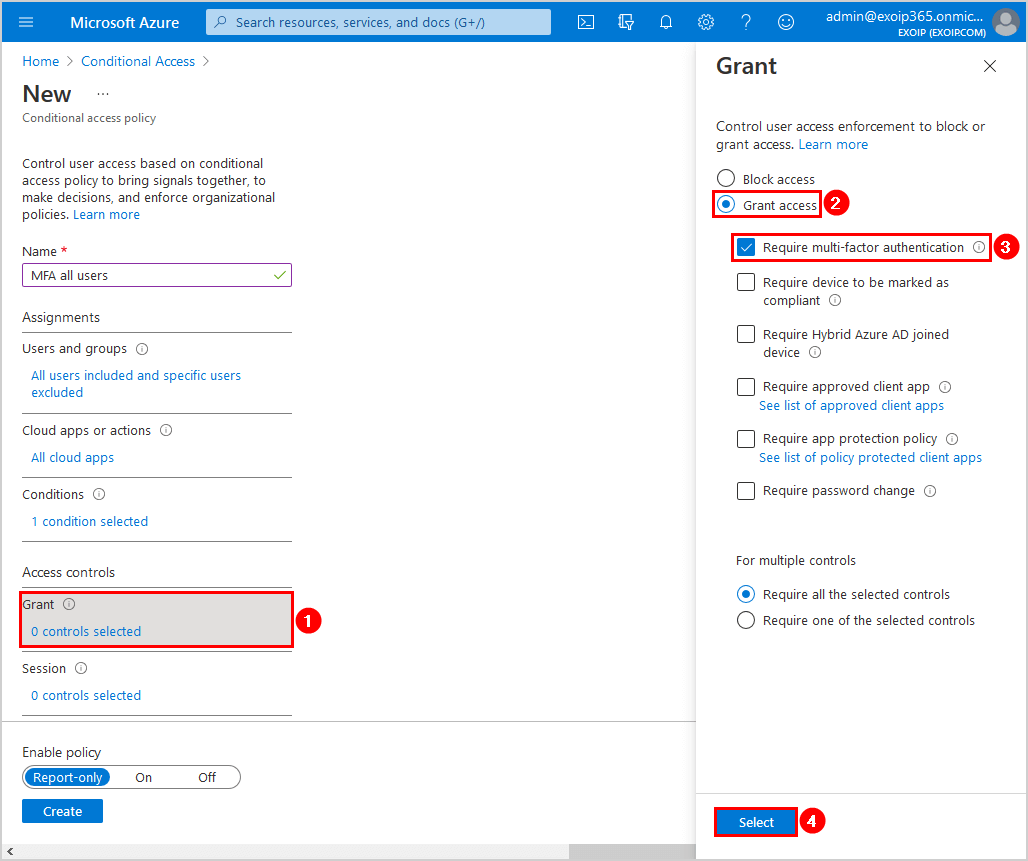
Step 6: Grant
Click Grant. Select Grant access. Check the checkbox Require multi-factor authentication. Click on Select.
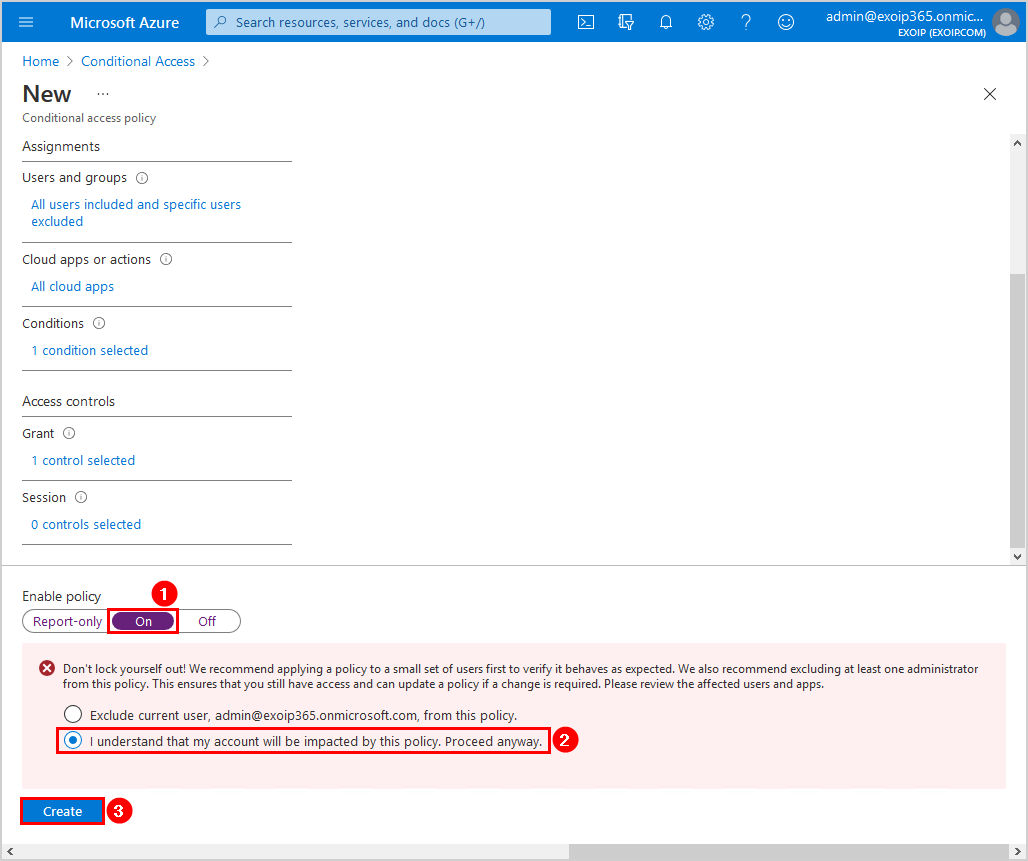
Step 7: Enable policy
Click the On switch to enable the policy. Select I understand that my account will be impacted by this policy. Proceed anyway. Click Create.
Note: Remember to test the Conditional Access MFA policy before you apply it to all the users.
Suppose you click on Create, and you get the below warning and error:
- It looks like you’re about to manage your organization’s security configurations. That’s great! You must first disable security defaults before enabling a Conditional Access policy.
- Security defaults must be disabled to enable Conditional Access policy.
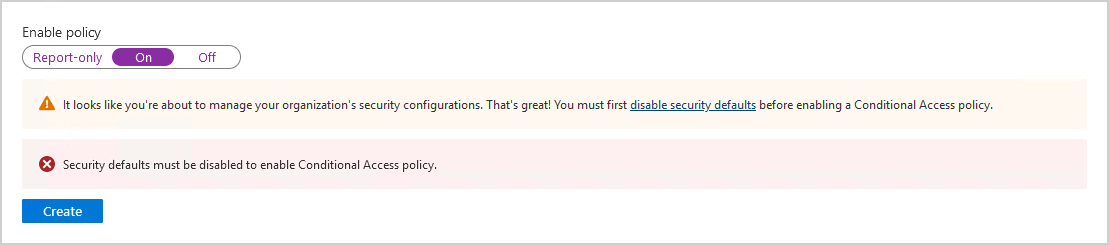
You can read the article How to Disable security defaults in Microsoft Entra ID.
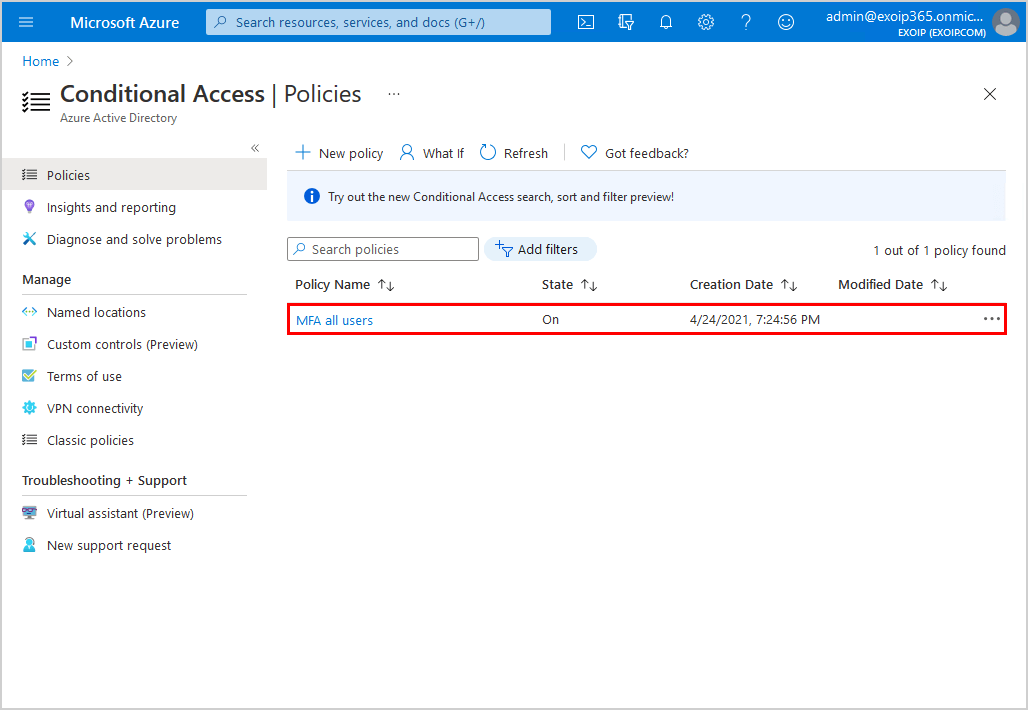
Step 8: Check policy
The policy shows up in the Conditional Access policies list.
You should always export Conditional Access policies to JSON files for backup purposes. Suppose policies get edited, and you want to restore the policies, you can easily import Conditional Access policies into the tenant.
Verify your work
After you configure the policy, the users will get a message that they need to set up MFA when they use services that require MFA. For example, when they sign in to Microsoft 365 portal.
Note: Users will not get a notification to set up MFA or MFA authorization if they are at the locations which are excluded from MFA. In this example, the Head Office and the Branch Office.
Below is an example of how it looks when a user signs in to Microsoft 365 portal after configuring Azure AD Conditional Access based MFA.
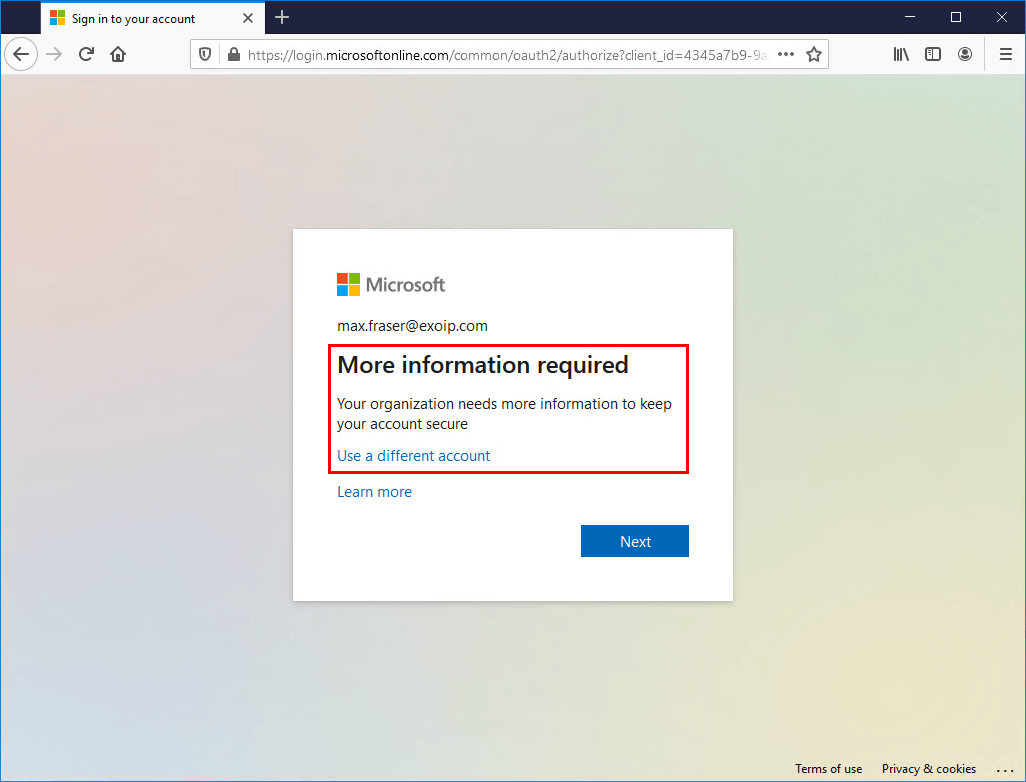
The user will now use the instructions you provided to set up MFA.
Read more: Secure MFA and SSPR registration with Conditional Access »
Conclusion
You learned how to configure Azure AD Multi-Factor Authentication. Create a Non-MFA security group and add the Service Accounts to that group. Otherwise, the accounts will have problems after you enable MFA. Before you roll out MFA for all users, test the policy first on a couple of test users or a Pilot group. Don’t forget to create an instruction on how to set up MFA and send it to the users.
Did you enjoy this article? You may also like Install and configure Azure AD Connect. Don’t forget to follow us and share this article.
What Others Are Reading


Nice article! This is exactly how is works. But…
How do you enforce users to setup their MFA if they only work from an excluded location? They will never get the ‘More information required’ pop-up. So you will always stay with some accounts which haven’t setup MFA which will be a risk.