Have you ever asked how to add Exchange Server to an existing send connector and…
Enable PowerShell serialization payload signing in Exchange Server
Starting in the January 2023 Security Updates (SU) for Microsoft Exchange Server, Microsoft introduced a new feature that enables admins to configure certificate-based signing of PowerShell serialization payloads. This feature is enabled by default since November 2023 Security Updates (SU) on all Exchange Server 2016/2019. In this article, you will learn how to enable certificate-based signing of PowerShell serialization data in Exchange Server.
Table of contents
PowerShell Serialization Payload Signing
Certificate-based signing of PowerShell Serialization Payload is a Defense-in-Depth security feature to prevent malicious manipulation of serialized data exchanged in Exchange Management Shell (EMS) sessions.
The Serialized Data Signing feature was introduced with the January 2023 Exchange Server Security Updates (SU) and is available on:
- Exchange Server 2013
- Exchange Server 2016
- Exchange Server 2019
The Serialized Data Signing feature is now enabled by default since November 2023 Exchange Server Security Updates (SU) and higher on:
- Exchange Server 2016
- Exchange Server 2019
Note: You don’t have to do anything if you are on November 2023 Exchange Server Security Updates or higher because it’s enabled by default. You can verify that it’s enabled by running the Exchange Health Checker script (the last part in the article). If you have Exchange Server 2013, you must manually enable this feature.
PowerShell Serialization Payload Signing prerequisites
Before you start to enable PowerShell Serialization Payload Signing, ensure that you have the below prerequisites in place.
Install Exchange Server January 2023 SU or later
Ensure all the Exchange Servers (Exchange Server 2019, 2016, and 2013) in the environment run the January 2023 SU (or later).
Do that before turning the feature on. Enabling the feature before all servers are updated might lead to failures and errors when managing your organization.
Important: Don’t forget to keep the Exchange Server up to date with the latest Exchange Cumulative Update and Exchange Security Update. Subscribe to the newsletter, and don’t miss out on the Exchange Server updates.
Check Microsoft Exchange Server Auth certificate
This feature uses the Exchange Server Auth Certificate to sign the serialized data. Therefore, it’s very important that the certificate configured as Auth Certificate is valid (not expired) and available on all Exchange Servers (except Edge Transport role and Exchange Management Tools role) within the organization.
Option 1: Check that the Microsoft Exchange Server Auth certificate exists and is valid.
Option 2: Download MonitorExchangeAuthCertificate.ps1 PowerShell script and check that the Microsoft Exchange Server Auth certificate exists and is valid.
Note: To run the script, you must be a member of the Organization Management role group. The script must be run from an elevated Exchange Management Shell (EMS) command prompt on an Exchange Server running the Mailbox role. The script cannot be run on an Exchange Management Tools-only machine.
In our example, we will place the script in the folder C:\scripts and run the below command.
C:\Scripts\.\MonitorExchangeAuthCertificate.ps1The output shows that the Exchange Server Auth certificate is valid.
Monitor Exchange Auth Certificate script version 23.03.03.1320
The script was run without parameter therefore, only a check of the Auth Certificate configuration is performed and no change will be made

Current Auth Certificate thumbprint: 91A2B6CBB1BEB5B5E8F2F56F0CEE06F2575D1K74
Current Auth Certificate is valid for 1571 day(s)
Exchange Hybrid was detected in this environment

Test result: No renewal action is required

Log file written to: C:\Program Files\Microsoft\Exchange Server\V15\Logging\AuthCertificateMonitoring\AuthCertificateMonitoringLog_20230324194706.txt
Check PowerShell Serialization Payload Signing status
Run the Exchange Health Checker script and search in the report for SerializedDataSigning Enabled.
[PS] C:\scripts>Get-ExchangeServer | ?{$_.AdminDisplayVersion -Match "^Version 15"} | .\HealthChecker.ps1; .\HealthChecker.ps1 -BuildHtmlServersReport -HtmlReportFile "ExchangeAllServersReport.html"; .\ExchangeAllServersReport.htmlIn our example, the value is False. It means that it’s not enabled, and we have to enable it.
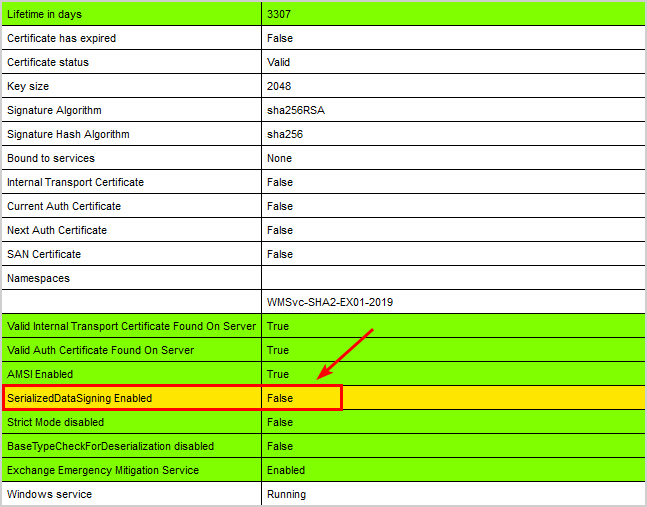
Note: If you have not installed the January 2023 Security Update (SU) for Microsoft Exchange Server or later, you will not see the SerializedDataSigning Enabled data and value in the health checker report.
How to enable PowerShell Serialization Payload Signing
To enable PowerShell Serialization Payload Signing, follow the below steps:
Exchange Server 2016/2019
Run Exchange Management Shell and run the below commands.
Note: This cmdlet enables the signing verification on all Exchange Servers, and you don’t have to run the cmdlet on every Exchange Server.
Set a new settings override.
New-SettingOverride -Name "EnableSigningVerification" -Component Data -Section EnableSerializationDataSigning -Parameters @("Enabled=true") -Reason "Enabling Signing Verification"Refresh the VariantConfiguration argument.
Get-ExchangeDiagnosticInfo -Process Microsoft.Exchange.Directory.TopologyService -Component VariantConfiguration -Argument RefreshRestart the World Wide Web Publishing service and the Windows Process Activation Service (WAS) to apply the new settings.
Note: It’s sufficient to restart the services on the Exchange Server where the change was made.
Restart-Service -Name W3SVC, WAS -ForceExchange Server 2013
Create a registry key.
New-ItemProperty -Path HKLM:\SOFTWARE\Microsoft\ExchangeServer\v15\Diagnostics -Name "EnableSerializationDataSigning" -Value 1 -Type StringRestart the World Wide Web Publishing service and the Windows Process Activation Service (WAS) to apply the new settings.
Note: It’s required to restart these services on all Exchange 2013 servers whenever the registry value is updated.
Restart-Service -Name W3SVC, WAS -ForceVerify your work
Run the Exchange Health Checker script.
[PS] C:\scripts>Get-ExchangeServer | ?{$_.AdminDisplayVersion -Match "^Version 15"} | .\HealthChecker.ps1; .\HealthChecker.ps1 -BuildHtmlServersReport -HtmlReportFile "ExchangeAllServersReport.html"; .\ExchangeAllServersReport.htmlVerify that SerializedDataSigning Enabled has the value True.

That’s it!
Read more: Antivirus exclusions for Exchange Server »
Conclusion
You learned how to enable PowerShell serialization payload signing in Exchange Server. First, ensure you have Exchange Server January 2023 Security Update (SU) or later installed. Next, verify the Microsoft Exchange Server Auth certificate validity. As of last, enable PowerShell Serialization Payload Signing and verify with the Exchange Health Checker script that it shows as enabled.
Did you enjoy this article? You may also like Configure HSTS on Exchange Server. Don’t forget to follow us and share this article.
What Others Are Reading

exchange management shell has stop connecting after su11 for 2016. i assume it has something to do with this. my cert is not expired. KB5032147. should i back off the patch, or is there a fix? i could not find anything online. thanks.
Perfectly written als always. The best blog posts I have ever seen in my life!
I enabled it. Easy to follow. Thank you so much for all the work.