You must update Exchange Server to a newer CU build to get the latest security…
Recreate virtual directories in Exchange Server
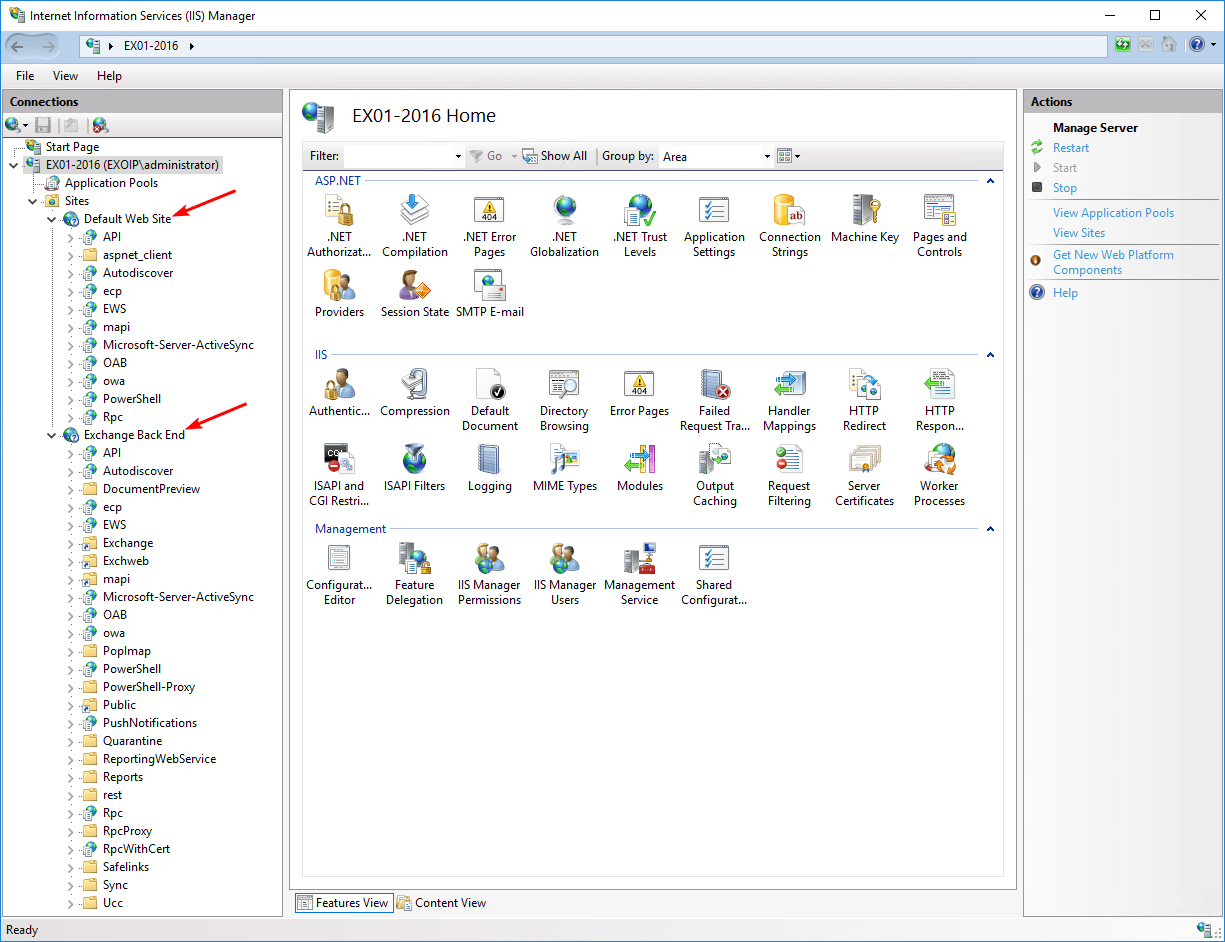
Today’s article will show how to recreate virtual directories in Exchange Server. After installing Exchange Server and looking in IIS Manager, we can see two sites configured. That’s the Default Web Site and the Exchange Back End. If there are issues and you like to reset virtual directories in Exchange Server, you’re at the right place. Read more on how to recreate virtual directories in Exchange Server.
Table of contents
Find and manage virtual directories in Exchange Server
To find and manage virtual directories, you can use:
- IIS Manager
- Exchange Management Shell (EMS)
- Exchange Admin Center (EAC)
Why you want to recreate Exchange virtual directories
Sometimes you have to start with a clean slate, which will fix most problems. Such as:
- Permission problems
- Blank screen
- Missing files
- Connectivity issues
- Page errors
Recreate Exchange virtual directories Default Web Site
Start Internet Information Services (IIS) 6.0 Manager. Exchange Server installation creates two websites:
- Default Web Site
- Exchange Back End
To recreate virtual directories in IIS, we will use PowerShell. We will:
- Get the virtual directory
- Remove the virtual directory
- Create the virtual directory
The virtual directories list in alphabetic order:
| IIS Virtual Directory | Name |
|---|---|
| ActiveSyncVirtualDirectory | Microsoft-Server-ActiveSync |
| AutodiscoverVirtualDirectory | Autodiscover |
| EcpVirtualDirectory | ecp |
| MapiVirtualDirectory | mapi |
| OABVirtualDirectory | OAB |
| OwaVirtualDirectory | owa |
| PowerShellVirtualDirectory | PowerShell |
| WebServicesVirtualDirectory | EWS |
In our example, we will reset the virtual directories on Exchange Server EX01-2016. The internal and external URL is https://mail.exoip.com. We recommend configuring the internal and external URLs to a generic namespace.
Read more: Exchange namespace design and planning »
Recreate ActiveSyncVirtualDirectory
Run Exchange Management Shell as administrator. Recreate Microsoft-Server-ActiveSync virtual directory.
[PS] C:\>Get-ActiveSyncVirtualDirectory -Server "EX01-2016" | Format-List Server, Name, Identity, InternalUrl, ExternalUrl


Server      : EX01-2016
Name        : Microsoft-Server-ActiveSync (Default Web Site)
Identity    : EX01-2016\Microsoft-Server-ActiveSync (Default Web Site)
InternalUrl : https://mail.exoip.com/Microsoft-Server-ActiveSync
ExternalUrl : https://mail.exoip.com/Microsoft-Server-ActiveSync


[PS] C:\>Remove-ActiveSyncVirtualDirectory -Identity "EX01-2016\Microsoft-Server-ActiveSync (Default Web Site)" -Confirm:$false


[PS] C:\>New-ActiveSyncVirtualDirectory -Server "EX01-2016" -InternalUrl "https://mail.exoip.com/Microsoft-Server-ActiveSync" -ExternalUrl "https://mail.exoip.com/Microsoft-Server-ActiveSync"

Name                                           Server    InternalUrl
----                                           ------    -----------
Microsoft-Server-ActiveSync (Default Web Site) EX01-2016 https://mail.exoip.com/Microsoft-Server-ActiveSync
Note: Do you get errors when creating the Exchange virtual directory? Read the article An error occurred while creating the IIS virtual directory.
Recreate AutoDiscoverVirtualDirectory
Recreate Autodiscover virtual directory.
[PS] C:\>Get-AutodiscoverVirtualDirectory -Server "EX01-2016" | Format-List Server, Name, Identity


Server   : EX01-2016
Name     : Autodiscover (Default Web Site)
Identity : EX01-2016\Autodiscover (Default Web Site)


[PS] C:\>Remove-AutodiscoverVirtualDirectory -Identity "EX01-2016\Autodiscover (Default Web Site)" -Confirm:$false


[PS] C:\>New-AutodiscoverVirtualDirectory -Server "EX01-2016" -BasicAuthentication $true -WindowsAuthentication $true

Name                            Server    InternalUrl
----                            ------    -----------
Autodiscover (Default Web Site) EX01-2016


[PS] C:\>Set-ClientAccessServer -Identity "EX01-2016" -AutodiscoverServiceInternalUri https://autodiscover.exoip.com/Autodiscover/Autodiscover.xml
Learn more about Autodiscover in Exchange Server:
- Configure autodiscover URL in Exchange with PowerShell
- Find autodiscover URL in Exchange with PowerShell
Recreate EcpVirtualDirectory
Recreate ecp virtual directory.
[PS] C:\>Get-EcpVirtualDirectory -Server "EX01-2016" | Format-List Server, Name, InternalUrl, ExternalUrl, Identity


Server      : EX01-2016
Name        : ecp (Default Web Site)
InternalUrl : https://mail.exoip.com/ecp
ExternalUrl : https://mail.exoip.com/ecp
Identity    : EX01-2016\ecp (Default Web Site)


[PS] C:\>Remove-EcpVirtualDirectory -Identity "EX01-2016\ecp (Default Web Site)" -Confirm:$false


[PS] C:\>New-EcpVirtualDirectory -Server "EX01-2016" -InternalUrl "https://mail.exoip.com/ecp" -ExternalUrl "https://mail.exoip.com/ecp"

Name                   Server
----                   ------
ecp (Default Web Site) EX01-2016
Recreate MapiVirtualDirectory
Recreate mapi virtual directory.
[PS] C:\>Get-MapiVirtualDirectory -Server "EX01-2016" | Format-List Server, Name, InternalUrl, ExternalUrl, Identity


Server      : EX01-2016
Name        : mapi (Default Web Site)
InternalUrl : https://mail.exoip.com/mapi
ExternalUrl : https://mail.exoip.com/mapi
Identity    : EX01-2016\mapi (Default Web Site)


[PS] C:\>Remove-MapiVirtualDirectory -Identity "EX01-2016\mapi (Default Web Site)" -Confirm:$false


[PS] C:\>New-MapiVirtualDirectory -Server "EX01-2016" -InternalUrl https://mail.exoip.com/mapi -ExternalUrl https://mail.exoip.com/mapi -IISAuthenticationMethods Ntlm, OAuth, Negotiate

Name                    Server    InternalUrl                 ExternalUrl
----                    ------    -----------                 -----------
mapi (Default Web Site) EX01-2016 https://mail.exoip.com/mapi https://mail.exoip.com/mapi
Recreate OABVirtualDirectory
Recreate OAB virtual directory.
[PS] C:\>Get-OabVirtualDirectory -Server "EX01-2016" | Format-List Server, Name, InternalUrl, ExternalUrl, Identity


Server      : EX01-2016
Name        : OAB (Default Web Site)
InternalUrl : https://mail.exoip.com/OAB
ExternalUrl : https://mail.exoip.com/OAB
Identity    : EX01-2016\OAB (Default Web Site)


[PS] C:\>Remove-OabVirtualDirectory -Identity "EX01-2016\OAB (Default Web Site)" -Confirm:$false -Force


[PS] C:\>New-OabVirtualDirectory -Server "EX01-2016" -InternalUrl "https://mail.exoip.com/OAB" -ExternalUrl "https://mail.exoip.com/OAB"
Server    Name                   Internal Url               External Url
------    ----                   ------------               ------------
EX01-2016 OAB (Default Web Site) https://mail.exoip.com/OAB https://mail.exoip.com/OAB
Recreate OwaVirtualDirectory
Recreate owa virtual directory.
[PS] C:\>Get-OwaVirtualDirectory -Server "EX01-2016" | Format-List Server, Name, InternalUrl, ExternalUrl, Identity


Server      : EX01-2016
Name        : owa (Default Web Site)
InternalUrl : https://mail.exoip.com/owa
ExternalUrl : https://mail.exoip.com/owa
Identity    : EX01-2016\owa (Default Web Site)


[PS] C:\>Remove-OwaVirtualDirectory -Identity "EX01-2016\owa (Default Web Site)" -Confirm:$false


[PS] C:\>New-OwaVirtualDirectory -Server "EX01-2016" -InternalUrl "https://mail.exoip.com/owa" -ExternalUrl "https://mail.exoip.com/owa"

Name                   Server    OwaVersion
----                   ------    ----------
owa (Default Web Site) EX01-2016 Exchange2013
Recreate PowerShellVirtualDirectory
Recreate PowerShell virtual directory.
You must open PowerShell or PowerShell ISE and run the following cmdlets. That’s because you can’t recreate a PowerShell virtual directory if you are in a session (Exchange Management Shell). The first cmdlet will load the Microsoft Exchange Management Powershell Snapin.
PS C:\> Add-PSSnapin Microsoft.Exchange.Management.PowerShell.SnapIn


PS C:\> Get-PowerShellVirtualDirectory -Server "EX01-2016" | Format-List Server, Name, InternalUrl, Externalurl, Identity


Server      : EX01-2016
Name        : Powershell (Default Web Site)
InternalUrl : https://mail.exoip.com/PowerShell
ExternalUrl : https://mail.exoip.com/PowerShell
Identity    : EX01-2016\Powershell (Default Web Site)


PS C:\> Remove-PowerShellVirtualDirectory -Identity "EX01-2016\PowerShell (Default Web Site)" -Confirm:$false


PS C:\> New-PowerShellVirtualDirectory -Server "EX01-2016" -Name Powershell -InternalUrl https://mail.exoip.com/PowerShell -ExternalUrl https://mail.exoip.com/PowerShell -RequireSSL:$false

Name                          Server
----                          ------
Powershell (Default Web Site) EX01-2016
Recreate WebServicesVirtualDirectory
Recreate EWS virtual directory.
[PS] C:\>Get-WebServicesVirtualDirectory -Server "EX01-2016" | Format-List Server, Name, InternalUrl, ExternalUrl, Identity


Server      : EX01-2016
Name        : EWS (Default Web Site)
InternalUrl : https://mail.exoip.com/EWS/Exchange.asmx
ExternalUrl : https://mail.exoip.com/EWS/Exchange.asmx
Identity    : EX01-2016\EWS (Default Web Site)


[PS] C:\>Remove-WebServicesVirtualDirectory -Identity "EX01-2016\EWS (Default Web Site)" -Confirm:$false -Force
WARNING: Outlook Web App won't function correctly if you remove the Exchange Web Services virtual directory "EX01-2016\EWS (Default Web Site)". To disable Exchange Web Services without blocking access to Outlook Web
App, you can use "Set-CASMailbox -Identity <user> -EwsEnabled:$false" or "Set-OrganizationConfig -Identity <org> -EwsEnabled:$false".


[[PS] C:\>New-WebServicesVirtualDirectory -Server "EX01-2016" -InternalUrl "https://mail.exoip.com/EWS/Exchange.asmx" -ExternalUrl "https://mail.exoip.com/EWS/Exchange.asmx"

Name                   Server    InternalUrl
----                   ------    -----------
EWS (Default Web Site) EX01-2016 https://mail.exoip.com/EWS/Exchange.asmx
Restart IIS or reboot the Exchange Server.
Verify virtual directories in Exchange Admin Center
Start your favorite browser and sign in to Exchange Server Admin Center (EAC). The localhost link is https://localhost/ecp. Next, navigate to servers > virtual directories and select the server on which you recreated the virtual directories.

The Exchange virtual directories are recreated and showing successfully. Did it work for you?
Keep reading: Recreate arbitration mailboxes in Exchange Server »
Conclusion
You learned how to recreate virtual directories in Exchange Server. We did reset Exchange virtual directories with PowerShell. The cmdlets did get the virtual directory, remove the virtual directory and, as of last, create the virtual directory. It’s always good to check the virtual directories in Exchange Admin Center to verify if they are created.
Did you enjoy this article? You may also like Recreate audit log mailbox in Exchange Server. Don’t forget to follow us and share this article.
What Others Are Reading

Hi Ali, I do not know if you may have the time to give me an advice, I try.
I am migrating from Exchange 2013 (latest CU/SU) to Exchange 2019 CU14. No EPA enabled on any CAS to not break PFs access that are on 2013. It is a simple environment, single Exchange server (no DAG).
I did several migrations in the past so I am quite used to it.
I reached the step where Exchange 2019 is the frontend CAS, and manages all the inbuond and outbound mailflow. Arbitration mailboxes already moved to it, as well as the discovery mailbox.
Client connectivity is almost all fine, OWA, Outlook client*, ActiveSync.
The * on Outlook client above is because I am facing an odd issue.
All my internal Outlook clients did not even notice when I changed the DNS (internal and external) pointing to the new CAS. The same for mobile devices.
The thing is that if I try to setup a new Outlook desktop test account, whose mailbox resides on Exchange 2019, and in the Outlook account creation wizard I choose “Exchange”, a credential prompt pops up. If I enter the correct credentials it works.
If, on the other hand, I choose “Exchange 2013 and Previous versions” the profile gets configured correctly automatically, with no prompts as it should be.
I traced what happens with Fiddler. When I face the credentials popup, in Fiddler I see a “401” response on “autodiscover.contoso.com” with “X-CASErrorCode: UnauthenticatedRequest”. Nothing more.
If I choose “Exchange 2013 and previous versions”, in place of the 401 response I get a 200 and the Kerberos ticket provided (I have ASA credentials in place on both Ex2013 and Ex2019). Then all the autodiscover configuration is retrieved.
Summing it up, it is something that occurs at the very beginning when contacting the autodiscover service. I commented under this post because it seems to me a permission related issue on the autodiscover virtual directory.
A last hint: when I firts setup Exchange 2019 I entered manually in ADSI the SCP value in the newly created Autodiscover entries in AD, because I thought to cause less problems to my clients with the certs popups. It did not like it. So I nulled it out from EMS and properly set it again with the usual cmdlet. Then everything worked. Maybe this caused some mess with the permissions on the autodiscover virtual directory?
Thank you very much for your time,
Francesco
Hi Ali,
Thank for your amazing tutos & always clear explanations. This one help me a lot. 😉
ps : Unquestionably one of the best ref website for Exchange administrator.
Regards,
Thank you, Sam! And you’re welcome.
HI Ali,
i was change internal and external url for all virtual directories, but after that internal working just fine but external dont. When i try open OWA receive 403 Forbidden Request forbidden by administrative rules. Also i try to recreate all directories but still the same.
Please help
Your articles are amazing and a huge help. Thank you.
Hi ali, i got the error like 404 not found when accessing the owa and ecp when i used other ISP to test the external. hope you help me on this matter. thank you.
I get the error below when I try login to ECP
***NegotiateSecurityContext failed with for host ‘mail.domain.org’ with status ‘LogonDenied’***
What could be the problem and what’s the possible solution to it. I have tried running the two update files in Exchange Bin and run IIS reset yet problem persists.
Hi, I am getting the below error on fresh install of exchange 2019 and was going to try to recreate the RPC virtual directory. Is it possible to do that?
[PS] C:\Windows\system32>Test-OutlookConnectivity -ProbeIdentity Outlook.protocol\OutlookRPCSelfTestProbe
WARNING: Failed Probe Result Details:
Error: The remote server returned an error: (403) Forbidden.
Exception: System.Net.WebException: The remote server returned an error: (403) Forbidden.
at System.Net.HttpWebRequest.EndGetResponse(IAsyncResult asyncResult) at Microsoft.Exchange.RpcClientAccess.Monitoring.VerifyRpcProxyClient.VerifyRpcProxyContext.OnEnd(IAsyncResult
asyncResult)
at Microsoft.Exchange.RpcClientAccess.Monitoring.ClientCallContext`1.InternalEnd(IAsyncResult asyncResult)
Hello,
I would like to know how to enable HSTS on exchange server 2016 or 2019.
is it even supported.
I tried looking around many places , but no concrete information.
Thank you
Manju
You can read the article Configure HSTS on Exchange Server.
Hello and thanks for the detailed article.
So every virtual directory must point to https://mail.exoip.com/PowerShell, except AutoDiscover. Is that right?
thanks again
Hi Saeed,
That’s correct.
Hi Ali,
I may need your help in a matter of recreating the owa and ecp virtual directories for an exchange2013.
I removed them, after some errors and reading your amazing guides.
But when I run the command to recreate the ecp directory it doesn’t do aanything and I do not see it created in IIS and metabase explorer.
owa seems to be created, but I still get the blank page when I try to login.
Also the EMC console when I run a command, is very slow in responde and I don’t know why. Sometimes after a command is taking 5-10min and after that nothing, no error, no OK, no response, just the [PS] prompt again.
Please, I need your help, I don’t know what to do more.