There are many distribution groups, and we like to get all the members and owners.…
Configure DKIM record for Office 365
In the previous article, we looked at how to configure the SPF record for Office 365. An excellent way to protect both senders and recipients from phishing mail is to configure a DKIM record for Office 365. In this article, we will look at how to configure and enable DKIM record for Office 365.
Table of contents
What is DomainKeys Identified Mail (DKIM)?
DomainKeys Identified Mail (DKIM) is an authentication process that can help protect both senders and recipients from forged and phishing email. Add DKIM signatures to your domains, so recipients know that email messages actually came from users in your organization and weren’t modified after they were sent.
How to configure Office 365 DKIM in Microsoft portal
To set up Office 365 DKIM for the domain in the Microsoft 365 portal, go through the below steps:
1. Create Office 365 DKIM keys
Step 1. Sign in to Microsoft 365 security center.
Step 2. Expand Email & collaboration and click on Policies & rules.
Step 3. Click on Threat Policies.
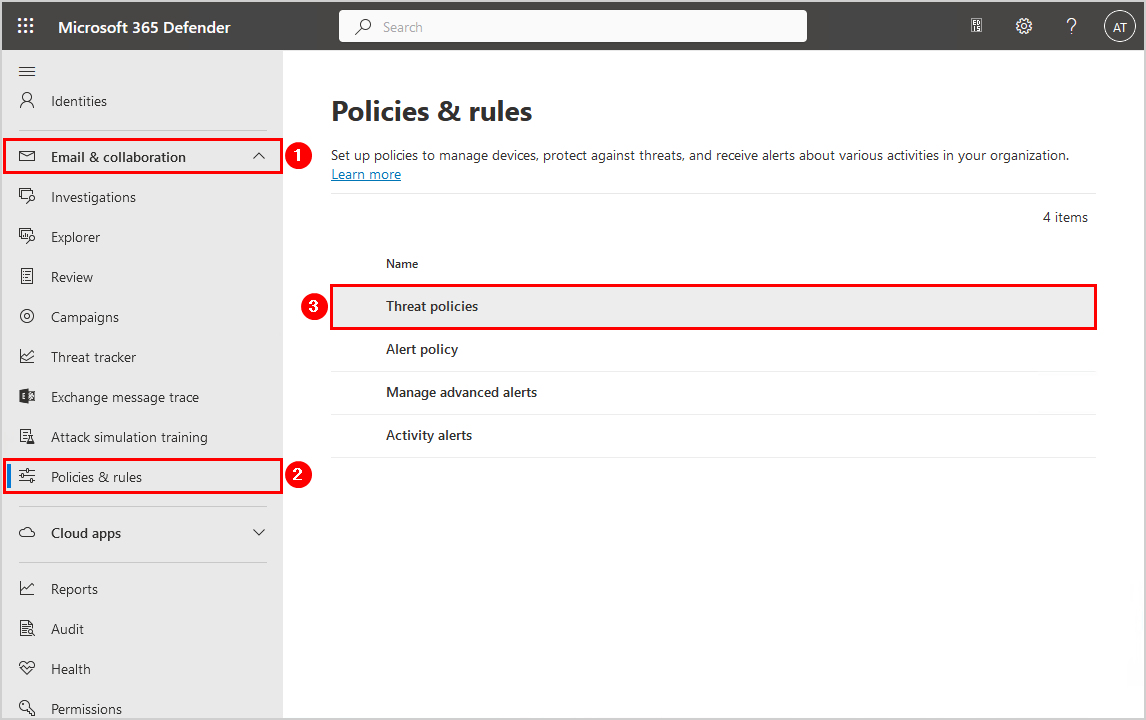
Step 4. Click on Email authentication settings.

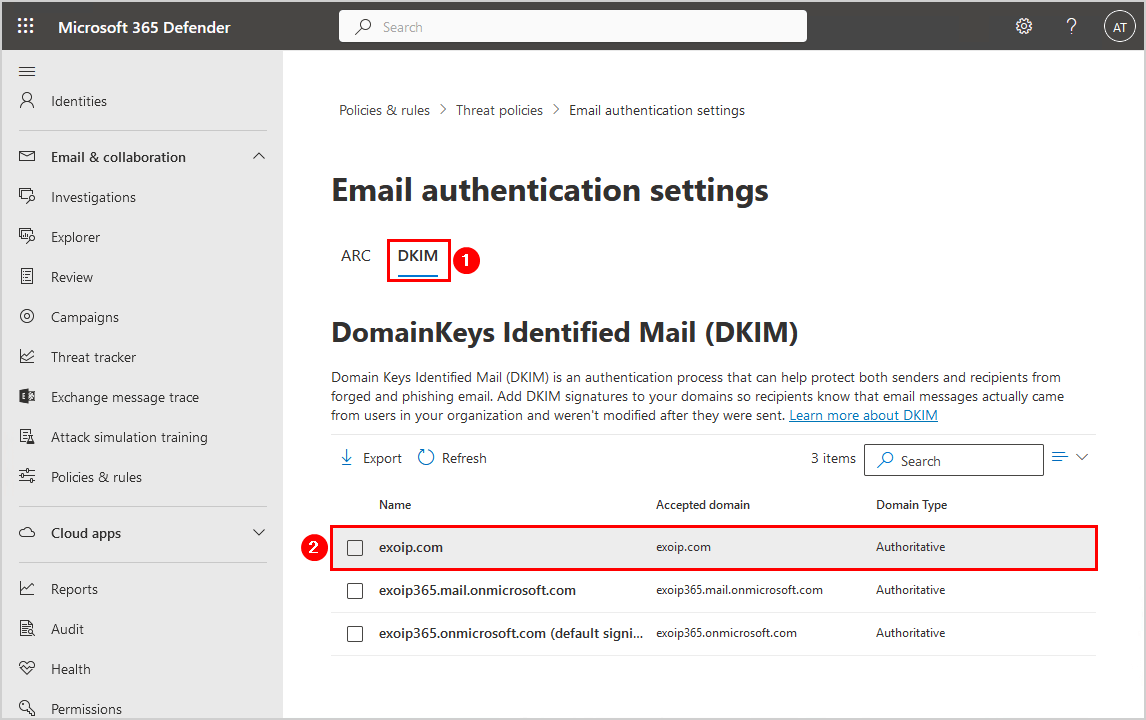
Step 5. Click on DKIM.
Note: Another option is to go directly to the DKIM configuration page through the link https://security.microsoft.com/dkimv2.
Step 6. Click on the domain in the list view. In this example, the domain exoip.com.
Step 7. Click on Create DKIM keys to enable DKIM.
Note: DKIM is by default disabled for every domain you add in Office 365/Microsoft 365. Microsoft can’t automatically enable this as it relies on certain DNS records added to the domain’s registrar.
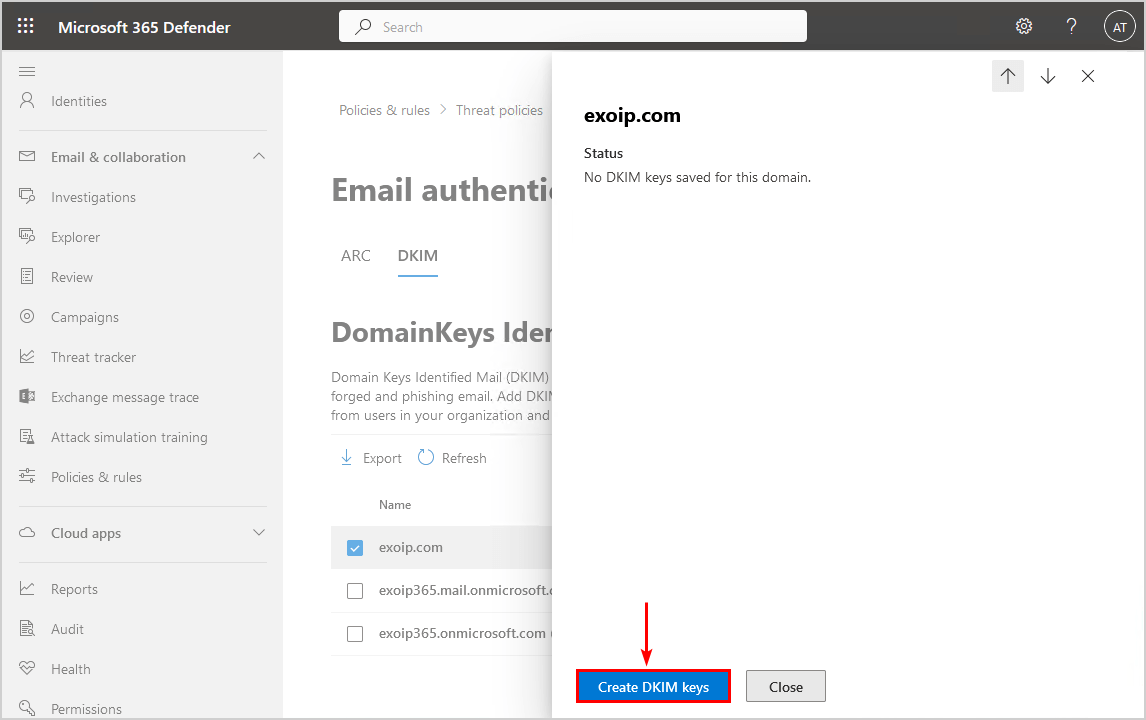
A message will show that it can’t enable DKIM because the CNAME record does not exist for this config. That’s correct because we need to add a couple of CNAMES in the domain’s registrar. After that, we will return to this page and enable DKIM.
Step 8. Click Copy.
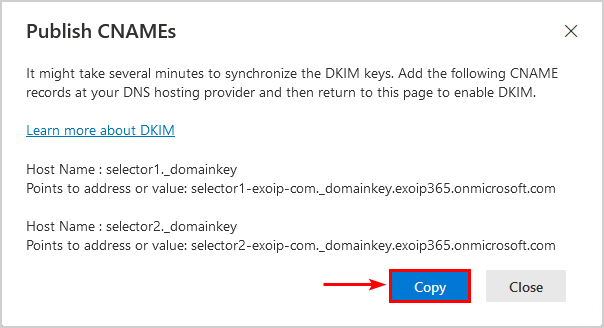
If you want to add more than one domain, change the domain and tenant in the selector value. Everything else looks the same.
2. Add Office 365 DKIM CNAME records to domain’s registrar
Go to the domain’s registrar and add the two CNAME records.
Note: Pay close attention, as some registrars want you to add a dot at the end of the value, and others don’t. You can verify by checking other records and see if they have a dot at the end of their value. If you are not sure, contact your domain’s registrar.
In our example, a dot must be added at the end of the value. It will look like below.
Name                   TTL      Type    Value
----                   ---      ----    -----
selector1._domainkey   5 min.   CNAME   selector1-exoip-com._domainkey.exoip365.onmicrosoft.com.
selector2._domainkey   5 min.   CNAME   selector2-exoip-com._domainkey.exoip365.onmicrosoft.com.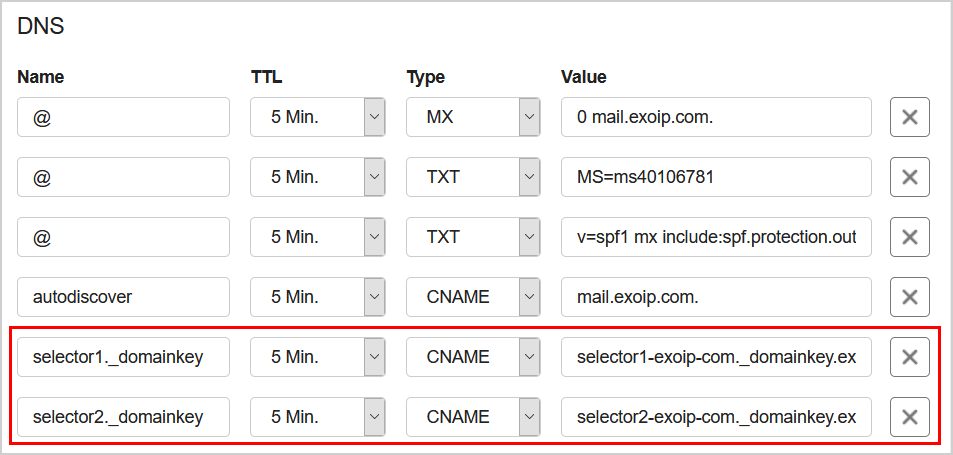
We have to wait 15 minutes to an hour before changes take effect.
3. Enable Office 365 DKIM
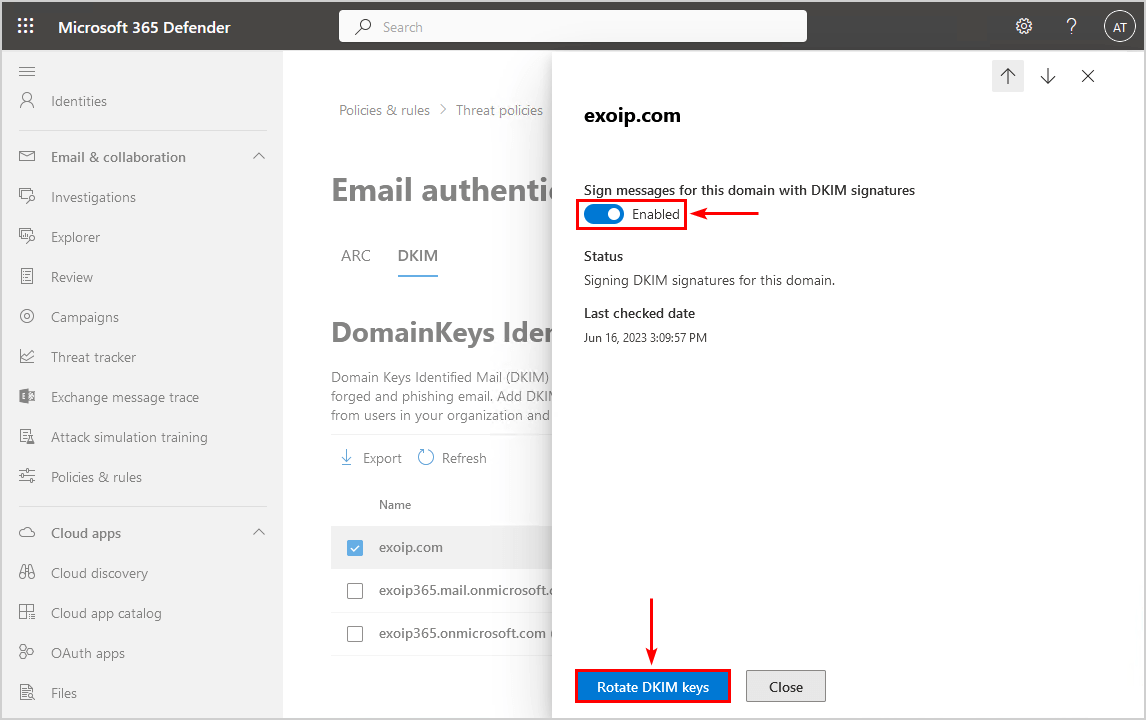
Return to the Microsoft 365 security center and Enable DKIM for Office 365.
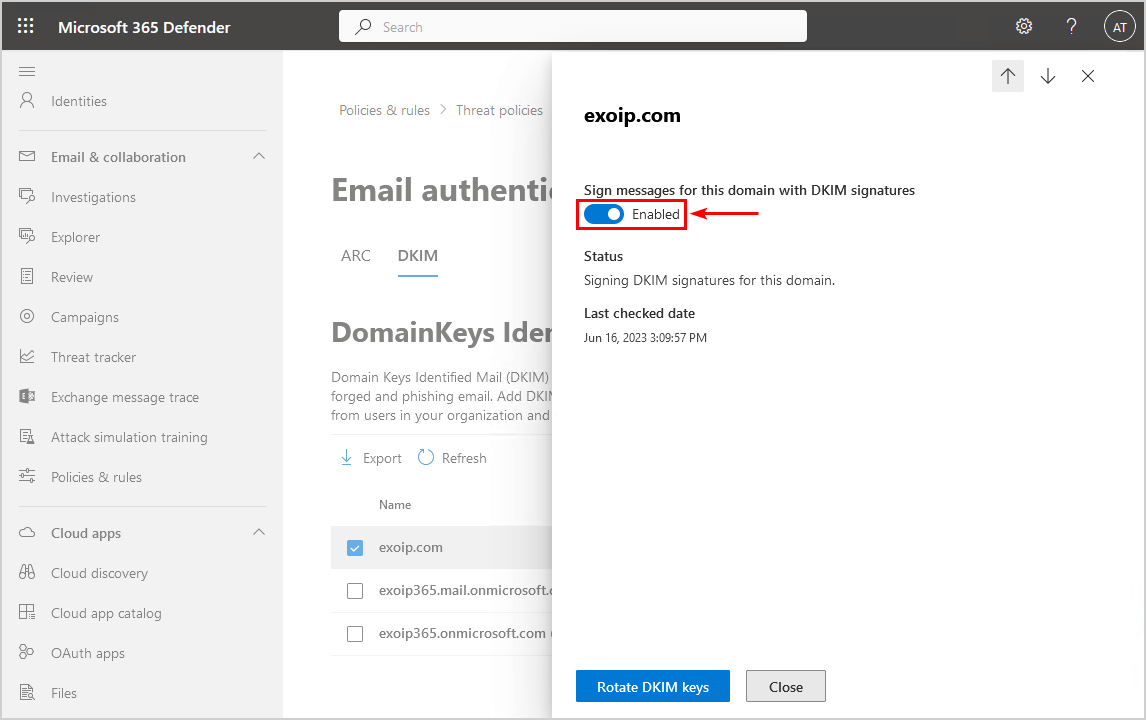
Note: It’s important to Rotate DKIM keys every 6 months for security purposes. Read more in the article Rotate DKIM keys in Microsoft 365.
How to configure Office 365 DKIM with PowerShell
To set up Office 365 DKIM for the domain with PowerShell, follow the below steps:
1. Connect to Exchange Online PowerShell
Run PowerShell as administrator and Connect to Exchange Online PowerShell.
PS C:\> Connect-ExchangeOnline -UserPrincipalName admin@exoip365.onmicrosoft.com2. Get Office 365 DKIM selector
Run the Get-DkimSigningConfig cmdlet to get the Office 365 DKIM selectors.
PS C:\> Get-DkimSigningConfig -Identity "exoip.com" | fl Selector1CNAME,Selector2CNAME

Selector1CNAME : selector1-exoip-com._domainkey.exoip365.onmicrosoft.com
Selector2CNAME : selector2-exoip-com._domainkey.exoip365.onmicrosoft.com
Go to the domain’s registrar and add the two CNAME records.
3. Enable DKIM for the domain
Run the Set-DkimSigningConfig cmdlet to enable DKIM for the domain.
PS C:\> Set-DkimSigningConfig -Identity "exoip.com" -Enabled $trueNote: It’s important to Rotate DKIM keys every 6 months for security purposes. Read more in the article Rotate DKIM keys in Microsoft 365.
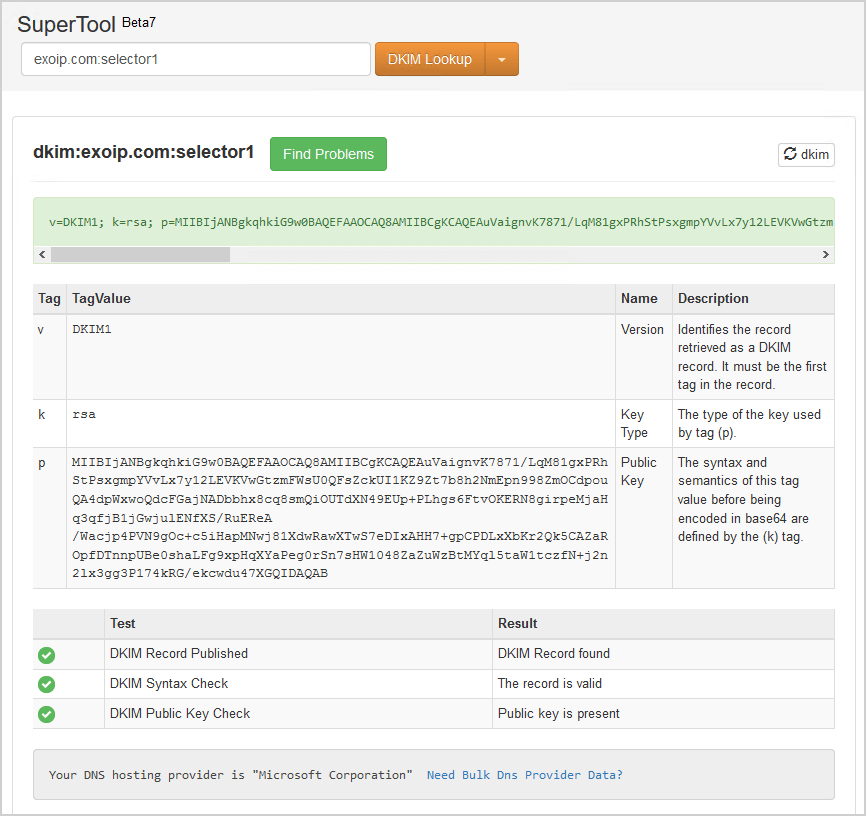
DKIM record check
Once you have DKIM configured for the Office 365 domain, it’s good to check both DKIM selectors.
Go to MxToolbox. Fill in the domain name and selector1. Click DKIM Lookup.
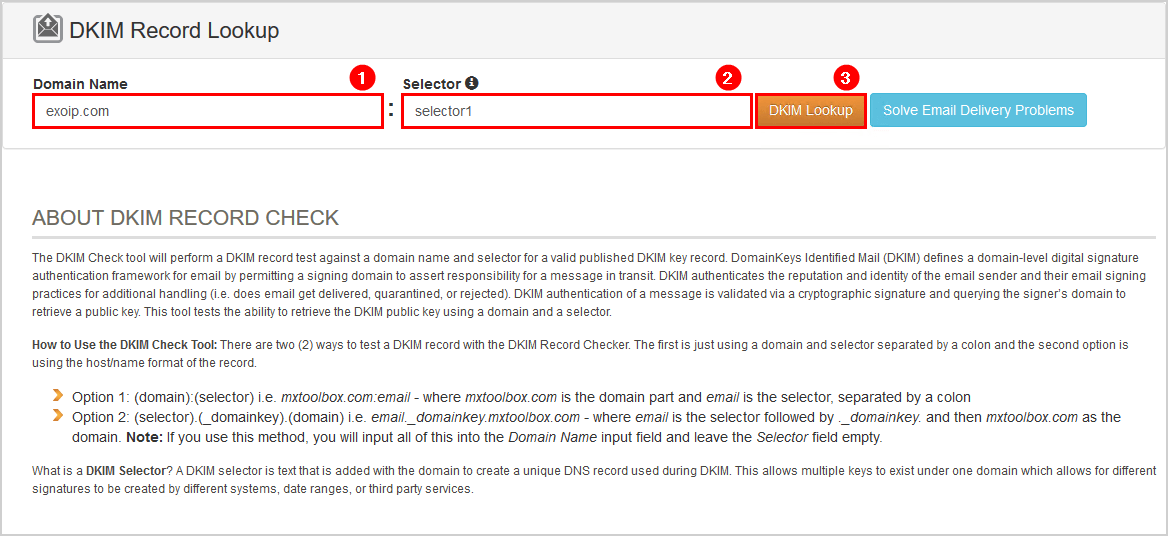
The DKIM selector1 record is published.
Change the lookup field to selector2 and click on DKIM Lookup. The DKIM selector2 record is published.
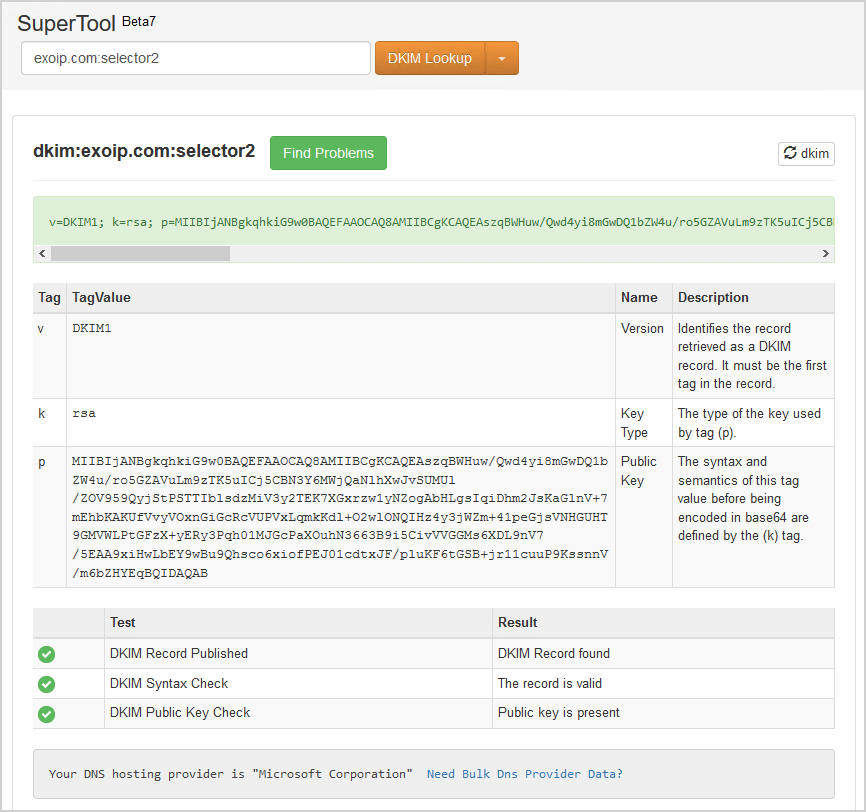
We did successfully configure the DKIM record for the Office 365 domain.
No DKIM Record found
Suppose you get a result that shows No DKIM Record found.
Read more in the article DKIM selector2 not working for Microsoft 365 domain.
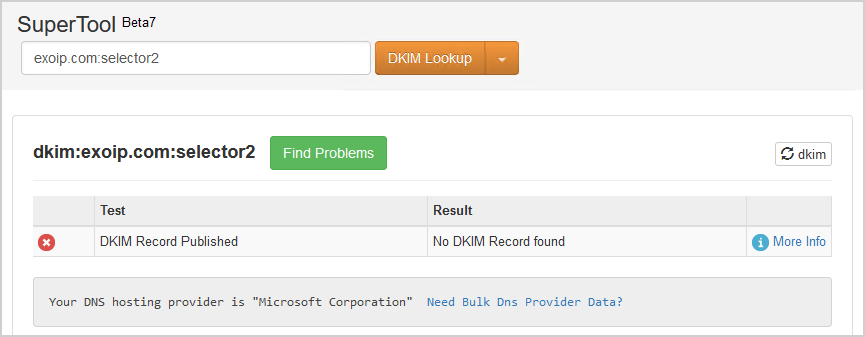
Go back to the Microsoft 365 security center and click on Rotate DKIM keys.
Wait a couple of minutes and check again in MxToolbox. It will show the result DKIM record found.
In the next article, we will change Users UPN with PowerShell.
Conclusion
You learned how to configure DKIM record for Office 365. Sign in to the Microsoft 365 security portal and go to the DKIM policy. Enabling DKIM for the domain will not work without first creating the CNAME records in the domain’s registrar.
Sign in to the domain’s registrar and publish the CNAME records selector1 and selector2. After that, wait for 15 minutes before enabling DKIM in Microsoft 365 security portal. You can always use MxToolbox to perform a DKIM record test against the domain name and selector for a valid published DKIM key record.
Did you enjoy this article? You may also like Add second domain to Exchange Server. Don’t forget to follow us and share this article.
What Others Are Reading

Thanks for writing. It was the easiest to understand. The note about registrars was helpful.
Great post Ali, I’ve jut run the Secure Cloud Business Applications (SCuBA) baseline report against my MS365 tenant and its flagged that dkim should be configured for the mail.onmicrosoft.com and onmicrosoft.com domains is this needed?
Microsoft 365 automatically sets up DKIM for its initial ‘onmicrosoft.com’ domains. That means you don’t need to do anything to set up DKIM for any initial domain names.
If it doesn’t appear as enabled for the onmicrosoft.com domains, enable it.
I have hybrid environment. On-premises email is routed from ESA. and mailbox which are moved in office 365 is directly going outside from office 365. in this case do I have to setup two DKIM key ?
Yes, you need to set up multiple DKIM records on your domain.
A domain can have as many DKIM records for public keys as servers that send mail. Just make sure that they use different selector names.
Thanks, allot for your quick answer.
Thanks for all your great posts. Trying to understand DKIM a bit better. If you have a hybrid environment and set dkim up only in the office 365 side, how does this affect emails sent from on-premise mailboxes that don’t yet route through 365?
Thanks,
B
Hi
Have You instruction to setup DKIM and DMARC for Exchange 2016 ?
You need to configure DKIM in your third-party hygiene solution (spam filter). Once that is done, you can configure DMARC.
Here is how to set up DKIM with the SpamBull cloud spam filter
Very clear! This and the SPF for Office 365 post are really helpful.