In the previous article, we did install and configure Azure AD Connect to sync identities…
How to clear Microsoft Teams cache
Microsoft Teams can have stubborn issues and not download all the data correctly. By clearing the Microsoft Teams cache on the client side, it downloads everything again with all fresh data. In this article, you will learn how to clear the cache for the new Microsoft Teams and classic Microsoft Teams versions manually and with PowerShell.
Table of contents
- What does clearing Microsoft Teams cache do?
- Check Microsoft Teams version
- Clear classic Microsoft Teams cache
- Clear classic Microsoft Teams cache with PowerShell
- Clear new Microsoft Teams cache
- Clear new Microsoft Teams cache with PowerShell
- Clear classic Microsoft Teams cache on Mac OS
- Clear new Microsoft Teams cache on Mac OS
- Conclusion
What does clearing Microsoft Teams cache do?
Clearing the Teams cache will force the Teams client to re-download fresh information, such as thumbnails, icons, and others, from the Microsoft cloud servers.
Everything is stored in your account on the Microsoft servers. The clear cache process just removes local settings and repeated information, the same as when you browse through different internet sites with a browser.
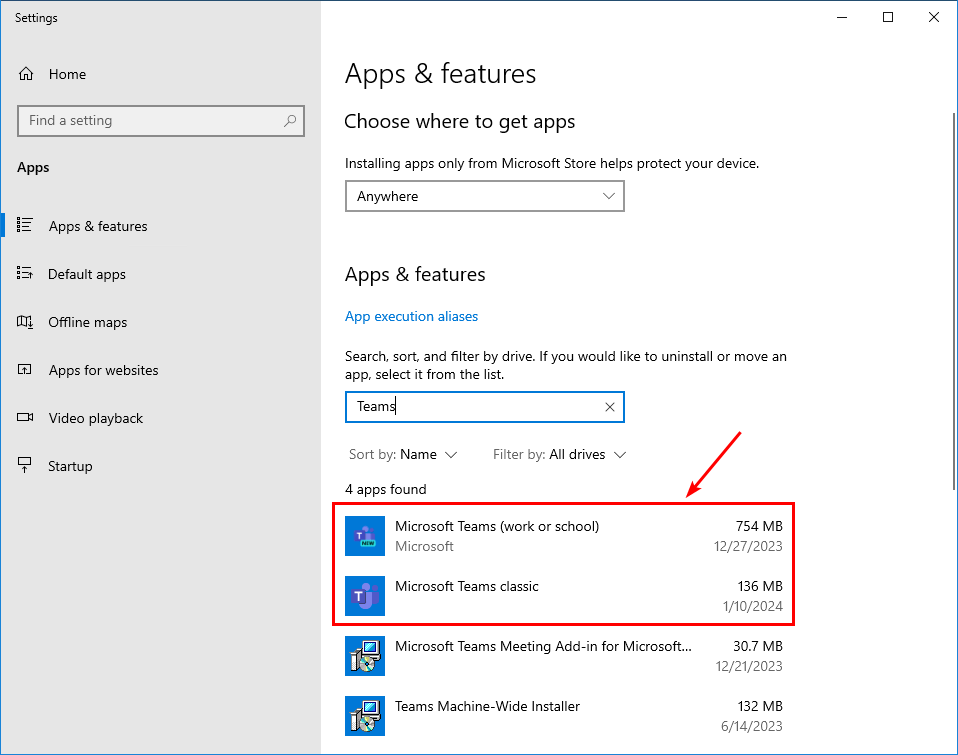
Check Microsoft Teams version
There are two Microsoft Teams versions referenced as:
- New Microsoft Teams.
- Classic Microsoft Teams.
You can open Microsoft Teams, go to the About window, and see which version you are running. Another way is to go to the Installed Apps section and check it from there.
In our example, both Microsoft Teams versions are installed.
Note: Microsoft Teams classic will appear in the old Programs and Features setting and the new Apps & features setting. But Microsoft Teams new will only appear in the new Apps & features setting because it’s differently built.
Clear classic Microsoft Teams cache
To remove the classic Microsoft Teams cache manually on Windows, follow the below steps:
- Right-click the Teams icon on the taskbar, and then select Quit.
- Open File Explorer and go to the below path:
%appdata%\Microsoft\Teams- Remove all files and folders in the directory.
- Start Microsoft Teams classic.
Clear classic Microsoft Teams cache with PowerShell
The PowerShell script will remove the cache from the classic Microsoft Teams. It works for all Windows versions.
Note: The Backgrounds folder is excluded, so it will not remove your custom backgrounds. If you also want to remove it, remove -Exclude ‘Backgrounds’ from the script.
# Clear the classic Microsoft Teams cache
$proc = Get-Process 'Teams' -ErrorAction SilentlyContinue
$proc | Stop-Process
Start-Sleep -Seconds 3
$cacheFolderPath = "$($env:APPDATA)\Microsoft\Teams"
$cacheItems = Get-ChildItem $cacheFolderPath -Exclude 'Backgrounds'
$cacheItems | Remove-Item -Recurse -Force
$startProcessArgs = @{
    FilePath     = "$($env:LOCALAPPDATA)\Microsoft\Teams\Update.exe"
    ArgumentList = '--processStart "Teams.exe"'
}
Start-Process  @startProcessArgs
Clear new Microsoft Teams cache
To remove the classic Microsoft Teams cache manually on Windows, follow the below steps:
- Right-click the Teams icon on the taskbar, and then select Quit.
- Open File Explorer and go to the below path:
%userprofile%\appdata\local\Packages\MSTeams_8wekyb3d8bbwe\LocalCache\Microsoft\MSTeams- Remove all files and folders in the directory.
- Start Microsoft Teams new.
Clear new Microsoft Teams cache with PowerShell
The PowerShell script will remove the cache from the new Microsoft Teams. It works for all Windows versions.
Note: The Backgrounds folder is excluded, so it will not remove your custom backgrounds. If you also want to remove it, remove -Exclude ‘Backgrounds’ from the script.
# Clear the new Microsoft Teams cache
$proc = Get-Process 'ms-teams' -ErrorAction SilentlyContinue
$proc | Stop-Process
Start-Sleep -Seconds 3
$cacheFolderPath = "$($env:LOCALAPPDATA)\Packages\MSTeams_8wekyb3d8bbwe\LocalCache\Microsoft\MSTeams"
$cacheItems = Get-ChildItem $cacheFolderPath -Exclude 'Backgrounds'
$cacheItems | Remove-Item -Recurse -Force
$teamsAppId = 'MSTeams_8wekyb3d8bbwe!MSTeams'
$startProcessArgs = @{
    FilePath     = 'explorer.exe'
    ArgumentList = "shell:AppsFolder\$teamsAppId"
}
Start-Process  @startProcessArgs
Clear classic Microsoft Teams cache on Mac OS
To remove the classic Microsoft Teams cache on Mac OS, follow the below steps:
- Right-click the Teams icon in the dock, and then select Quit.
- Open Finder, and open the /Applications/Utilities folder, and then double-click Terminal.
- Enter the following command, and then press Return:
rm -r ~/Library/Application\ Support/Microsoft/Teams- Start Microsoft Teams.
Clear new Microsoft Teams cache on Mac OS
To remove the new Microsoft Teams cache on Mac OS, follow the below steps:
- Right-click the Teams icon in the dock, and then select Quit.
- Open Finder, and open the /Applications/Utilities folder, and then double-click Terminal.
- Enter the following command, and then press Return after each command:
rm -rf ~/Library/Group Containers/UBF8T346G9.com.microsoft.teams
rm -rf ~/Library/Containers/com.microsoft.teams2- Start Microsoft Teams new.
That’s it!
Read more: Teams delegate schedule error in Outlook »
Conclusion
You learned how to clear the Microsoft Teams cache. Follow the appropriate steps for the Microsoft Teams version you want to remove the cache from. This can be Microsoft Teams classic or Microsoft Teams new.
Did you enjoy this article? You may also like Manage Teams meeting delegate permission. Don’t forget to follow us and share this article.
What Others Are Reading

This Post Has 0 Comments