The SpamBull cloud spam filter has a 7-day trial for everyone! So start a 7-day…
Complete migration batch with PowerShell
How to complete a migration batch with PowerShell in Exchange Online manually? You created new batches, and the mailboxes are in sync between Exchange On-Premises and Exchange Online. To finish the migration, you need to complete the batches. After that, the destination of the mailbox is in Exchange Online. In this article, you will learn how to complete a migration batch in Office 365 with PowerShell.
What if you want to complete an individual mailbox from the migration batch? Read more in our article complete individual mailbox move request from migration batch.
Table of contents
Connect to Exchange Online PowerShell
Run PowerShell as administrator and connect to Exchange Online PowerShell.
Get migration batch
Run the Get-MigrationBatch cmdlet to get the migration batches.
There are two migration batches created. Both batches are in sync between the Exchange organizations (On-Premises and Online).
PS C:\> Get-MigrationBatch

Identity         Status Type               TotalCount
--------         ------ ----               ----------
MigrationBatch01 Synced ExchangeRemoteMove 5
MigrationBatch02 Synced ExchangeRemoteMove 13
Read more: Schedule mailbox batch migration »
Complete migration batch
Run the Complete-MigrationBatch cmdlet to complete the migration batch in Office 365. Next, confirm with A and press Enter.
PS C:\> Complete-MigrationBatch -Identity "MigrationBatch01"

Confirm
Are you sure you want to perform this action?
Complete migration batch "MigrationBatch01"?
[Y] Yes  [A] Yes to All  [N] No  [L] No to All  [?] Help (default is "Y"):
Note: Do you get a bad encountered confirmation output? Read the article Complete mailbox migration with bad items.
If you don’t want to show the confirmation prompt and immediately start completing the migration batch, add –Confirm:$False switch at the end of the command.
PS C:\> Complete-MigrationBatch -Identity "MigrationBatch01" -Confirm:$FalseGet batch move request
Run the Get-MoveRequest, including -BatchName parameter, to check the mailbox move request status of the batch.
PS C:\> Get-MoveRequest -BatchName "MigrationService:MigrationBatch01" -ResultSize Unlimited | Get-MoveRequestStatistics

DisplayName    StatusDetail    TotalMailboxSize               TotalArchiveSize PercentComplete
-----------    ------------    ----------------               ---------------- ---------------
Thomas Wilkins IncrementalSync 67.87 MB (71,171,939 bytes)    0 B (0 bytes)    95
Amelia Nash    WorkItemPickup  48.22 MB (50,562,011 bytes)    0 B (0 bytes)    95
Sarah Coleman  IncrementalSync 322.8 MB (338,493,950 bytes)   0 B (0 bytes)    95
Simon Berry    IncrementalSync 1.768 GB (1,897,912,196 bytes) 0 B (0 bytes)    95
Curt Berry     WorkItemPickup  1.147 GB (1,231,440,391 bytes) 0 B (0 bytes)    95
You can also use the Get-MigrationUser cmdlet, including the -BatchId, parameter to check the mailbox move request status of the batch.
PS C:\> Get-MigrationUser -BatchId "MigrationBatch01" -ResultSize Unlimited | Get-MoveRequestStatistics

DisplayName    StatusDetail    TotalMailboxSize               TotalArchiveSize PercentComplete
-----------    ------------    ----------------               ---------------- ---------------
Thomas Wilkins IncrementalSync 67.87 MB (71,171,939 bytes)    0 B (0 bytes)    95
Amelia Nash    WorkItemPickup  48.22 MB (50,562,011 bytes)    0 B (0 bytes)    95
Sarah Coleman  IncrementalSync 322.8 MB (338,493,950 bytes)   0 B (0 bytes)    95
Simon Berry    IncrementalSync 1.768 GB (1,897,912,196 bytes) 0 B (0 bytes)    95
Curt Berry     WorkItemPickup  1.147 GB (1,231,440,391 bytes) 0 B (0 bytes)    95
Verify batch move request
If you have configured your email when creating the batches, you will get an email when it completes. If you didn’t do that or you like to keep track with PowerShell, keep running the command. In the end, it needs to show PercentComplete: 100% for all the mailboxes.
PS C:\> Get-MoveRequest -BatchName "MigrationService:MigrationBatch01" -ResultSize Unlimited | Get-MoveRequestStatistics
DisplayName StatusDetail TotalMailboxSize TotalArchiveSize PercentComplete
----------- ------------ ---------------- ---------------- ---------------
Thomas Wilkins Completed 67.87 MB (71,171,939 bytes) 0 B (0 bytes) 100
Amelia Nash Completed 48.22 MB (50,562,011 bytes) 0 B (0 bytes) 100
Sarah Coleman Completed 322.8 MB (338,493,950 bytes) 0 B (0 bytes) 100
Simon Berry Completed 1.768 GB (1,897,912,196 bytes) 0 B (0 bytes) 100
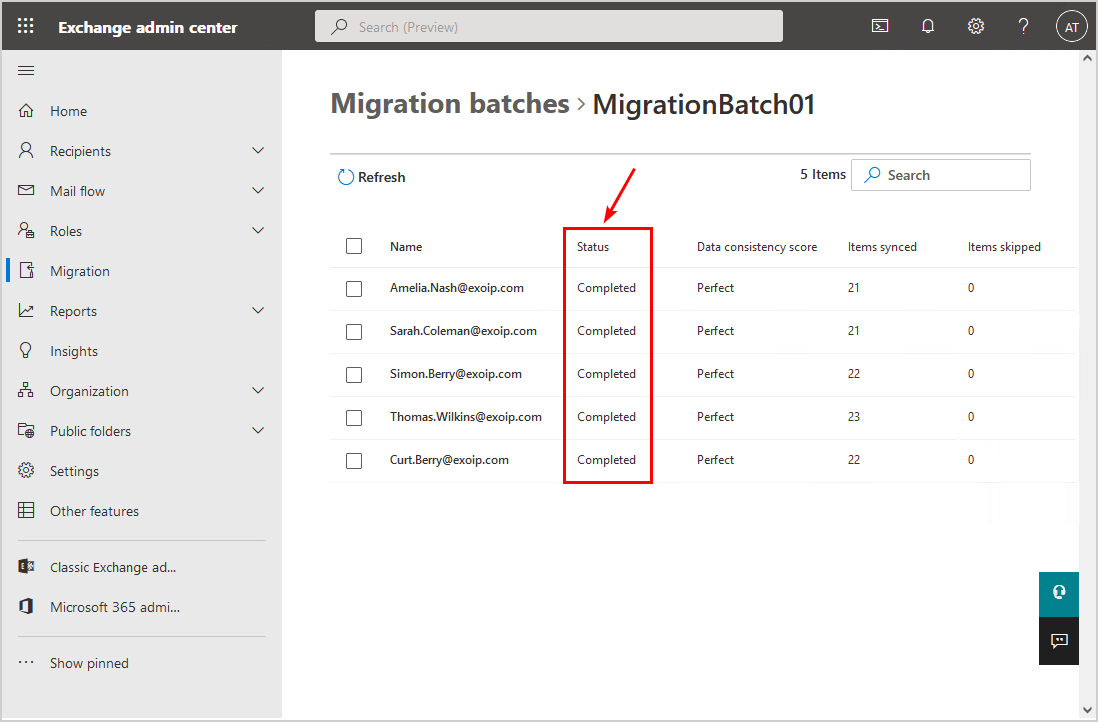
Curt Berry Completed 1.147 GB (1,231,440,391 bytes) 0 B (0 bytes) 100This is what MigrationBatch01 looks like in Microsoft 365 Exchange admin center.
Run Get-MigrationBatch cmdlet to verify if the batch is completed.
PS C:\> Get-MigrationBatch

Identity         Status    Type               TotalCount
--------         ------    ----               ----------
MigrationBatch01 Completed ExchangeRemoteMove 5
MigrationBatch02 Synced    ExchangeRemoteMove 13
The migration batch is completed successfully to Exchange Online.
Keep reading: Migrate mailboxes to Office 365 »
Conclusion
You learned how to complete the migration batch manually with PowerShell. Run Exchange Online PowerShell to manage the Exchange Online settings from the command line. Get the batch names, after that complete the mailbox migration batch.
Did you enjoy this article? You may also like Mailbox move failure – Troubleshoot and Fix. Don’t forget to follow us and share this article.
What Others Are Reading


This Post Has 0 Comments