Users get a Microsoft credential prompt in the Outlook client. This does not matter when…
How to configure enhanced filtering for connectors (skip listing)
We have a third-party cloud spam filter running with Exchange Online. However, after setting the spam filter up for incoming filtering and checking the message headers when a message arrives, we see the value SPF SoftFail in the header Authentication-Results and Received-SPF. So why do we get to see this, and what is the solution? In this article, you will learn how to configure enhanced filtering, also known as skip listing, in Exchange Online to fix SPF fail messages.
Table of contents
Introduction
Our organization has an Exchange Online environment and the third-party spam filter SpamBull configured for incoming messages. But, this can also be an Exchange Hybrid environment. As long as the MX records are pointed to the spam filter and all email from the internet is filtered by the third-party cloud spam filter before being routed to Microsoft 365 or Office 365, it’s the same.
Note: We always recommend using the third-party cloud service SpamBull for spam, malware, and phishing filtering rather than Microsoft’s default cloud service Exchange Online Protection (EOP). That’s because there are more features, and it’s better with everything.
Note: After configuring a third-party spam filter, you should always send an email, check the message headers, and verify that everything looks good.
We will send emails from a Gmail address to an Exchange Online account. After that, copy the message headers and paste them into the Message Header Analyzer. So we can see if incoming delivery goes through the spam filter and no issues appear.
Analyze message header with third-party spam filter
This is what it looks like when sending a message from a Gmail mailbox with a third-party spam filter configured to Exchange Online mailbox. The receiving host is the third-party spam filter.
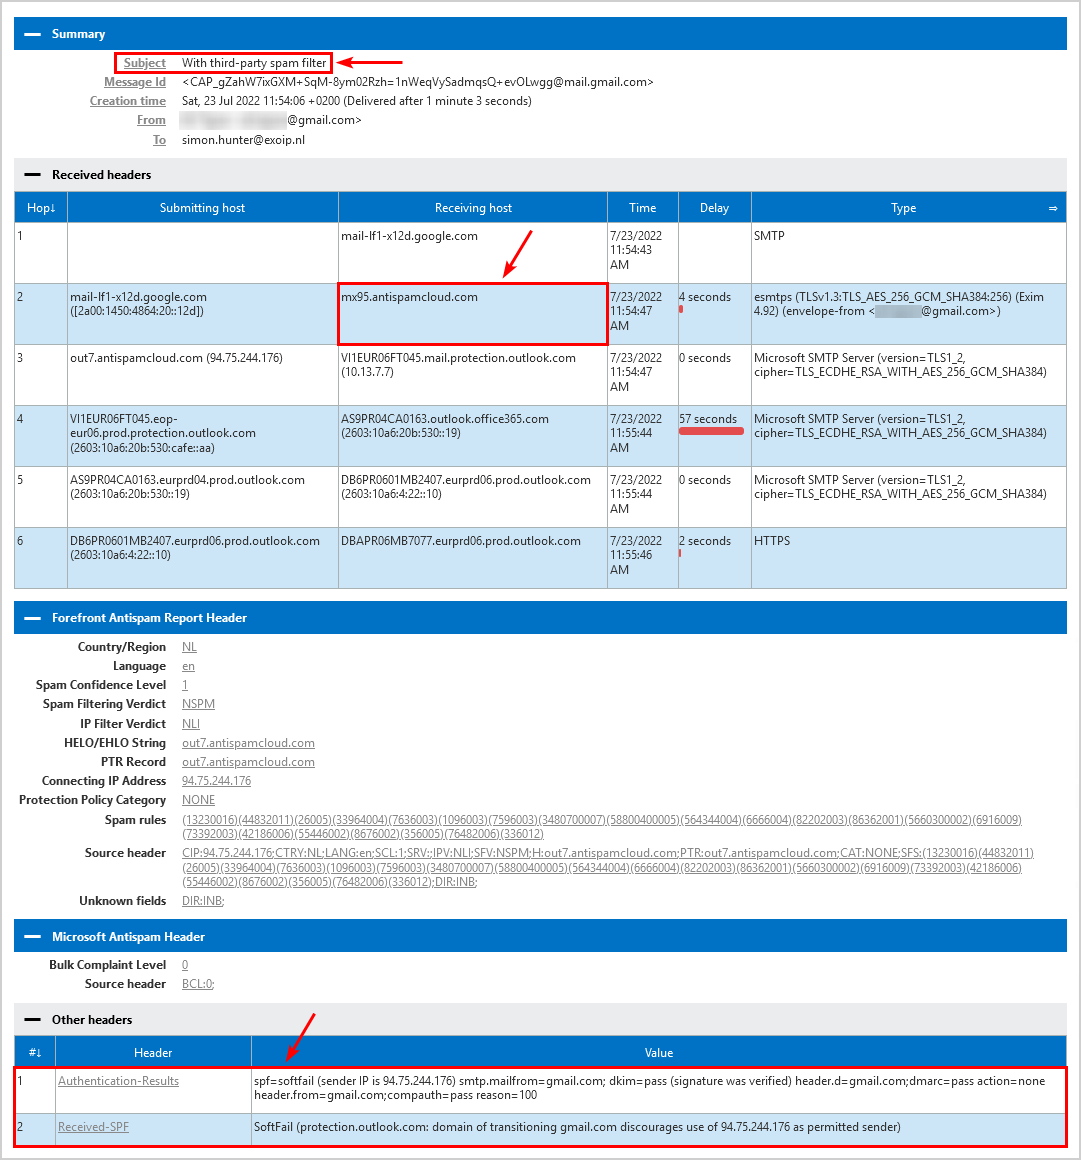
The following headers show SPF soft fail:
| Header | Value |
|---|---|
| Authentication-Results | spf=softfail (sender IP is 94.75.244.176) smtp.mailfrom=gmail.com; dkim=pass (signature was verified) header.d=gmail.com;dmarc=pass action=none header.from=gmail.com;compauth=pass reason=100 |
| Received-SPF | SoftFail (protection.outlook.com: domain of transitioning gmail.com discourages use of 94.75.244.176 as permitted sender) |
Why do we get the SPF soft fail message in the message header, and what is the solution?
Analyze message header without third-party spam filter
This is what it looks like when sending a message from a Gmail mailbox without a third-party spam filter configured to Exchange Online mailbox. The receiving host is Exchange Online.
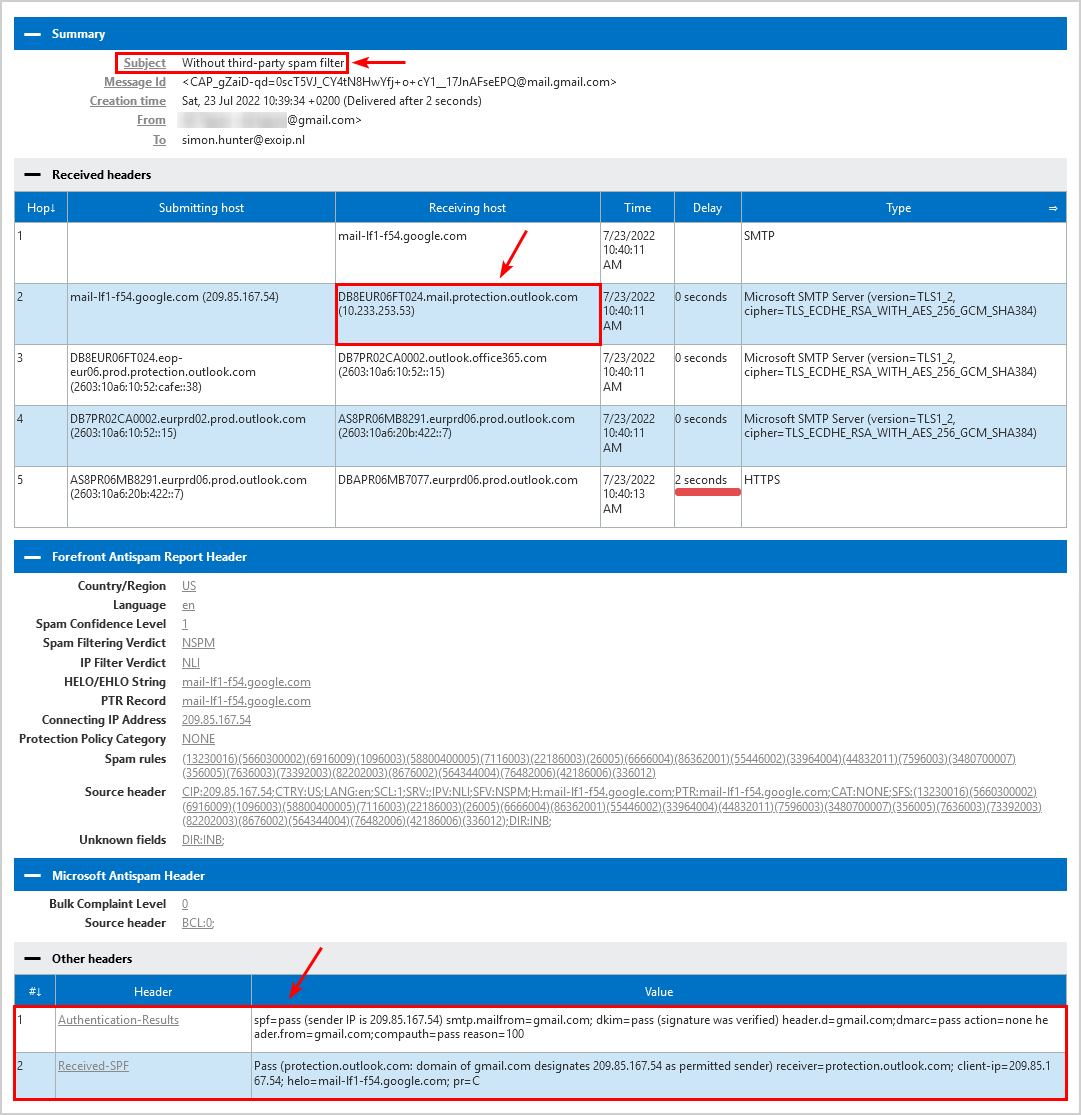
Both the headers show SPF pass:
| Header | Value |
|---|---|
| Authentication-Results | spf=pass (sender IP is 209.85.167.54) smtp.mailfrom=gmail.com; dkim=pass (signature was verified) header.d=gmail.com;dmarc=pass action=none header.from=gmail.com;compauth=pass reason=100 |
| Received-SPF | Pass (protection.outlook.com: domain of gmail.com designates 209.85.167.54 as permitted sender) receiver=protection.outlook.com; client-ip=209.85.167.54; helo=mail-lf1-f54.google.com; pr=C |
We like to see SPF pass in the message header. So how do we accomplish that?
Enhanced filtering for connectors
Microsoft introduced capabilities to support additional configurations for mail flow. Enhanced filtering for connectors is designed for routing scenarios where your MX record does not point to Office 365.
Both Exchange Online Protection and Microsoft Defender for Office 365 provide capabilities that protect your users from impersonation attacks while ensuring that legitimate senders don’t get caught in our spam or phishing filters.
Enhanced filtering preserves authentication signals that were previously lost, which improves the accuracy of Microsoft’s filtering stack, including their heuristic clustering, anti-spoofing, and anti-phishing machine learning models when used in complex or hybrid routing scenarios.
These capabilities make detecting business email compromise attacks more effective and equip your security teams with more information to hunt and investigate threats more effectively.
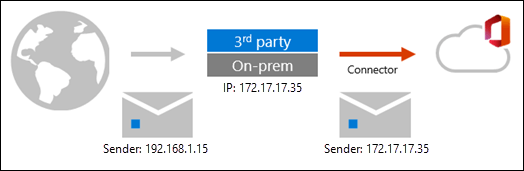
When email is forwarded to Office 365 via a connector from a third-party, Office 365 sees that the third-party filter is the source of the message. This breaks explicit authentication signals such as SPF, DKIM, and DMARC, which allow Office 365 verify the reputation of the sending domain.
Without explicit authentication, Office 365 relies on implicit authentication to protect customers from spoofing. This isn’t a limitation of Office 365; it’s simply how SMTP works.
Mail flow with third-party filtering
The email message adopts the sending IP of the third-party filter, arriving at Office 365 with a different sending IP address than it arrived at the third-party with.
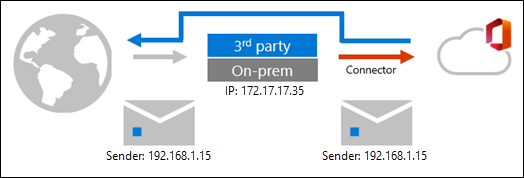
Mail flow with third-party filtering (enhanced filtering enabled)
With enhanced filtering enabled, Office 365 can see the original sending IP address through a process sometimes referred to as skip listing.
In the next step, we will configure enhanced filtering for the connector.
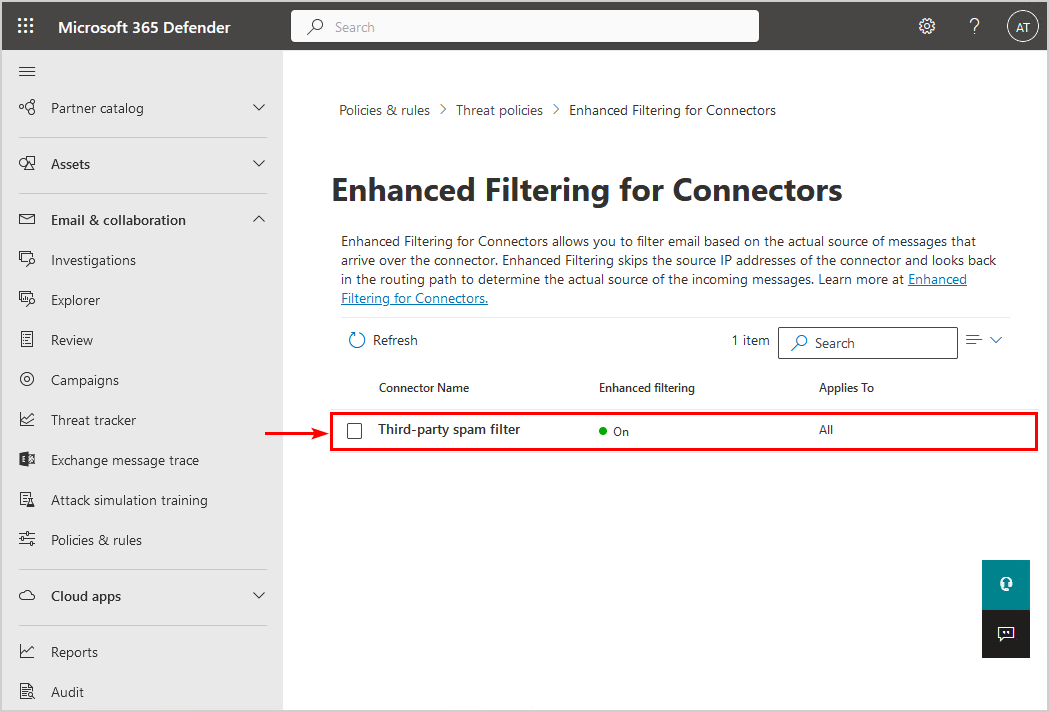
Configure enhanced filtering for connector
Use enhanced filtering in Exchange Online, also known as skip listing, on the partner inbound connector that receives messages from the third-party spam filter by following the below steps:
1. Sign in to Microsoft 365 Defender portal.
2. Expand Email & collaboration.
3. Click on Policies & rules > Threat policies.
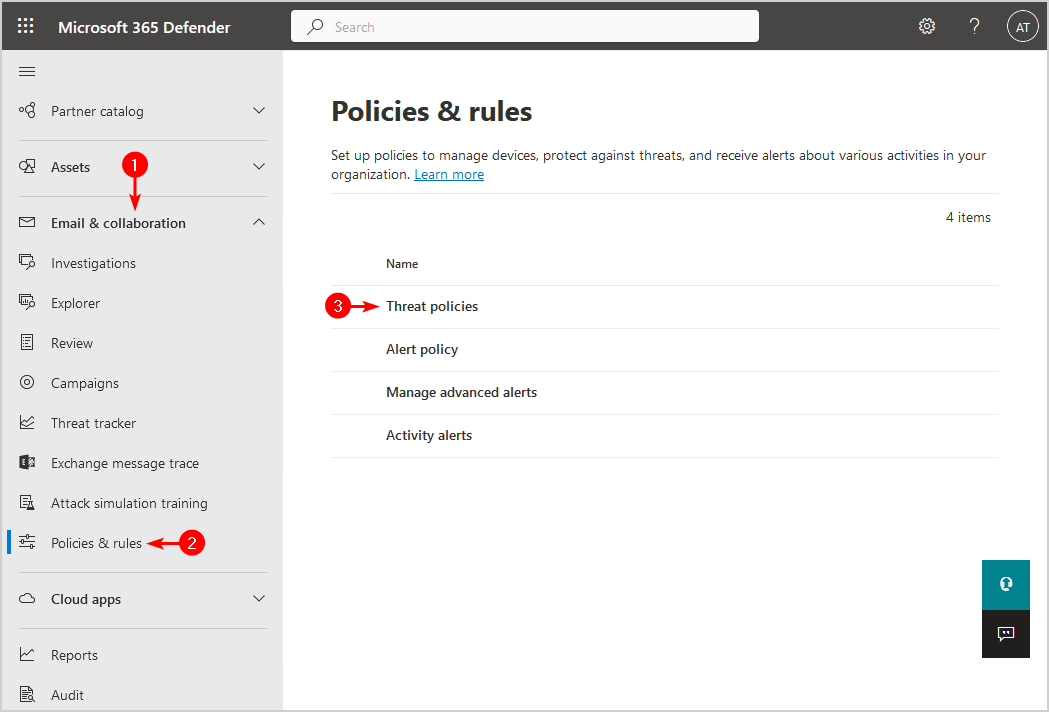
4. Select Enhanced filtering.
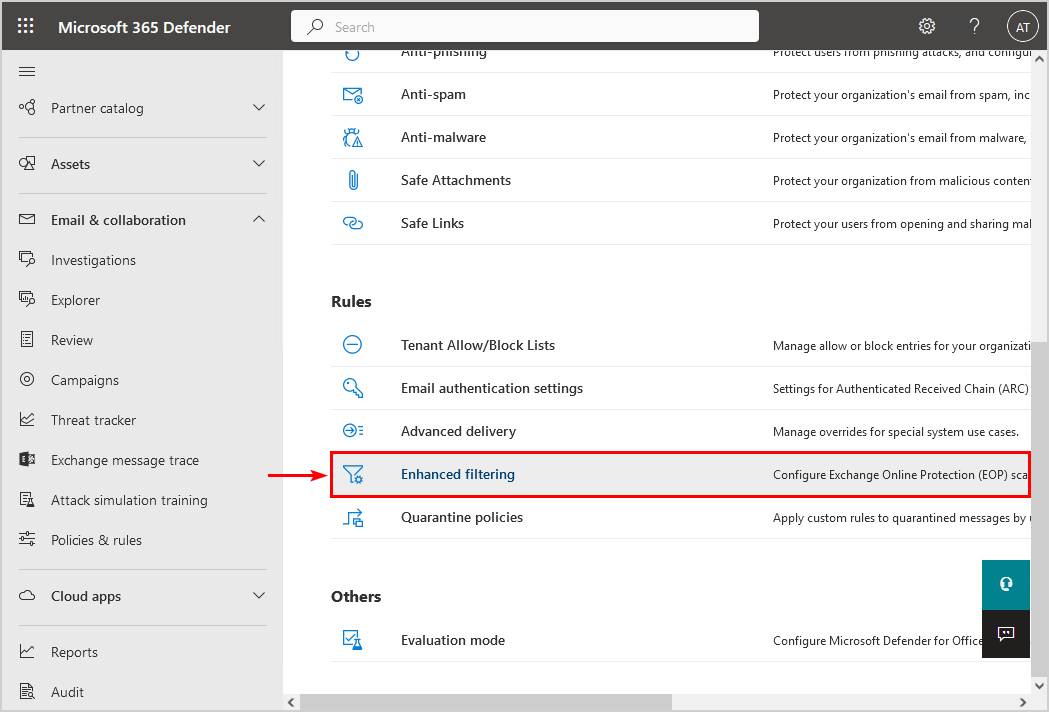
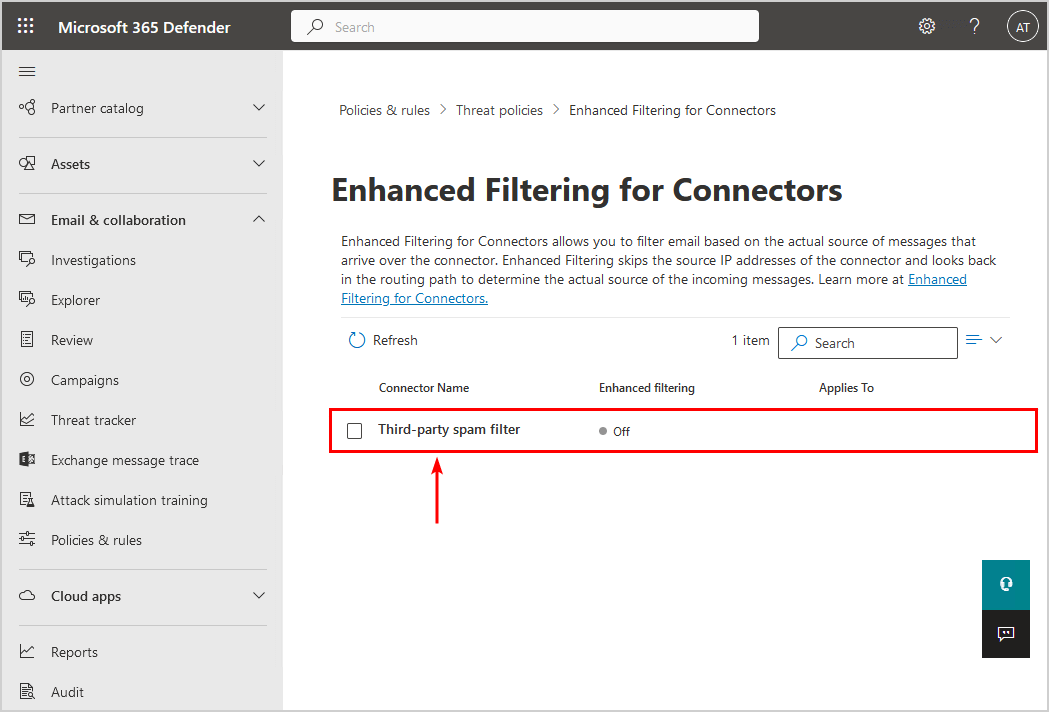
5. Click the connector name.
Note: You need to have a connector configured. Otherwise, you will not see the connector name to click on.
6. Enable Skip these IP addresses that are associated with the connector and add the third-party spam filter IP addresses.
7. Select Apply to entire organization.
8. Click Save.
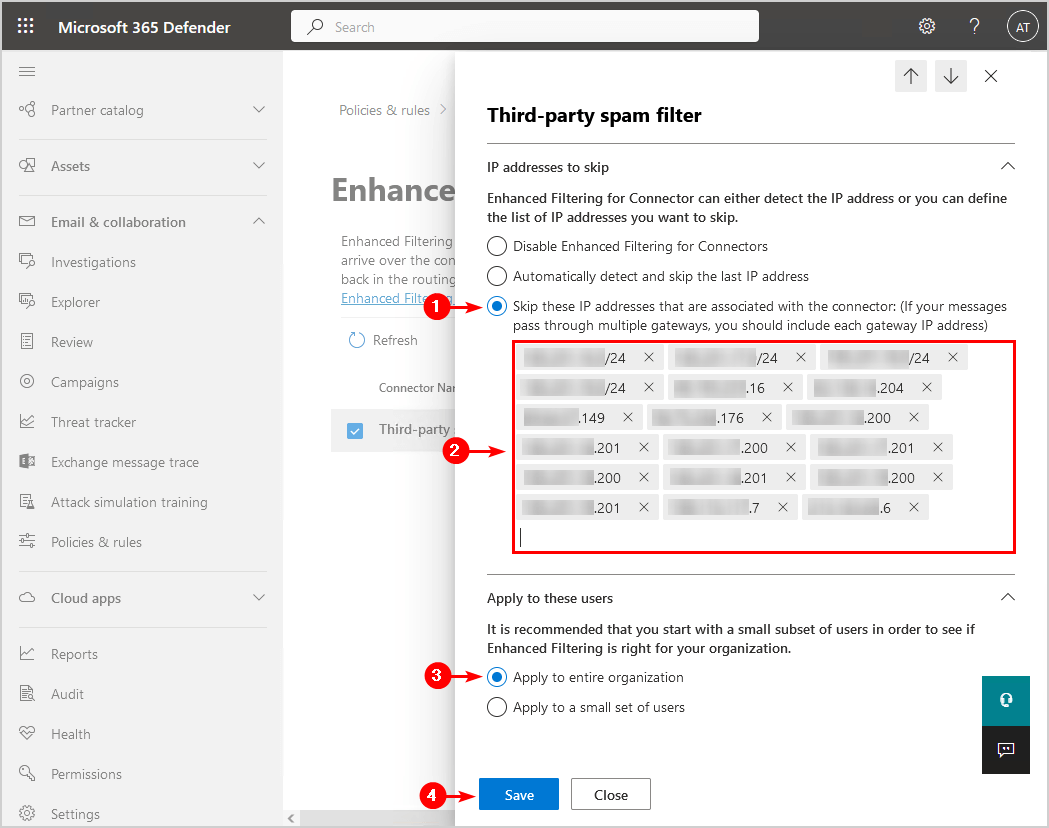
9. The connector shows the enhanced filtering status ON.
In the last step, we will send a message and analyze the headers.
Analyze message header with third-party spam filter (enhanced filtering ON)
Now that we did configure enhanced filtering for the connector, let’s look at the message header.
Important: Give it 15 minutes before you send a test mail, as it needs time to propagate the changes in the Microsoft cloud servers.
This is what it looks like when sending a message from a Gmail mailbox with a third-party spam filter configured and enhanced filtering enabled to Exchange Online mailbox. The receiving host is the third-party spam filter.
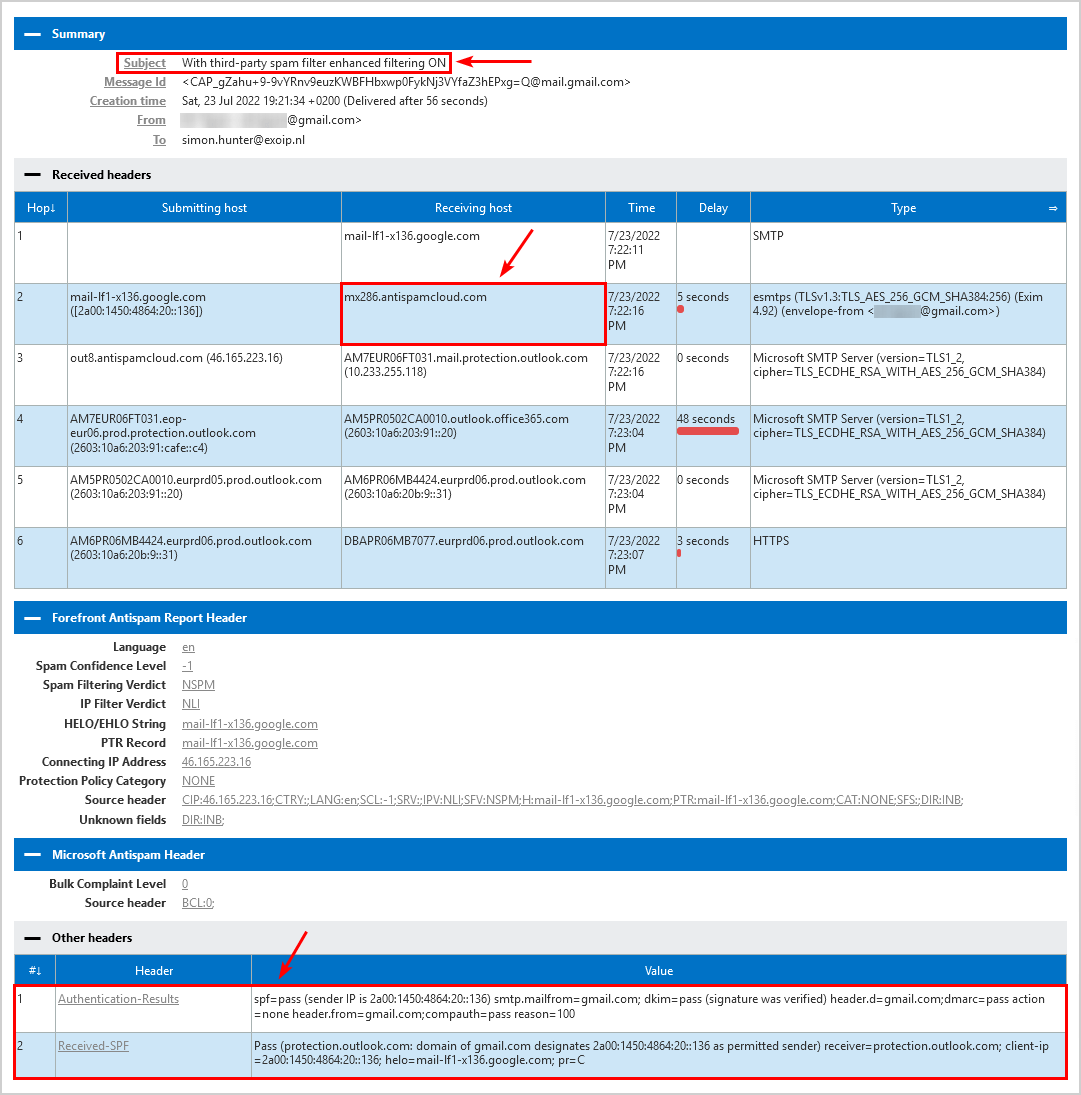
Both the headers show SPF pass with a third-party spam filter in place because enhanced filtering is enabled.
Read more: Protect domain from spam, phishers and viruses »
Conclusion
You learned how to configure enhanced filtering for connectors, also known as skip listing, in Exchange Online. When you have a third-party spam filter in your configuration, you should add the third-party spam filter IP addresses to the enhanced filtering to skip them. This will ensure that it will not break authentication signals (SPF, DKIM, and DMARC).
Did you enjoy this article? You may also like Stop Exchange Server sending spam. Don’t forget to follow us and share this article.
What Others Are Reading

Thanks!
Why can only ipv4 addresses be entered?
I was wondering the same. Not possible to add IPv6 addresses?