When you migrate mailboxes to Exchange Online - Microsoft 365, you might want to add…
Configure Exchange Online Certificate Based Authentication for unattended scripts
How to schedule an Exchange Online PowerShell script for automation purposes? For example, you have an Exchange Online PowerShell script that needs to run daily against the Exchange Online tenant unattended without any interaction. In this article, you will learn how to configure Exchange Online Certificate Based Authentication (CBA) and automate Exchange Online PowerShell scripts.
Table of contents
Certificate Based Authentication
Running scripts in Microsoft 365 often involves unattended scripts in Exchange Online PowerShell. In the past, unattended sign-in required you to store the username and password in a local file or in a secret vault that’s accessed at run-time. But, as we all know, storing user credentials locally is not a good security practice.
That’s where Certificate Based Authentication (CBA) comes to the rescue. It supports unattended script and automation scenarios using Azure AD apps and self-signed certificates. . This eliminates usernames, passwords, and MFA when authenticating.
How Certificate Based Authentication works
The Exchange Online PowerShell module uses the Active Directory Authentication Library to fetch an app-only token using the application Id, tenant Id (organization), and certificate thumbprint. The application object provisioned inside Azure AD has a Directory Role assigned to it, which is returned in the access token. The session’s role based access control (RBAC) is configured using the directory role information that’s available in the token.
How to set up Certificate Based Authentication in Exchange Online
Let’s go through the below steps and set up Exchange Online Certificate Based Authentication for unattended scripts.
1. Generate self-signed certificate
To generate a self-signed certificate, log onto any Windows Server or Desktop with Windows PowerShell. It’s best to generate the certificate on the machine you want to run the unattended PowerShell script.
You need the self-signed certificate later in the steps when you upload it to the application in Azure and if you want to use the certificate on other systems.
Note: By default, self-signed certificates are valid for one year.
In this case, we added 5 years to the self-signed certificate, so we don’t have to renew it yearly.
PS C:\> $mycert = New-SelfSignedCertificate -DnsName "exoip.com" -CertStoreLocation "cert:\LocalMachine\My" -NotAfter (Get-Date).AddYears(5) -KeySpec KeyExchange -FriendlyName "EXO unattended cert"Confirm the certificate and copy the ThumbPrint and paste it into Notepad. You will need it later when connecting to Exchange Online.
PS C:\> $mycert | Select-Object -Property Subject,Thumbprint,NotBefore,NotAfter

Subject      Thumbprint                               NotBefore             NotAfter
-------      ----------                               ---------             --------
CN=exoip.com 4F1C50EFC978A355227459E2D54FA9BEE8B93B78 12/28/2022 6:26:21 PM 12/28/2027 6:36:22 PM
Export certificate to .cer file.
You will need that .cer file when you upload it to the Azure application, which you will create in the next steps.
PS C:\> $mycert | Export-Certificate -FilePath "C:\temp\EXOUnattendedCert.cer"


    Directory: C:\temp


Mode                LastWriteTime         Length Name
----                -------------         ------ ----
-a----       12/28/2022   6:46 PM            796 EXOUnattendedCert.cer
Export certificate to .pfx file.
You will need that .pfx file when using another machine to connect with Certificate Based Authentication. Copy or send the .pfx file and install it on other machines.
PS C:\> $mycert | Export-PfxCertificate -FilePath "C:\temp\EXOUnattendedCert.pfx" -Password $(ConvertTo-SecureString -String "P@ssw0Rd1234" -AsPlainText -Force)


    Directory: C:\temp


Mode                LastWriteTime         Length Name
----                -------------         ------ ----
-a----       12/28/2022   6:47 PM           2725 EXOUnattendedCert.pfx
2. Register application in Azure
To register an application in Azure AD, follow these steps:
- Sign in to Microsoft Azure
- Click on Menu > Azure Active Directory
- Select App registration > New registration
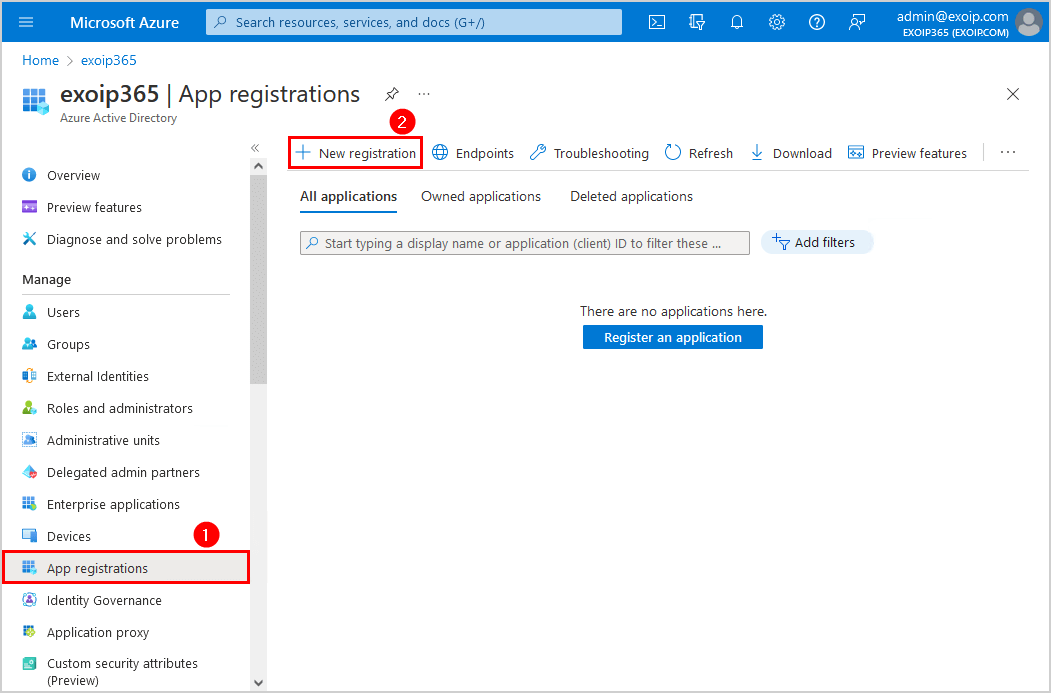
- Fill in the name EXO PowerShell unattended
- Keep the default supported account types Accounts in this organizational directory only – (Single tenant)
- Click Register
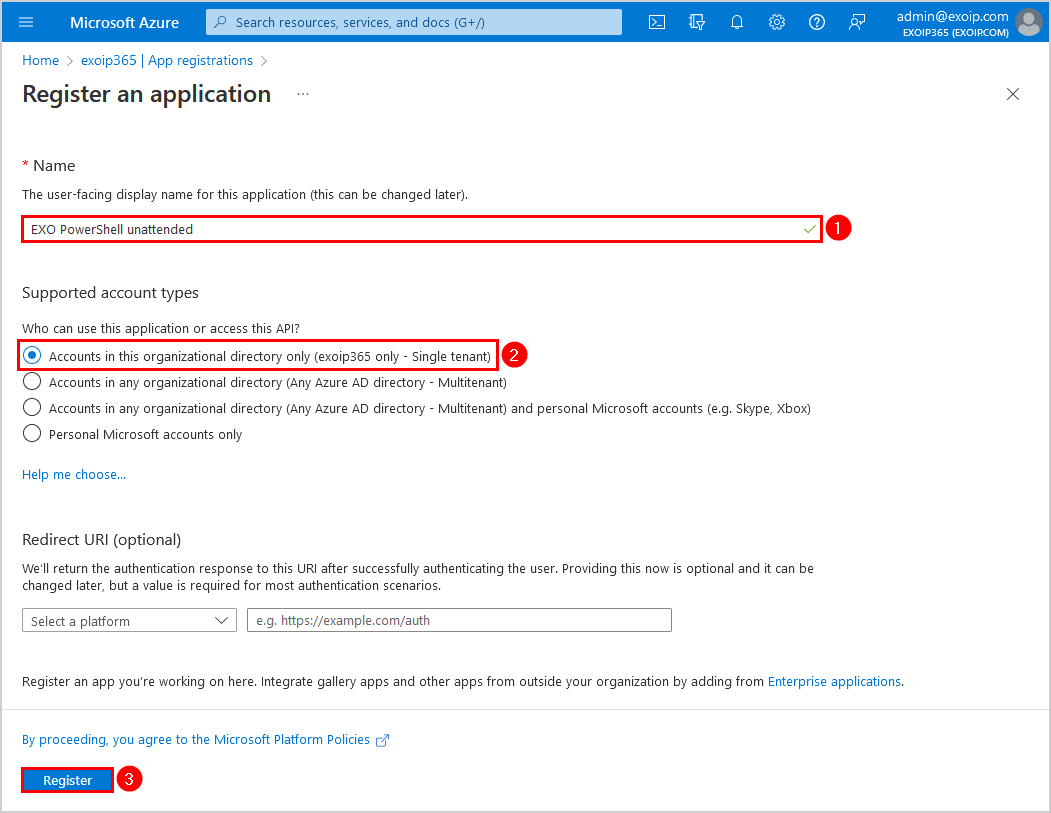
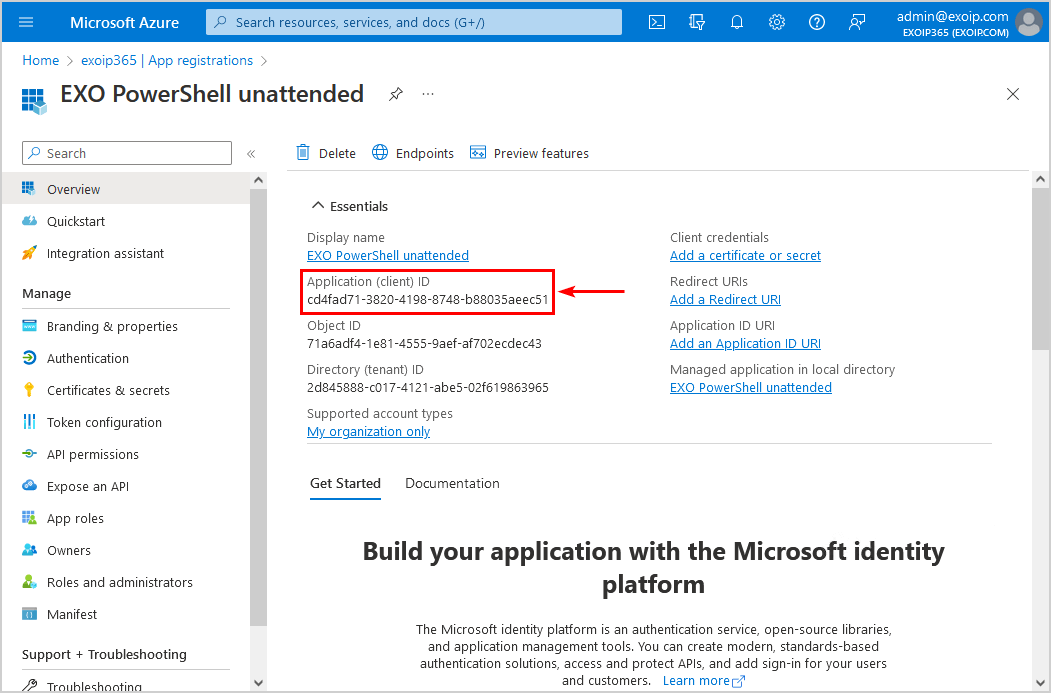
- The EXO PowerShell unattended application Overview appears
- Copy the Application (client ID) and paste it into Notepad because you will need it later when connecting to Exchange Online
3. Configure Azure application API permissions
You need to add API permissions to the EXO PowerShell unattended application you created, by following the below steps:
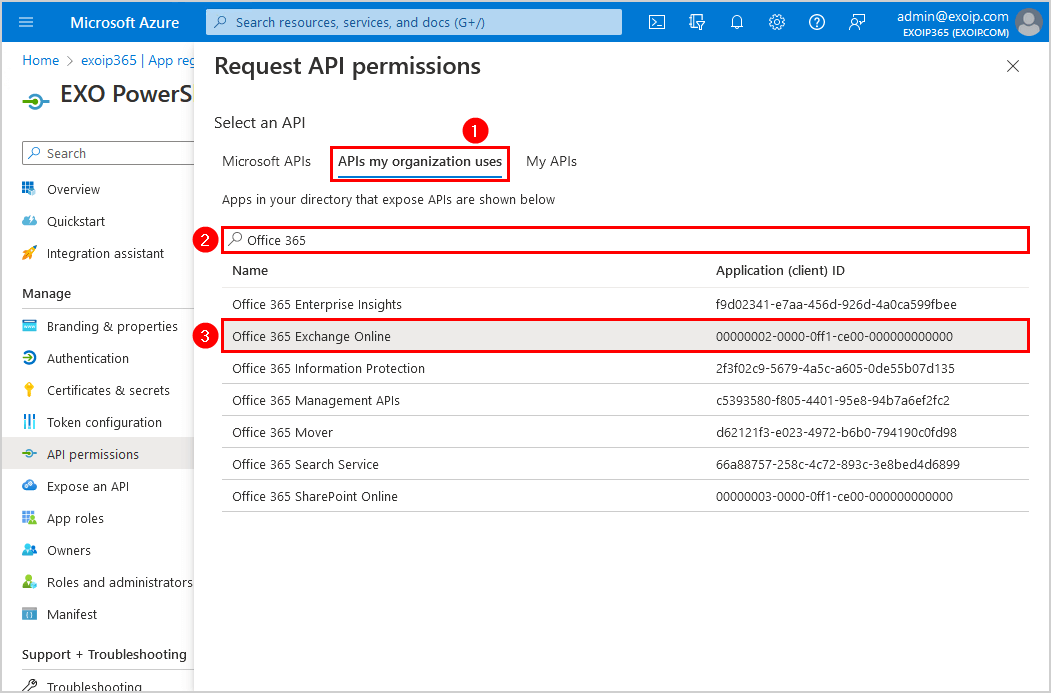
- Click on API permissions > Add a permission
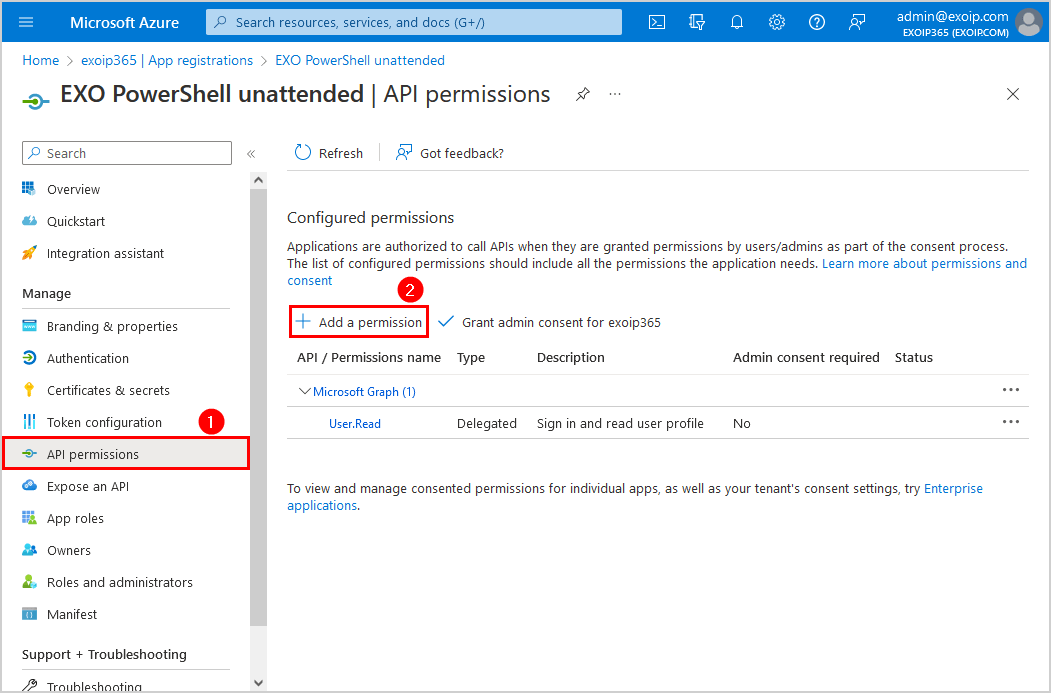
- Click APIs my organization uses
- Search for Office 365
- Select Office 365 Exchange Online from the results list
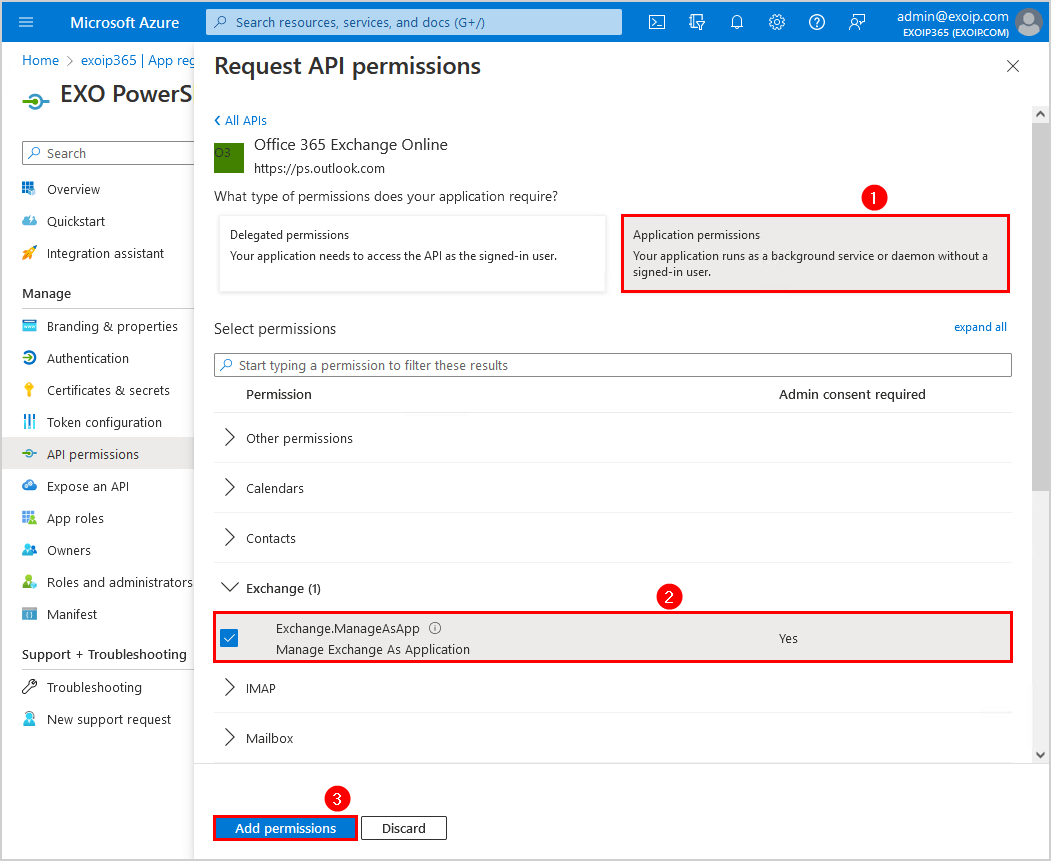
- Select Application permissions
- Expand Exchange and select Exchange.ManageAsApp
- Click Add permissions
- Click on Grant admin consent
- Click Yes
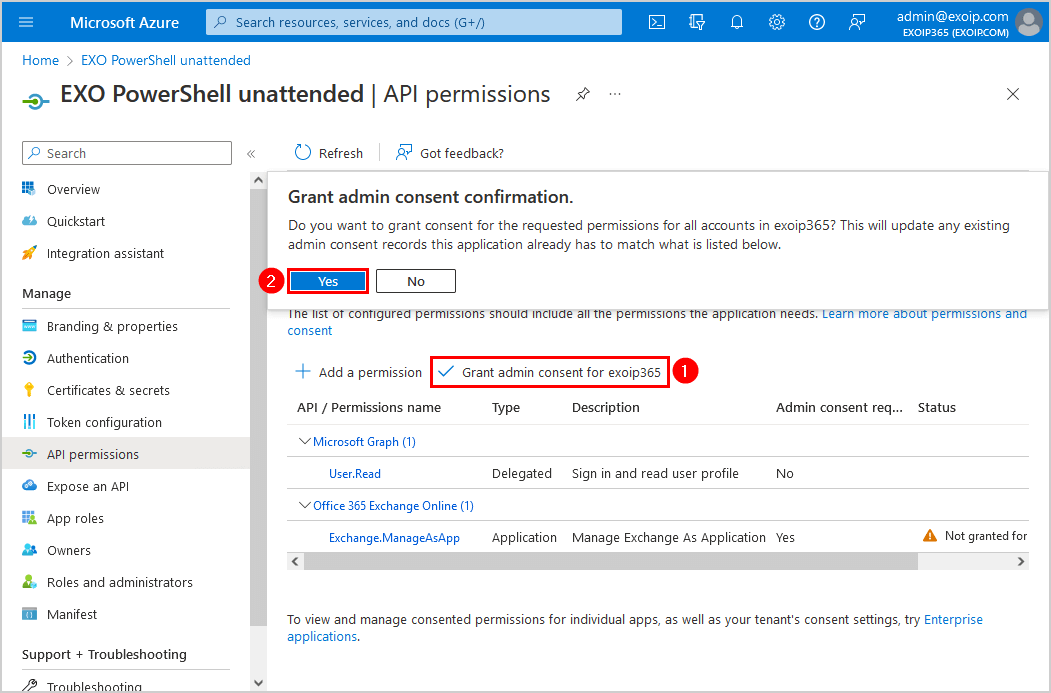
- The status shows a green checkmark

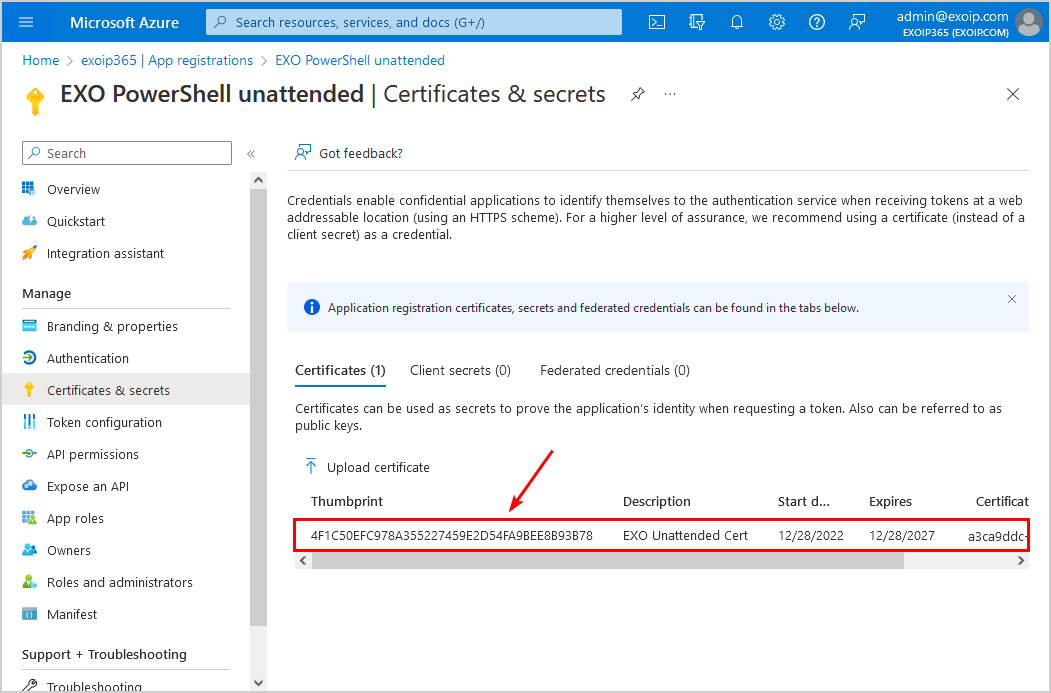
4. Upload certificate to application
It’s time to upload the self-signed certificate you created in the previous step:
- Click on Certificates & secrets
- Click Certificates > Upload certificate
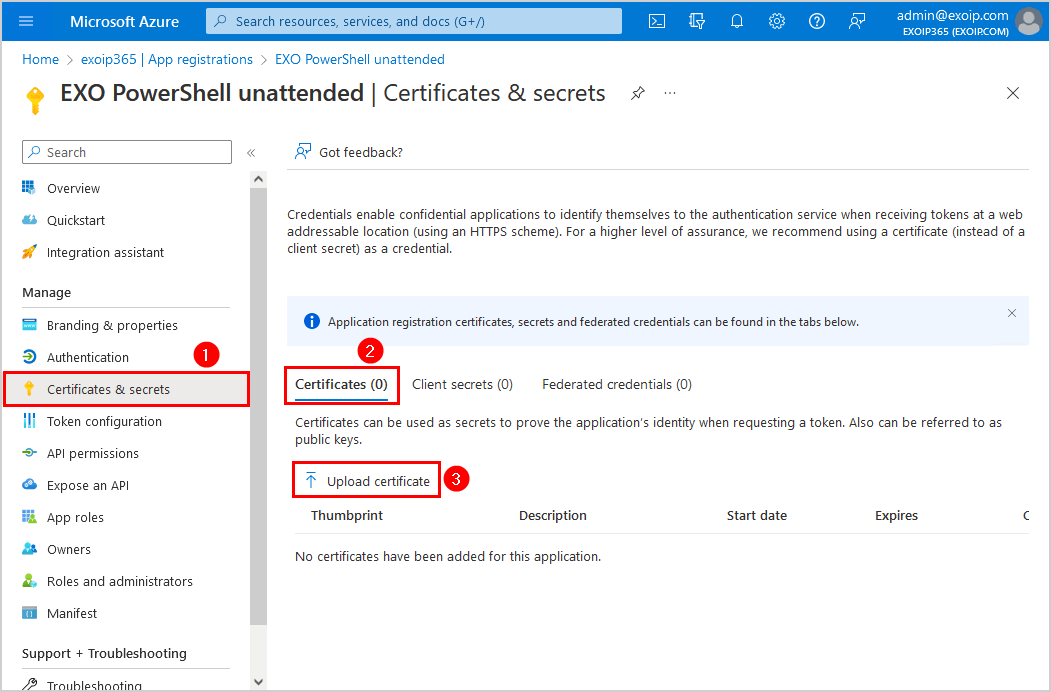
- Click on the browse icon and select the self-signed EXOUnattatended.cer file in C:\temp
- Add the description EXO Unattended Cert
- Click Add

- The certificate appears in the list
Note: Confirm that it has the same certificate thumbprint as the one you exported in the previous step.
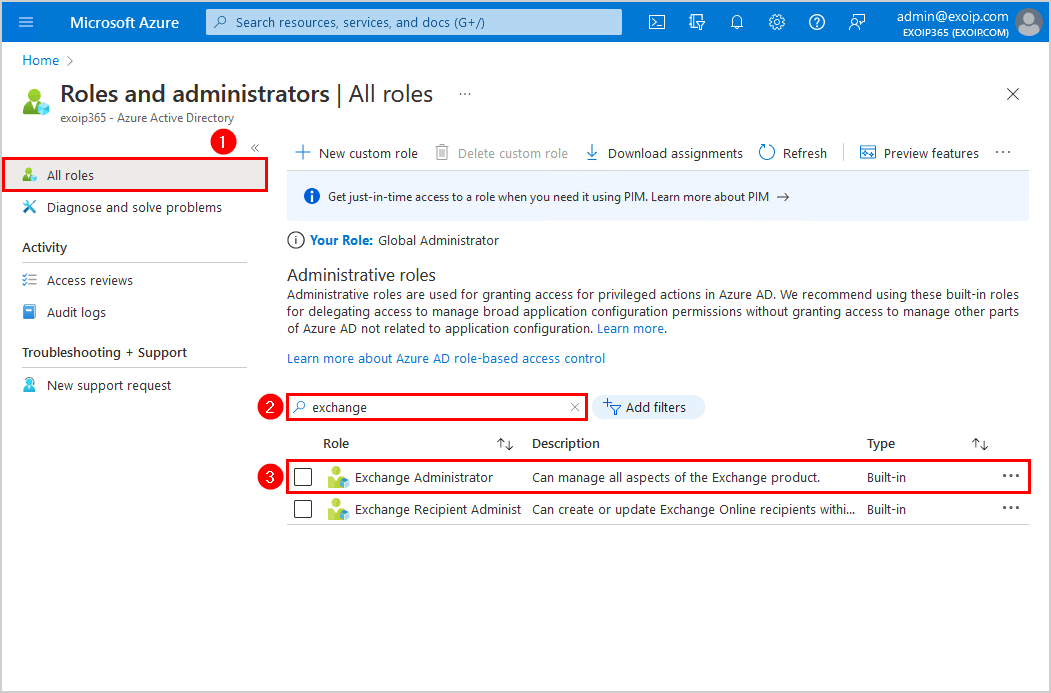
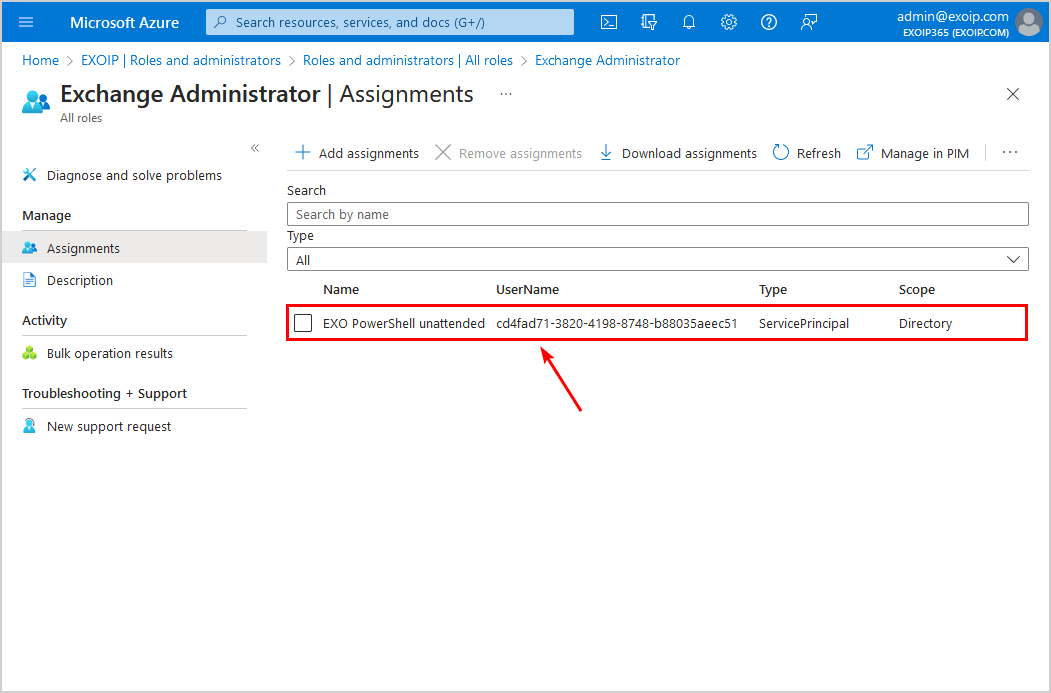
5. Assign application to Exchange administrator role
The last step is to add the application as a member to the Exchange Administrator role:
- Click on Menu > Azure Active Directory
- Select Roles and administrators
- Select All roles and search for exchange
- Click on Exchange Administrator
- Click on Assignments > Add assignments
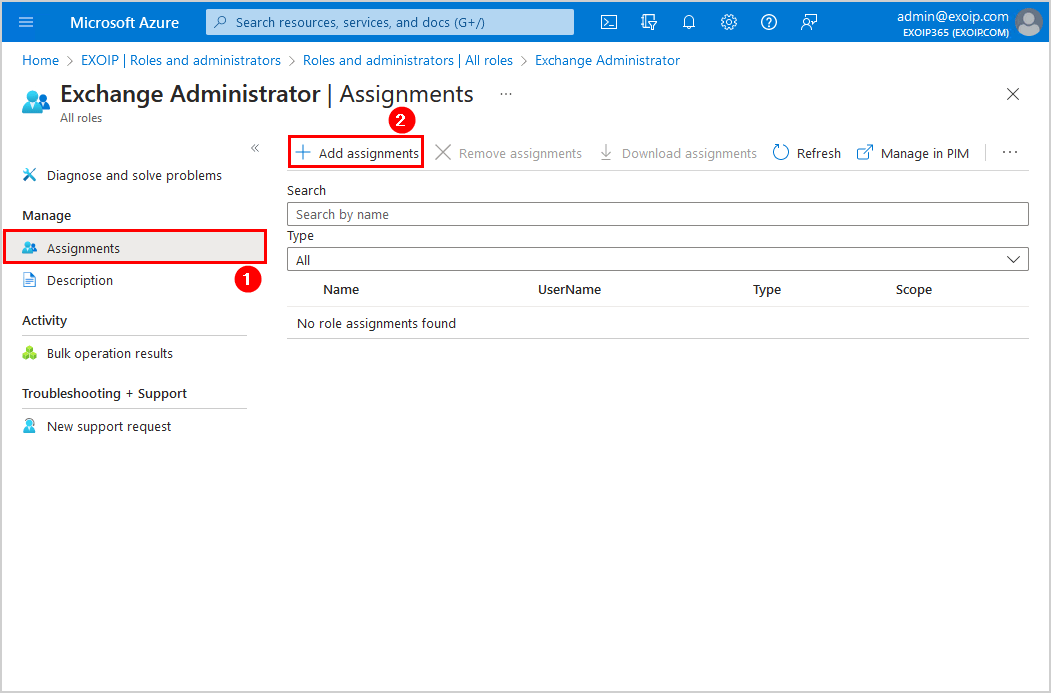
- Search for the Azure application name EXO PowerShell unattended
- Select the application from the results
- Click Add
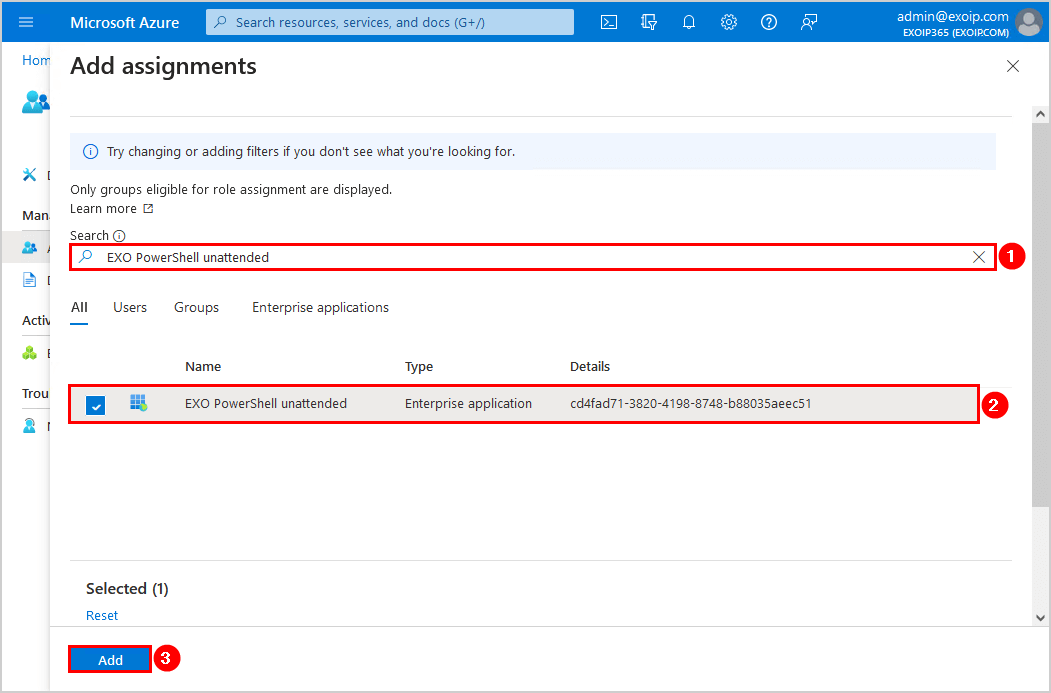
- The EXO PowerShell unattended application is added to the Exchange Administrator role assignments list
All the steps are completed.
Connect to Exchange Online PowerShell with Certificate Based Authentication
Let’s look at connecting to EXO PowerShell with CBA (Certificate Based Authentication).
It’s essential to Install Exchange Online PowerShell module on the machine. If you don’t have it installed, it’s impossible to connect.
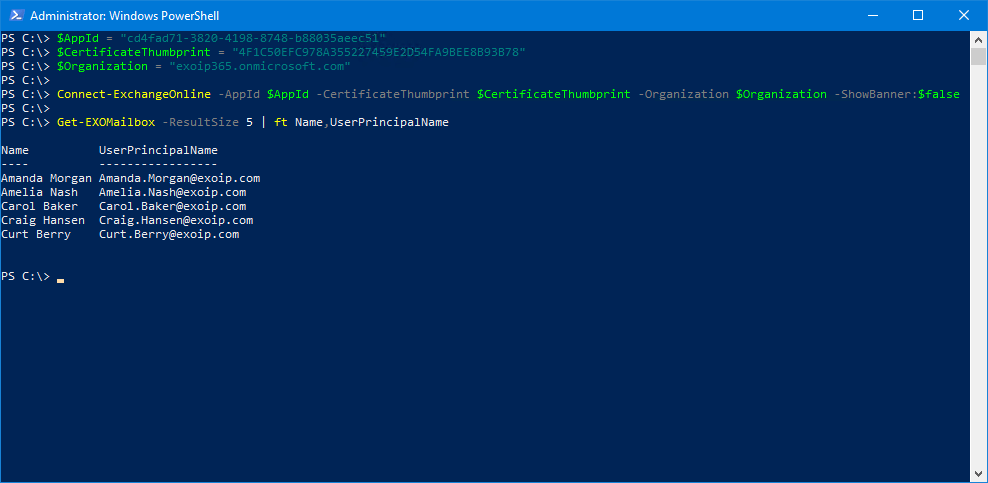
Fill in the below three variables to connect to Exchange Online PowerShell with Certificate Based Authentication:
- $AppId
- $CertificateThumbPrint
- $Organization
$AppId = "cd4fad71-3820-4198-8748-b88035aeec51"
$CertificateThumbprint = "4F1C50EFC978A355227459E2D54FA9BEE8B93B78"
$Organization = "exoip365.onmicrosoft.com"

Connect-ExchangeOnline -AppId $AppId -CertificateThumbprint $CertificateThumbprint -Organization $Organization -ShowBanner:$false
Now that you are connected to Exchange Online PowerShell, run the Get-EXOMailbox cmdlet to retrieve the mailboxes.
PS C:\> Get-EXOMailbox -ResultSize 5 | ft Name,UserPrincipalName

Name          UserPrincipalName
----          -----------------
Amanda Morgan Amanda.Morgan@exoip.com
Amelia Nash   Amelia.Nash@exoip.com
Carol Baker   Carol.Baker@exoip.com
Craig Hansen  Craig.Hansen@exoip.com
Curt Berry    Curt.Berry@exoip.com
This is what it looks like.
Unattended PowerShell script example
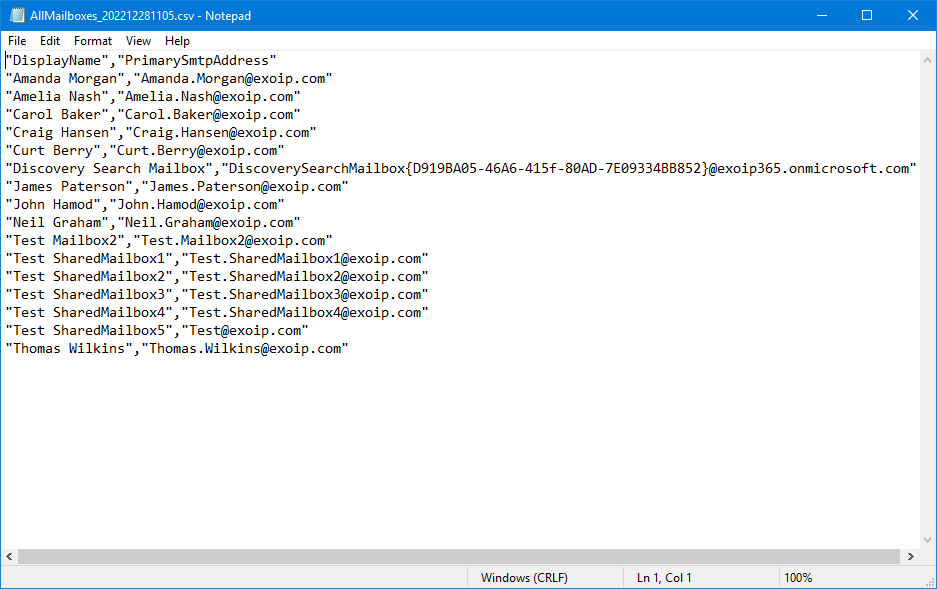
Here is an unattended PowerShell script that will Export a list of mailboxes in Exchange Online to CSV file in C:\temp. The script is added to a scheduled task that will run every day.
Note: Add Disconnect-ExchangeOnline -Confirm:$false at the end of the PowerShell script. If the script runs without disconnecting the session, you could use up all the remote PowerShell sessions available, and you’ll need to wait for the sessions to expire.
# Connect Exchange Online PowerShell
$AppId = "cd4fad71-3820-4198-8748-b88035aeec51"
$CertificateThumbprint = "4F1C50EFC978A355227459E2D54FA9BEE8B93B78"
$Organization = "exoip365.onmicrosoft.com"

Connect-ExchangeOnline -AppId $AppId -CertificateThumbprint $CertificateThumbprint -Organization $Organization -ShowBanner:$false

# Split path
$Path = Split-Path -Parent "C:\temp\*.*"

# Create variable for the date stamp
$LogDate = Get-Date -f yyyyMMddhhmm

# Define CSV and log file location variables
$Csvfile = $Path + "\AllMailboxes_$logDate.csv"

Get-EXOMailbox -ResultSize Unlimited | Select-Object DisplayName, PrimarySmtpAddress | Sort-Object PrimarySmtpAddress | Export-CSV -Path $Csvfile -NoTypeInformation -Encoding UTF8

# Disconnect Exchange Online PowerShell
Disconnect-ExchangeOnline -Confirm:$false
This is how it looks when opening the CSV file with Notepad.
That’s it!
You did successfully set up Exchange Online Certificate Based Authentication in Exchange Online.
Read more: Configure Microsoft Entra Password Protection for on-premises »
Conclusion
You learned how to configure Exchange Online Certificate Based Authentication for unattended scripts. Go through the step-by-step guide, and you can authenticate with Exchange Online PowerShell without user interaction. Remember to back up the self-signed certificate so you can import and use it on other machines.
Did you enjoy this article? You may also like Prevent MFA fatigue attacks in organization. Don’t forget to follow us and share this article.
What Others Are Reading
Great blog Ali,
One thing I’ve noticed whilst running the exchange server healthchecker.ps1
Signature Algorithm: sha1RSA
Signature Hash Algorithm: sha1
It’s recommended to use a hash algorithm from the SHA-2 family
I’m assuming the below may help to resolve this
New-SelfSignedCertificate -KeyAlgorithm RSA -KeyLength 2048 -HashAlgorithm “SHA256” …
Ali- Thanks for the great details – it worked fine for me.
I’m trying to take this one step further. Since I manage multiple tenants (as a partner org) I wanted to avoid having to create an app and certificates for each one. I changed the account type of the app to multitenant but i can still only connect to the partner tenancy. I’m not 100% that this is supported but from what I’ve read I think it is.
I’m using this format
Connect-ExchangeOnline -CertificateThumbPrint $certThumbprint -AppID $app_id -Organization “mypartnerorg.onmicrosoft.com” -DelegatedOrganization “mycustomerorg.com”
But I just get ‘UnAuthorized’
Hi, i’m trying to do exact same thing with exact same result.
Have you find a solution?
I’m not seeing Office 365 Exchange Online as an available API for the application registration portion of the steps. Has this been moved or renamed?
I followed the article, and everything works as described.
Hi Ali,
When using it’s mode of authentication to manage MailEnabled Security Group, I get permission errors, this does not affect other groups as Distribution list (default). Can’t I use this authentication mode for a script to automatically update MailEnabled Security Group membership?
Best Regards.
Thanks.
Hector
Hi Ali,
thanks for the very precise and great instructions. I ran into an issue where on “connect-exchangeonline” an error appeared:
“Could not use the certificate for signing. See inner exception for details. Possible cause: this may be a known issue with apps build against .NET Desktop 4.6 or lower. Either target a higher version of .NET desktop – 4.6.1 and above, or use a different certificate
type (non-CNG) or sign your own assertion as described at https://aka.ms/msal-net-signed-assertion
I had to add ‘-Provider “Microsoft RSA SChannel Cryptographic Provider”‘ to the New-SelfSignedCertificate command to get a NON-CNG cert. After that it worked like a charme 🙂
Have a nice day,
Chris
Thanks for letting us know what worked for you, Chris. This will definitely help others that will face this.
Dude, THANK YOU! You just put a quick end to my 8 hours of misery trying to figure out why Connect-ExchangeOnline didn’t like the cert in the App Registration, even though Connect-mgGraph had no issues with it. Now both are happy. If you’re ever in Atlanta, I’ll buy you a beer.
OTOH, I guess this shows that there is still some sort of rift between EO and Azure/Graph. I guess the Exchange guys didn’t want to (or couldn’t easily) rely exclusively on Azure to give the OK that an authentication is valid, so they’re still doing their own processing somewhere in the background?