The Get-ADGroupMember cmdlet is excellent for getting the AD members from a group. However, this…
Transfer FSMO roles in Active Directory
How to transfer FSMO roles in Active Directory? We did add another Domain Controller to existing domain, and now like to transfer FSMO roles to the new server. In this article, you will learn how to transfer FSMO roles to another DC with PowerShell and GUI.
Table of contents
How many FSMO roles
There are five FSMO roles, as listed in the table below:
| FSMO role | Value |
|---|---|
| PDCEmulator (one per domain) | 0 |
| RIDMaster (one per domain) | 1 |
| InfrastructureMaster (one per domain) | 2 |
| SchemaMaster (one per forest) | 3 |
| DomainNamingMaster (one per forest) | 4 |
Why transfer FSMO roles
Here is a list of why you must transfer FSMO roles:
- Demote a Domain Controller
- Change IP addresses on a Domain Controller
- Take Domain Controller offline for maintenance
- Upgrade Operating System
- Performance issues
Let’s look at how to transfer FSMO roles in Active Directory with PowerShell and the GUI.
Transfer FSMO roles with PowerShell
Go through the below steps to list the FSMO roles first. After that, move the FSMO roles independently or move all the FSMO roles with a single command in PowerShell. Both options work excellently.
Get FSMO roles with PowerShell
Run the Get-ADDomain cmdlet to get the RID master, PDC emulator, and Infrastructure master roles.
Get-ADDomain | fl PDCEmulator,RIDMaster,InfrastructureMasterThe output appears.
PDCEmulator          : DC01-2019.exoip.local
RIDMaster            : DC01-2019.exoip.local
InfrastructureMaster : DC01-2019.exoip.local
Run the Get-ADForest cmdlet to get the Schema master and Domain naming master roles.
Get-ADForest | fl SchemaMaster,DomainNamingMasterThe output appears.
SchemaMaster       : DC01-2019.exoip.local
DomainNamingMaster : DC01-2019.exoip.local
Read more: How to check FSMO roles in Active Directory »
Option 1: Transfer FSMO roles independently with PowerShell
Let’s move the FSMO roles independently with the Move-ADDirectoryServerOperationMasterRole cmdlet.
PDCEmulator (value 0)
Move-ADDirectoryServerOperationMasterRole "DC02-2019" -OperationMasterRole PDCEmulator -Confirm:$falseRIDMaster (value 1)
Move-ADDirectoryServerOperationMasterRole "DC02-2019" -OperationMasterRole RIDMaster -Confirm:$falseInfrastructureMaster (value 2)
Move-ADDirectoryServerOperationMasterRole "DC02-2019" -OperationMasterRole InfrastructureMaster -Confirm:$falseSchemaMaster (value 3)
Note: Your account needs to be a member of the Schema admins group. If it isn’t, an error appears after running the below command. After adding the account to the Schema admins group, you have to sign off and sign back in again to have the changes take effect.
Move-ADDirectoryServerOperationMasterRole "DC02-2019" -OperationMasterRole SchemaMaster -Confirm:$falseDomainNamingMaster (value 4)
Move-ADDirectoryServerOperationMasterRole "DC02-2019" -OperationMasterRole DomainNamingMaster -Confirm:$falseOption 2: Transfer FSMO roles with single PowerShell command
Run one of the below commands to move the FSMO roles with a single PowerShell command.
Note: Your account needs to be a member of the Schema admins group. If it isn’t, an error appears after running the below command. After adding the account to the Schema admins group, you have to sign off and sign back in again to have the changes take effect.
Move all FSMO roles by name value.
Move-ADDirectoryServerOperationMasterRole "DC02-2019" -OperationMasterRole PDCEmulator,RIDMaster,InfrastructureMaster,SchemaMaster,DomainNamingMaster -Confirm:$falseMove all FSMO roles by digits value.
Move-ADDirectoryServerOperationMasterRole "DC02-2019" -OperationMasterRole 0,1,2,3,4 -Confirm:$falseTransfer FSMO roles with GUI
To transfer the FSMO roles with GUI, follow these steps:
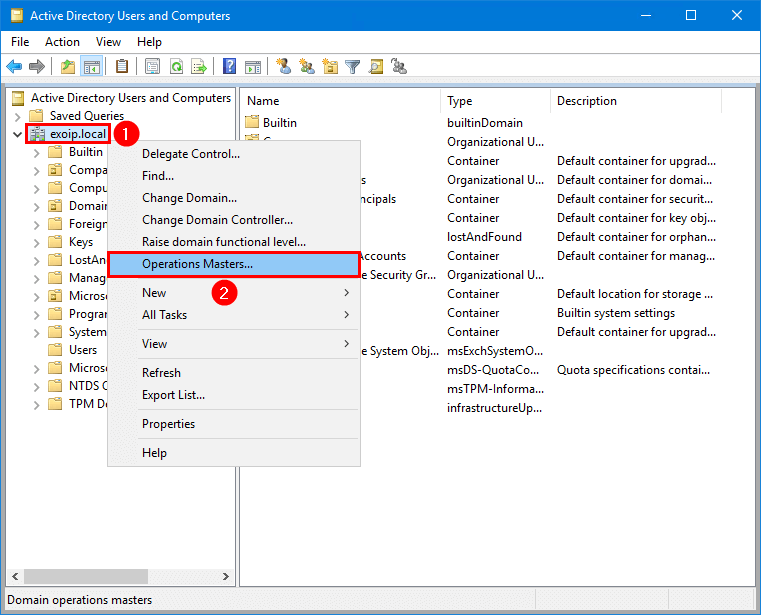
1. Start Active Directory Users and Computers.
2. Right-click on the domain and click on Operations Master.
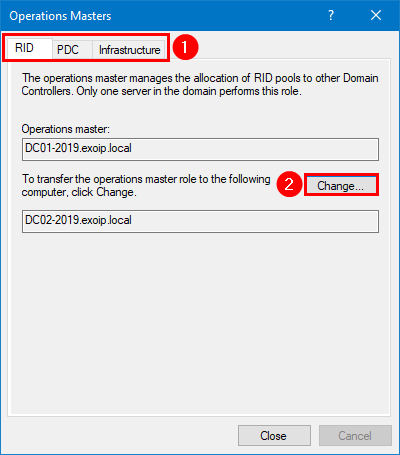
3. Select each tab to see which Domain Controller holds the FSMO roles. Click on Change to move the FSMO roles:
- RID master
- PDC emulator
- Infrastructure master
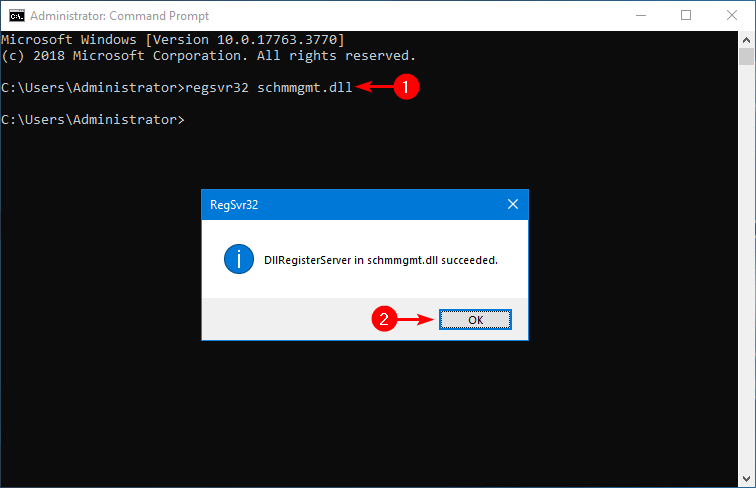
4. Start Command Prompt as administrator.
5. Type the command regsvr32 schmmgmt.dll and press Enter.
6. A message appears that DllRegisterServer in schmmgmt.dll succeeded. Press OK.
Note: You must register the Active Directory schema MMC snap-in to make it available in the MMC snap-in list.
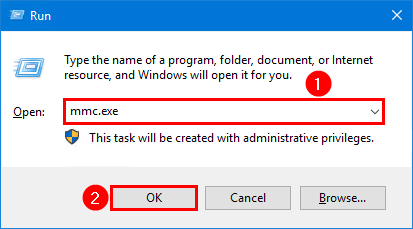
7. Click the start button, search for Run and click on it.

8. Type in mmc.exe and click OK.
9. Click File and select Add/Remove Snap-in.
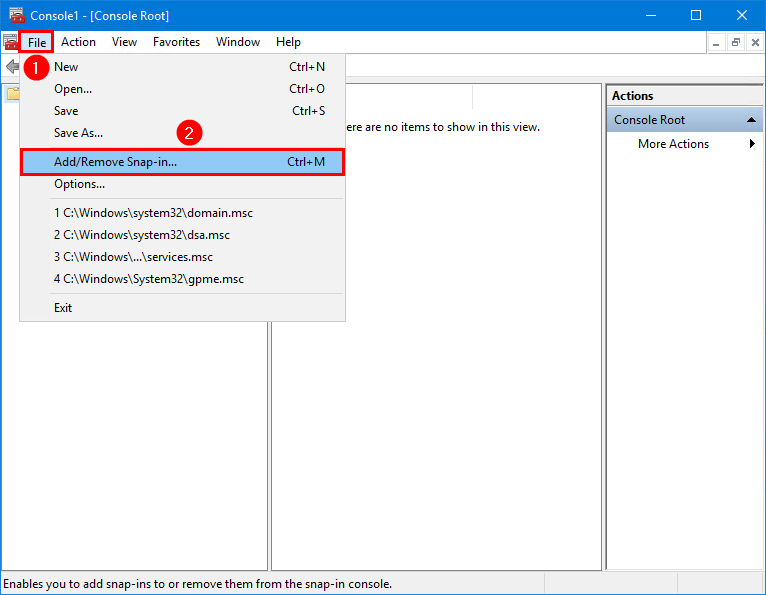
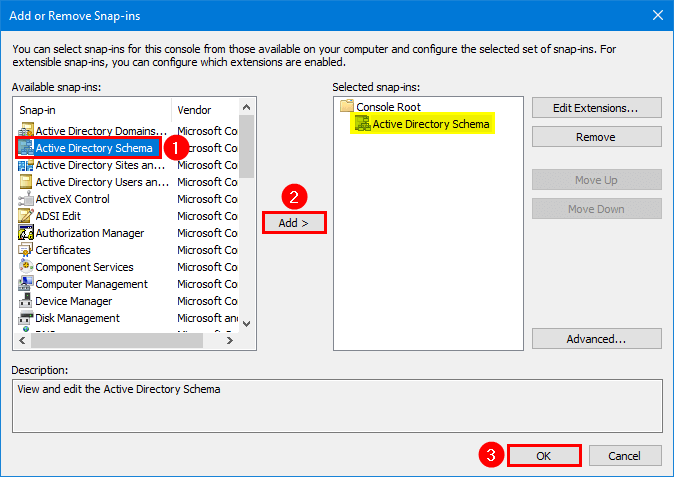
10. Click on Active Directory Schema, select Add, and click OK.
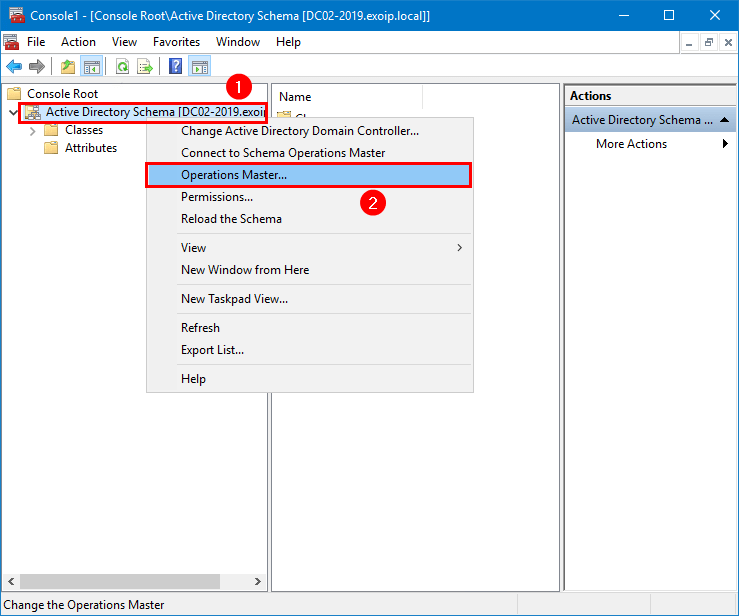
11. Click on Active Directory Schema to load the configuration.
12. Right-click Active Directory Schema and click on Operations Master.
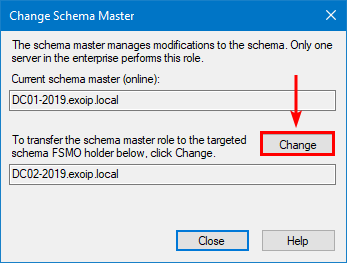
13. The Domain Controller that holds the Schema master role will appear. Click on Change to move the FSMO role.
14. Start Active Directory Domains and Trusts.
15. Right-click on Active Directory Domains and Trusts and click on Operations Master.

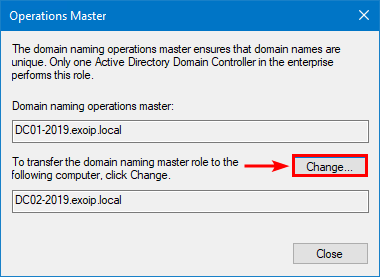
16. The Domain Controller that holds the Domain naming master role will appear. Click on Change to move the FSMO role.
Seize FSMO roles
When a Domain Controller crashes, or there are hardware failures, and you can’t bring it online anymore, you cannot transfer the FSMO roles with the above steps.
To seize the FSMO roles from an offline Domain Controller, you must use the -Force parameter.
Move-ADDirectoryServerOperationMasterRole "DC02-2019" -OperationMasterRole 0,1,2,3,4 -Force -Confirm:$falseThat’s it! Did this help you to transfer FSMO roles to another DC?
Read more: Active Directory health check with PowerShell script »
Conclusion
You learned how to transfer FSMO roles in Active Directory with PowerShell and GUI. Listing and transferring the FSMO roles to a new server with PowerShell is much faster. Also, you can run the commands on every Windows Server with Remote Server Administration Tools (RSAT) installed. If using the GUI method to move the FSMO roles, ensure you connect to the target Domain Controller.
Did you enjoy this article? You may also like Get all Domain Controllers with PowerShell. Don’t forget to follow us and share this article.
Thanks for sharing this! Very useful.