You like to offboard a mailbox from Exchange Online to Exchange On-Premises. This time you…
Bulk move AD users to another OU with PowerShell
You already learned how to bulk convert user mailbox to shared mailbox. This time we like to bulk move AD objects to a new OU (Organizational Unit). There are more than a hundred of shared mailboxes across Active Directory (AD). If we search for the shared mailboxes in AD and move them to the OU, it takes time. This is an excellent way to automate the task with PowerShell. In this article, you will learn how to bulk move AD users with PowerShell to another OU from CSV file.
Table of contents
Before you start to bulk move AD users
If you have a list of AD users in one OU, you can select the AD objects and move them in Active Directory Users and Computers. Yes, it’s that simple to drag and drop. What if you have users in different OUs? In our case, there are over a hundred shared mailboxes. It will take a lot of time to search and move them. That’s why we have to work smart and make use of PowerShell.
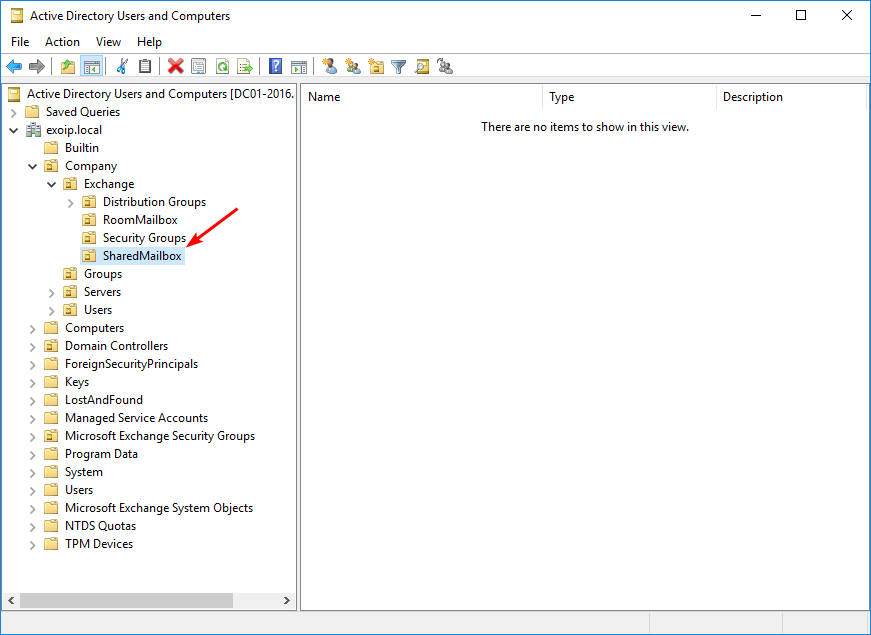
Create a target OU in Active Directory
Create a target OU if you don’t have one. We recommend to keep it tidy and move all the shared mailboxes to the target OU SharedMailbox.
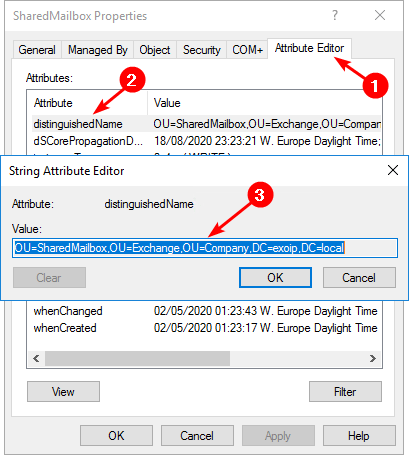
Get the distinguished name
You can get the OU distinguished name in Active Directory. Right-click the target OU and click Properties. Go to the Attribute Editor tab. Find the attribute distuingedName in the attributes list. Double-click to open the string and copy the value. You will need it in the next part.
You can also get the Organizational Unit distinguished name with PowerShell.
Create CSV file with AD users
Before we can run the script, we need to have a CSV file with the AD users SamAccountName. In our example, the shared mailboxes are going to be moved. When you create a mailbox, an AD object is automatically created in AD.

Run Exchange Management Shell as administrator. The first cmdlet will give us the result. The second cmdlet will export the result to a CSV file.
[PS] C:\>Get-Mailbox -Filter {RecipientTypeDetails -eq "SharedMailbox"} | Select Name, SamAccountName, OrganizationalUnit, DistinguishedName

Name  SamAccountName OrganizationalUnit                         DistinguishedName
----  -------------- ------------------                         -----------------
Sales sales          exoip.local/Company/Exchange/SharedMailbox CN=Sales,OU=SharedMailbox,OU=Exchange,OU=Company,DC=exoip,DC=local
Info  info           exoip.local/Company/Exchange/SharedMailbox CN=Info,OU=SharedMailbox,OU=Exchange,OU=Company,DC=exoip,DC=local
HR    hr             exoip.local/Company/Exchange/SharedMailbox CN=HR,OU=SharedMailbox,OU=Exchange,OU=Company,DC=exoip,DC=local

[PS] C:\>Get-Mailbox -Filter {RecipientTypeDetails -eq "SharedMailbox"} | Select Name, SamAccountName, OrganizationalUnit, DistinguishedName | Export-Csv -Path "C:\temp\shared_mailboxes.csv" -NTI
After exporting the CSV file, the next step is to read the CSV file content with PowerShell.
Check the content in CSV file
Verify that the CSV file is readable in PowerShell.
[PS] C:\>Import-Csv "C:\temp\shared_mailboxes.csv"

Name  SamAccountName OrganizationalUnit                         DistinguishedName
----  -------------- ------------------                         -----------------
Sales sales          exoip.local/Company/Exchange/SharedMailbox CN=Sales,OU=SharedMailbox,OU=Exchange,OU=Company,DC=exoip,DC=local
Info  info           exoip.local/Company/Exchange/SharedMailbox CN=Info,OU=SharedMailbox,OU=Exchange,OU=Company,DC=exoip,DC=local
HR    hr             exoip.local/Company/Exchange/SharedMailbox CN=HR,OU=SharedMailbox,OU=Exchange,OU=Company,DC=exoip,DC=local
Bulk move AD users to another OU PowerShell script
Download the Move-ADUsers.ps1 PowerShell script or copy and paste the below code in Notepad. Give it the name Move-AdUsers.ps1 and place it in the C:\scripts folder. Create a scripts folder if you don’t have one.
# Import AD Module
Import-Module ActiveDirectory

# Import the data from CSV file and assign it to variable
$Import_csv = Import-Csv -Path "C:\temp\shared_mailboxes.csv"

# Specify target OU where the users will be moved to
$TargetOU = "OU=SharedMailbox,OU=Exchange,OU=Company,DC=exoip,DC=local"

$Import_csv | ForEach-Object {

    # Retrieve DN of User
    $UserDN = (Get-ADUser -Identity $_.SamAccountName).distinguishedName

    Write-Host "Moving Accounts....."

    # Move user to target OU. Remove the -WhatIf parameter after you tested.
    Move-ADObject -Identity $UserDN -TargetPath $TargetOU -WhatIf
}
Write-Host "Completed move"- Line 5: Edit the CSV file name and the path.
- Line 8: Edit the target OU.
In the next step, we will have a look at the bulk move AD Users PowerShell script.
Bulk move AD users to another OU with CSV file
Run the PowerShell script to bulk move AD users to another OU. Good to know is that there is a -WhatIf parameter added to the script. If you run the script, nothing will happen in the environment. You will get an output showing what will happen.
[PS] C:\>cd C:\scripts
[PS] C:\scripts>.\Move-ADUsers.ps1
Moving Accounts.....
What if: Performing the operation "Move" on target "CN=Sales,OU=Company,DC=exoip,DC=local".
Moving Accounts.....
What if: Performing the operation "Move" on target "CN=Info,OU=Company,DC=exoip,DC=local".
Moving Accounts.....
What if: Performing the operation "Move" on target "CN=HR,OU=Company,DC=exoip,DC=local".
Completed move
Everything is looking good. We can remove the -WhatIf parameter and rerun the PowerShell script.
[PS] C:\scripts>.\Move-ADUsers.ps1
Moving Accounts.....
Moving Accounts.....
Moving Accounts.....
Completed move
Verify the result
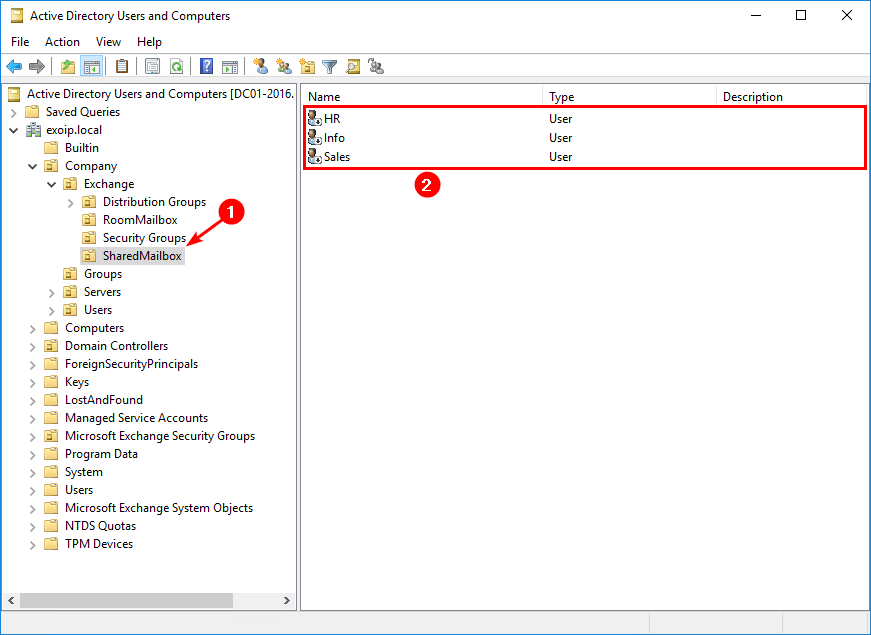
Have a look at Active Directory Users and Computers. The shared mailboxes in the CSV file are moved to another OU. In this case, the SharedMailbox OU.
Another check, but this time with PowerShell.
[PS] C:\>Get-Mailbox -Filter {RecipientTypeDetails -eq "SharedMailbox"} | Select Name, SamAccountName, OrganizationalUnit

Name  SamAccountName OrganizationalUnit
----  -------------- ------------------
Sales sales          exoip.local/Company/Exchange/SharedMailbox
Info  info           exoip.local/Company/Exchange/SharedMailbox
HR    hr             exoip.local/Company/Exchange/SharedMailbox
Everything is looking great. Did this help you to bulk move AD objects to another OU?
Read more: Create bulk mailboxes in Exchange Server with PowerShell »
Conclusion
In this article, you learned how to bulk move AD users to another OU with PowerShell. Download the Move-ADusers.ps1 PowerShell script, edit the CSV path, and the target OU. Run the script and verify that the AD objects are moved successfully to the new OU.
Did you enjoy this article? You may also like Change Users UPN with Powershell. Don’t forget to follow us and share this article.
Good stuff