How to install Exchange certificate with PowerShell? You already have a certificate and you want…
Recreate default receive connectors in Exchange Server
There are 5 default Exchange Server receive connectors on Exchange Server 2013/2016/2019. These receive connectors are automatically created when you install Exchange Server. Sometimes, you have to recreate the default receive connectors because you adjusted something, and mail flow isn’t working anymore. In this article, you will learn how to recreate the default receive connectors in Exchange Server.
Table of contents
Exchange Server default receive connectors
Exchange servers use receive connectors to control inbound SMTP connections from:
- Messaging servers that are external to the Exchange organization.
- Services in the transport pipeline on the local Exchange server or on remote Exchange servers.
- Email clients that need to use authenticated SMTP to send messages.
Read more about Exchange Server receive connectors:
- Exchange Server receive connector logging
- Configure anonymous SMTP relay in Exchange Server
- Copy receive connector to another Exchange Server
- Import remote IP addresses to Exchange receive connector
- Export remote IP addresses from Exchange receive connector
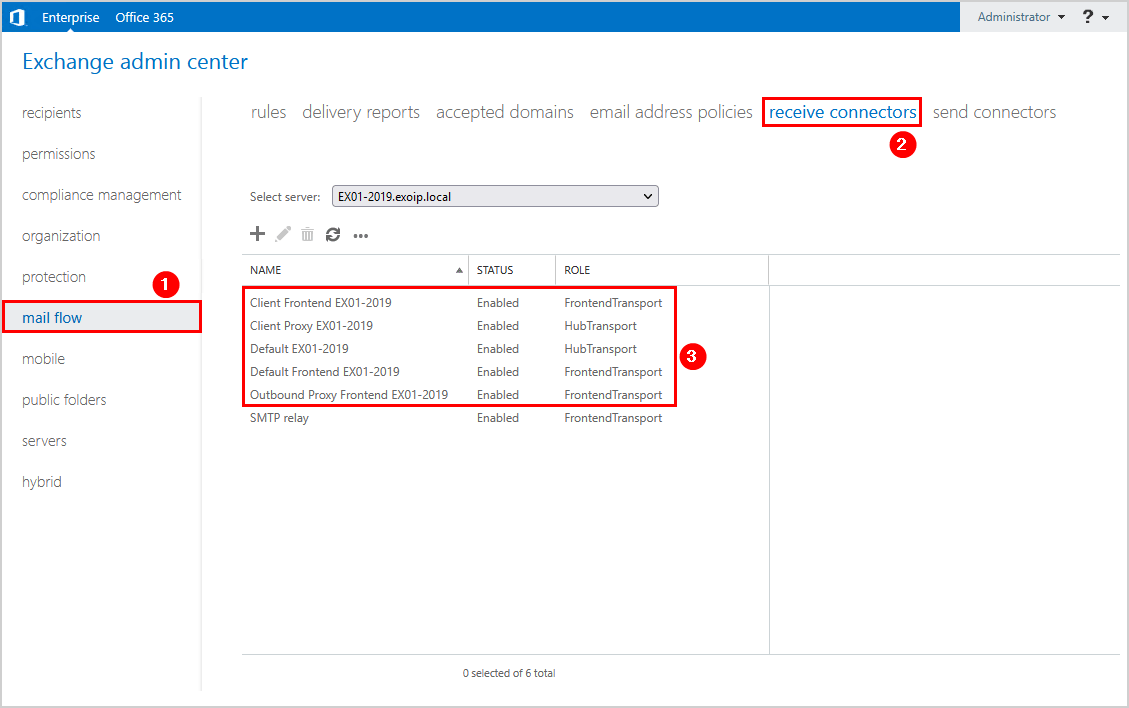
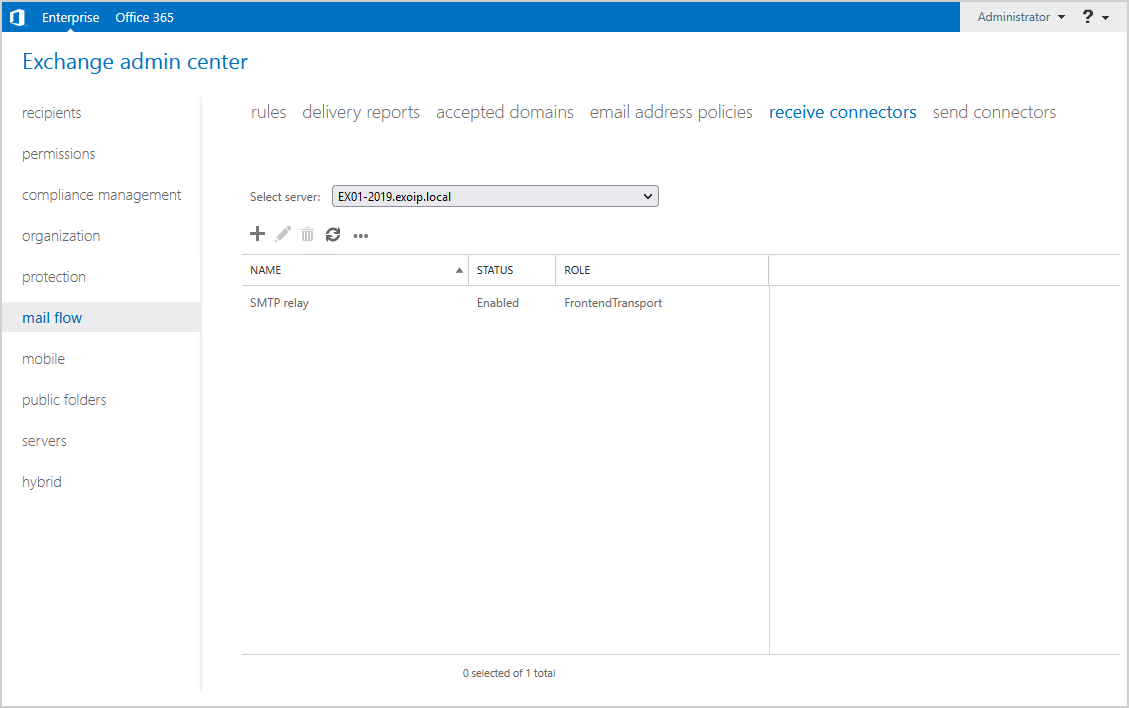
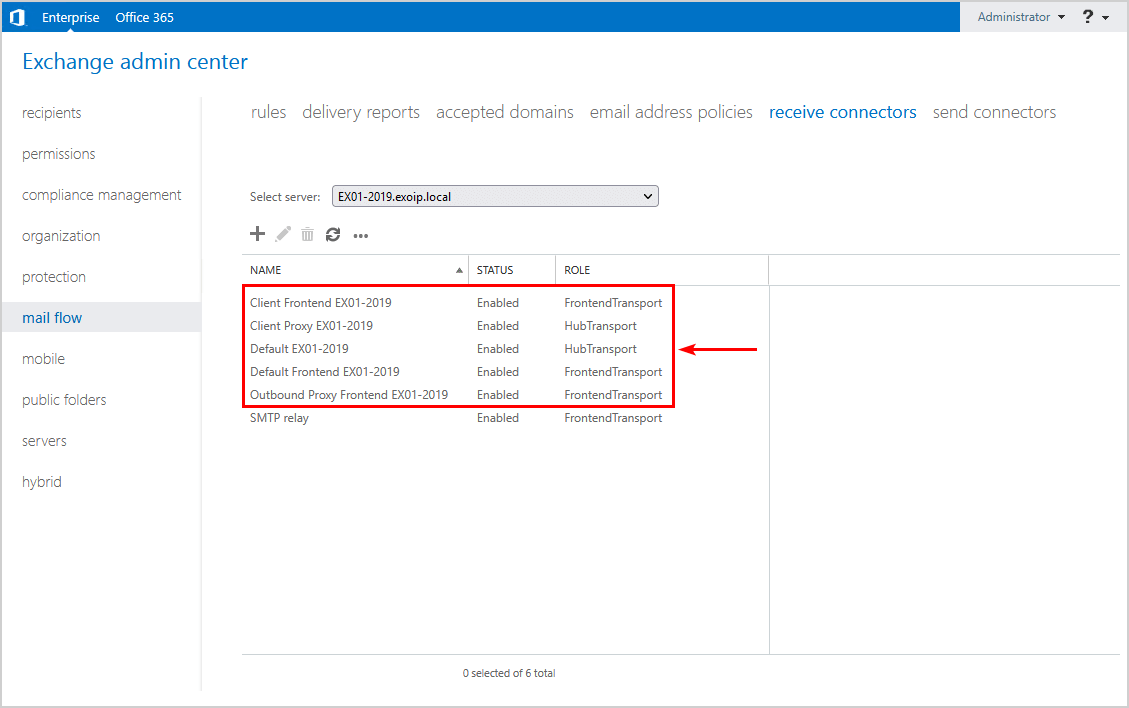
Let’s look at the receive connectors in Exchange Server. Sign in to Exchange admin center and navigate to mail flow > receive connectors.
The 5 default Exchange Server receive connectors on Exchange Server are:
- Client Frontend
- Client Proxy
- Default
- Default Frontend
- Outbound Proxy Frontend
Recreate default receive connectors
To recreate the default receive connectors in Exchange admin center, go through the below screens and ensure that you configure the same configuration for each receive connector.
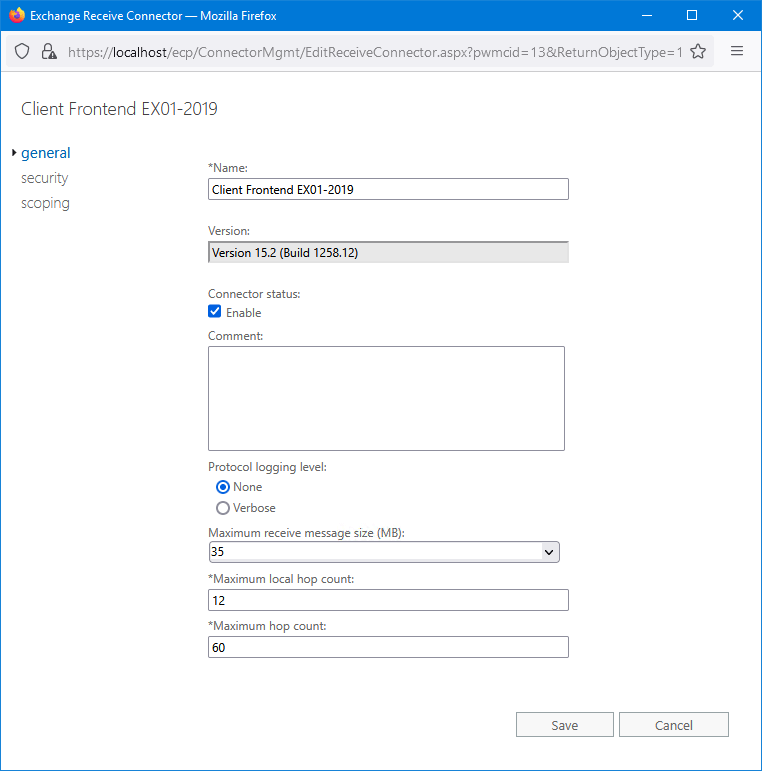
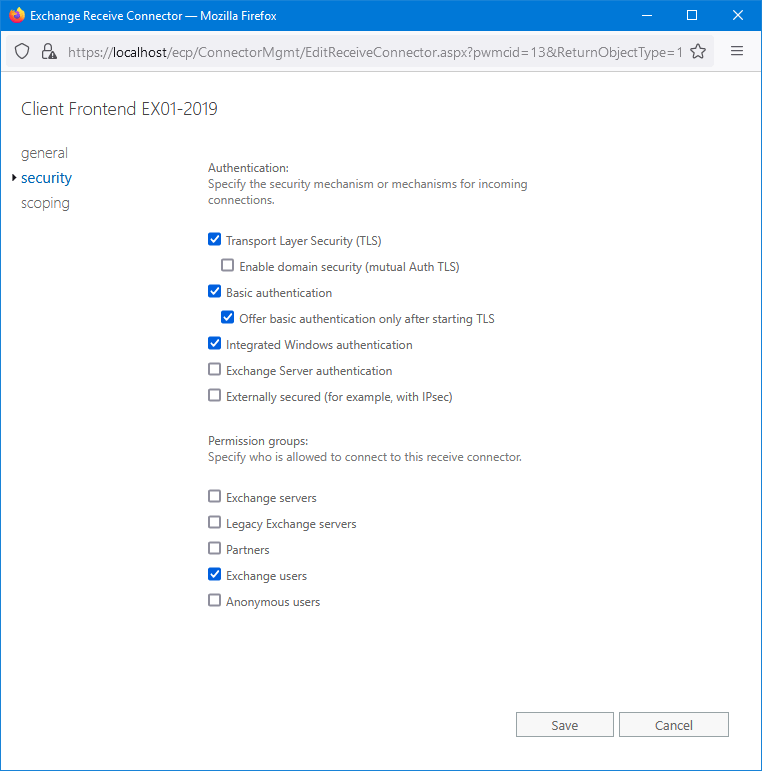
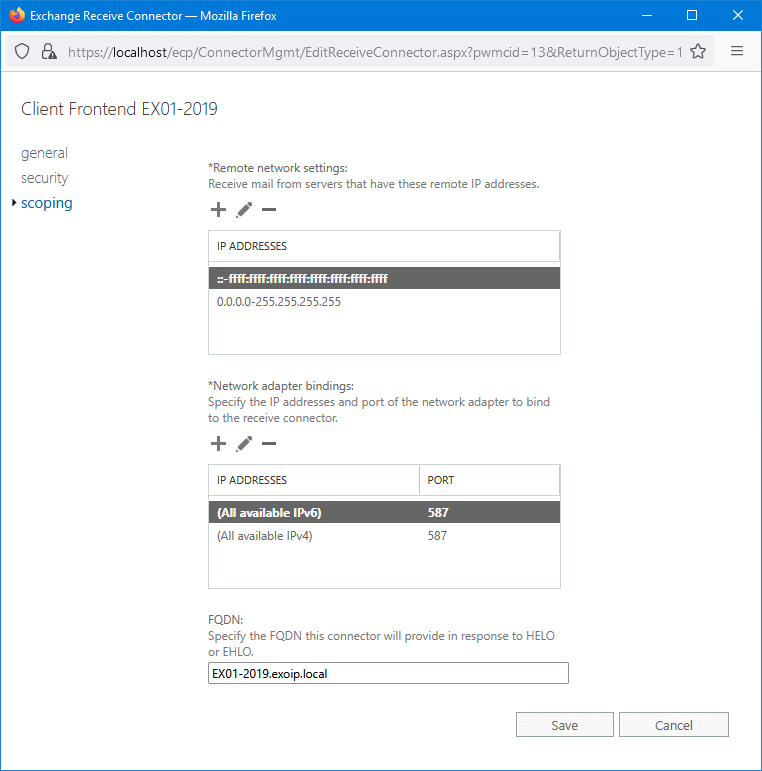
Client Frontend receive connector
To recreate the Client Frontend receive connector, go through the below configuration:
General
Security
Scoping
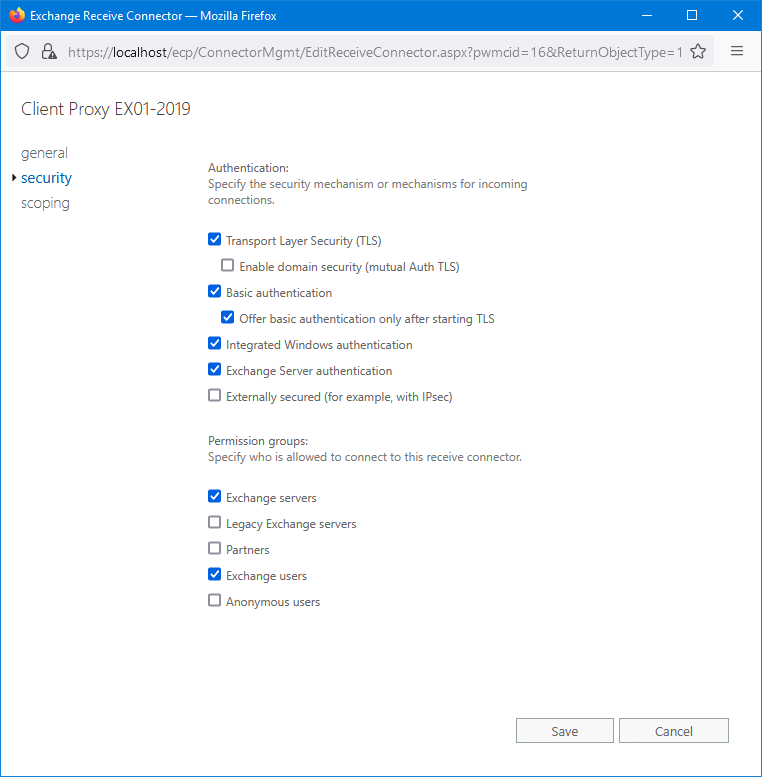
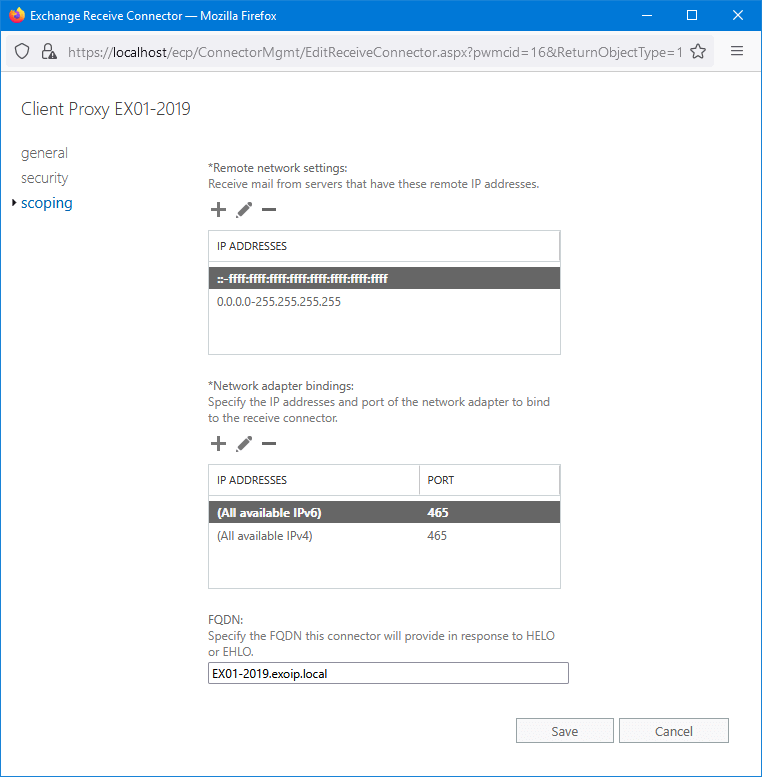
Client Proxy receive connector
To recreate the Client Proxy receive connector, go through the below configuration:
General

Security
Scoping
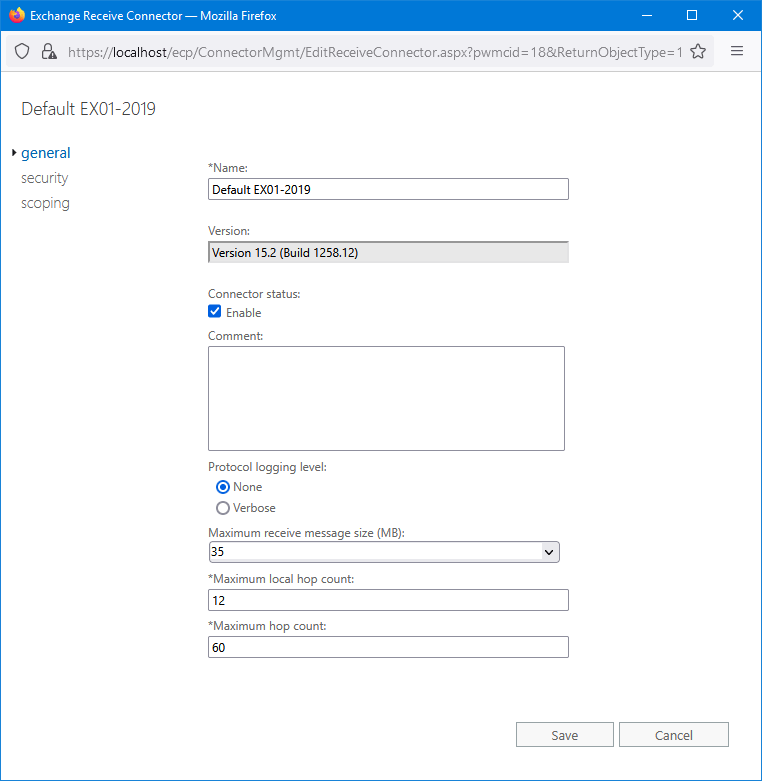
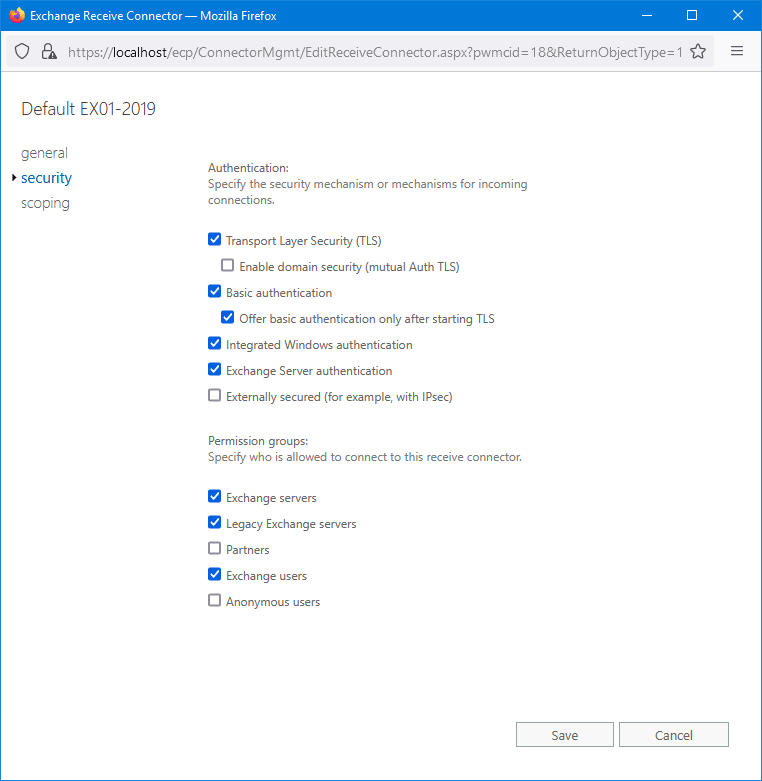
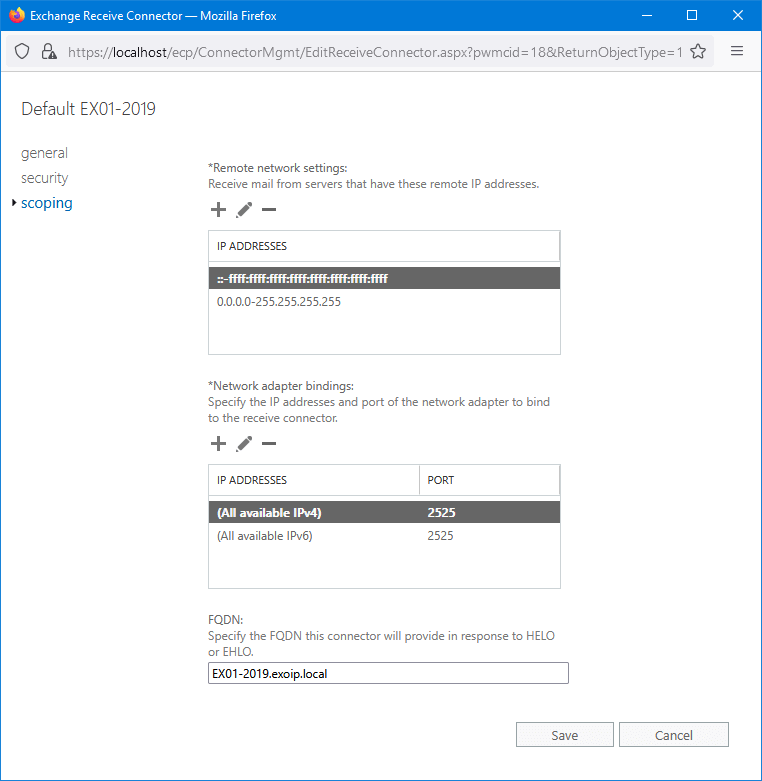
Default receive connector
To recreate the Default receive connector, go through the below configuration:
General
Security
Scoping
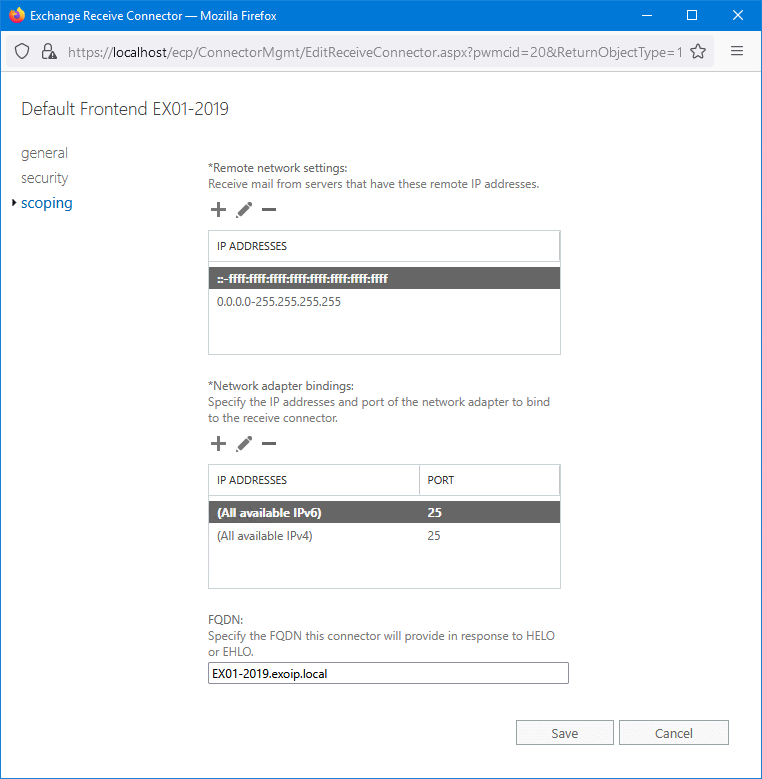
Default Frontend receive connector
To recreate the Default Frontend receive connector, go through the below configuration:
General
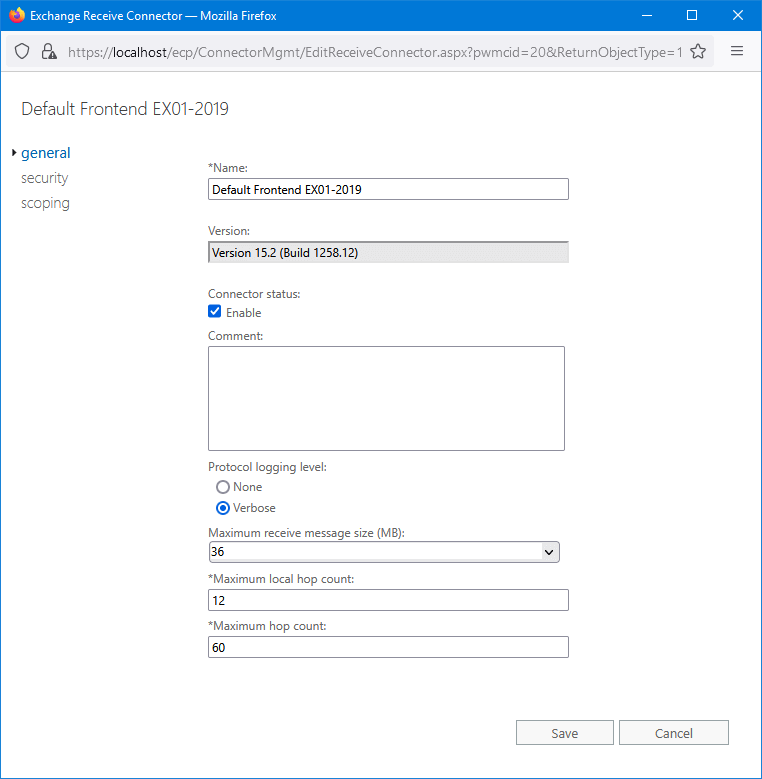
Security
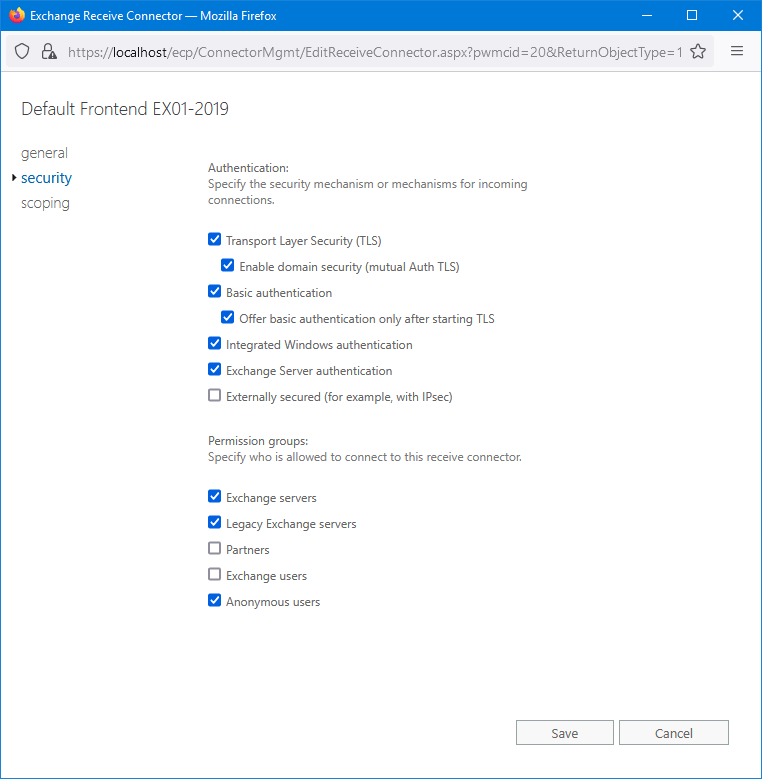
Scoping
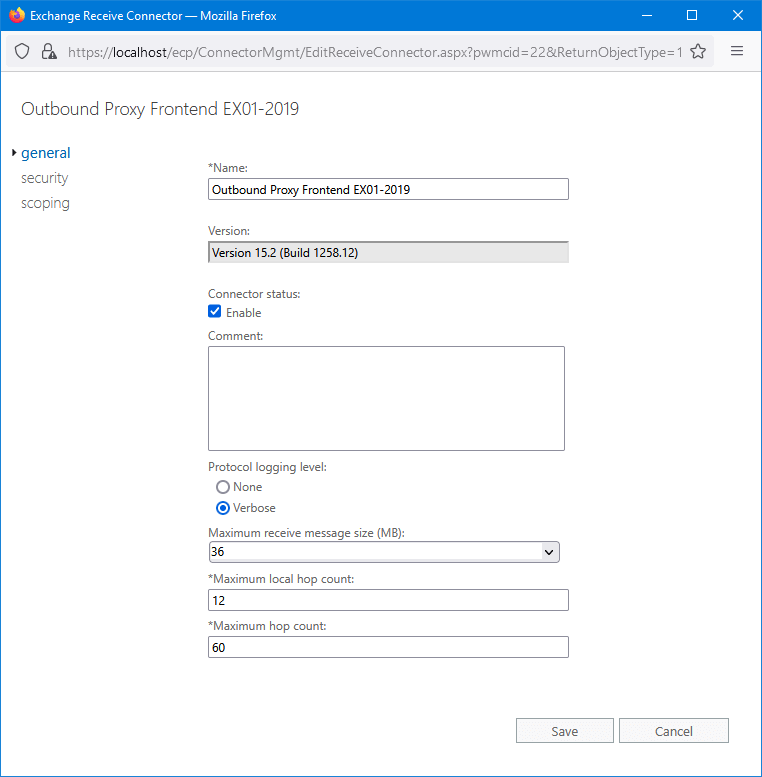
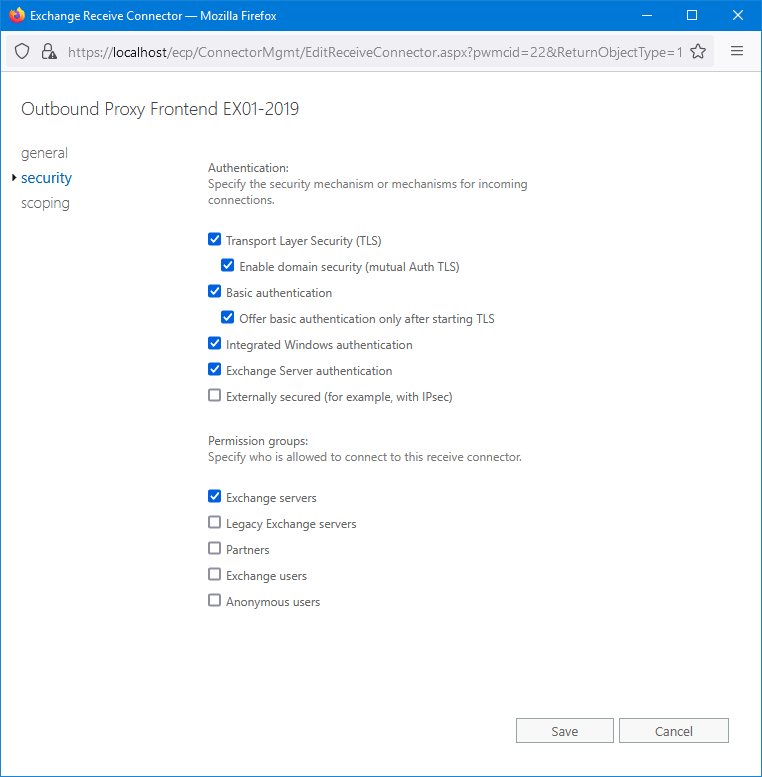
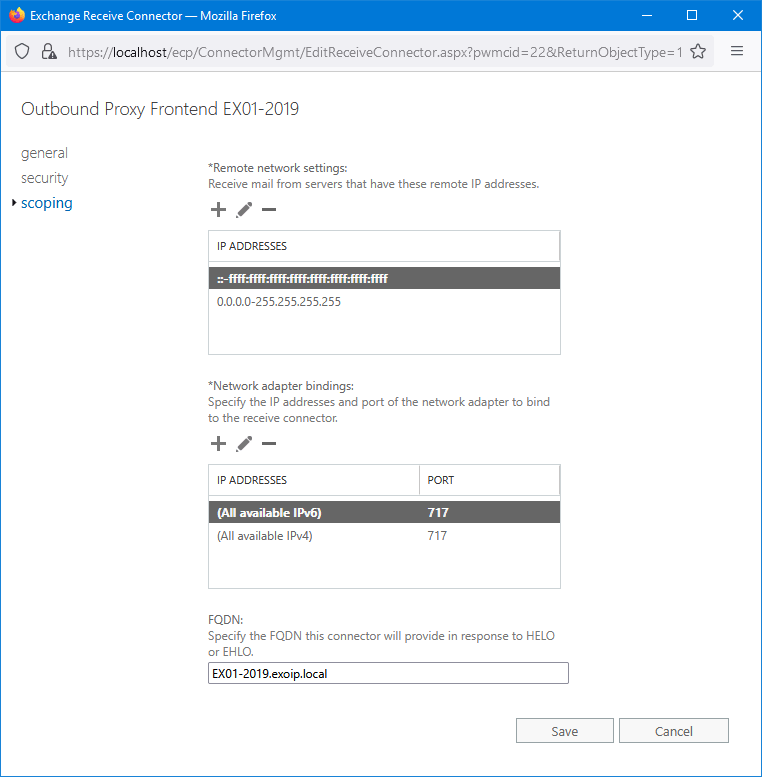
Outbound Proxy Frontend receive connector
To recreate the Outbound Proxy Frontend receive connector, go through the below configuration:
General
Security
Scoping
In the next step, we will show how to recreate the default receive connectors with a PowerShell script.
Recreate default receive connectors PowerShell script
To recreate the default receive connectors in Exchange Server with a PowerShell script, follow the below steps.
Step 1. Download Set-ReceiveConnectors PowerShell script
Download and place Set-ReceiveConnectors.ps1 PowerShell script on the Exchange Server C:\scripts folder. If you don’t have a scripts folder, create one.
Ensure the file is unblocked to prevent errors when running the script. Read more in the article Not digitally signed error when running PowerShell script.
Another option is to copy and paste the below code into Notepad. Give it the name Set-ReceiveConnectors.ps1 and place it in the C:\scripts folder.
<#
    .SYNOPSIS
    Set-ReceiveConnectors.ps1

    .DESCRIPTION
    Recreate the default Receive Connectors on the Exchange Server.

    .LINK
    www.alitajran.com/recreate-default-receive-connectors-exchange-server

    .NOTES
    Written by: ALI TAJRAN
    Website:    www.alitajran.com
    LinkedIn:   linkedin.com/in/alitajran

    .CHANGELOG
    V1.00, 09/25/2023 - Initial version
#>

# Specify the target server name
$serverName = "EX01-2019"

# Define IP Range
$range = "0.0.0.0-255.255.255.255", "::-ffff:ffff:ffff:ffff:ffff:ffff:ffff:ffff"

# Check if the server with the specified name exists
$targetServer = Get-ExchangeServer -Identity $serverName -ErrorAction SilentlyContinue

if ($targetServer) {
    # Define connector names
    $clientProxyConnectorName = "Client Proxy $serverName"
    $defaultFrontendConnectorName = "Default Frontend $serverName"
    $outboundProxyFrontendConnectorName = "Outbound Proxy Frontend $serverName"
    $clientFrontendConnectorName = "Client Frontend $serverName"
    $defaultConnectorName = "Default $serverName"

    # Check if each connector already exists
    $clientProxyConnectorExists = Get-ReceiveConnector | Where-Object { $_.Name -eq $clientProxyConnectorName -and $_.Server -eq $serverName }
    $defaultFrontendConnectorExists = Get-ReceiveConnector | Where-Object { $_.Name -eq $defaultFrontendConnectorName -and $_.Server -eq $serverName }
    $outboundProxyFrontendConnectorExists = Get-ReceiveConnector | Where-Object { $_.Name -eq $outboundProxyFrontendConnectorName -and $_.Server -eq $serverName }
    $clientFrontendConnectorExists = Get-ReceiveConnector | Where-Object { $_.Name -eq $clientFrontendConnectorName -and $_.Server -eq $serverName }
    $defaultConnectorExists = Get-ReceiveConnector | Where-Object { $_.Name -eq $defaultConnectorName -and $_.Server -eq $serverName }

    # Create connectors that do not already exist
    if (!$clientProxyConnectorExists) {
        New-ReceiveConnector -Name $clientProxyConnectorName `
            -Bindings 0.0.0.0:465, [::]:465 `
            -AuthMechanism Tls, Integrated, BasicAuth, BasicAuthRequireTLS, ExchangeServer `
            -RemoteIPRanges $range `
            -TransportRole HubTransport `
            -PermissionGroups ExchangeUsers, ExchangeServers `
            -MaxMessageSize 35MB -MessageRateLimit 5 -MessageRateSource User -EnableAuthGSSAPI $True `
            -Server $serverName
        Write-Host "Client Proxy Connector created successfully." -ForegroundColor Cyan
    }
    else {
        Write-Host "Client Proxy Connector already exists." -ForegroundColor Yellow
    }

    if (!$defaultFrontendConnectorExists) {
        New-ReceiveConnector -Name $defaultFrontendConnectorName `
            -Bindings 0.0.0.0:25, [::]:25 `
            -AuthMechanism Tls, Integrated, BasicAuth, BasicAuthRequireTLS, ExchangeServer `
            -RemoteIPRanges $range `
            -TransportRole FrontendTransport `
            -PermissionGroups AnonymousUsers, ExchangeServers, ExchangeLegacyServers `
            -MaxMessageSize 36MB -DomainSecureEnabled $True -ProtocolLoggingLevel Verbose `
            -Server $serverName
        Write-Host "Default Frontend Connector created successfully." -ForegroundColor Cyan
    }
    else {
        Write-Host "Default Frontend Connector already exists." -ForegroundColor Yellow
    }

    if (!$outboundProxyFrontendConnectorExists) {
        New-ReceiveConnector -Name $outboundProxyFrontendConnectorName `
            -Bindings 0.0.0.0:717, [::]:717 `
            -AuthMechanism Tls, Integrated, BasicAuth, BasicAuthRequireTLS, ExchangeServer `
            -RemoteIPRanges $range `
            -TransportRole FrontendTransport `
            -PermissionGroups ExchangeServers `
            -MaxMessageSize 36MB -DomainSecureEnabled $True -ProtocolLoggingLevel Verbose `
            -Server $serverName
        Write-Host "Outbound Proxy Frontend Connector created successfully." -ForegroundColor Cyan
    }
    else {
        Write-Host "Outbound Proxy Frontend Connector already exists." -ForegroundColor Yellow
    }

    if (!$clientFrontendConnectorExists) {
        New-ReceiveConnector -Name $clientFrontendConnectorName `
            -Bindings 0.0.0.0:587, [::]:587 `
            -AuthMechanism Tls, Integrated, BasicAuth, BasicAuthRequireTLS `
            -RemoteIPRanges $range `
            -TransportRole FrontendTransport `
            -PermissionGroups ExchangeUsers `
            -MaxMessageSize 35MB -MessageRateLimit 5 -MessageRateSource User -EnableAuthGSSAPI $True `
            -Server $serverName
        Write-Host "Client Frontend Connector created successfully." -ForegroundColor Cyan
    }
    else {
        Write-Host "Client Frontend Connector already exists." -ForegroundColor Yellow
    }

    if (!$defaultConnectorExists) {
        New-ReceiveConnector -Name $defaultConnectorName `
            -Bindings [::]:2525, 0.0.0.0:2525 `
            -AuthMechanism Tls, Integrated, BasicAuth, BasicAuthRequireTLS, ExchangeServer `
            -RemoteIPRanges $range `
            -TransportRole HubTransport `
            -PermissionGroups ExchangeUsers, ExchangeServers, ExchangeLegacyServers `
            -MaxMessageSize 35MB -MaxInboundConnectionPerSource Unlimited `
            -MaxInboundConnectionPercentagePerSource 100 -MaxRecipientsPerMessage 5000 `
            -SizeEnabled EnabledWithoutValue -Server $serverName
        Write-Host "Default Connector created successfully." -ForegroundColor Cyan
    }
    else {
        Write-Host "Default Connector already exists." -ForegroundColor Yellow
    }

}
else {
    Write-Host "Server '$serverName' not found. Please provide a valid Exchange Server name." -ForegroundColor Red
}- Line 21: Change to your Exchange Server name.
Step 2. Remove the default receive connectors
It’s important to remove the default receive connector you want to recreate. Suppose you only want to recreate one of them, then only remove that specific default receive connector.
In our example, we will remove all the default receive connectors because we like to recreate them all.
Step 3. Run the Set-ReceiveConnector PowerShell script
Start Exchange Management Shell as administrator. Change the path to the scripts folder. Run the PowerShell script to recreate the default receive connectors.
[PS] C:\> cd c:\scripts
[PS] C:\scripts> .\Set-ReceiveConnectors.ps1
The script will show if:
- If the default receive connector already exists, it will move on to the next default receive connector.
- If the default receive connector does not exist, it will create a new default receive connector with the correct settings.
- If the wrong Exchange Server name is set, the script will show that you need to enter a valid Exchange Server name.
Client Proxy Connector created successfully.
Default Frontend Connector created successfully.
Outbound Proxy Frontend Connector created successfully.
Client Frontend Connector created successfully.
Default Connector created successfully.
Step 4. Verify default receive connectors
Verify that the default receive connectors are successfully created in Exchange Server.
That’s it!
Read more: Configure postmaster address in Exchange Server »
Conclusion
You learned how to recreate default receive connectors in Exchange Server. If you have issues with inbound mail flow or made changes to the default Exchange Server receive connectors and want to set it back to its original configuration, recreate them. Recreate the receive connectors in Exchange admin center or with the PowerShell script.
Did you enjoy this article? You may also like Find IP addresses using Exchange SMTP relay. Don’t forget to follow us and share this article.
What Others Are Reading

As always, thank you for your expertise!